
In the last vCAC entry we covered how to setup EC2 and deploy machines to it. It doesn’t seem fair to leave VMware’s first party cloud out of the fun, right? In the spirit of being fair and balanced I set out to do a provisioning test on vCHS.
The great news here is that vCHS is a vCD platform. All of the vCD plumbing still works with a minor exception at the end of the chain during the provisioning process (more on this later). We already covered the required foundation bits of a vCAC implementation, so let’s just take a look at the vCHS implementation. First, the endpoint:
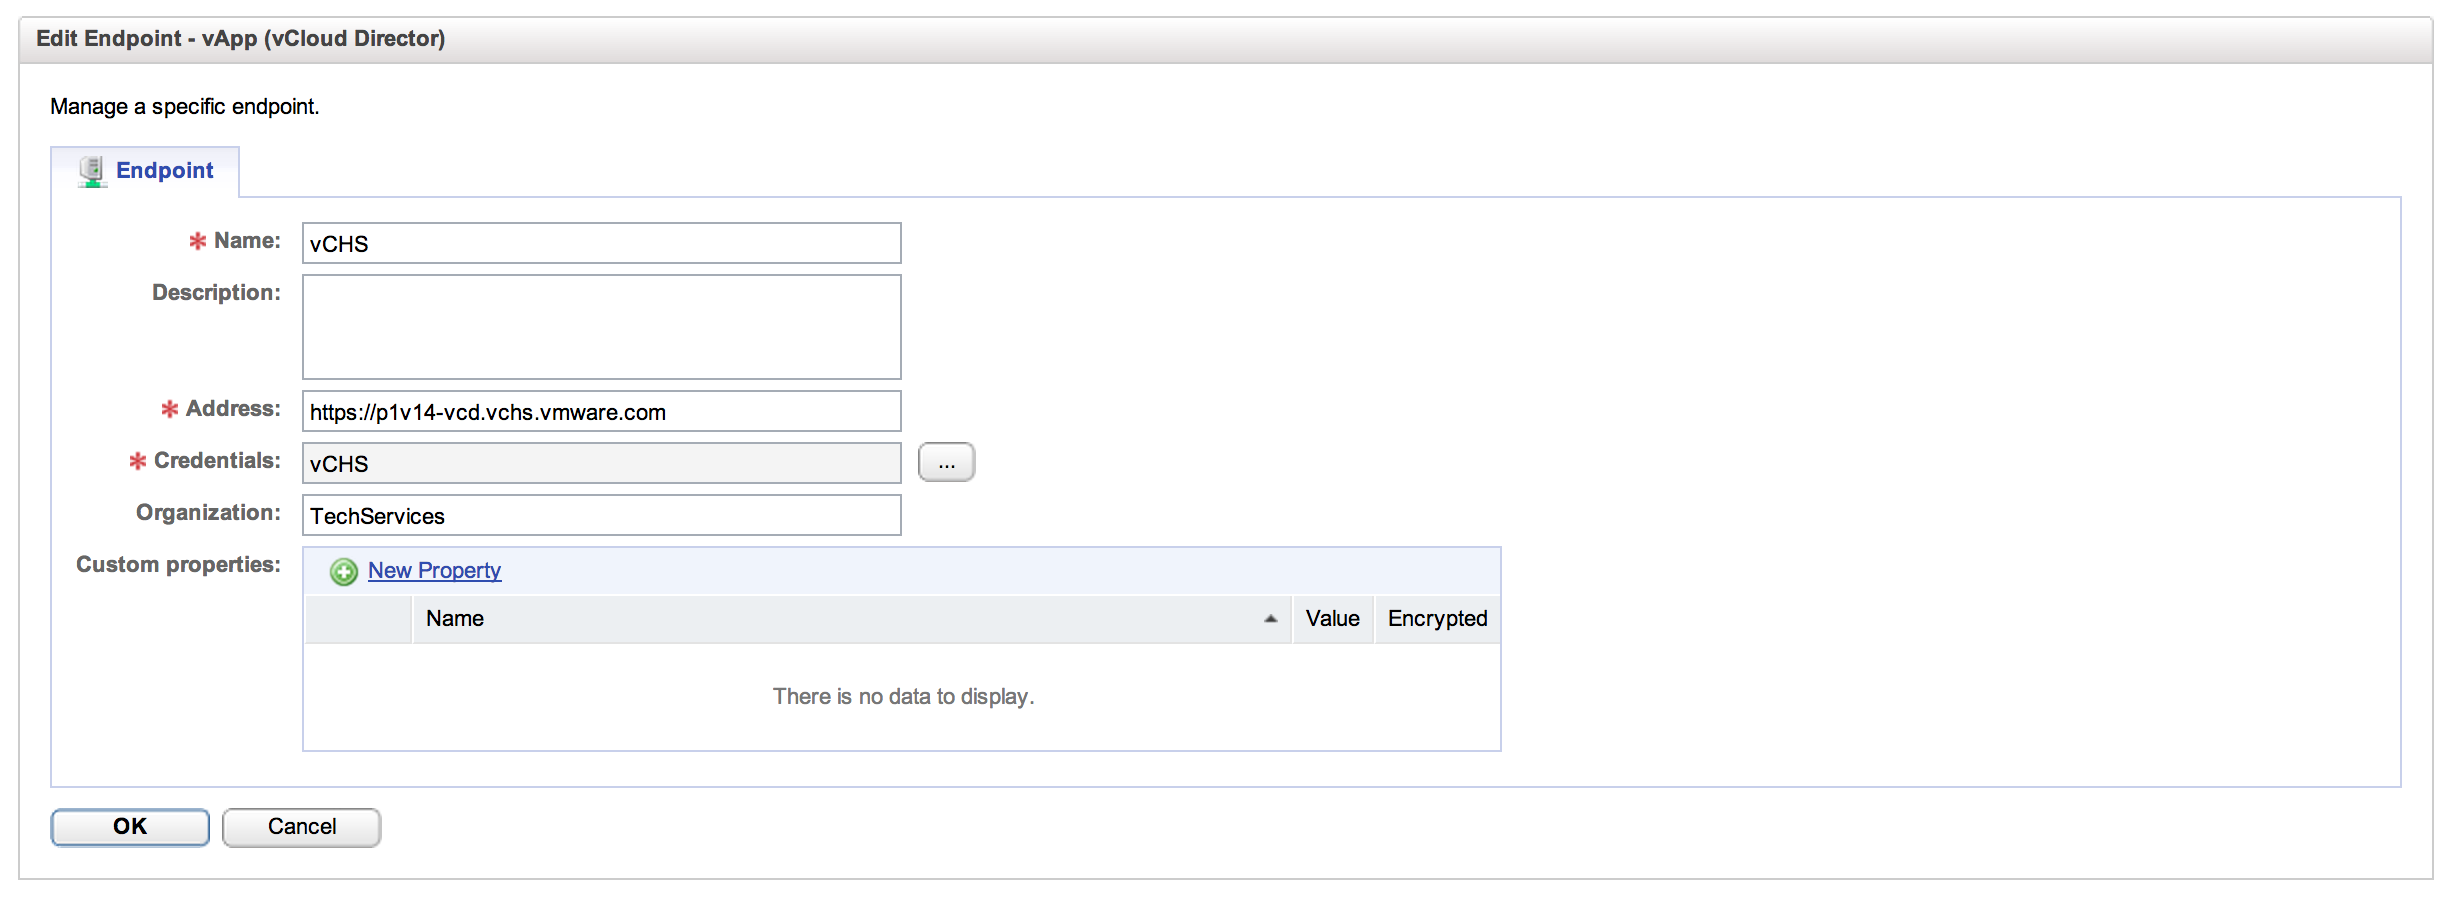
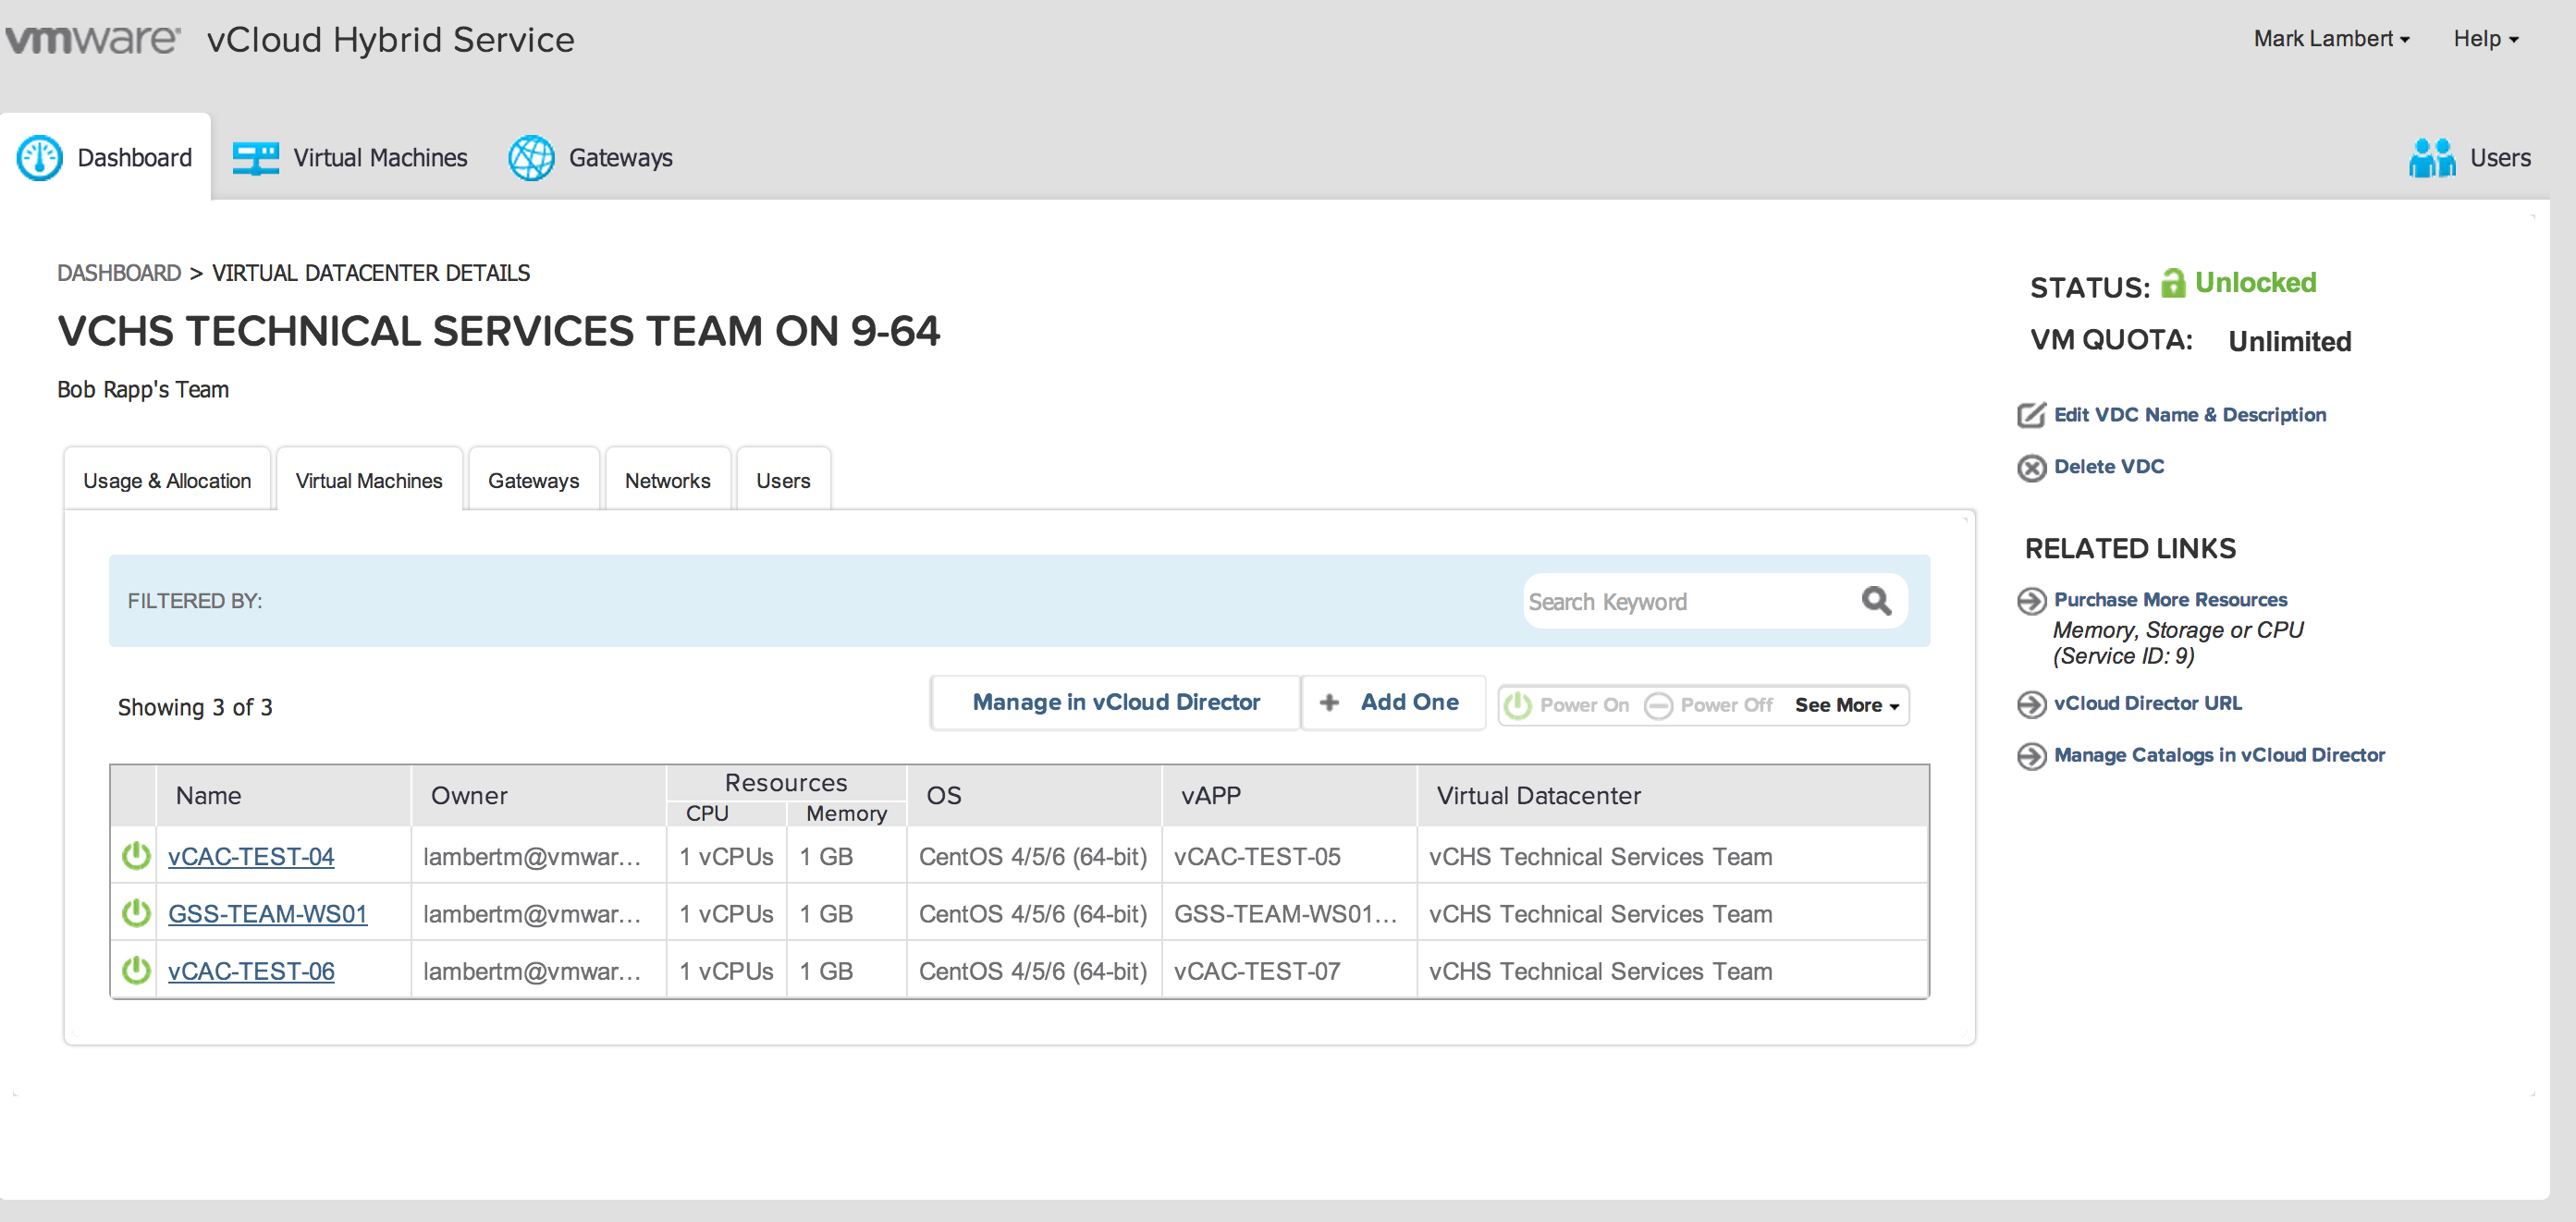
Straightforward stuff here. For address, you want the URL of your tenant, but only the FQDN (no path). This can be found in the vCHS UI on the right hand panel off of the Dashboard tab:

So we drop the /cloud/org/[org] part and just use the FQDN for the address – pXvY-vcd.vchs.vmware.com. Our tenant designation, in my case “TechServices” is your Organization identifier and should be entered in that field in vCAC. It is worth noting here that I have access to an Org vDC in a Dedicated Cloud instance in vCHS, so these examples assume that tenant configuration. Any differences resulting from a Virtual Private Cloud tenant, and the distinction between the two flavors of tenancy, are out of the scope of this entry.
The other important component of the end point is the credentials entity. For vCHS we created a set of credentials that obviously match our vCHS login info:
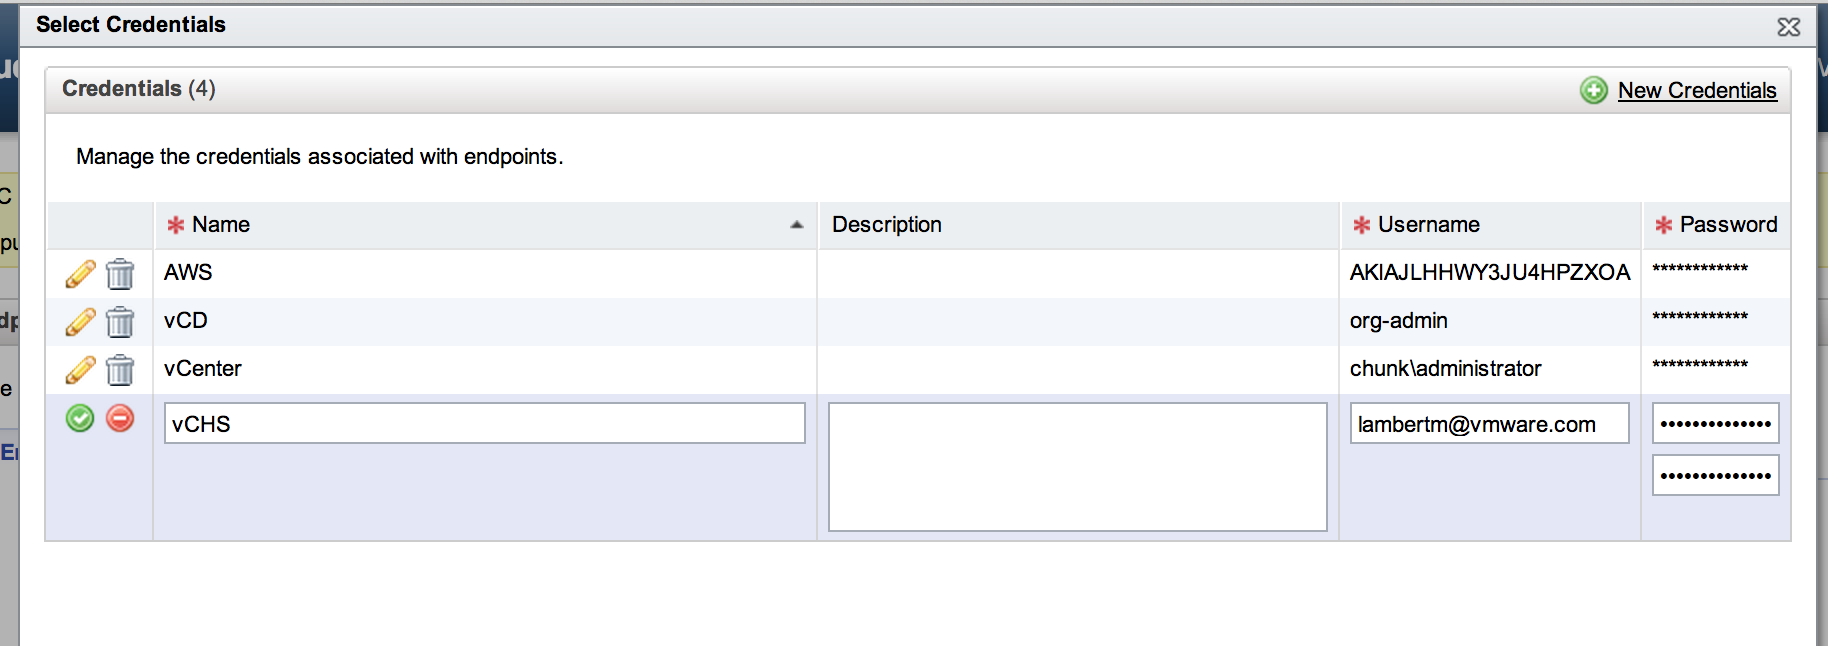
For vCHS this is going to be name@domain and is not going to match your identity management infrastructure for your vCAC implementation (which will be Active Directory). There is a broader question here about identity federation and how to map vCAC users to service endpoint users. Right now there is no actual federation happening.
One way to manage this for now would be to establish multiple public service End Points , configured with the credentials of users who have been given sufficient authorization in the public cloud services to provision resources, and then establish Enterprise Groups, Provisioning Groups and Blueprints associated with each of these. If you think about the mission of vCAC, it is to centrally entitle resources to end-users and both control and monitor their consumption of those resources. On premise there is generally a global identity that identifies each user. At the very least there will be at least one central directory, Active Directory in this case, that vCAC can reference for entitlements and authorization. For external systems, which each have their own native identity and access management, the ideal state would obviously be federation. A way to map the on premise directory, via SAML for example, to the services identity store. Identity management remains really one of the toughest challenges for cloud implementations . In the absence of proper federation, there are some alternate approaches that can help us reach our end-goal of authorizing resource consumption for services that aren’t “speaking the same identity language”.
Let’s take the example of a software company (Big Games Inc) that has multiple design studios. One of these studios, “Studio X”, has approval to use both AWS and vCHS. They have workflows already in mind, and cost structures calculated, that can be implemented in vCAC to set the rules for what can be self-service provisioned, by whom, and under what circumstances. Lot’s of variables can factor into this including compliance rules, resource cost, technical complexity, etc. The workflow designer is used to put these business rules into play. The workflow component is super interesting, and very powerful, but is also out of scope for this entry. For our purposes lets assume that the vCAC Admin at Big Games has worked with the business line IT at Studio X to lay this groundwork. Now within Studio X, there will be a business line IT admin who has the authority to provision services on behalf of the business unit. There may also be delegated administration based on task, team or project. Within vCHS each of these administrative users will have been granted either infrastructure and/or network administration rights based on what resources they are entitled to deploy, or possibly even subscription administrator rights if they are authorized to request additional capacity. Within EC2 IAM has almost surely would have been used to set access control to the various AWS services at a granular level for different users using IAM policies.
Ultimately it is typically a limited set of users who are likely to be able to request new infrastructure from the public cloud services. The approach being suggested here for vCAC is that for each of these business unit admins, an end point would be defined using their credentials and then mapped ultimately to a set of blueprints that fit the use cases they would represent. Individual users could be entitled by that administrative user to access their blueprints as consumers. The workflow would be the gating factor on who sees what at what time. It is still a kind of identity proxy linkage, and clearly not as clean as real federation, but it can be made to work. I plan to do a deeper dive into the business process integration aspects of vCAC, and workflow definition, at some point down the road.
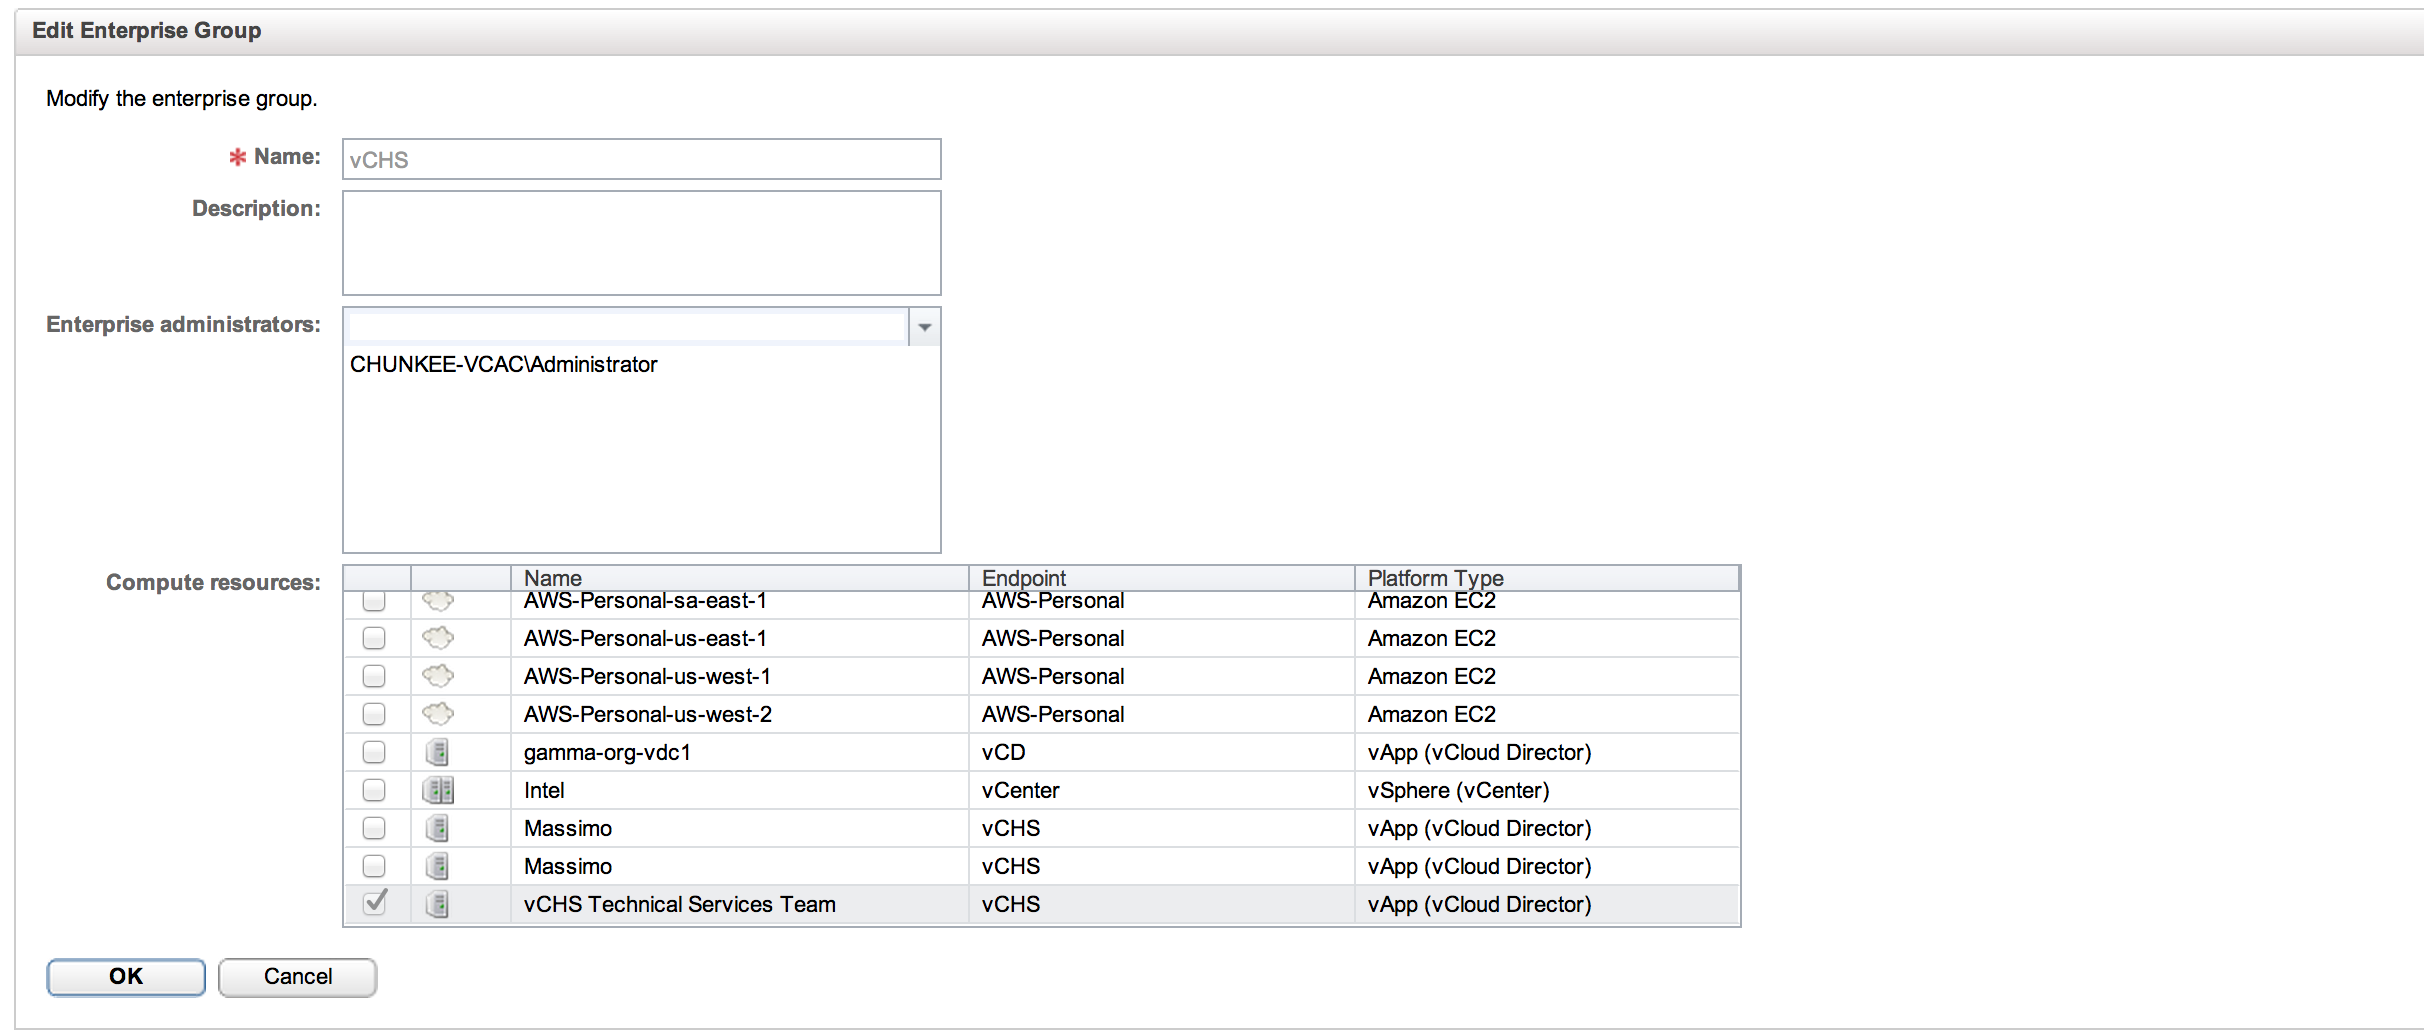
For our simple lab scenario, we will stick with one uber admin user who can ask for anything from any service. Drunk on power, this uber admin has already deployed EC2 machines and is now ready to get dangerous on vCHS. Everything we covered under the EC2 entry still applies. We have our end-point in place and Enterprise Group created. Below we can see the Enterprise Group with the resource provider for our tenant selected:
With our End Point successfully connected and associated with an Enterprise Group, it’s time to set a vCHS Reservation. This is an area where vCHS diverges a bit from EC2. With vCHS, as with vCD or vCenter, the concept of resource pools from which you would reserve capacity is valid. Within EC2, the “atomic unit” is an instance, not the component parts of an instance. So when we set our EC2 reservation, we are setting the number of instances that can be provisioned, the size and number of EBS volumes, etc. All of the standard EC2 components can be throttled. With vCHS (or vCD) we are reserving a chunk of the resource capacity in terms of RAM, compute and storage. Heading over to the Enterprise Administrator menu in the admin portal let’s take a look:
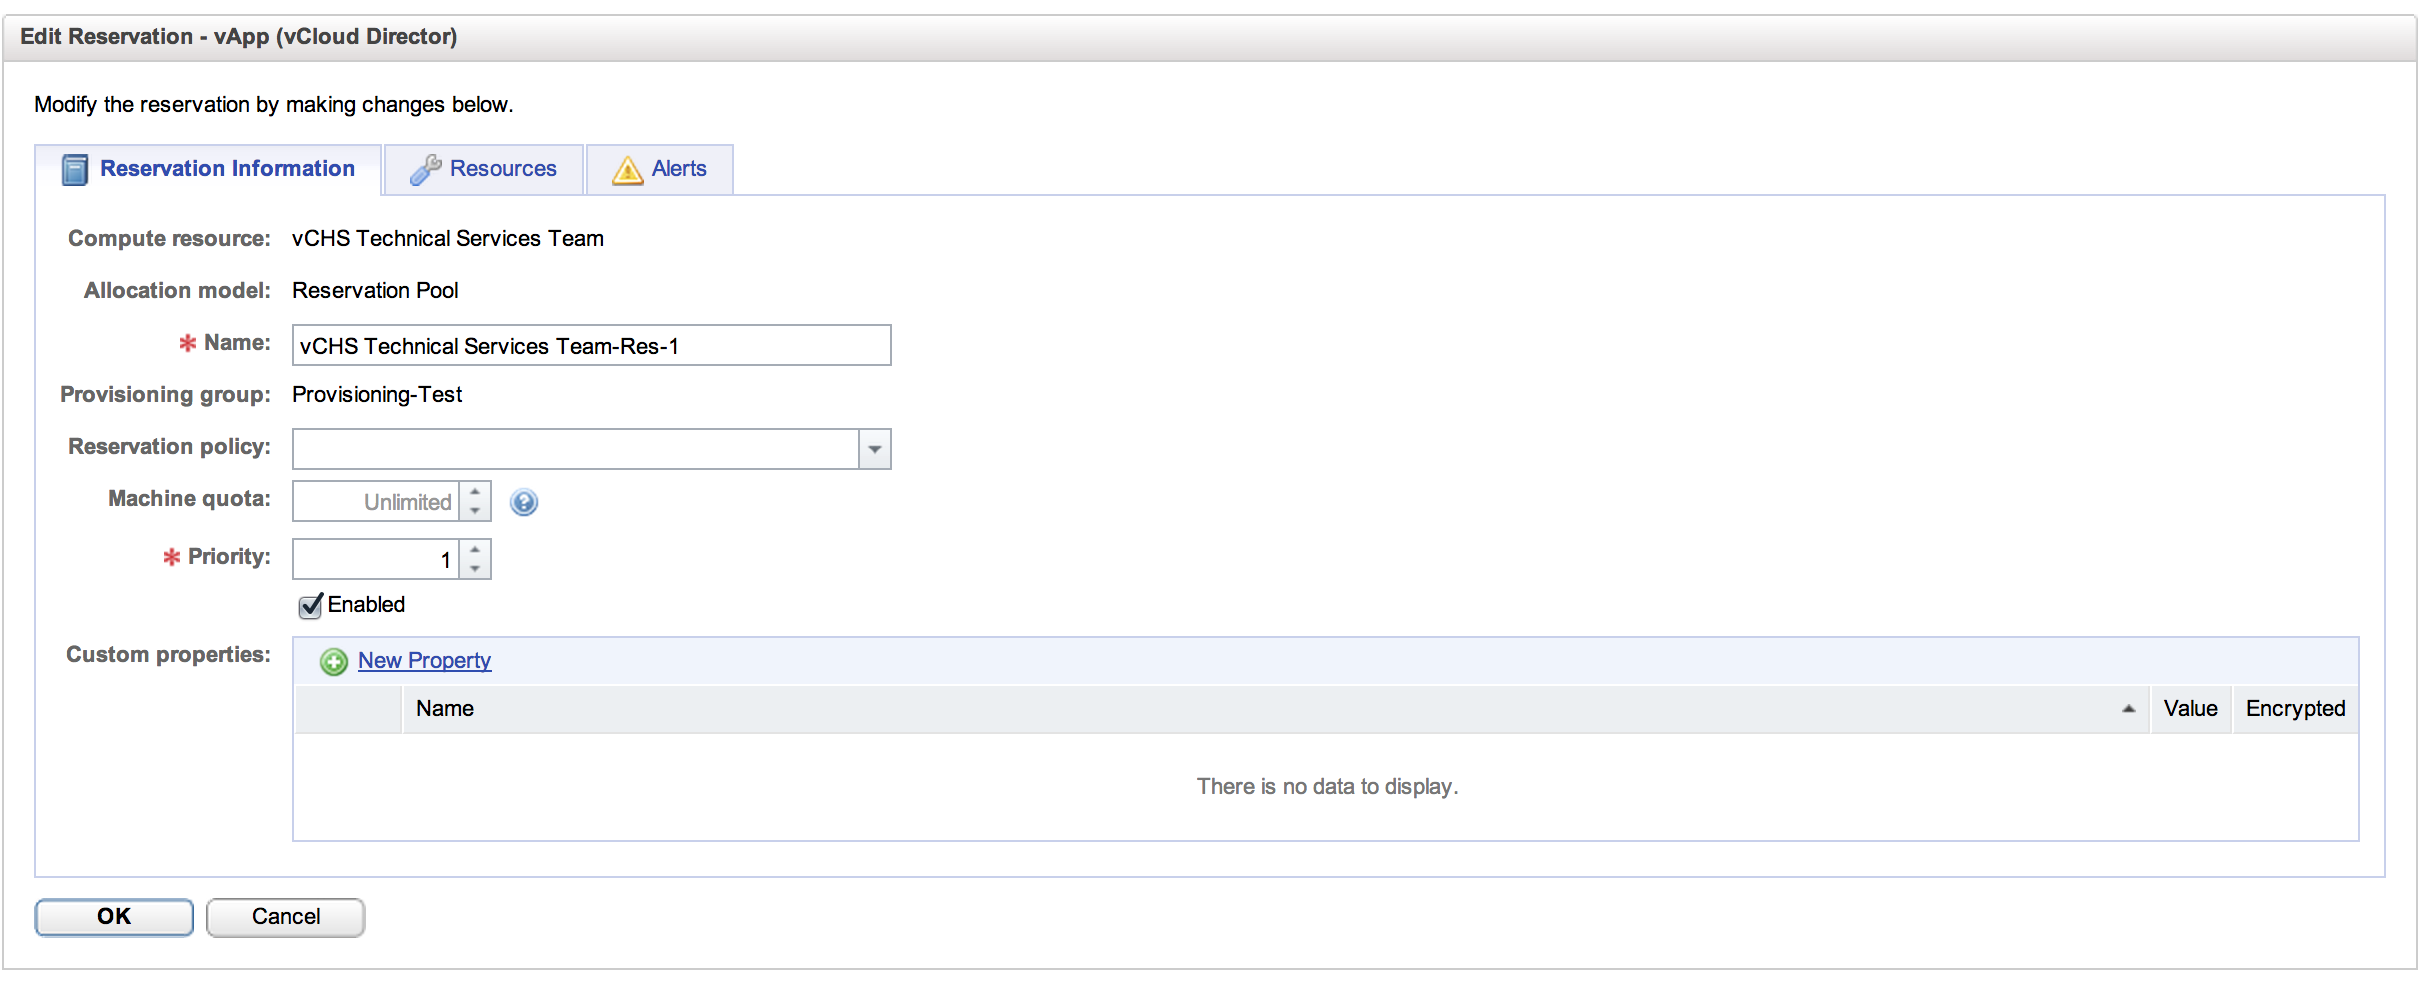
Here we can see the basics of the Reservation Pool. At the least we need a name, machine quota and priority, but we can also add Custom Properties or set a Reservation Policy. It is in these latter two that the power of the workflows comes into play, but again we’ll save that for future discussions. For now, this is all we need for this tab, so let’s move on to Resources:
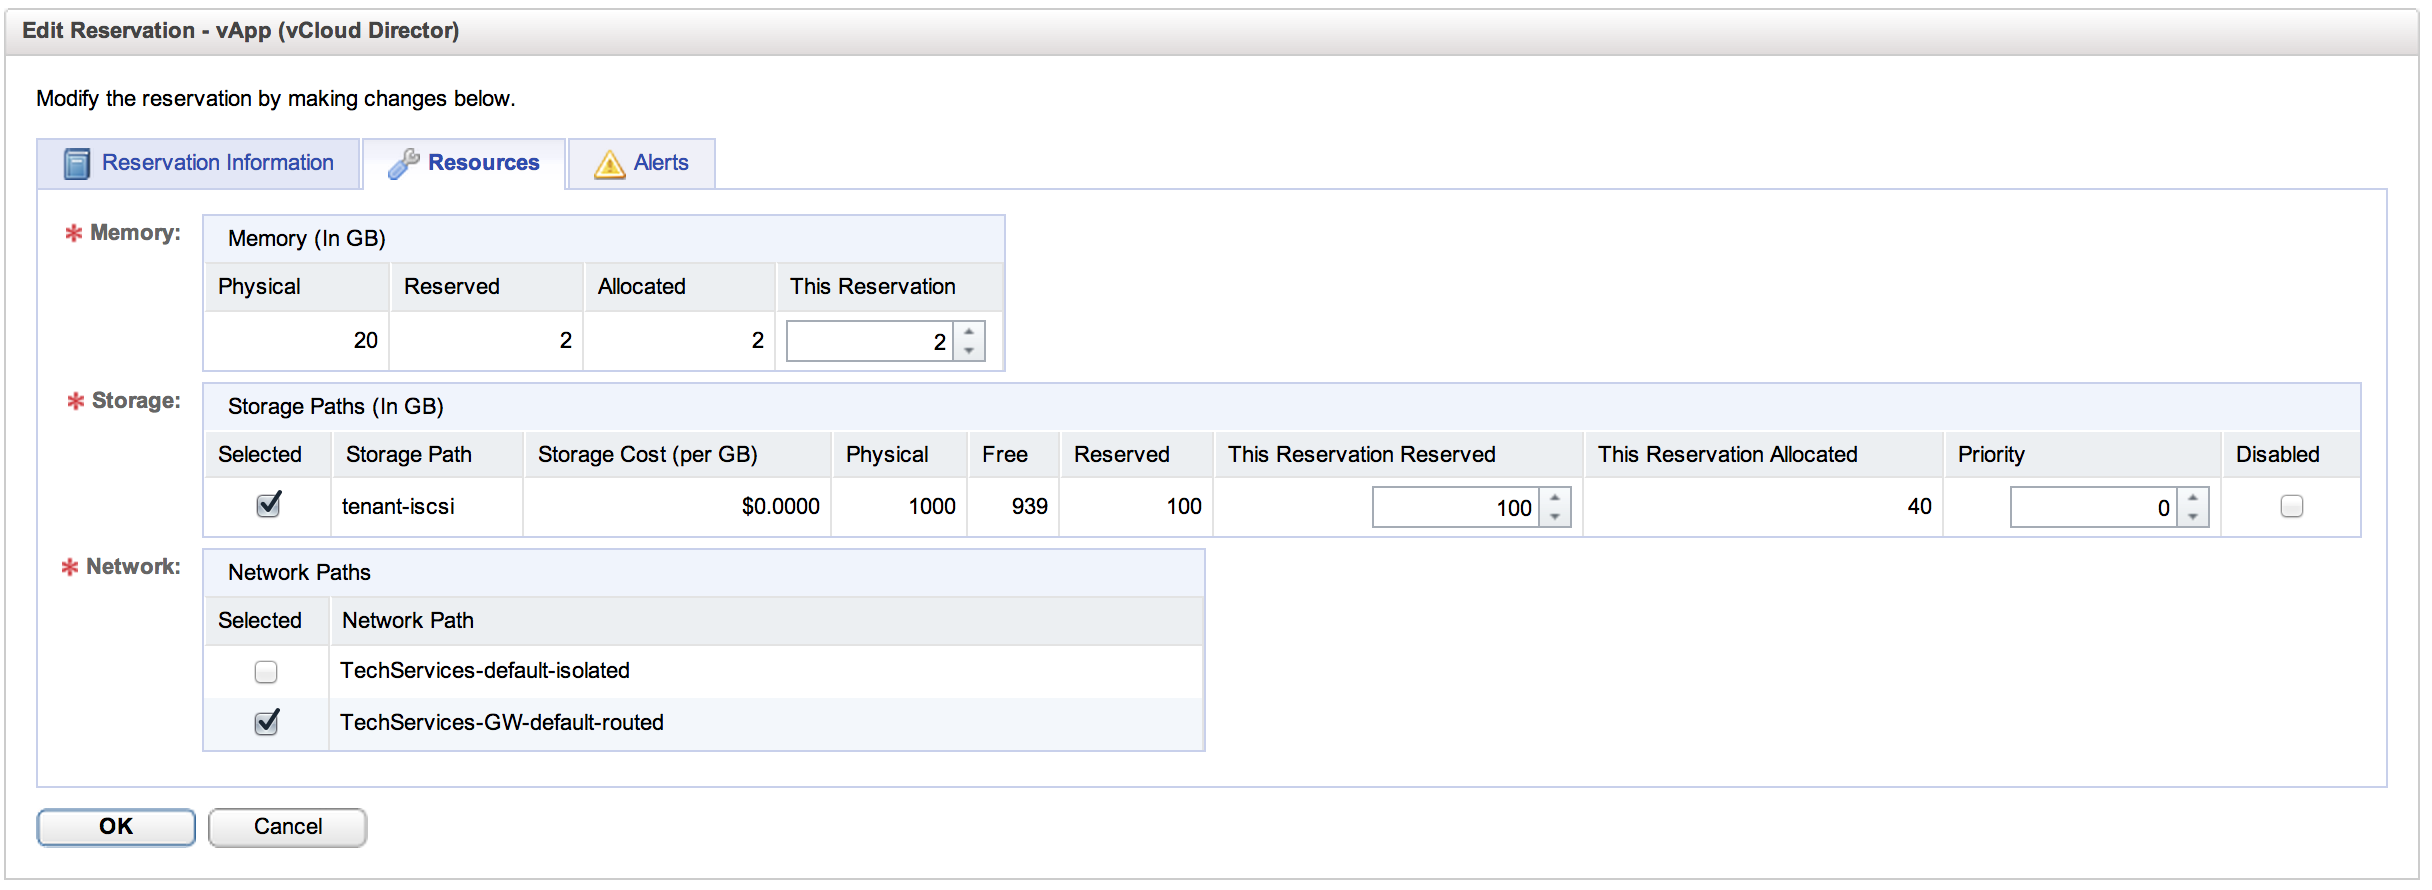
This is where things get fun. As you can see, we are going to allocate chunks of the total available resources, by resource domain, within our tenant to this reservation pool. I am setting here that this resource pool is good for a 2GB chunk of our 20GB of RAM and a 100GB chunk of our 900GB of storage. I am also setting which org vDC network machines provisioned from this resource pool will attach to. This will be familiar to anyone who has take a look at vCHS. For anyone who hasn’t, I encourage you to head over to services Home on the Web and take a look.
With our resources reserved, it is time to build some Blueprints. Again, this is an area where vCHS diverges from EC2 because of the structure of vCD. With vCHS/vCD, we can build blueprints either for vApps (associated collections of related virtual machines that share common metadata for anyone who doesn’t remember) and vApp components (the configuration for the component parts of the vApps). Let’s take a look at our two vCHS blueprints. First up, the vApp Component (before we can build the container, we have to define what we will be putting in the container):
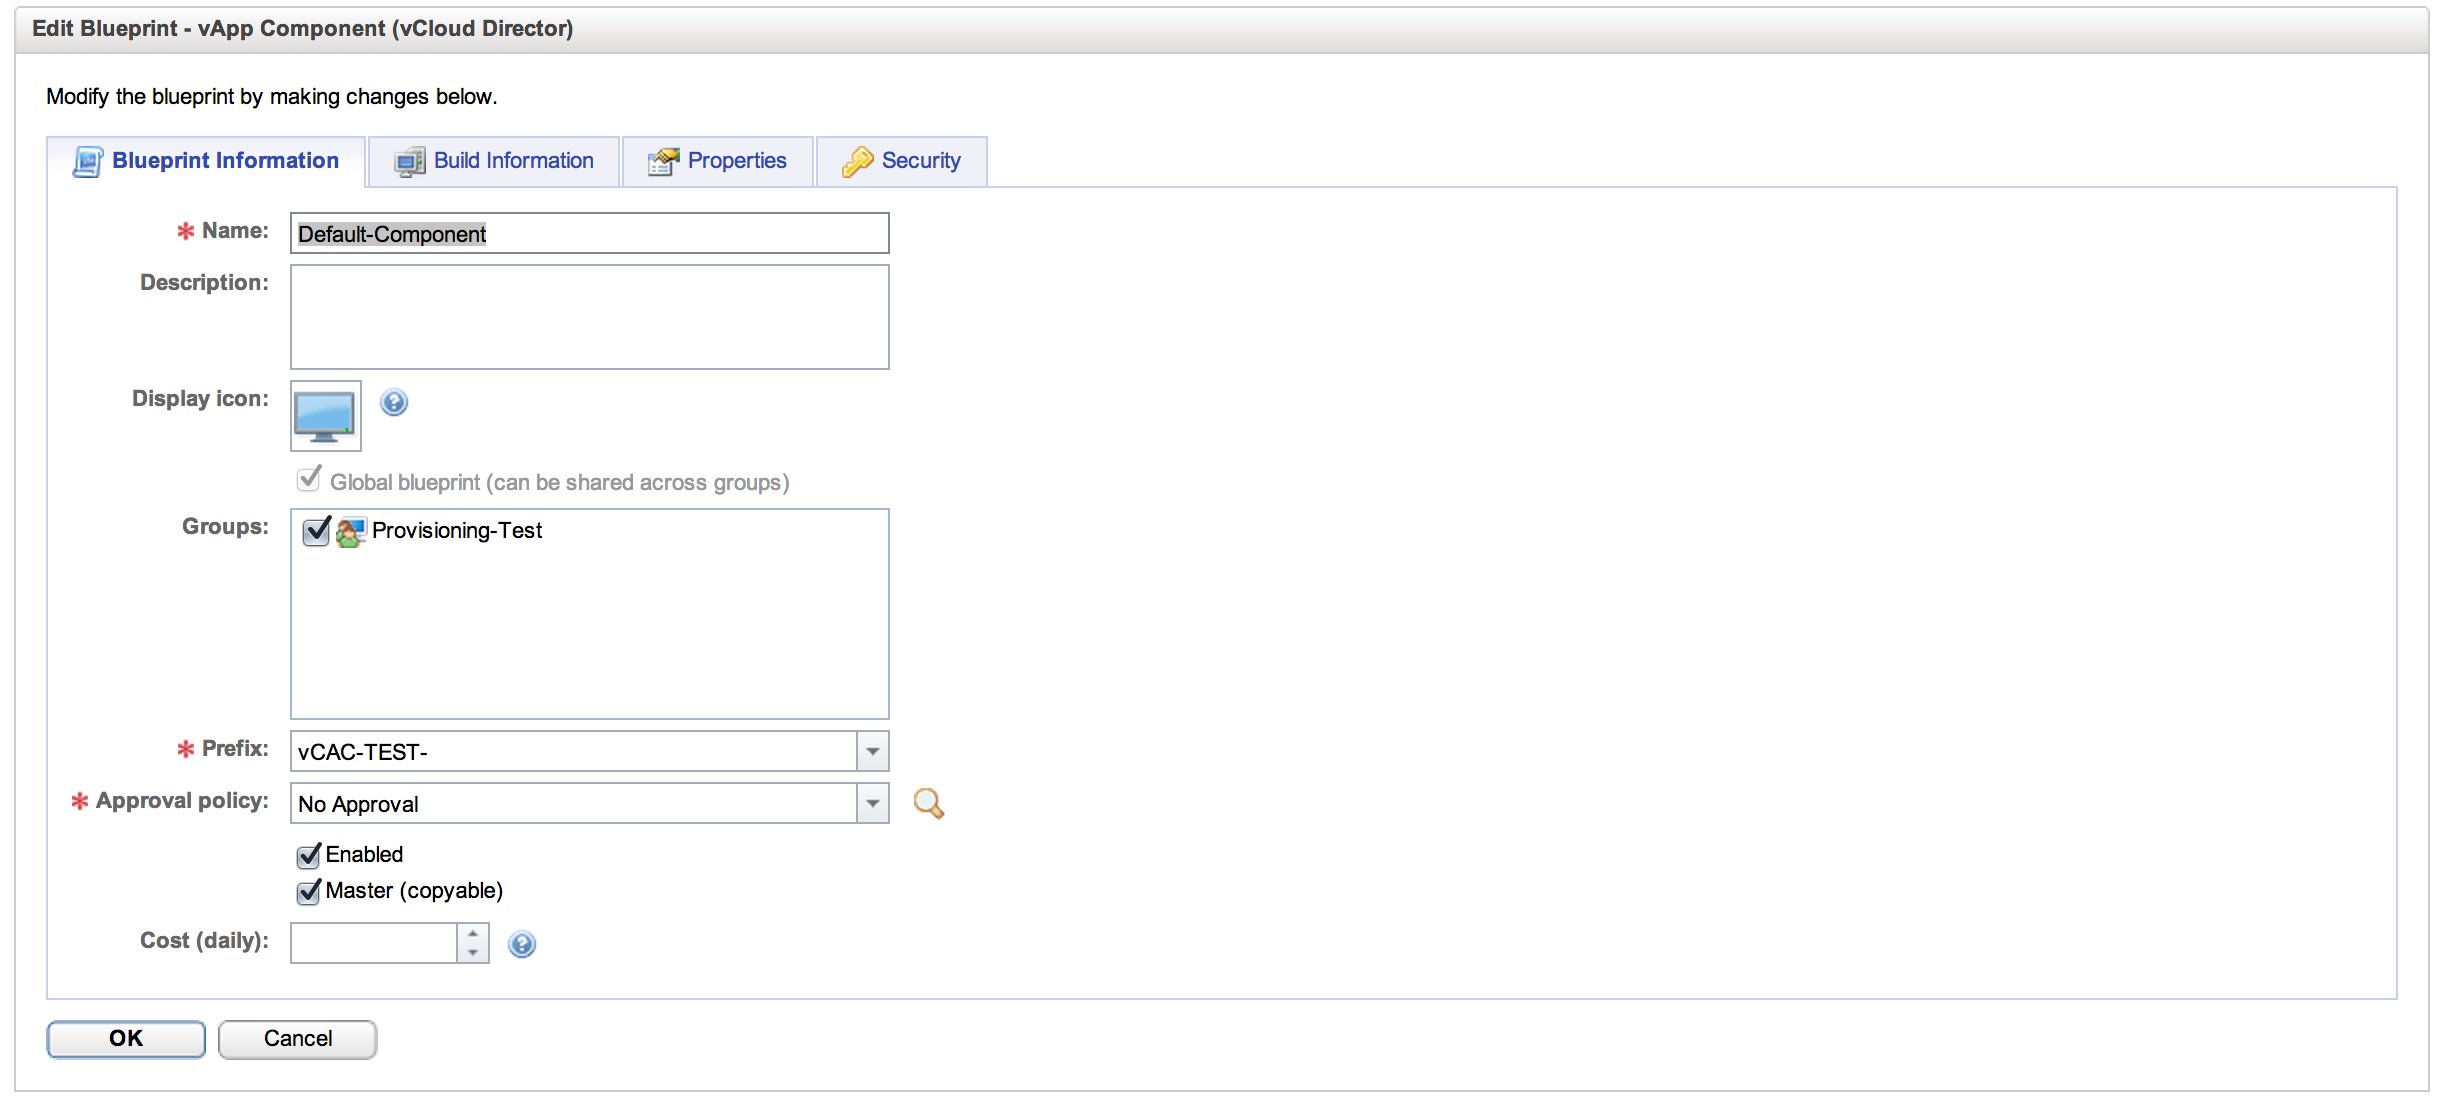
The basics of the vApp component are straightforward. We need to name it and associate it with a Provisioning Group. We can set a Prefix for the machines that will be created from this component definition (in this case the VMs will be “vCAC-TEST-##”) and we can set an approval policy. We can also assign costing, which is very important, and will be part of that future workflow entry. With the basic stuff out of the way, let’s take a look at the Build Information tab:
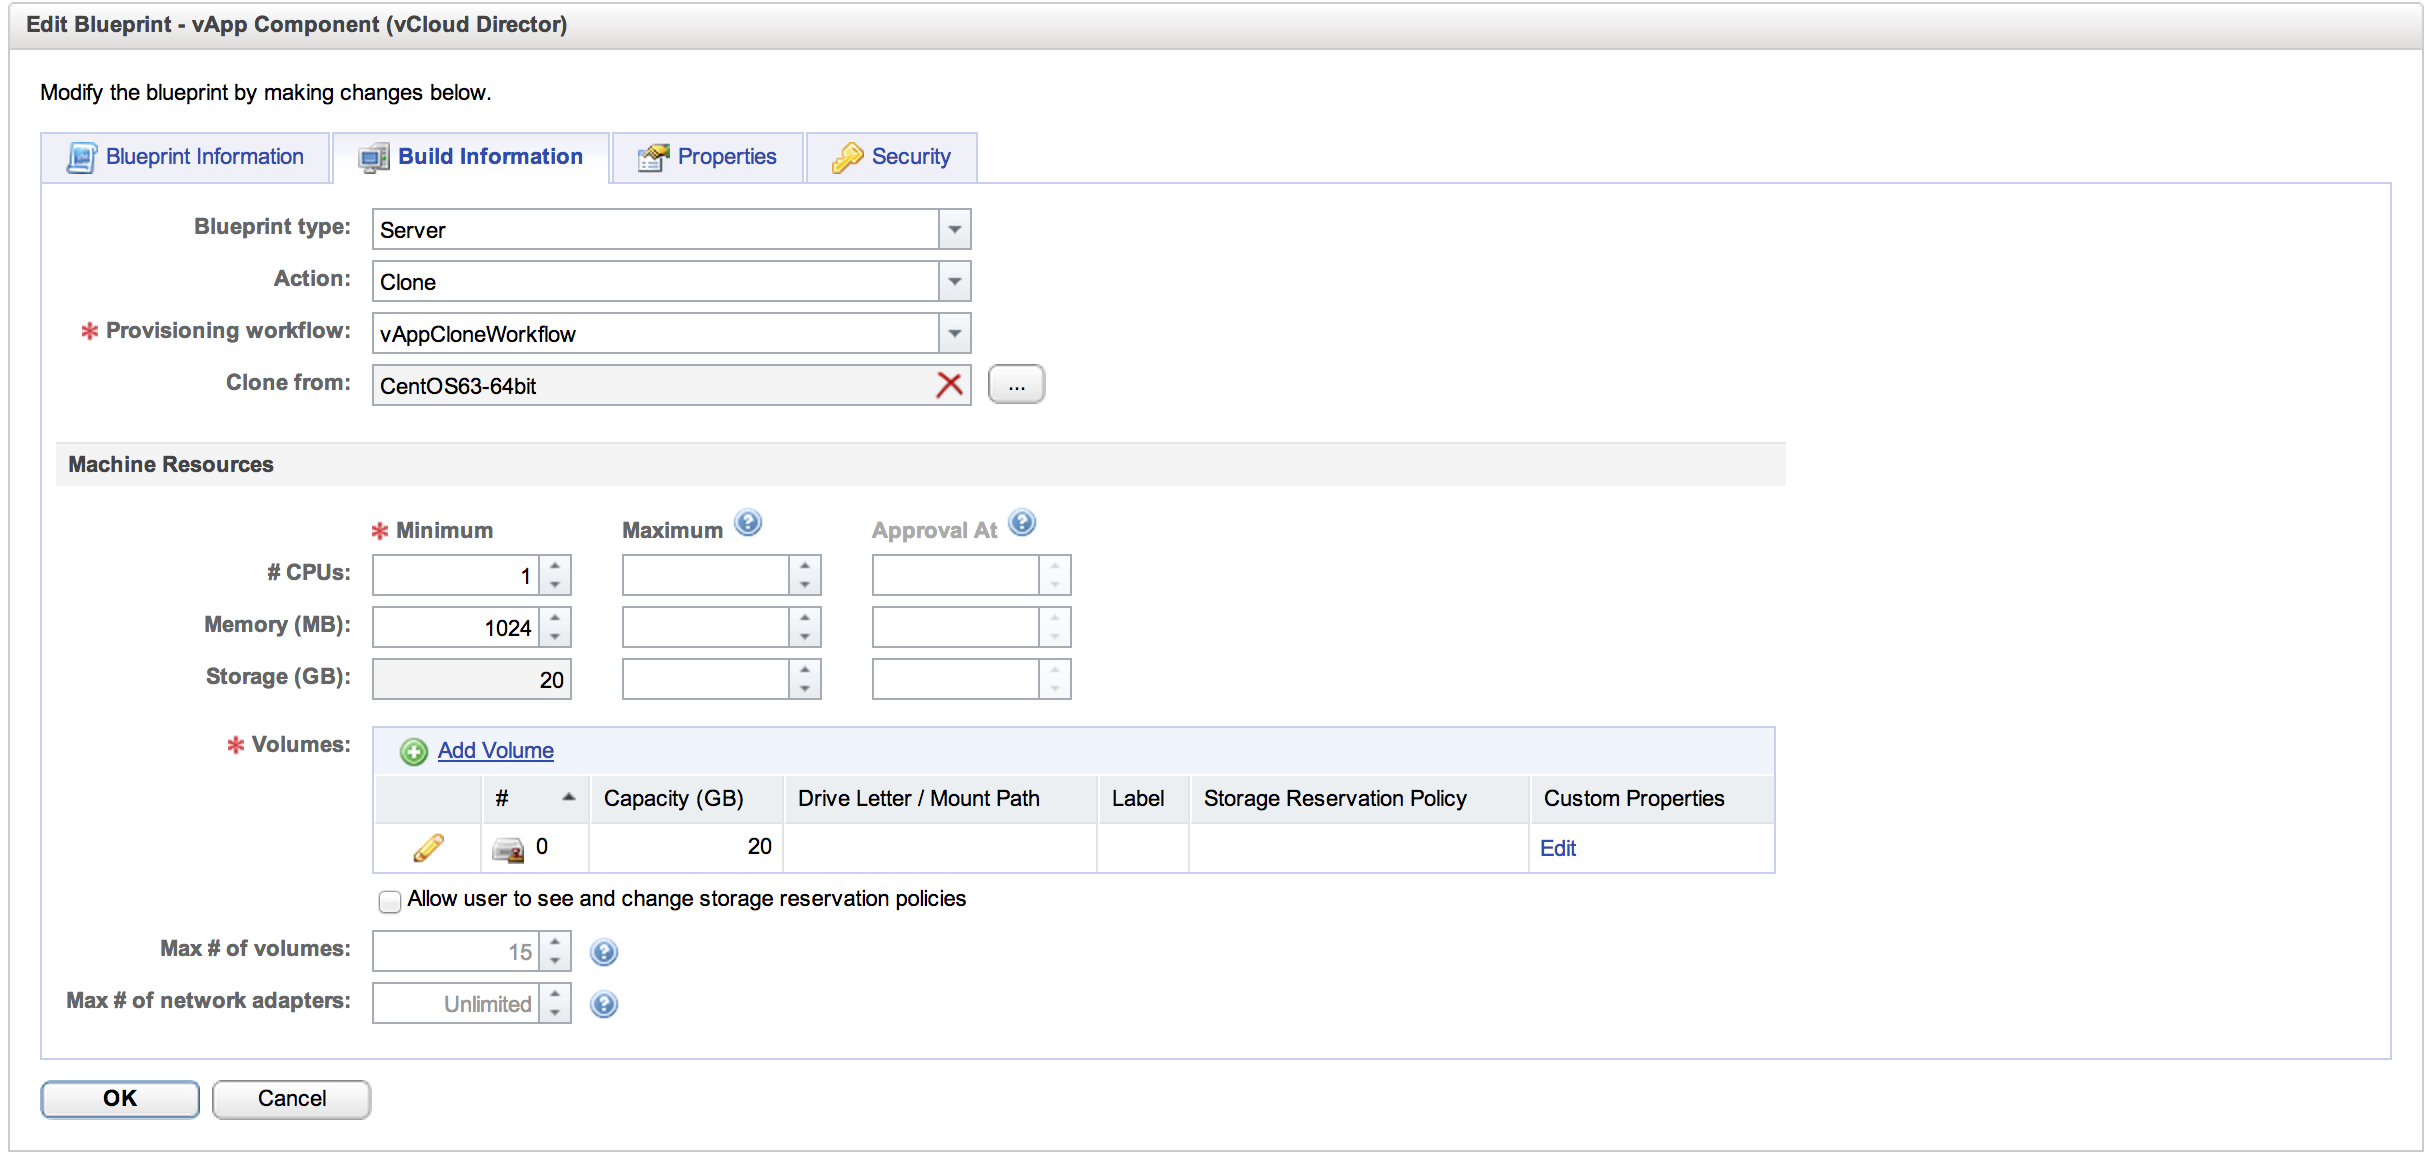
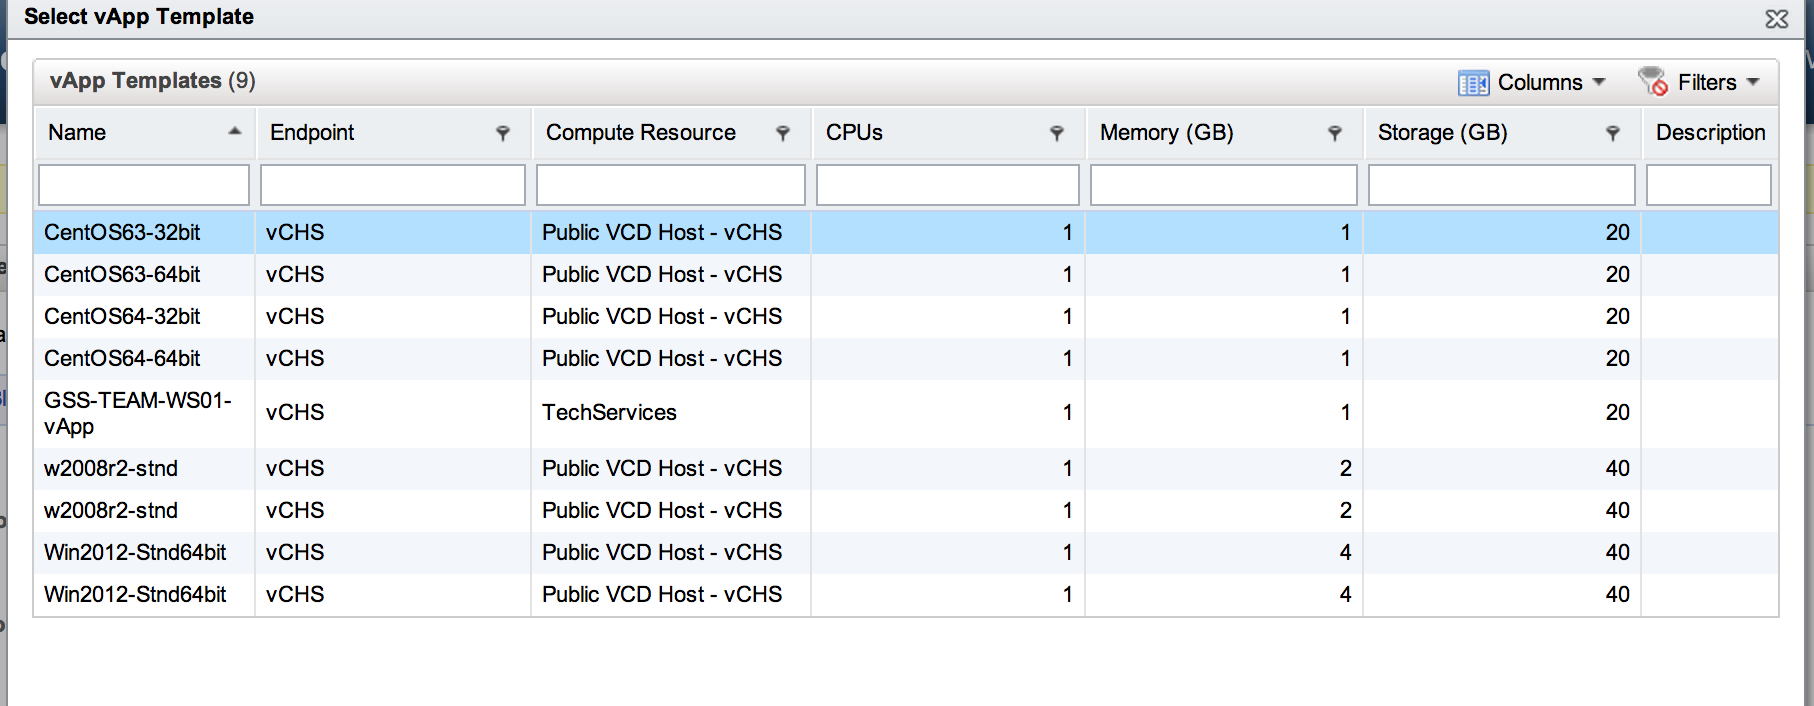
This is where we define the characteristics of the actual machine itself. Essentially, we are creating an EC2 style “t-shirt size” here for our vCAC end-users. The actions available to us are to “Clone”, with that actions matching “vAppCloneWorkflow” and we will be cloning from an entry in our vCHS catalog. Clicking the ellipses next to “Clone From” we get the catalog view:

The last bit is where we create the t-shirt size by setting the resources that will be allocated to any machines created by this blueprint. We can set the number of vCPUs an amount of RAM. Storage is set by the template but can be changed here and additional storage can be added. With the component definition in place, we can hit “OK” to commit it and then go ahead and create the vApp that will contain it:
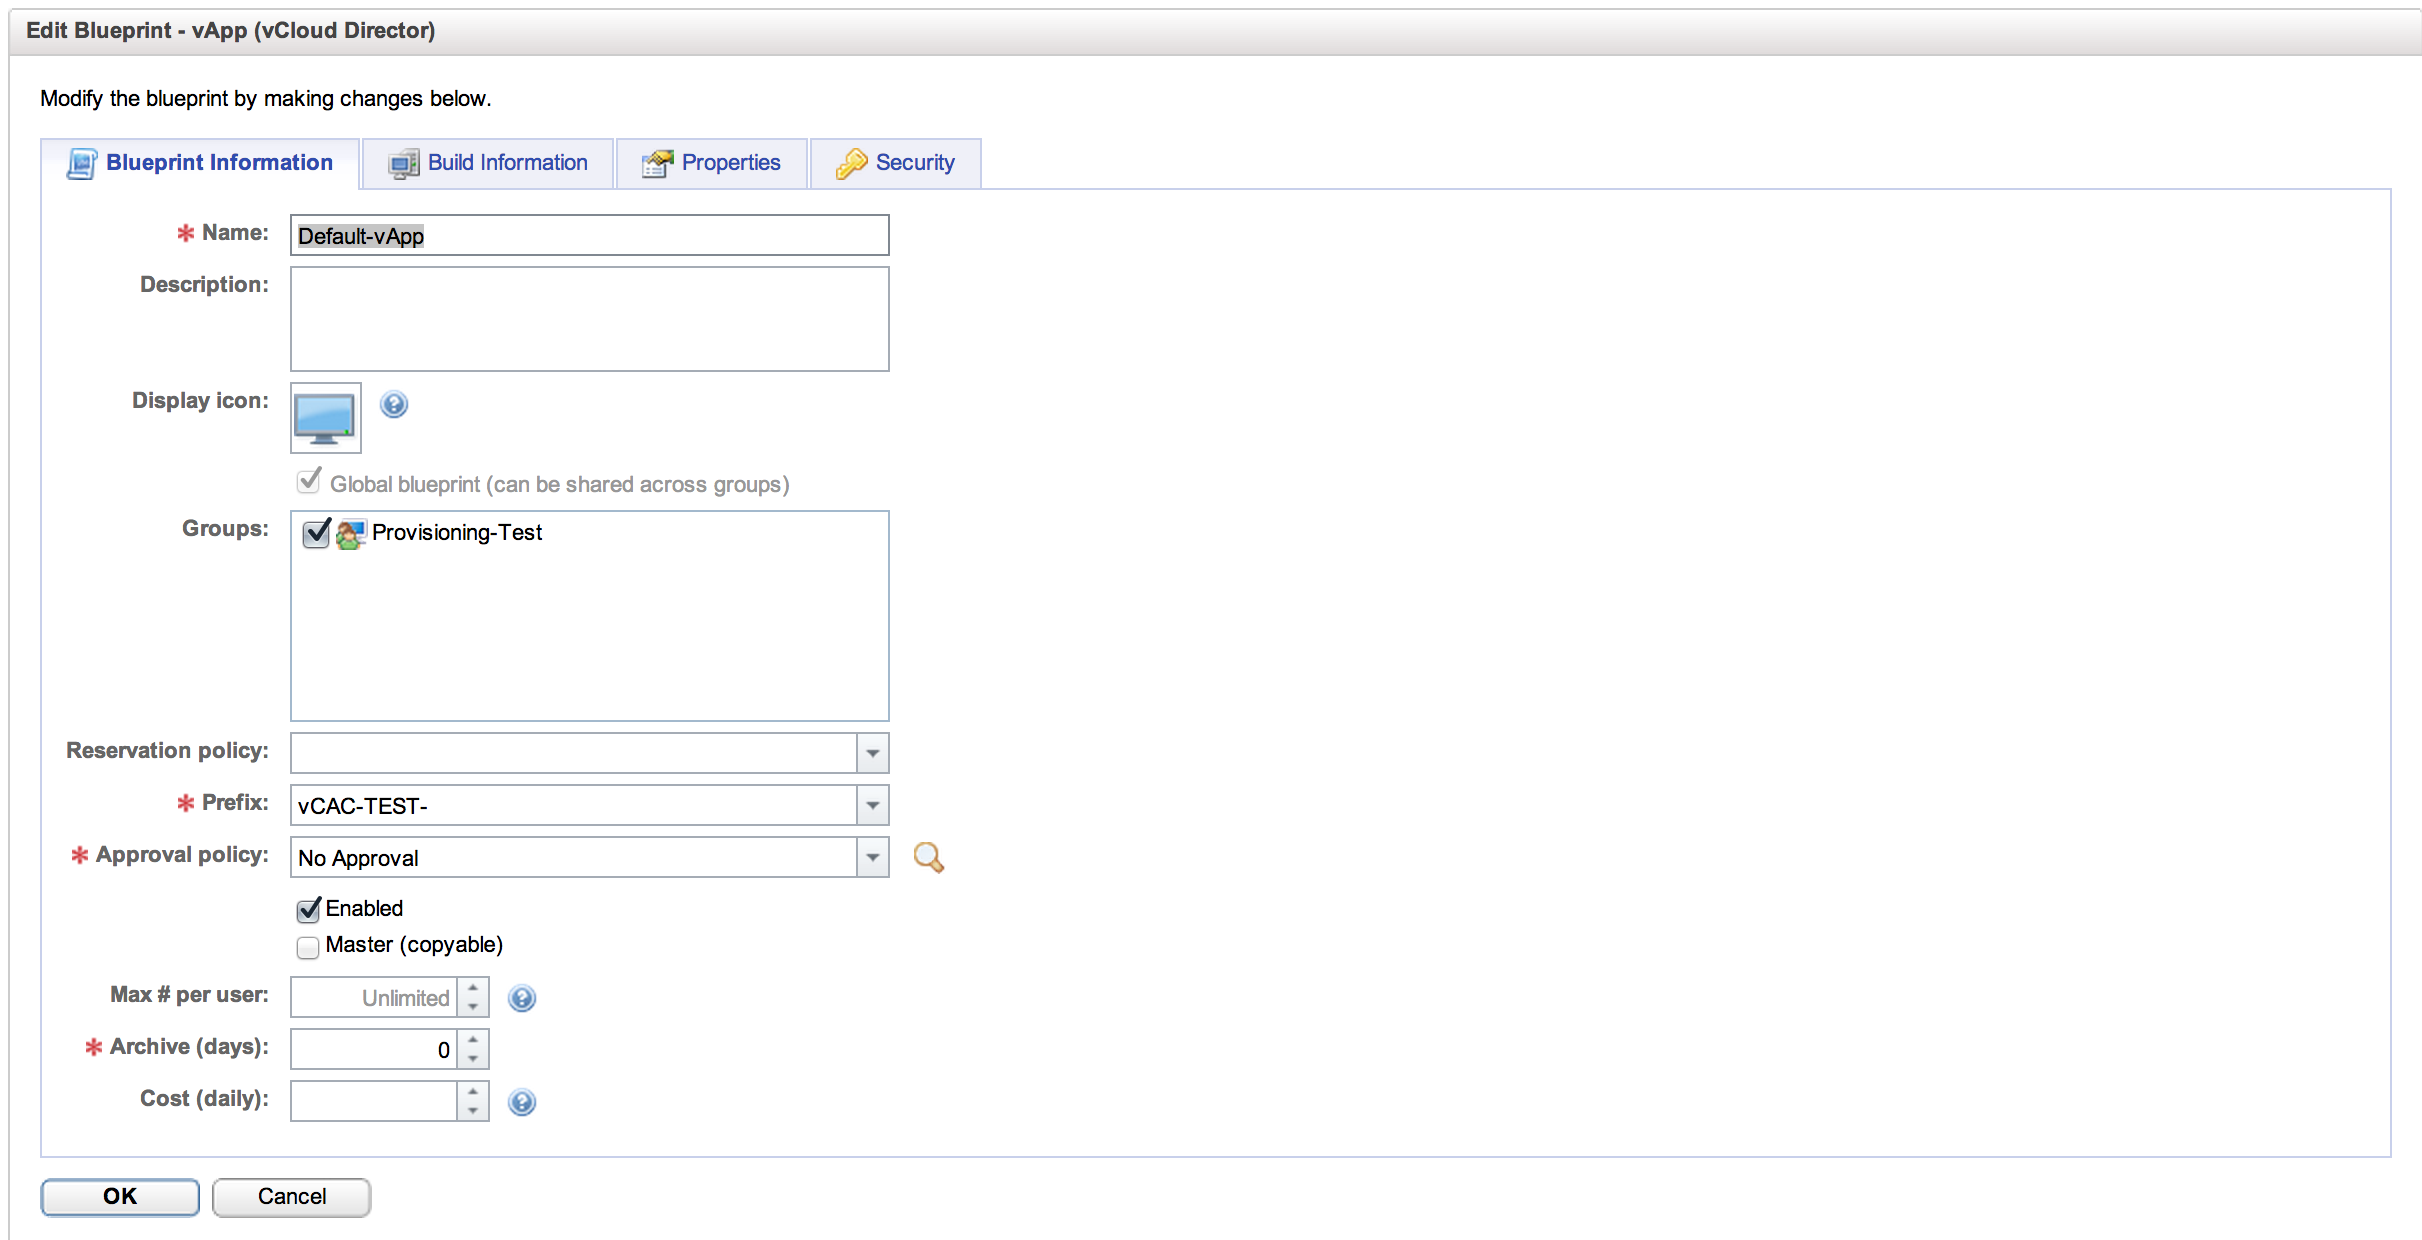
Under Blueprint Information, we are adding the Name, a Prefix that will be the prefix used for naming the vApp, an Approval Policy (more workflow component power there) and an archive policy. vApps created by this Blueprint will be named “vCAC-TEST-##”. So you can see here where different blueprints would be defined based on workload in a real world scenario. For our lab case this is fine, so let’s look at the Build Information tab:
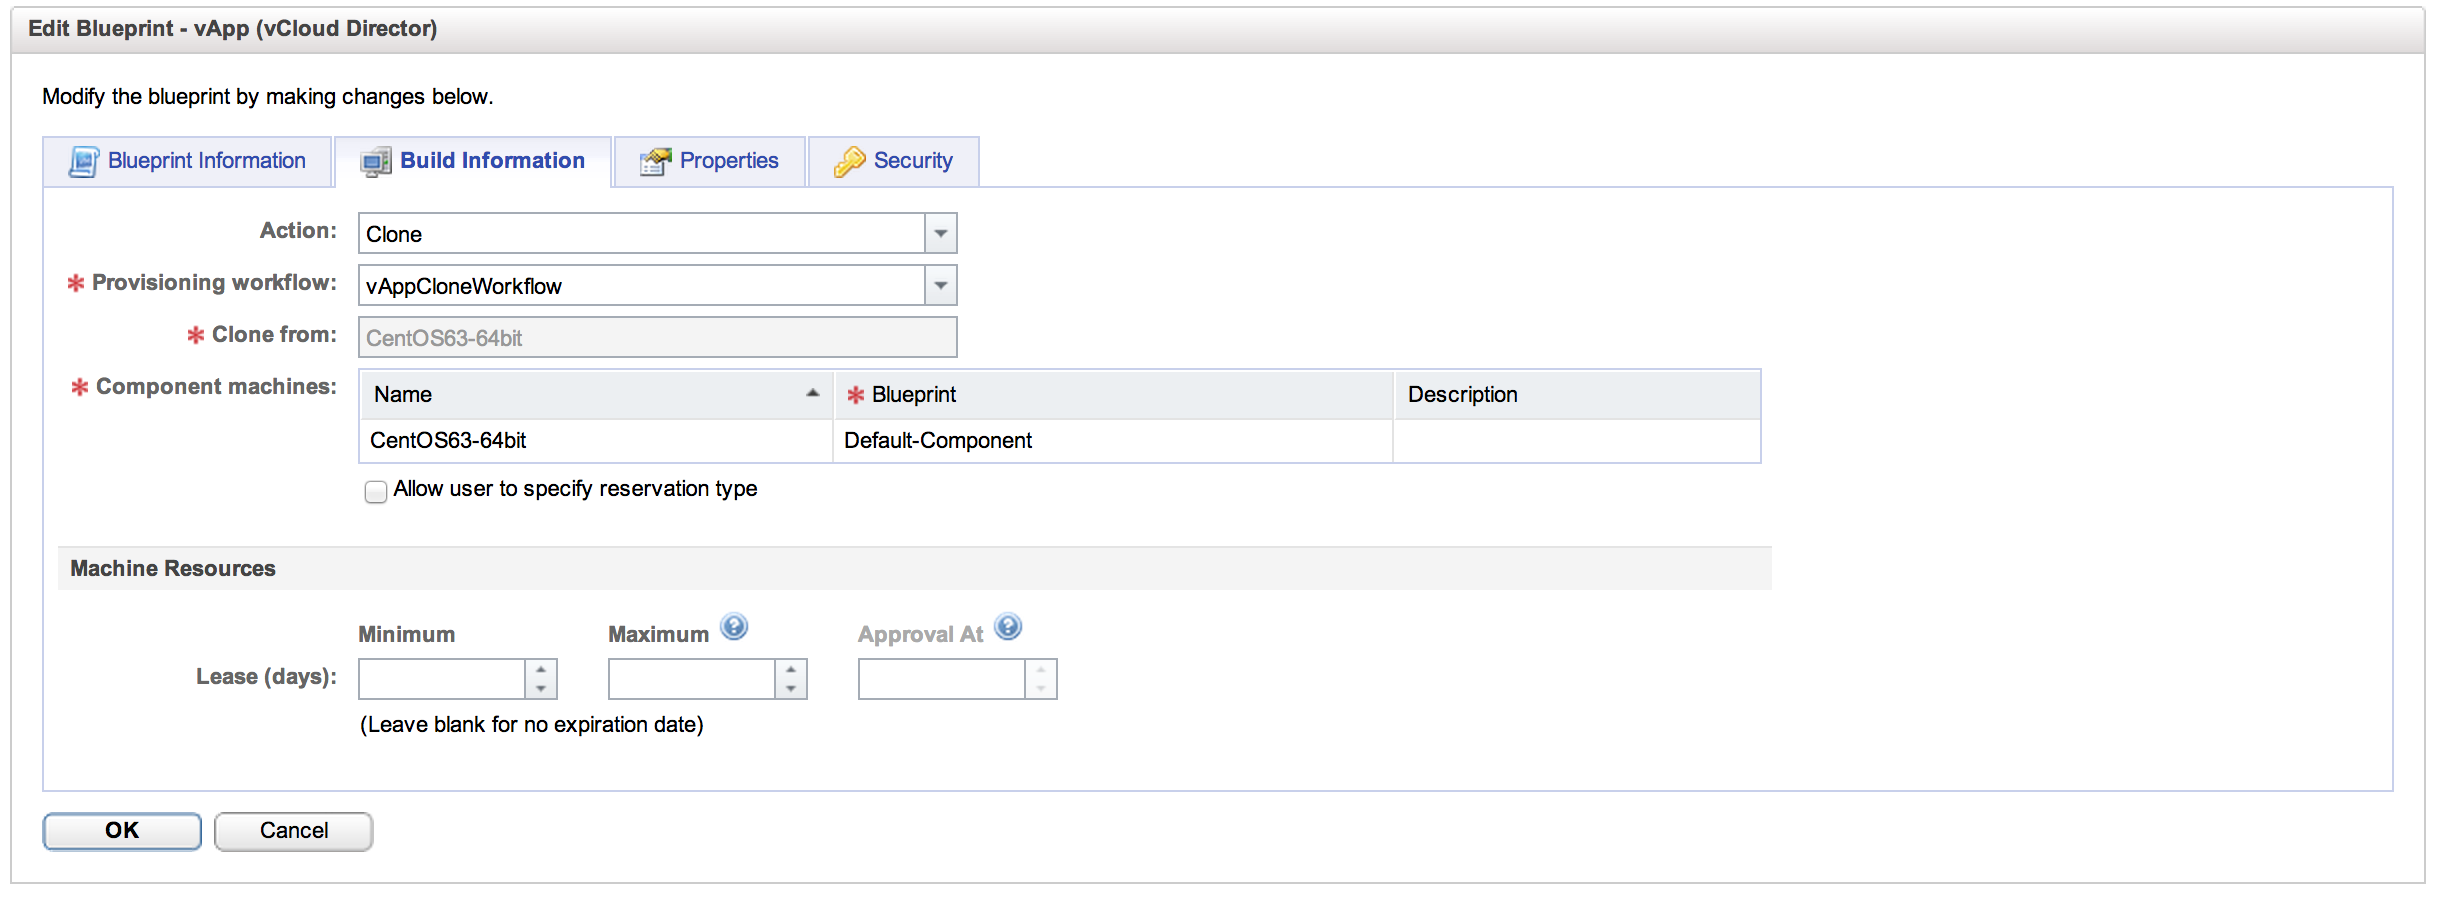
Life is a bit more interesting here. The first thing to look at is “Action”. For our vApp, the only available action is “Clone”. What this means is that the vApp we are carving out of our reservation pool of resources is going to be a clone form the vCHS catalog. The workflow to be used will be the “vAppCloneWorkflow” and we can select where we will be cloning from. The clone source can be anything in our vCHS catalog:
The last field, Component Machine, is where we select the vApp component that we defined in the prior step. With all required fields entered, we can go ahead and click “OK” to create our vApp blueprint.
Now we’re cooking with gas! We have a functional end point, enterprise group, reservation pool and have defined some blueprints. It’s time to go and create some resources! Let’s head over to the Self Service Portal:
On the front page we can see that we have a couple of blueprints available from which we can deploy machines. Our workflow and entitlements are wide open, so lets enjoy the freedom, click blueprints (that’s actually a giant button) and do some damage!

Here we have our old EC2 blueprint alongside our shiny new vCHS vApp blueprint. Isn’t it cool how both of these are presented to the end-user without any distinction? On-prem resources would be presented here as well. All of the complexity of juggling multiple services get’s abstracted out, governed by workflows that are defined by the business and is centrally managed from the portal. The point is your consumers really shouldn’t care where the resources come from, as long as those resources meet their business rules and requirements. We have no rules or requirements in our lab, so let’s go forth and deploy! Clicking the vApp’s name link invokes the request form:
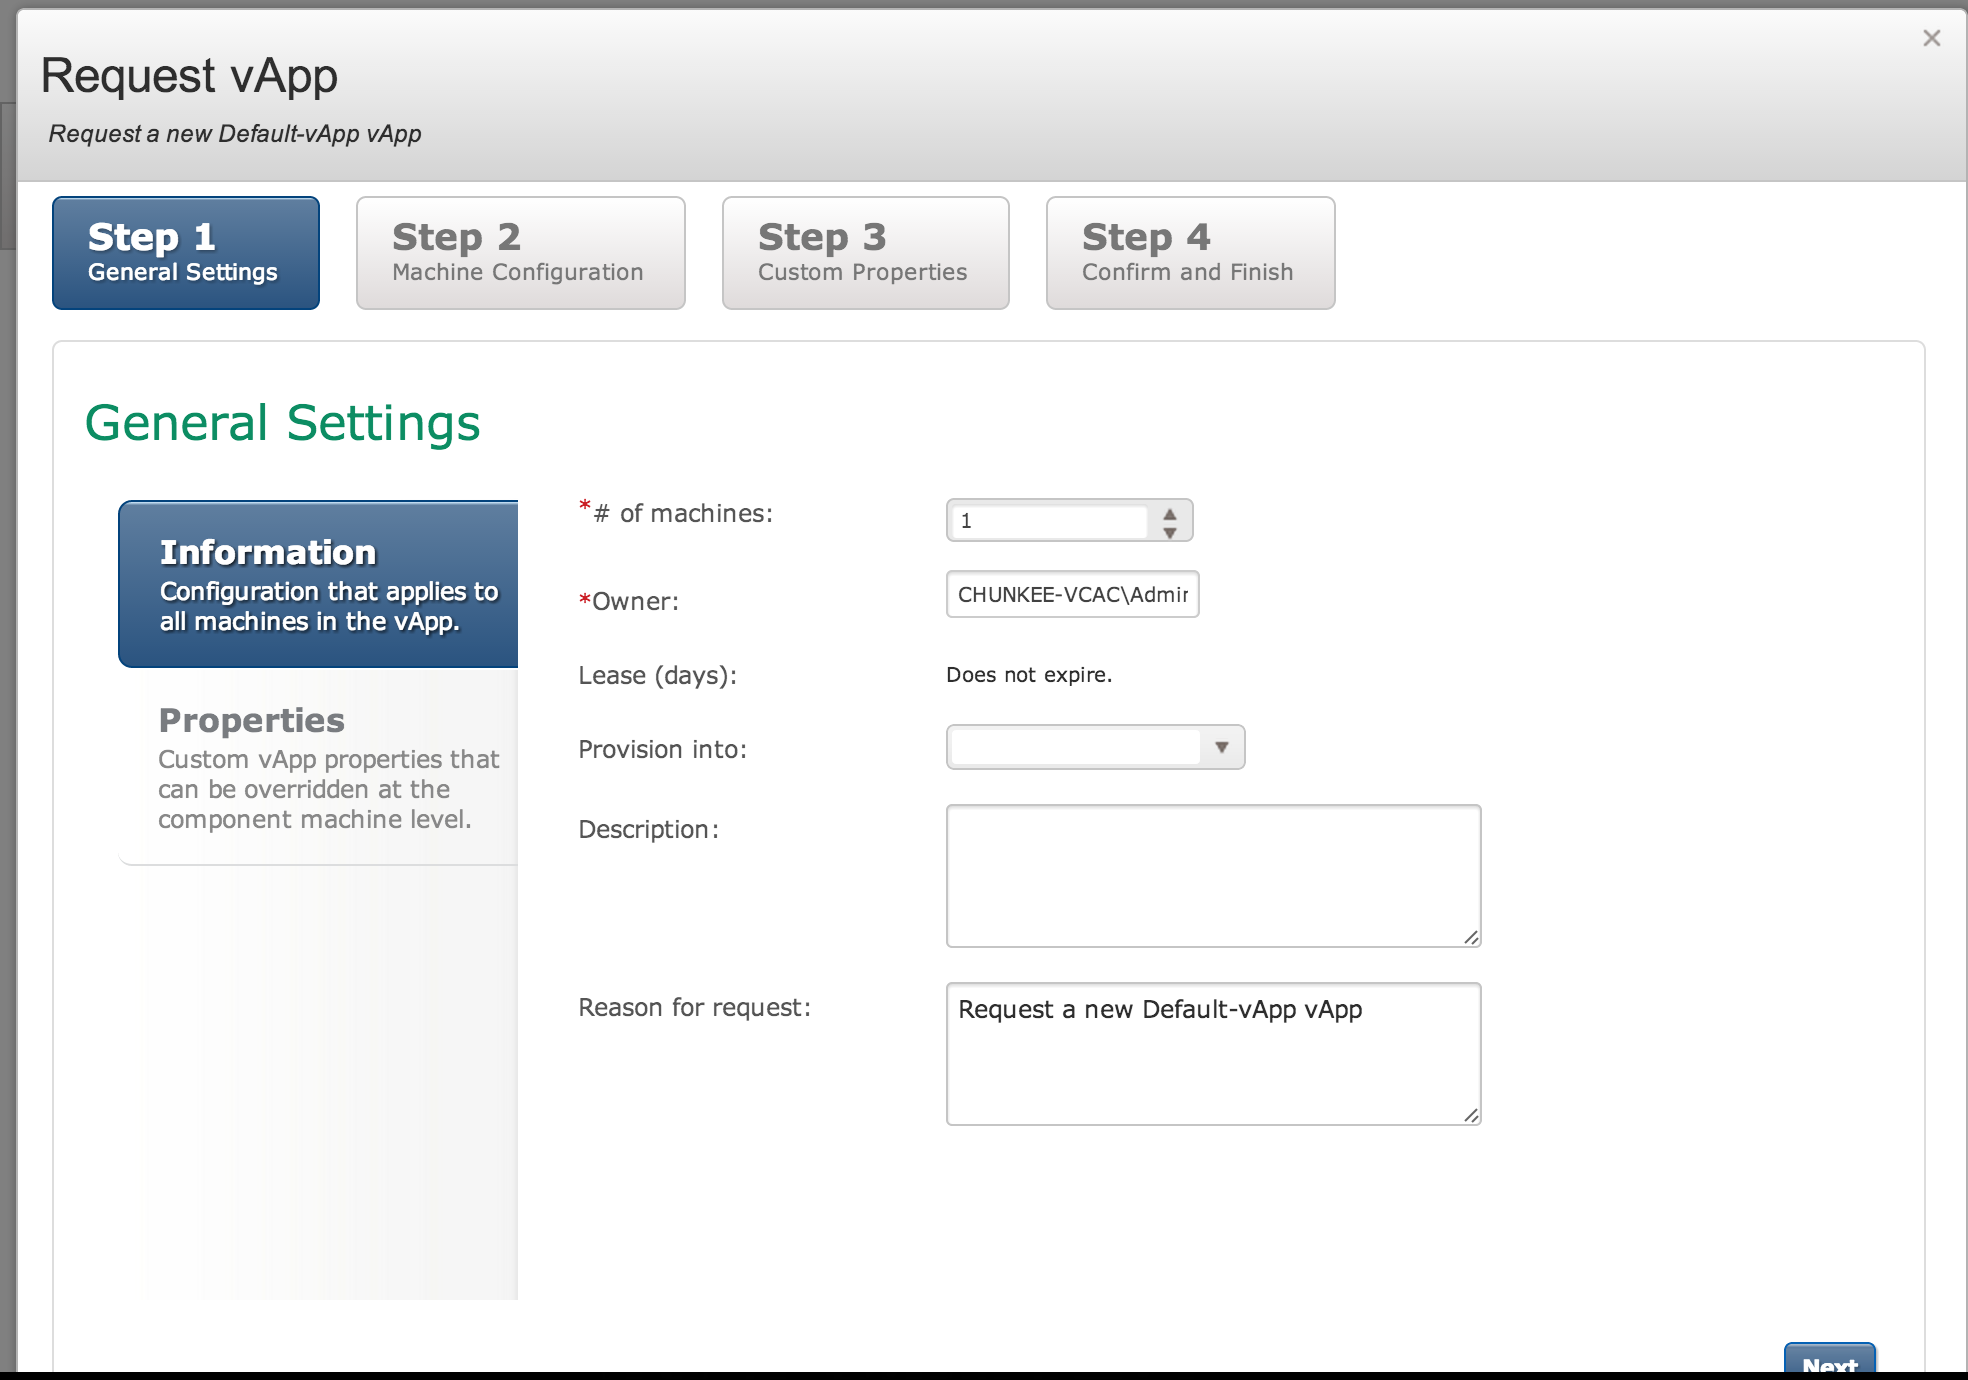
This is where things get interesting. vCHS has no clue who this owner is. We can talk to vCHS because our vCHS credentials are set in the end point definition, but vCAC also want’s to assign an owner to the resource and it must be someone that vCHS knows. In our case we’re going to manually override the default owner (which will be whoever logged into the portal), and enter the identity of the configured vCHS user. Now obviously this is a bit awkward, but with good workflow definition, and some portal customization, there is no reason this can’t be made workable if there is well defined delegated authority. In my case I overwrite “administrator” with my vCHS creds and click Next after setting the number of machines.
Here we can further customize our machine resources (assuming we have permission to) and change the default allocation, we also have another chance to set the number of machines being created, and based on those inputs we will get an awesome cost estimate assuming chargeback has been configured and cost has been defined and assigned (in my case obviously it hasn’t):

Next up we can set some additional properties and add extra metadata if we so choose (this can also be prescriptive through pre-defined setup and workflow). In our case we’ll stick with the defaults and click Next:

Which brings us to our final “Bill of Sale”. If we had costing defined we’d see what provisioning this infrastructure was going to cost us. $0 sounds like a great deal so I will go ahead and Finish:

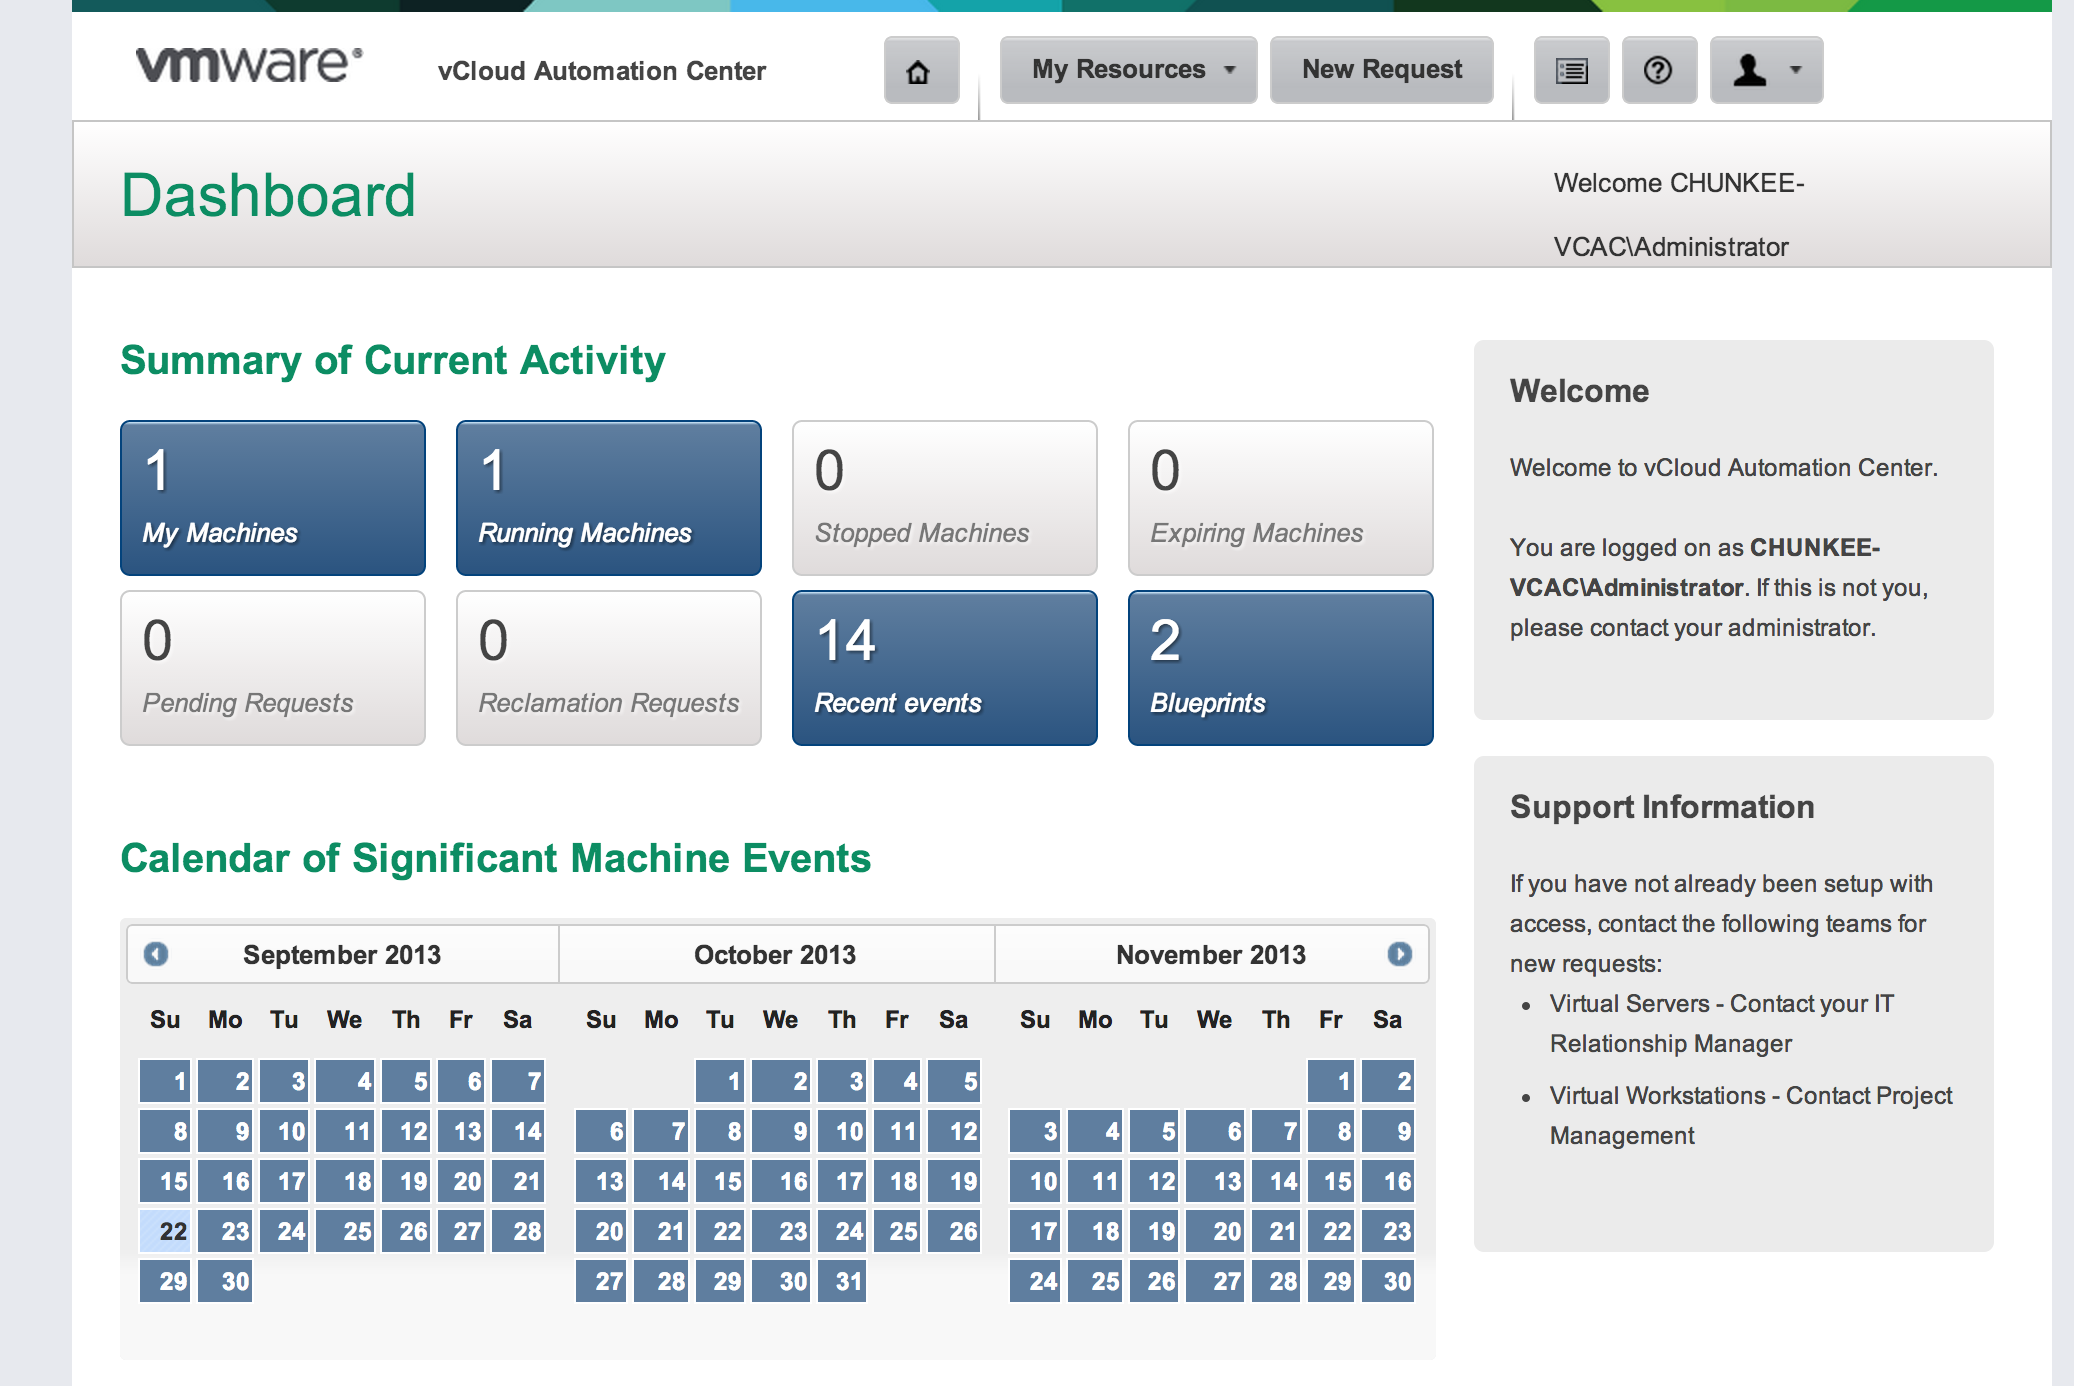
If everything is in order you will be brought immediately back to the dashboard. Lets take a look at the vCHS tenant and see what happened:
Lo and behold as if by magic it worked! We can see that we have two shiny new Centos machines up and running in vCHS! Well I feel better now that vCHS has gotten equal air time with EC2! The deep integration of vCD into vCAC, and the resource pool based construct of vCHS (vs AWS prescriptive t-shirt sizing) should allow for richer workflow scenarios once we start defining some business logic, so stay tuned!
