
With the physical build complete, it was time to fire up the Nightblade. The system configuration UI, as expected of a UEFI system, is very slick and features both basic and advanced modes as well as tools for overclocking and system monitoring. In addition, there are single button settings for “Game Boost” and XMP. “Game Boost” is auto-pilot overclocking that pushes the CPU to 4.4Ghz under load. Once enabled boot up triggers a warning to not directly change any advanced BIOS settings. I experimented with this setting but couldn’t get 100% reliable boots with it on. I’m really going for stability in this build, and I personally find the auto-pilot overclocking solutions to be hit or miss anyhow, so I left it disabled. XMP (eXtended Memory Profile), on the other hand, is a more well known quantity. Ideally XMP should cause the BIOS to read memory setting parameters from the memory itself. Enabling XMP correctly set the RAM settings to 3200Mhz CL15, but unfortunately once again stability suffered.
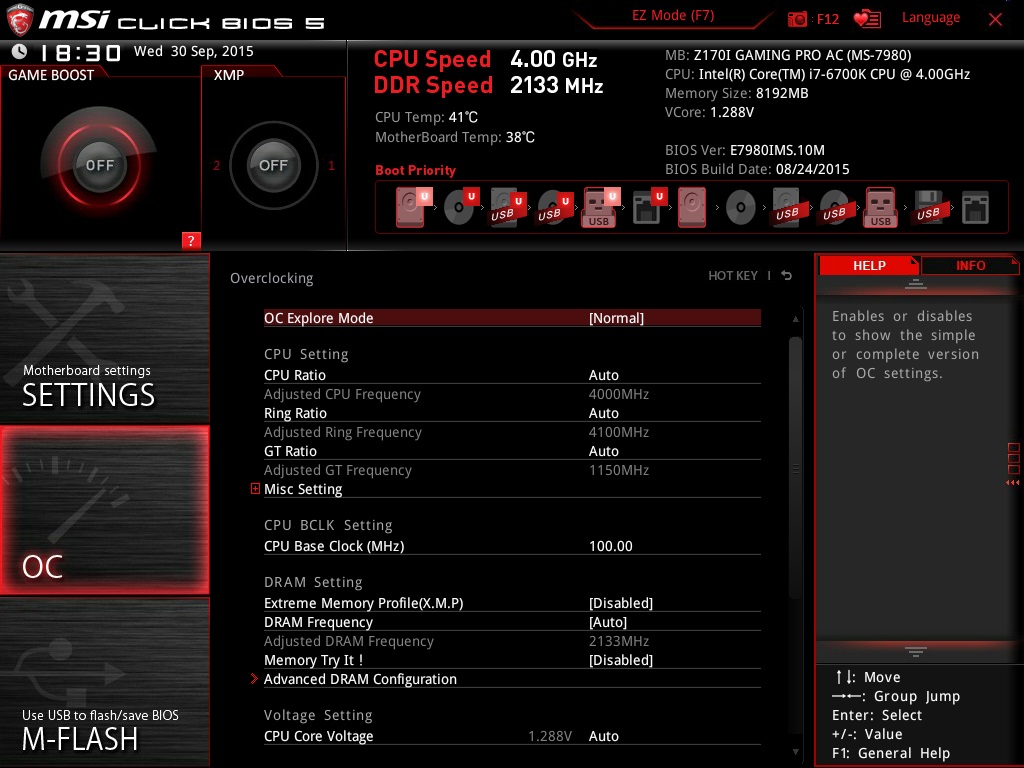
In the end I was able to get a rock solid build leaving the 6700K at standard clocks (a respectable 4Ghz) and the DDR4 at 2800Mhz. The interesting thing is throughout all of the testing the temps were fantastic. Idling at 39C CPU/33C Mobo with Prime95 spiking to 59C. Not bad considering the really compact form factor of the Nightblade and the modest H75 cooler. Noise levels from the 3 120mm fans (push/pull on H75 and exhaust) was manageable and didn’t rise to the level where normal conversation in the room was impacted.
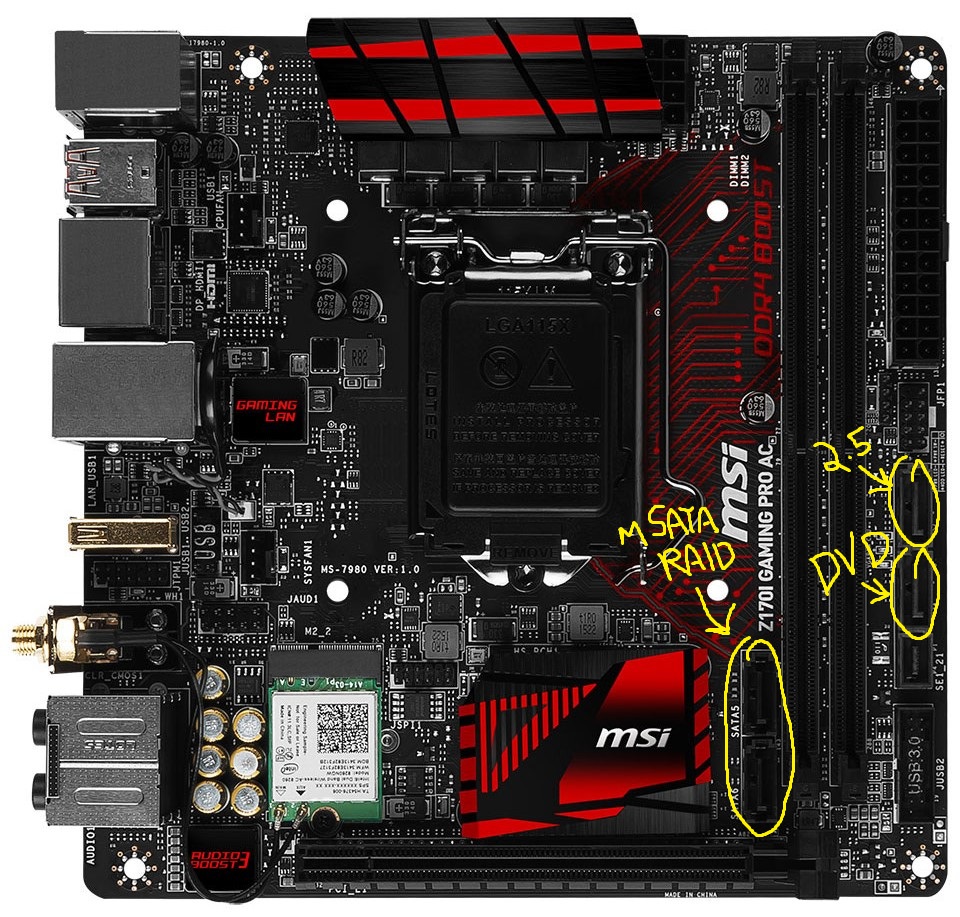
On the storage side the Z170 of course includes Intel RST which was switched to on since this build was intended to be a RAID 0 build. Normally a non-event, this turned out to be the source of a huge number of problems with this build. As a reminder, the disk config is:
- 2 x Samsung EVO 850 500GB mSATA
- 1 x Samsung EVO 850 500GB 2.5″
- 1 x SATA blu-ray DVD
The Z170i provides 4 SATA ports. Two of these SATA ports (ports 1 and 2) can be configured as SATA Express and these two are also shared with the M.2 slot on the back of the board. If the M.2 slot is used in SATA protocol mode, the 2 SATA ports (and by extension SATA Express support) are disabled. In this case the M.2 slot is being left empty and there is no SATA Express. Unfortunately, for some reason, having the 2 mSATA SSDs connected to those ports resulted in extremely unstable performance with one of the drives inevitably falling out of the RAID in successive reboots and either one, or both, intermittently disappearing from the BIOS device list. This was a really frustrating issue as it prevented installation of the OS at best, and left the system spontaneously booting into uEFI recovery mode at worst. Luckily the fix turned out to be as simple as moving around the ports the devices were connecting to. The config that did the charm is pictured below:
One the RAM and RAID issues were sorted, installation of Windows 10 Pro OEM 64 bit was a snap. Incidentally I (reluctantly at first) purchased Windows from the folks at Bargain Valley. I was skeptical at the prospect of buying a digital download version of Windows at a discount online, supposedly legitimately, and having it not be a direct line to sinister overseas blackhats. Well I am happy to say my fears were unfounded! Within minutes of paying I had my product key emailed to me and was able to install and activate without a hitch using the official Microsoft Windows 10 media creator. Really a great experience.
With Windows installed, the first thing I decided to do was test the RAID. Given the plethora of initial disk problems, and the mixing of mSATA and 2.5, it seemed like a good idea. Crystal Diskmark results were good:
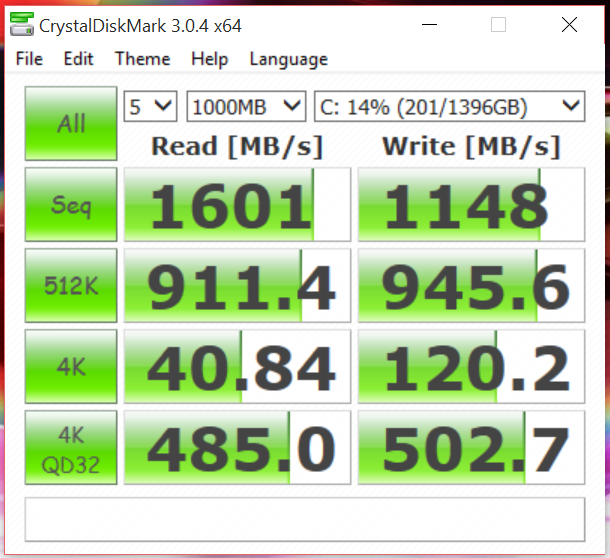
This is a 1.5TB 3 disk 6gb/s SATA RAID 0, so theoretical absolute peak throughput would be somewhere around 1.8GB/s. The sequential read performance comes awfully close (within 20%) of absolute theoretical peak, so I consider this pretty good. A PCI-E M.2 device on the rear of the board probably would equal this, but as mentioned in the first build entry, there really are no PCI-E 2240 or 2260 M.2 SSDs to be found at this stage (much less in a high capacity package).
At this point the system was stable and running well. Next up, bench marking! Stay tuned!
