
I like to play a lot of indie games. While of course hit or miss, by and large the bang for the buck on these is amazing. Plus it’s cool to support small studios who are able to take risks and bring you experiences that would never pass the business plan review stage at a AAA shop. When it comes to Live streaming, though, this is a bit of an under served niche. Live streaming has become a legitimate phenomenon and an actual new estate of entertainment, which is awesome, but most of the content centers on big releases for obvious reasons. I figured at the nexus of these two realities might lie a good science project and an even better way to waste money! Thus, “Project Live Stream” was born and I learned ultimately that this is not such an easy space!
Let’s kick things off with an architecture view (skip to the finish product basically):
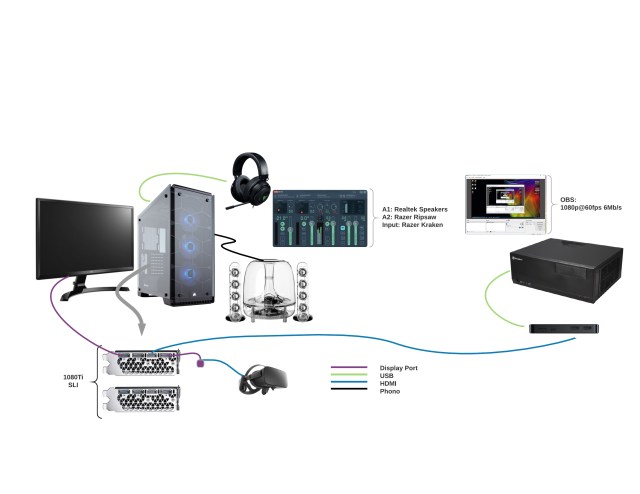
Ok so there is a lot going on there. To start with, I decided on a few rules up front for no particularly great reason:
- 2 PC capture – mainly because I have two PCs and also because my main gaming PC is a quad core running 4k native whereas the server is a 10 core Xeon so I (mistakenly) thought this would be ideal (more on that later)
- USB capture – USB 3 is 4.8Gb/s and modern Intel chipsets, with DMI 3, get very close to that. The server has no other USB devices. Internal capture cards are generally PCI-E 2.0 1x, which means 500MB/s or about the same perf as the USB device, but with the added complexity of being an internal card and not being portable
- No webcam – because this is about the game, I’m not aiming to be a “YouTube star” and, frankly, no one should need to be subjected to seeing yours truly just to get pointers on “Gone Home”
- No high end mic – room is tight as it is, I hate the sound of my voice so plan to speak only incredibly rarely and when absolutely necessary (like if there is some pending emergency only I am aware of and it becomes my civic duty to notify the 2 people viewing my stream). I have a Razer Kraken headset that is perfectly fine, so that works as a recording device
So with the rules of engagement in place, I set out to pick up some components. For a refresher, this is the PC setup currently in play at Complaints HQ:
- Gaming Rig – Core i7 7700k, Asus Maximus Z270, GTX1080Ti SLI, DP connect to LG 4k monitor, Occulus Rift (this part becomes important)
- Server – Xeon E5-2630v4, 10 cores, 128GB ECC RAM, Titan X Pascal, Supermicro X10SRi-F (C620), LSI MegaRAID 9260-8i
- Server is about 20 feet away from the PC in the living room entertainment center
For the USB capture device, I found myself torn between two tough contenders: the Razer Ripsaw (AVerMedia LGX OEM), and the Elgato HD60S. These parts are pretty close, and the “forum drone reflex” is to repeat Elgato like a mantra. Looking closer though, most reviews give the nod to the Ripsaw and, ironically, many forum drones also give the nod to the AverMedia LGX (being either unaware the Ripsaw is that same part or taking exception to Razer or Razer software). The main issue pro reviewers had with the Ripsaw was that it was ridiculously expensive. Fast forward a year though and the two parts are the same price (about $180). Given I had an Elgato in the past, like the design of the Ripsaw, and it did seem to take the uncompressed quality edge in reviews, I went with the Razer.
If these sections had subheadings, the subheading for this one would be “Setup – A Tale of Woe”. I learned a bunch of things up front that challenges my initial assumptions and are worth noting:
- The Razer in a 2 PC setup connects to the gaming PC via HDMI (so you need a spare HDMI out) and to the capture PC via USB 3.0. The 1080Ti only has a single HDMI out and that was in use by the Occulus Rift. The second 1080Ti ports can’t be used because of SLI. I ended up solving this by spending $25 on an HDMI to DP converter with 4k support (HDMI 2.0/DP 1.2). This worked out well. Video via the converter was no problem and the Occulus software switches Rift audio to default when the headset is active, and switches back when it’s off
- SLI is an issue – here in 2017 you somehow still cant run SLI with a cloned desktop setup. If you do extended desktop, you will be unable to play and stream fullscreen games and actually wont be able to stream anything unless you drag it onto the invisible monitor surface. The only solution is to switch the monitor config to clone when streaming and set the resolution to 1080p for both surfaces. This is annoying, but does allow for full stream streaming to the 2nd PC. I suspect this will never be resolved due to the way SLI manages the display (it has always been a limitation)
- Audio for this setup is a pain – Windows only supports a single default audio device and another default audio device for communications. The TL;DR here is that a software audio mixer is needed. I found that VoiceMeeter Banana is absolutely phenomenal. It virtualizes the audio I/O via a system driver (install requires reboot) allows you to map multiple inputs to multiple outputs. In my case I set it up as follows:
- Output A1: Realtek Speakers. WDM resulted in reverb distortion, so I had to set the driver to MME. Also, in the speaker configuration of the VoiceMeeter Aux Input device, 5.1 had to be selected to get 4.1 working. Just select 5.1, then deselect the center speaker under the “optional speakers” settings. The cool part is once this is setup, surround sound will work on the desktop, but the mixer is smart enough to only send 2 channels via HDMI and USB
- Output A2: Razer Ripsaw via Nvidia HDMI
- Output A3: Razer Kraken USB headset
- Input 1: Razer Kraken mic
In addition to the above settings, all channels should be toggled on for the virtual inputs so that the virtual wire will utilize all physical channels for output and will also enable “listen” for the physical input. I left all channels in normal mode which worked fine (none set to mix down or composite)
It was a bit of a complicated journey, but this setup results in everything just about working with only a few minor inconveniences. Having to switch monitor config and resolution before every stream is definitely a pain but the audio mixer does a good job and is unobtrusive and it is definitely cool when speakers, headset and the stream are all active along with voice capture.
With the source side setup, it was time to move on to the capture side of the equation. After trying a number of different solutions, I decided to stick with OBS Studio. It’s open source, free obviously, and extremely powerful. It also has great support for both software encoding (H.264 via the x264 CODEC) and hardware (Nvidia NVENC) for both recording and streaming. The software defaulted to NVENC and the Titan X, but with 10 2.2Ghz cores I decided H.264 was the better choice.
