
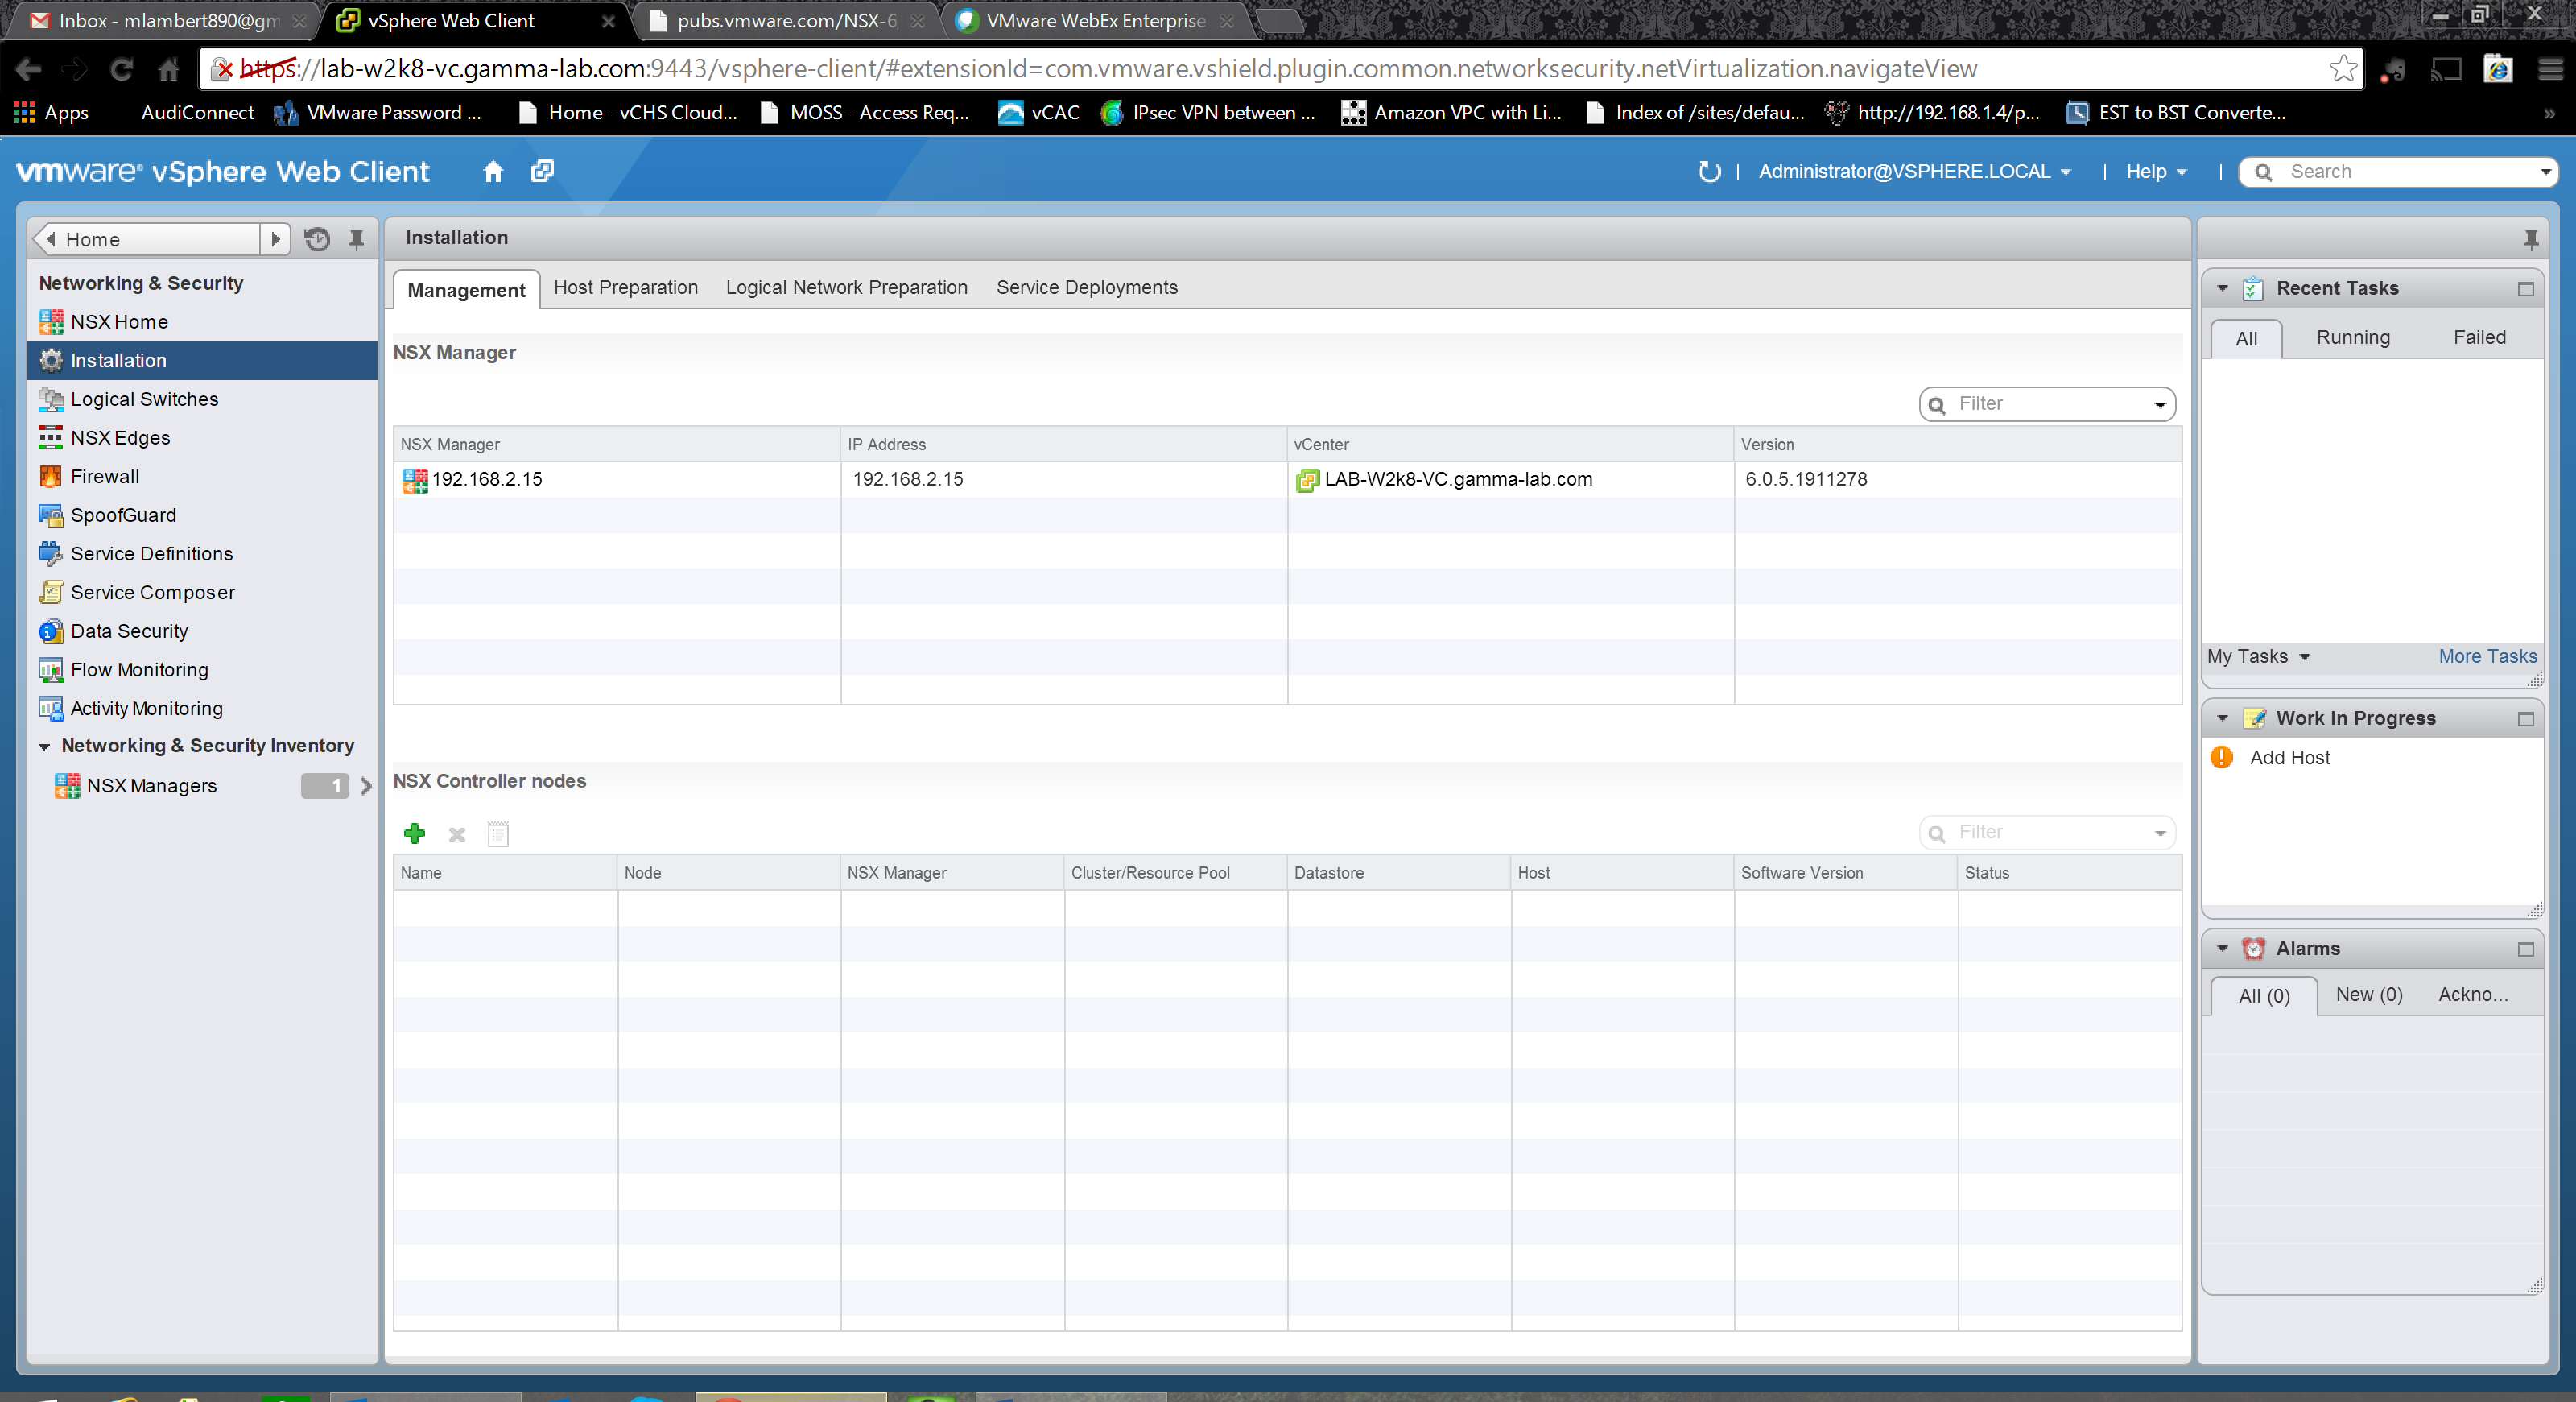
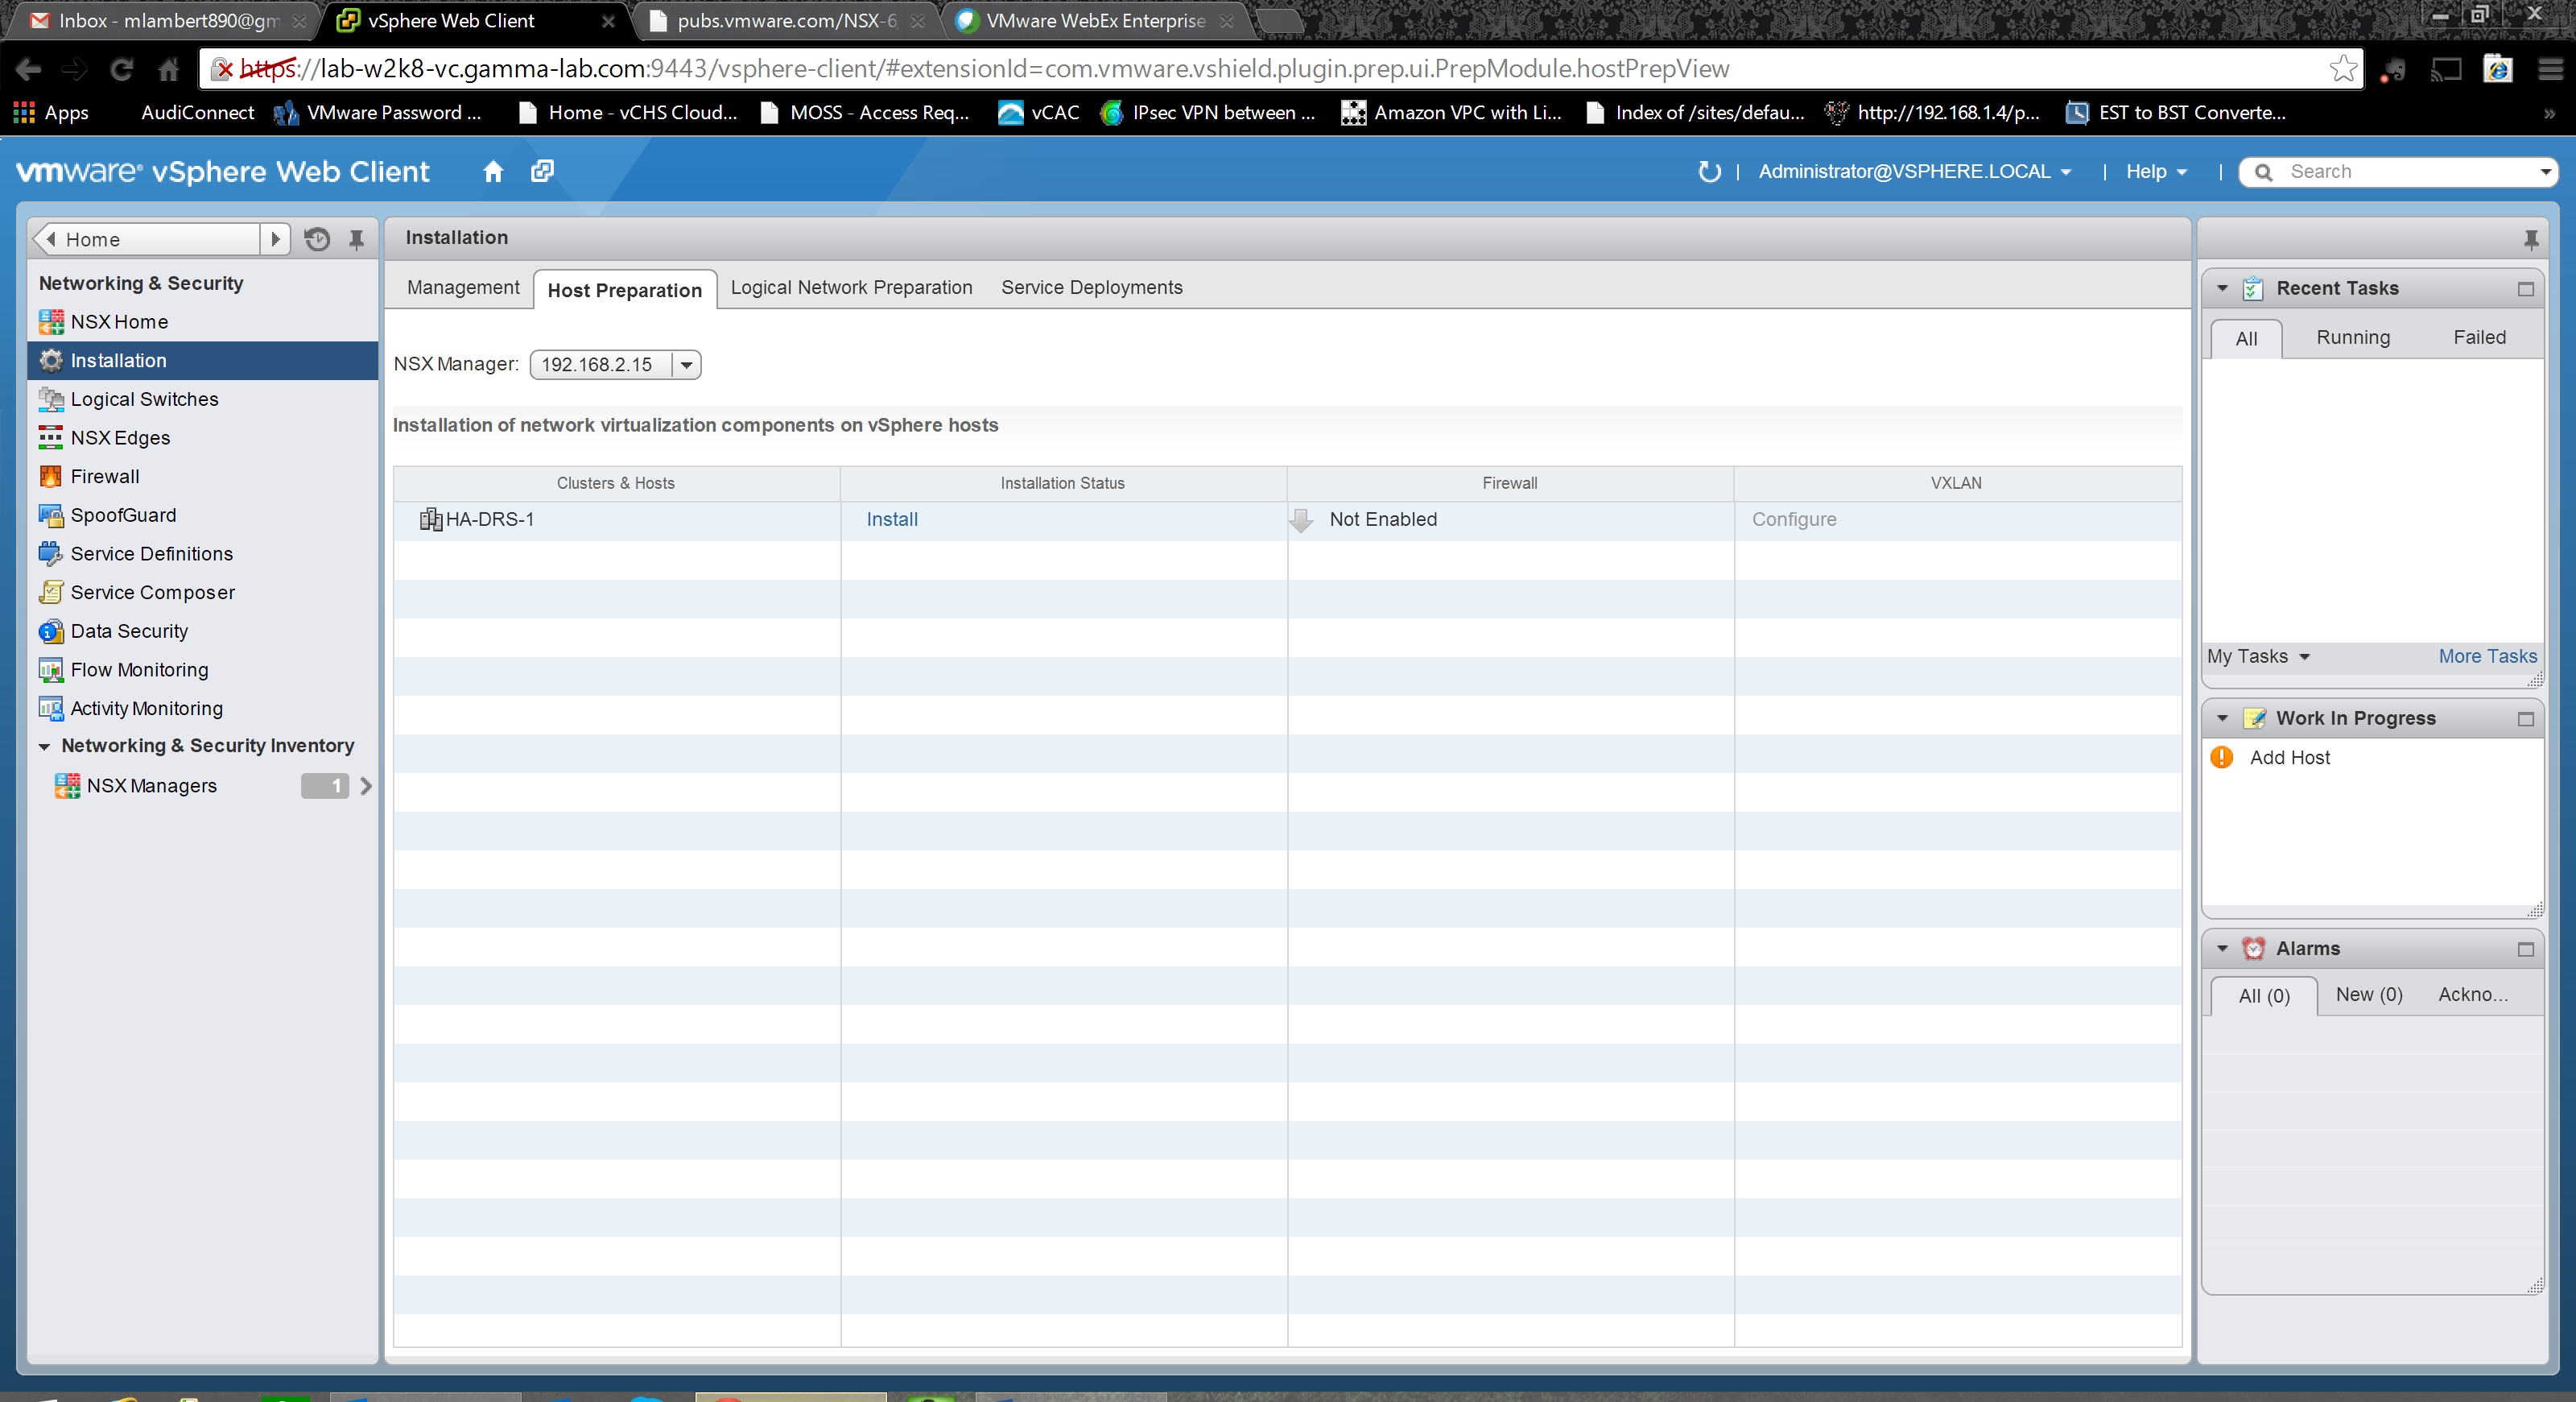
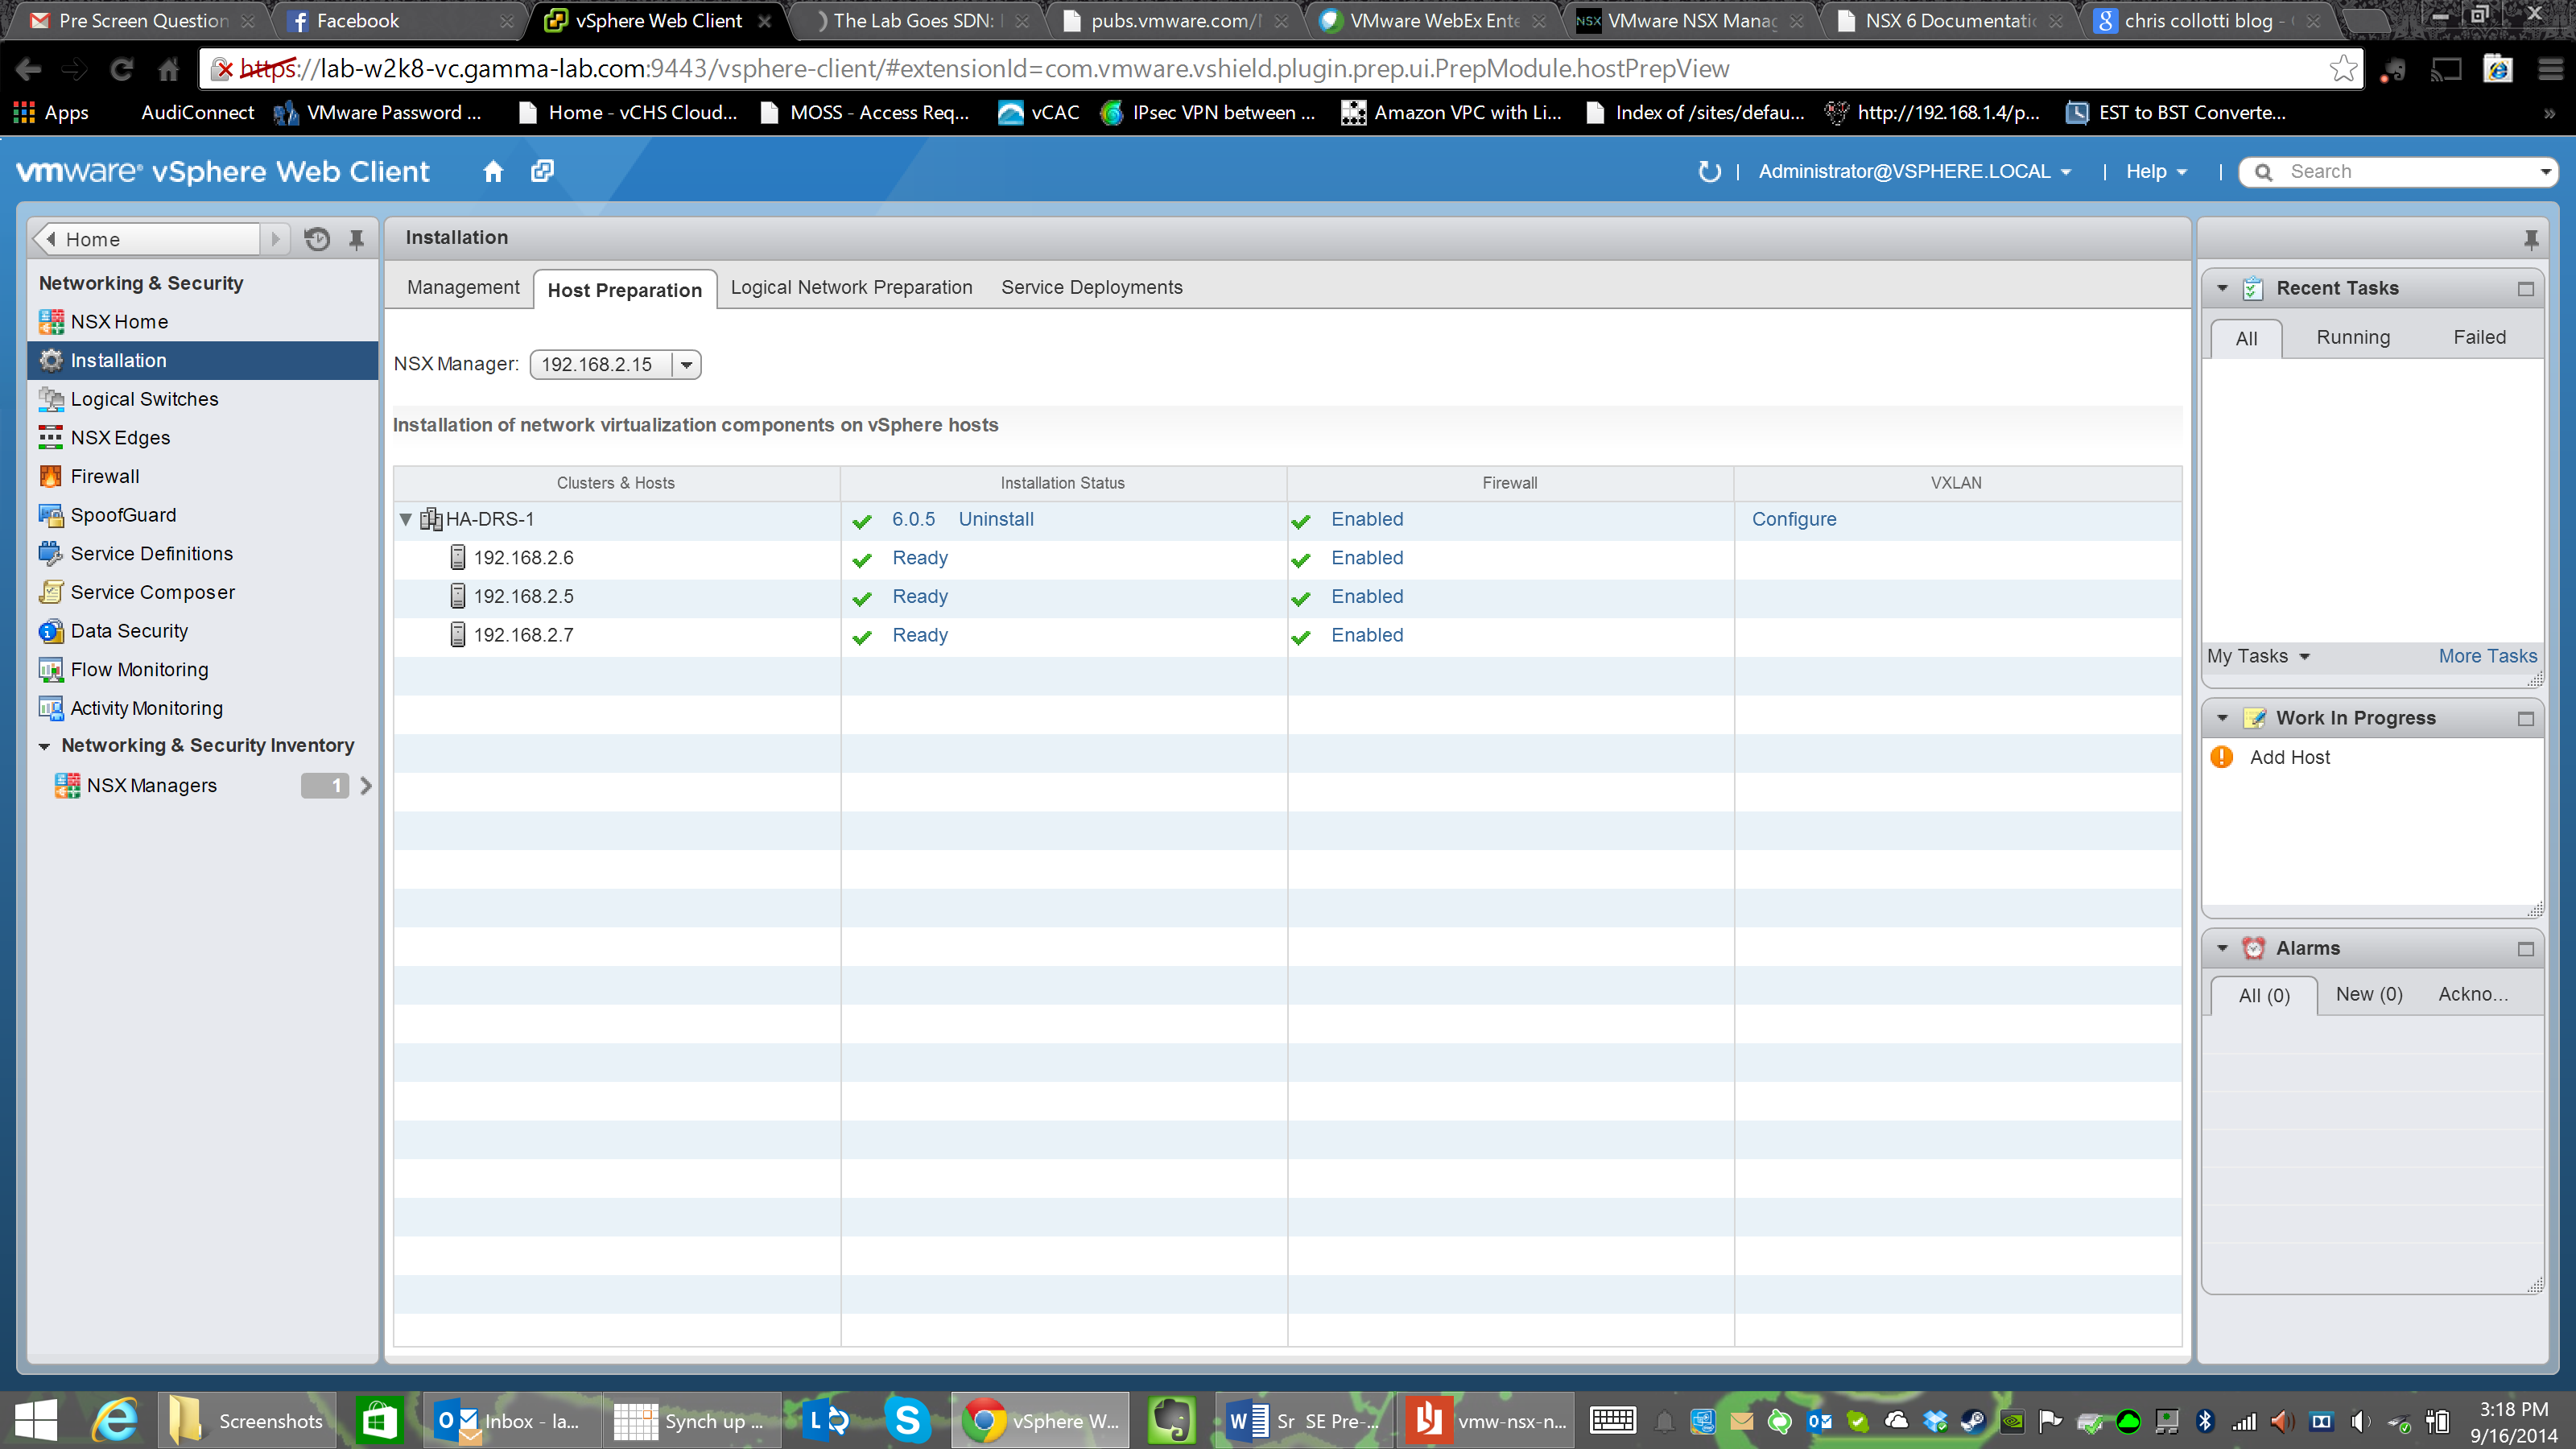
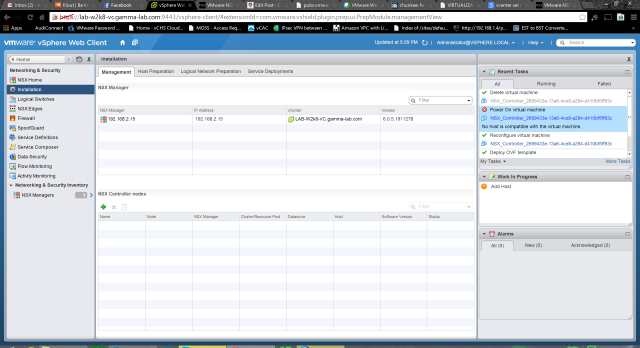
Last entry we got the NSX Manager up and running in vCenter after a quick overview of the technical requirements. Next up it is time to actually implement the SDN in our environment. The first step is to login to the vCenter web client and select the Network & Security solution from the Home tab. If you recall the rundown of NSX components from the last entry, our next task is to install the hypervisor level integration. To do this we need to prepare the hosts. This is similar to implementing VXLAN and results in a VIB being installed. Click on the Install option in the menu pane, then select the Host Preparation tab:
Under Host Preparation, we can see any clusters in our vCenter configured with a vDS. In our case there can be only one!
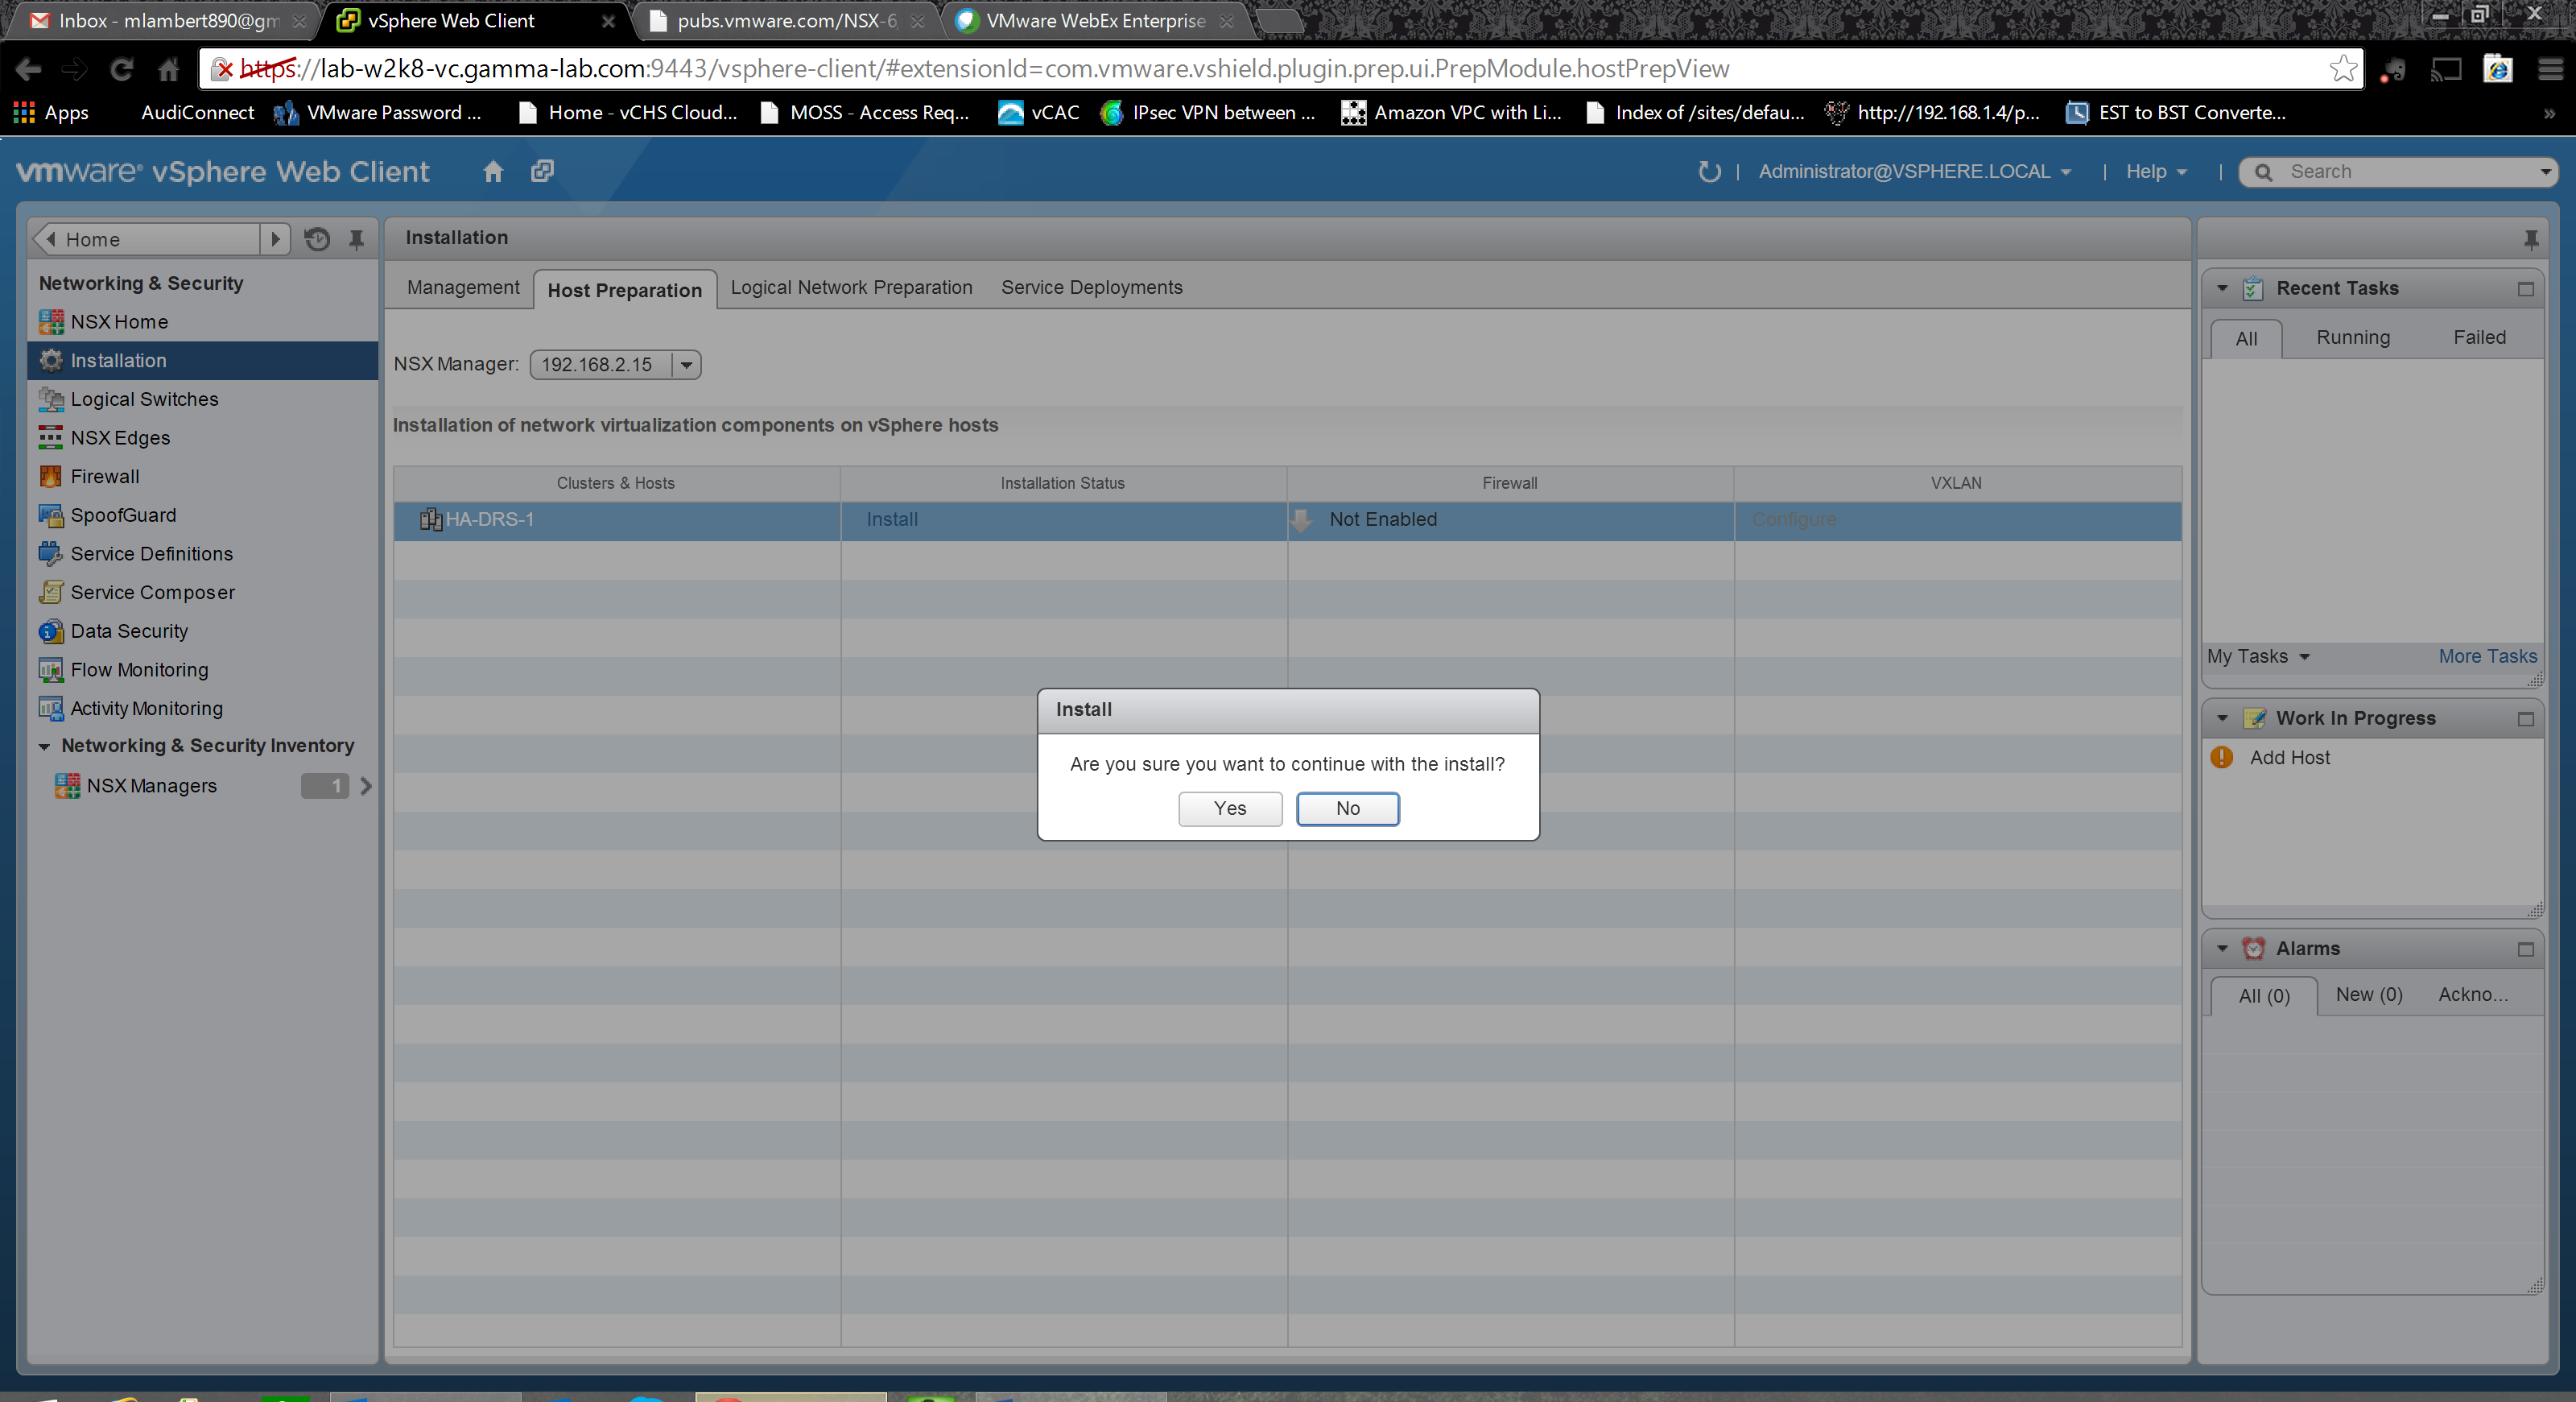
Clicking the “Install” hyperlink in column 2 will trigger the install after a quick confirmation:
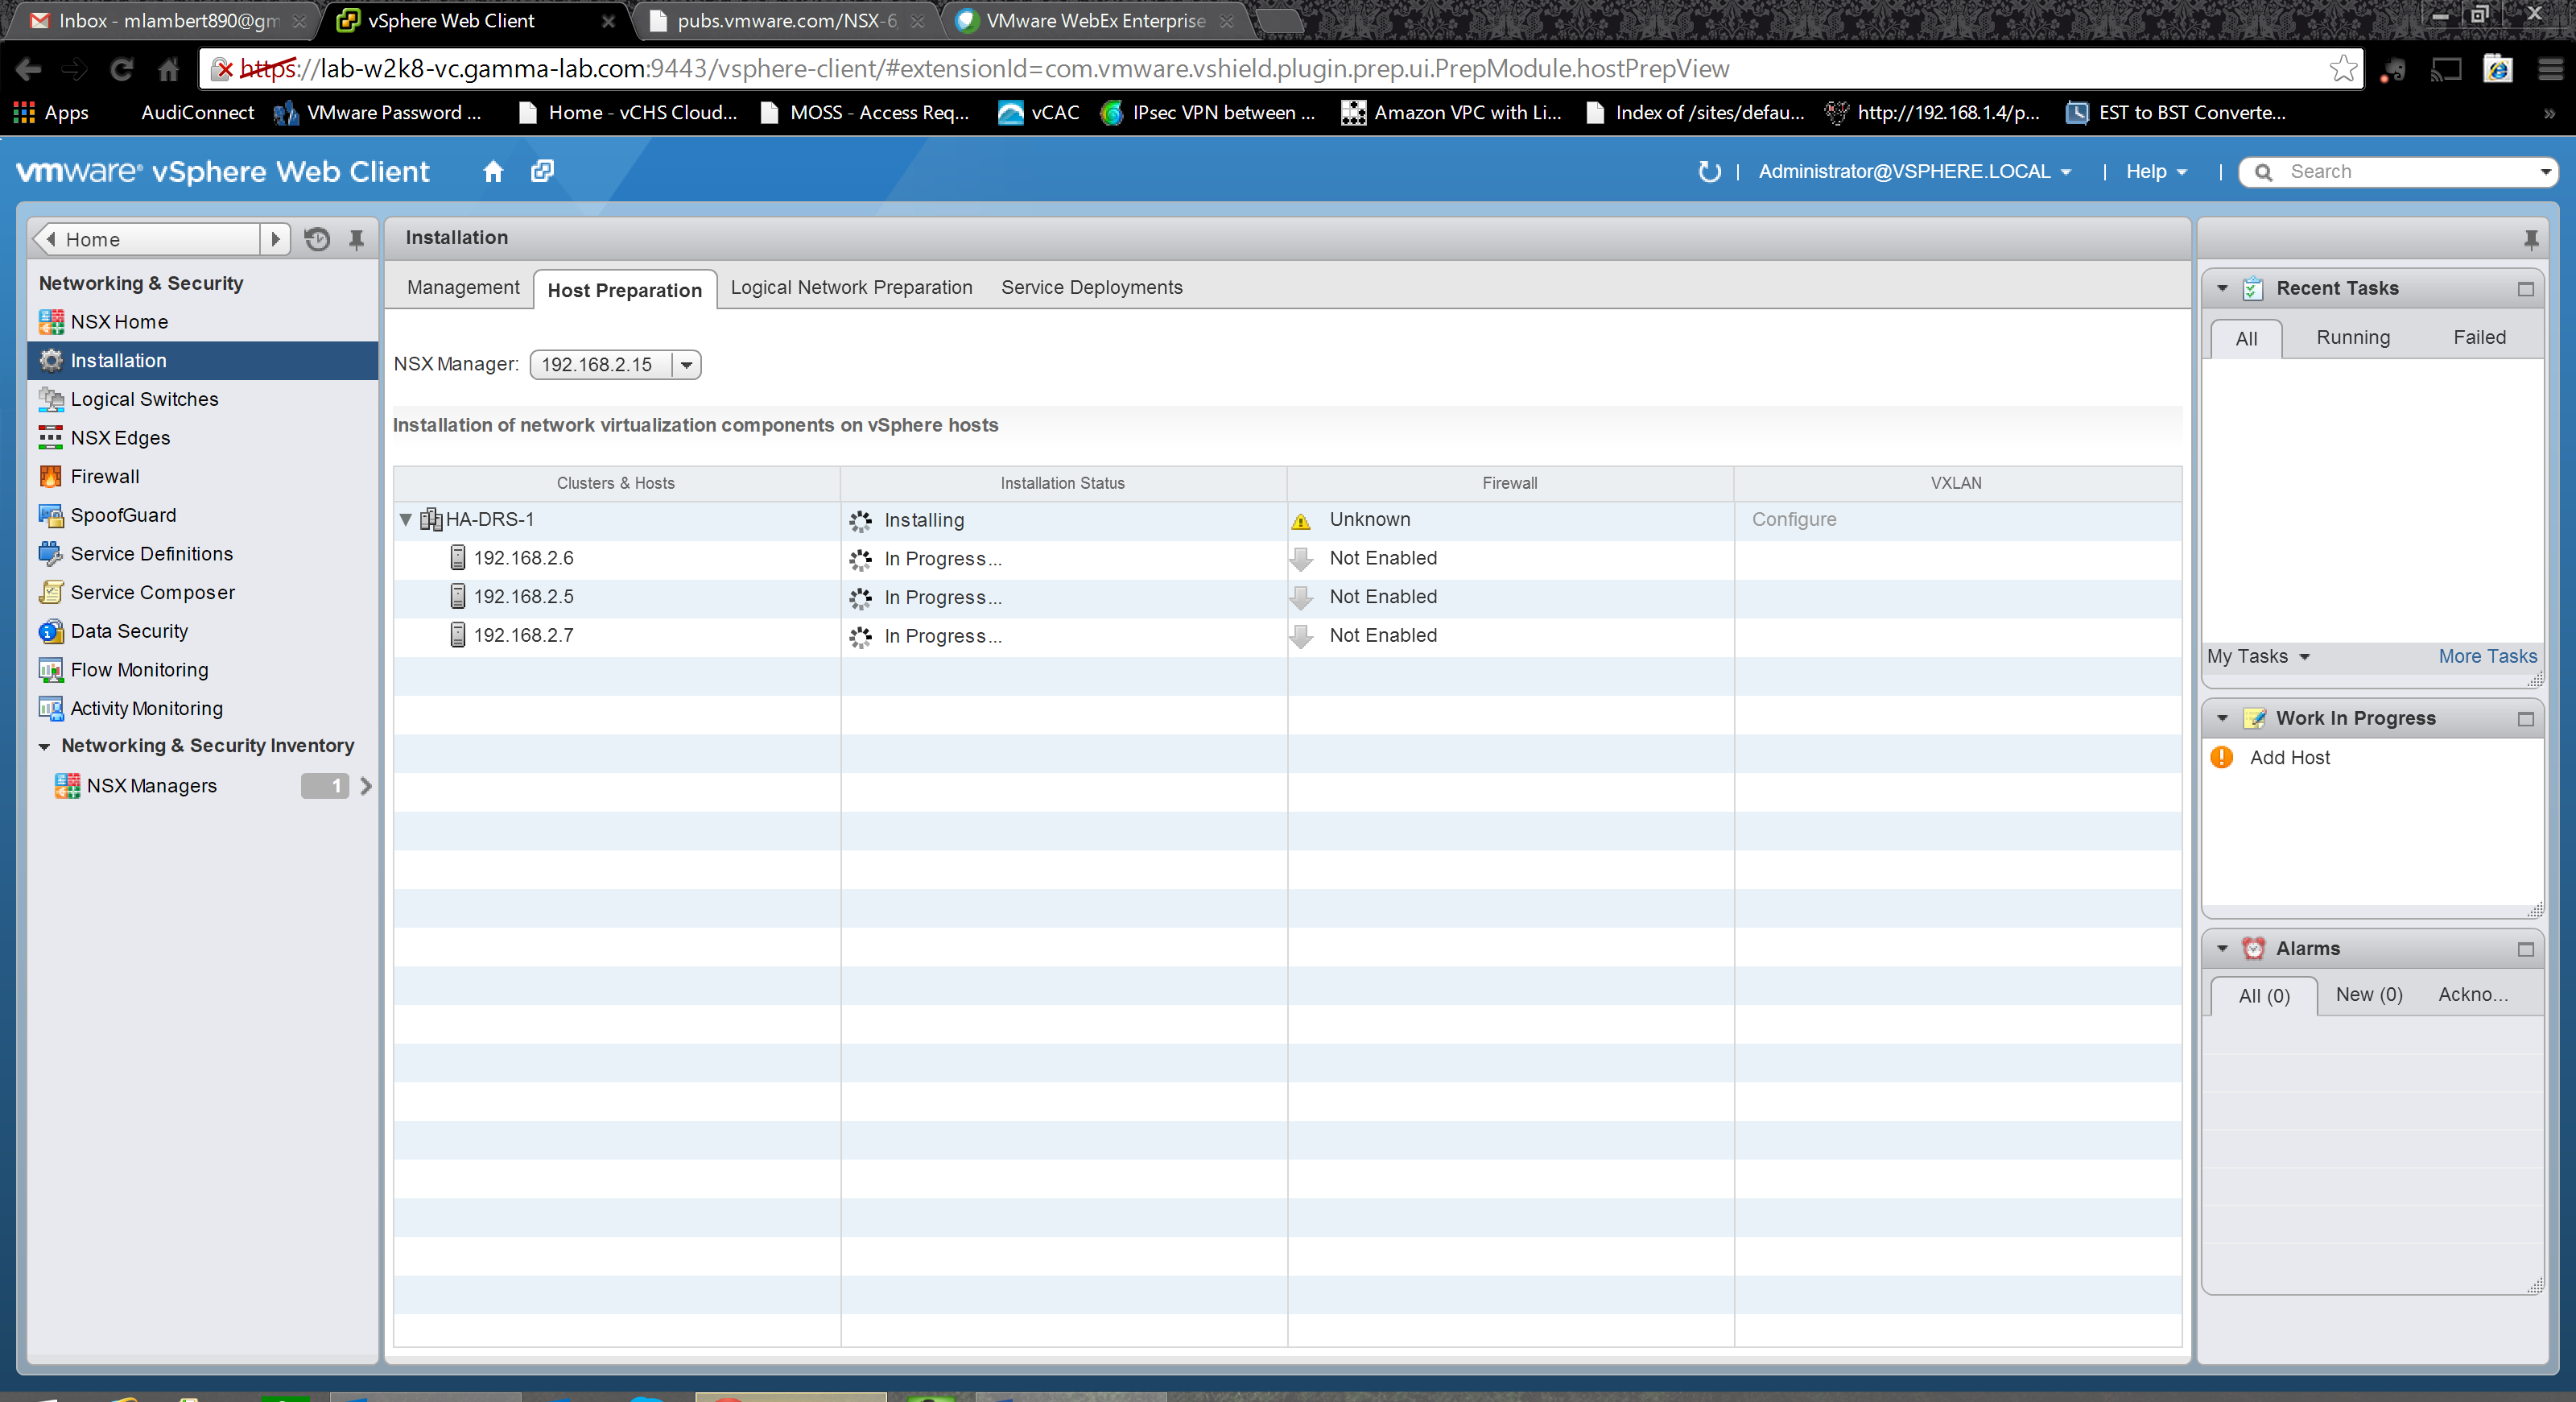
The Manager will start the download of the VIB to the hosts, and trigger the scripted install. All of the usual automated workflow orchestration for VIB installation applies. Lots of things can trip this part up, mostly attributable to host or network misconfiguration. Our environment is sparking clean so we have nothing to worry about!

Working away at each host in parallel…
And just like magic we…. Wait… What the heck is this?! Hmmm… So much for our clean environment! Looks like it failed. Luckily there is a handy “Resolve” hyperlink. Let’s click it.

A bit more thinking and POOF! As if by magic we’re good. So what the heck happened here? Well in some cases it seems that the install actually requires a host reboot. The workflow triggered by resolve will perform this reboot so be aware of that before clicking. It should probably mention this when triggered, but the good news is HA/DRS is there for just such a situation, right? Well I’m not sure because I can’t be 100% certain that it staggered reboots. In any event, maintenance mode is probably a great idea when doing massive configuration changes like migrating to SDN! And in any event it worked so all is well…
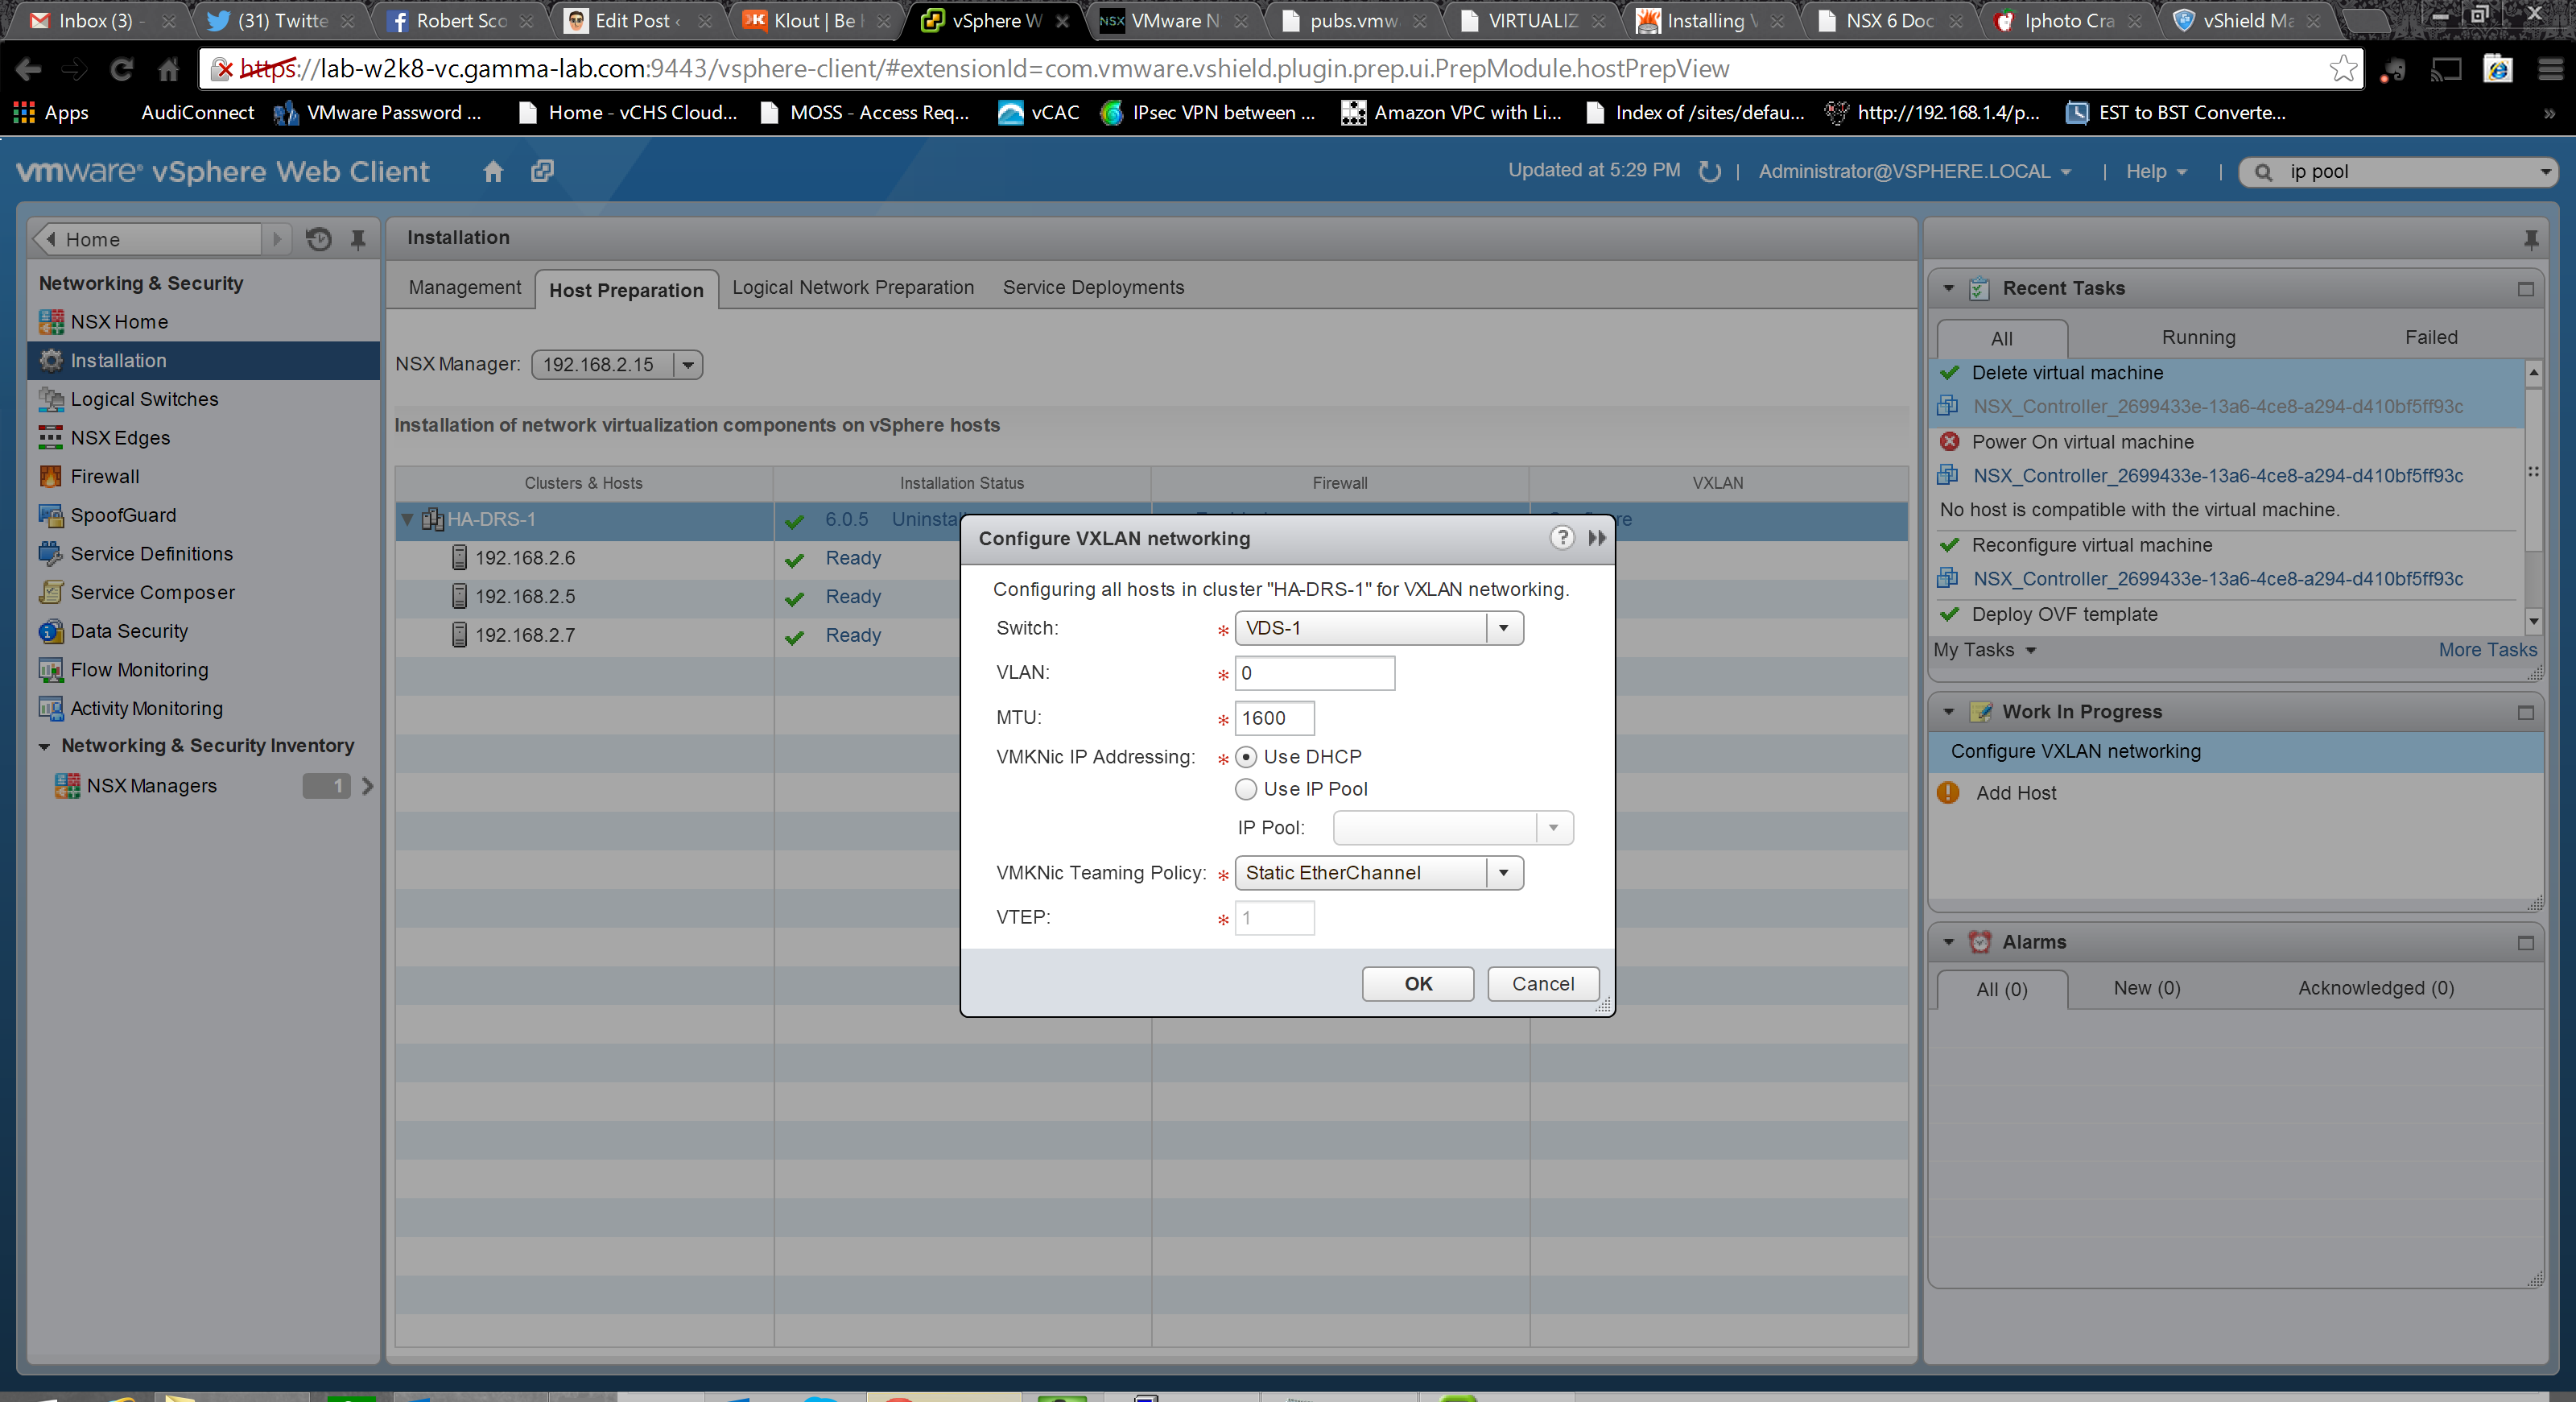
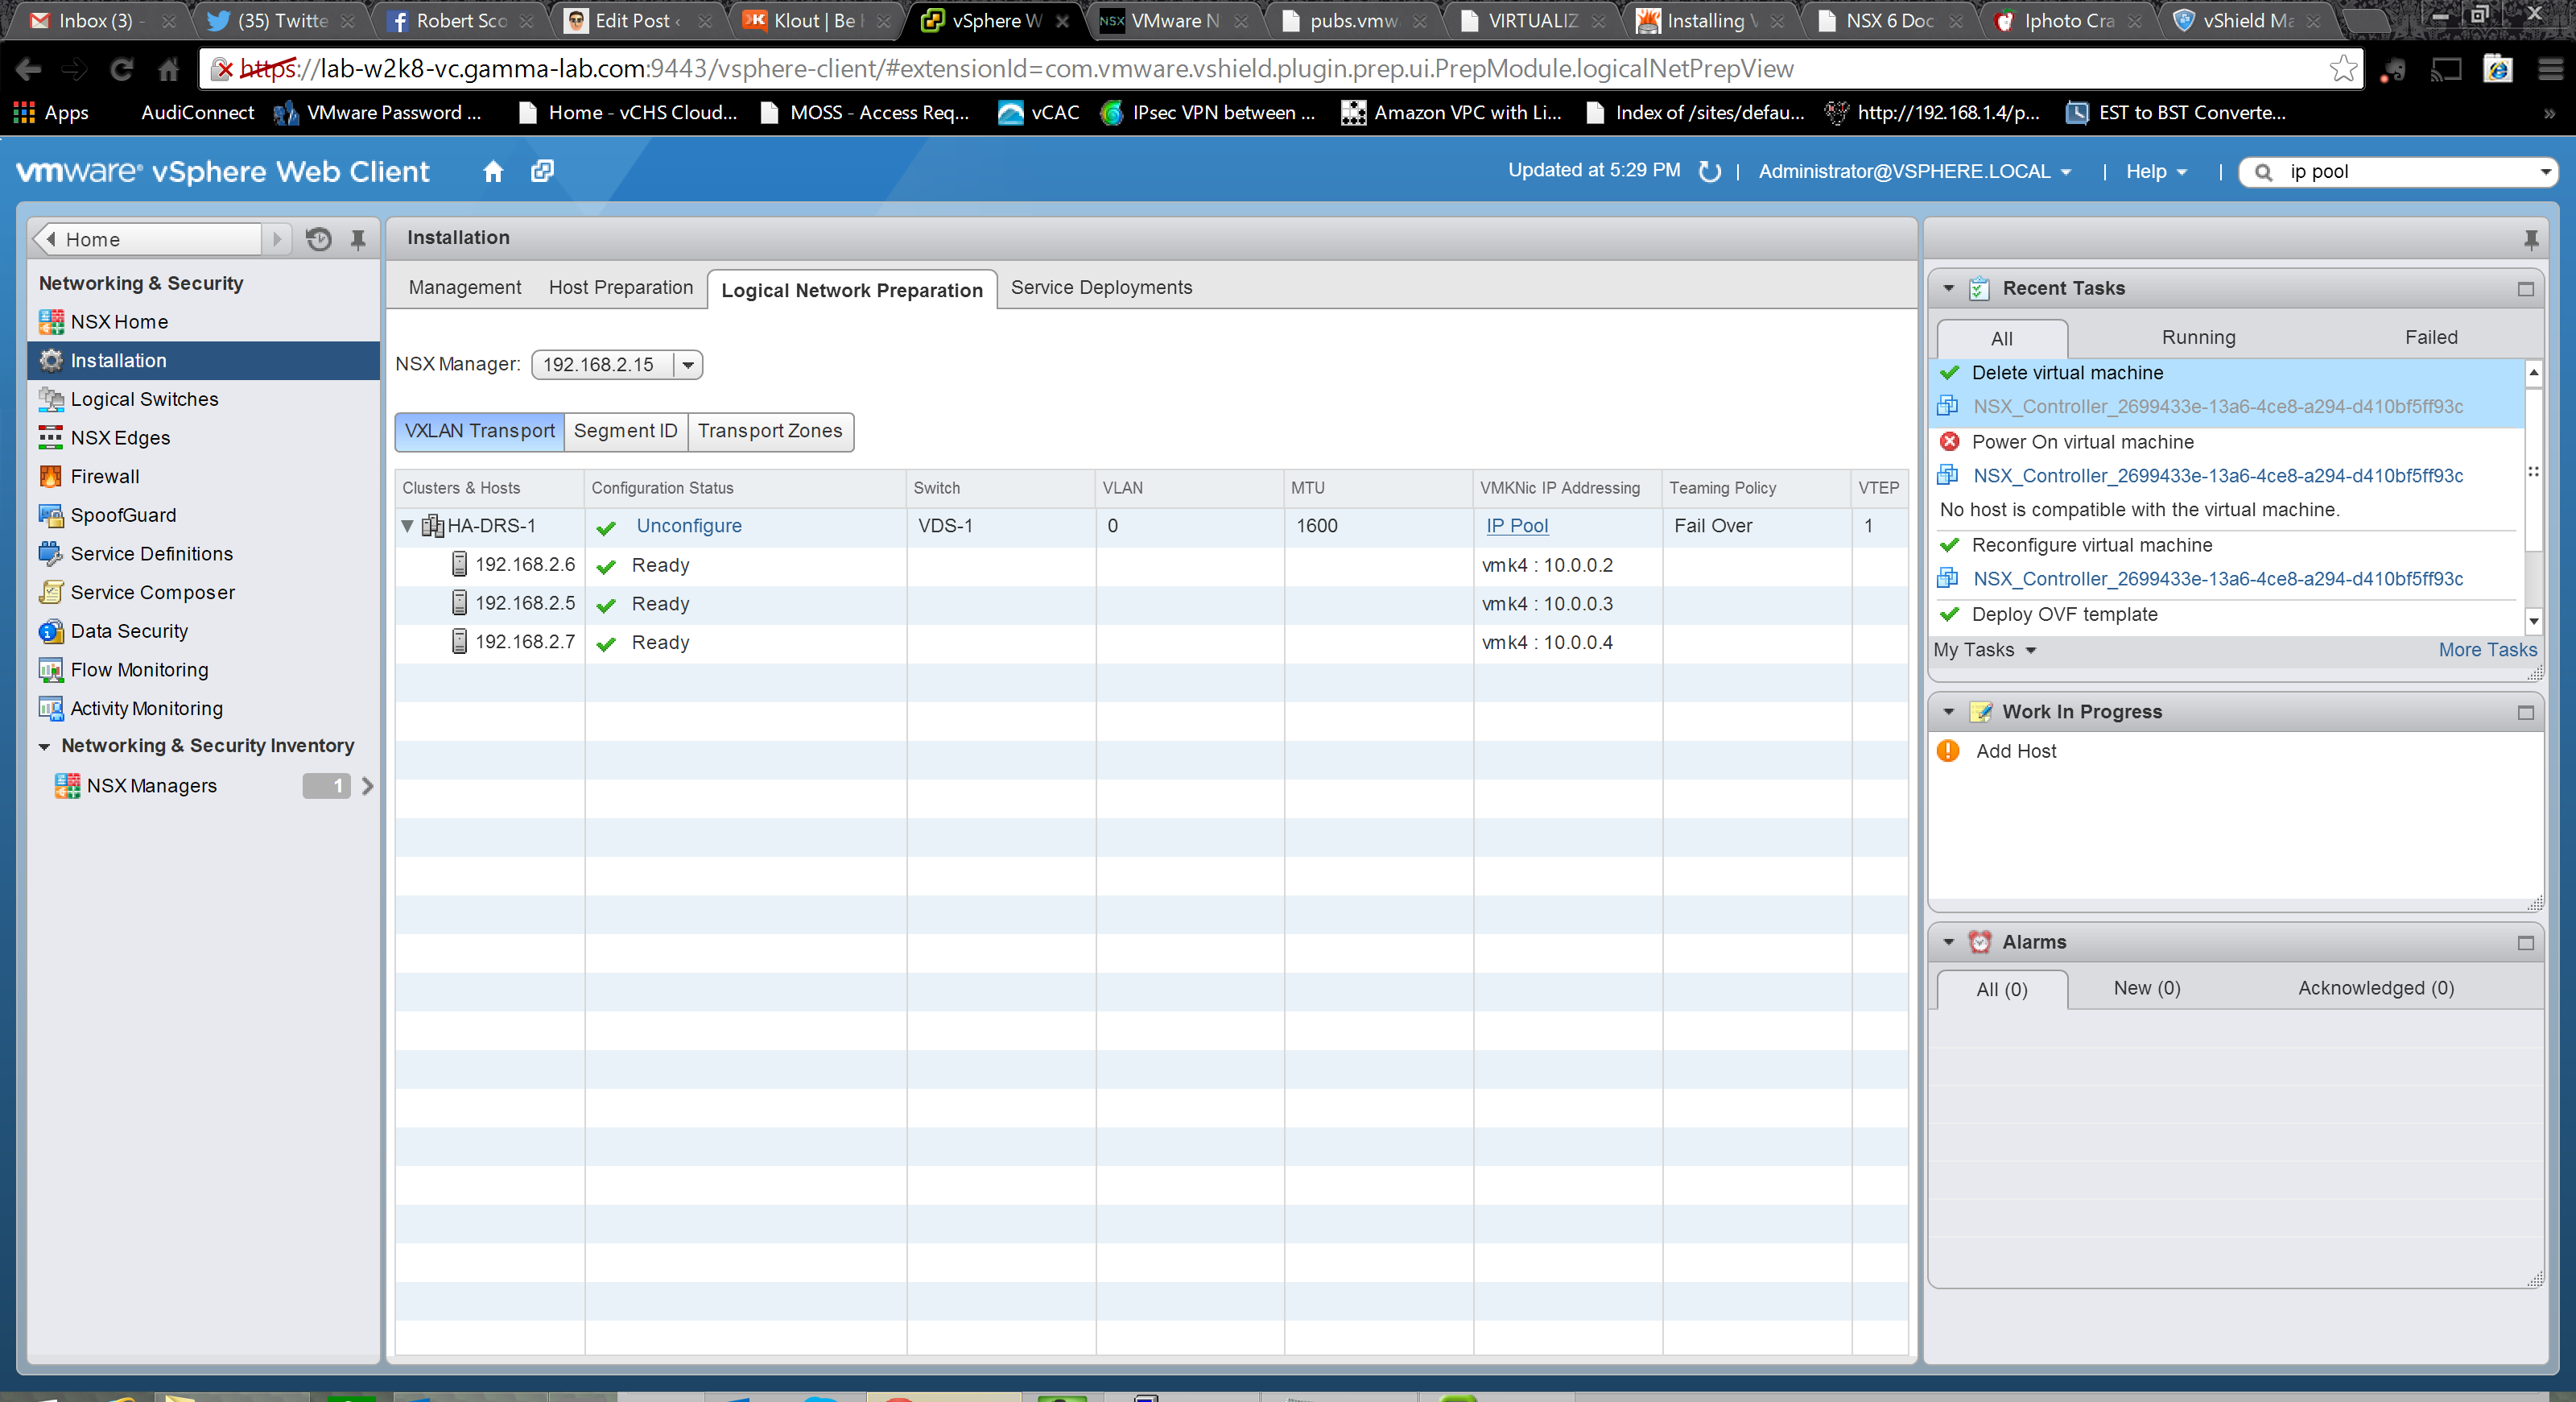
Notice there is a hyperlinked “Configure” next to our cluster? These are great UI clues in the NSX manager. Go ahead and click configure to prepare the VXLAN configuration. There are a few things we need to enter here. We select our vDS under Switch, enter the VLAN id of the transport VLAN (if applicable), the MTU size of the VXLAN uplink vmkNIC (note – 1600), select a vmkNIC IP addressing scheme – we are going to switch this to IP pool in a second, select a vmkNIC Teaming policy (I chose failover, remember that EtherChannel must have matching switch config on the physical uplink switch) and lastly enter a VTEP id:
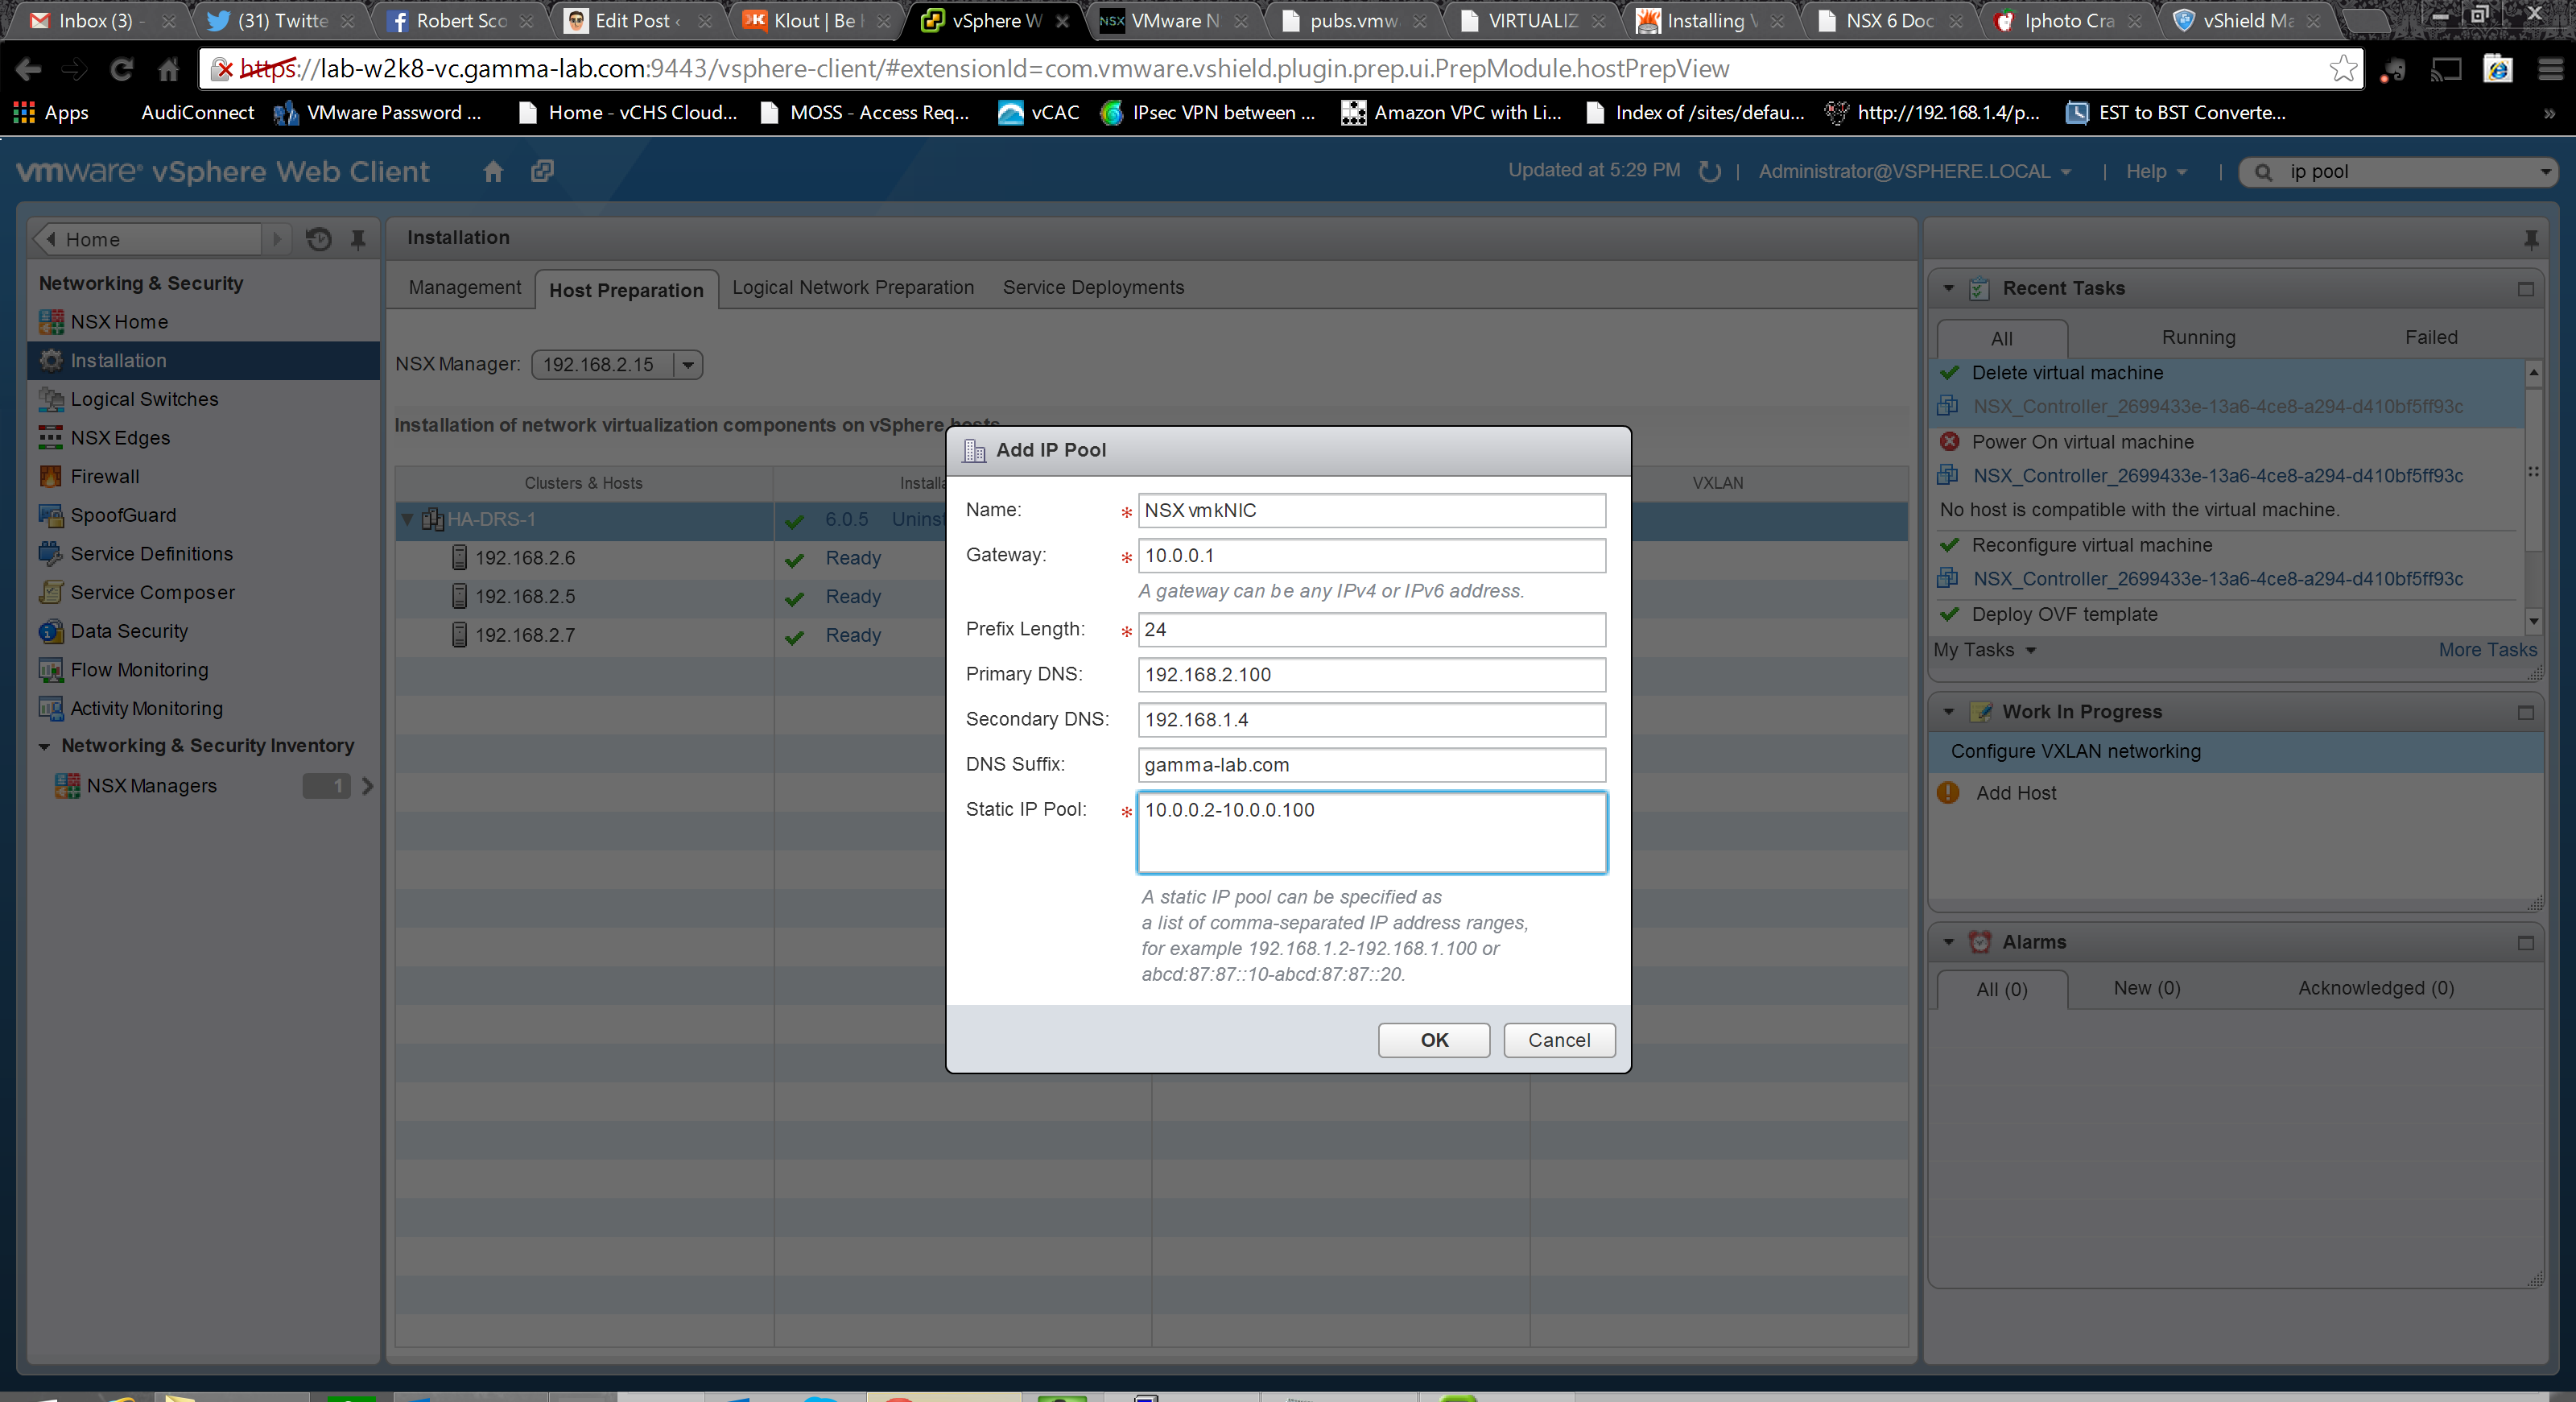
Creating a new IP Pool for VXLAN use is easy. Simply provide a name and IP subnet info, as well as a range:
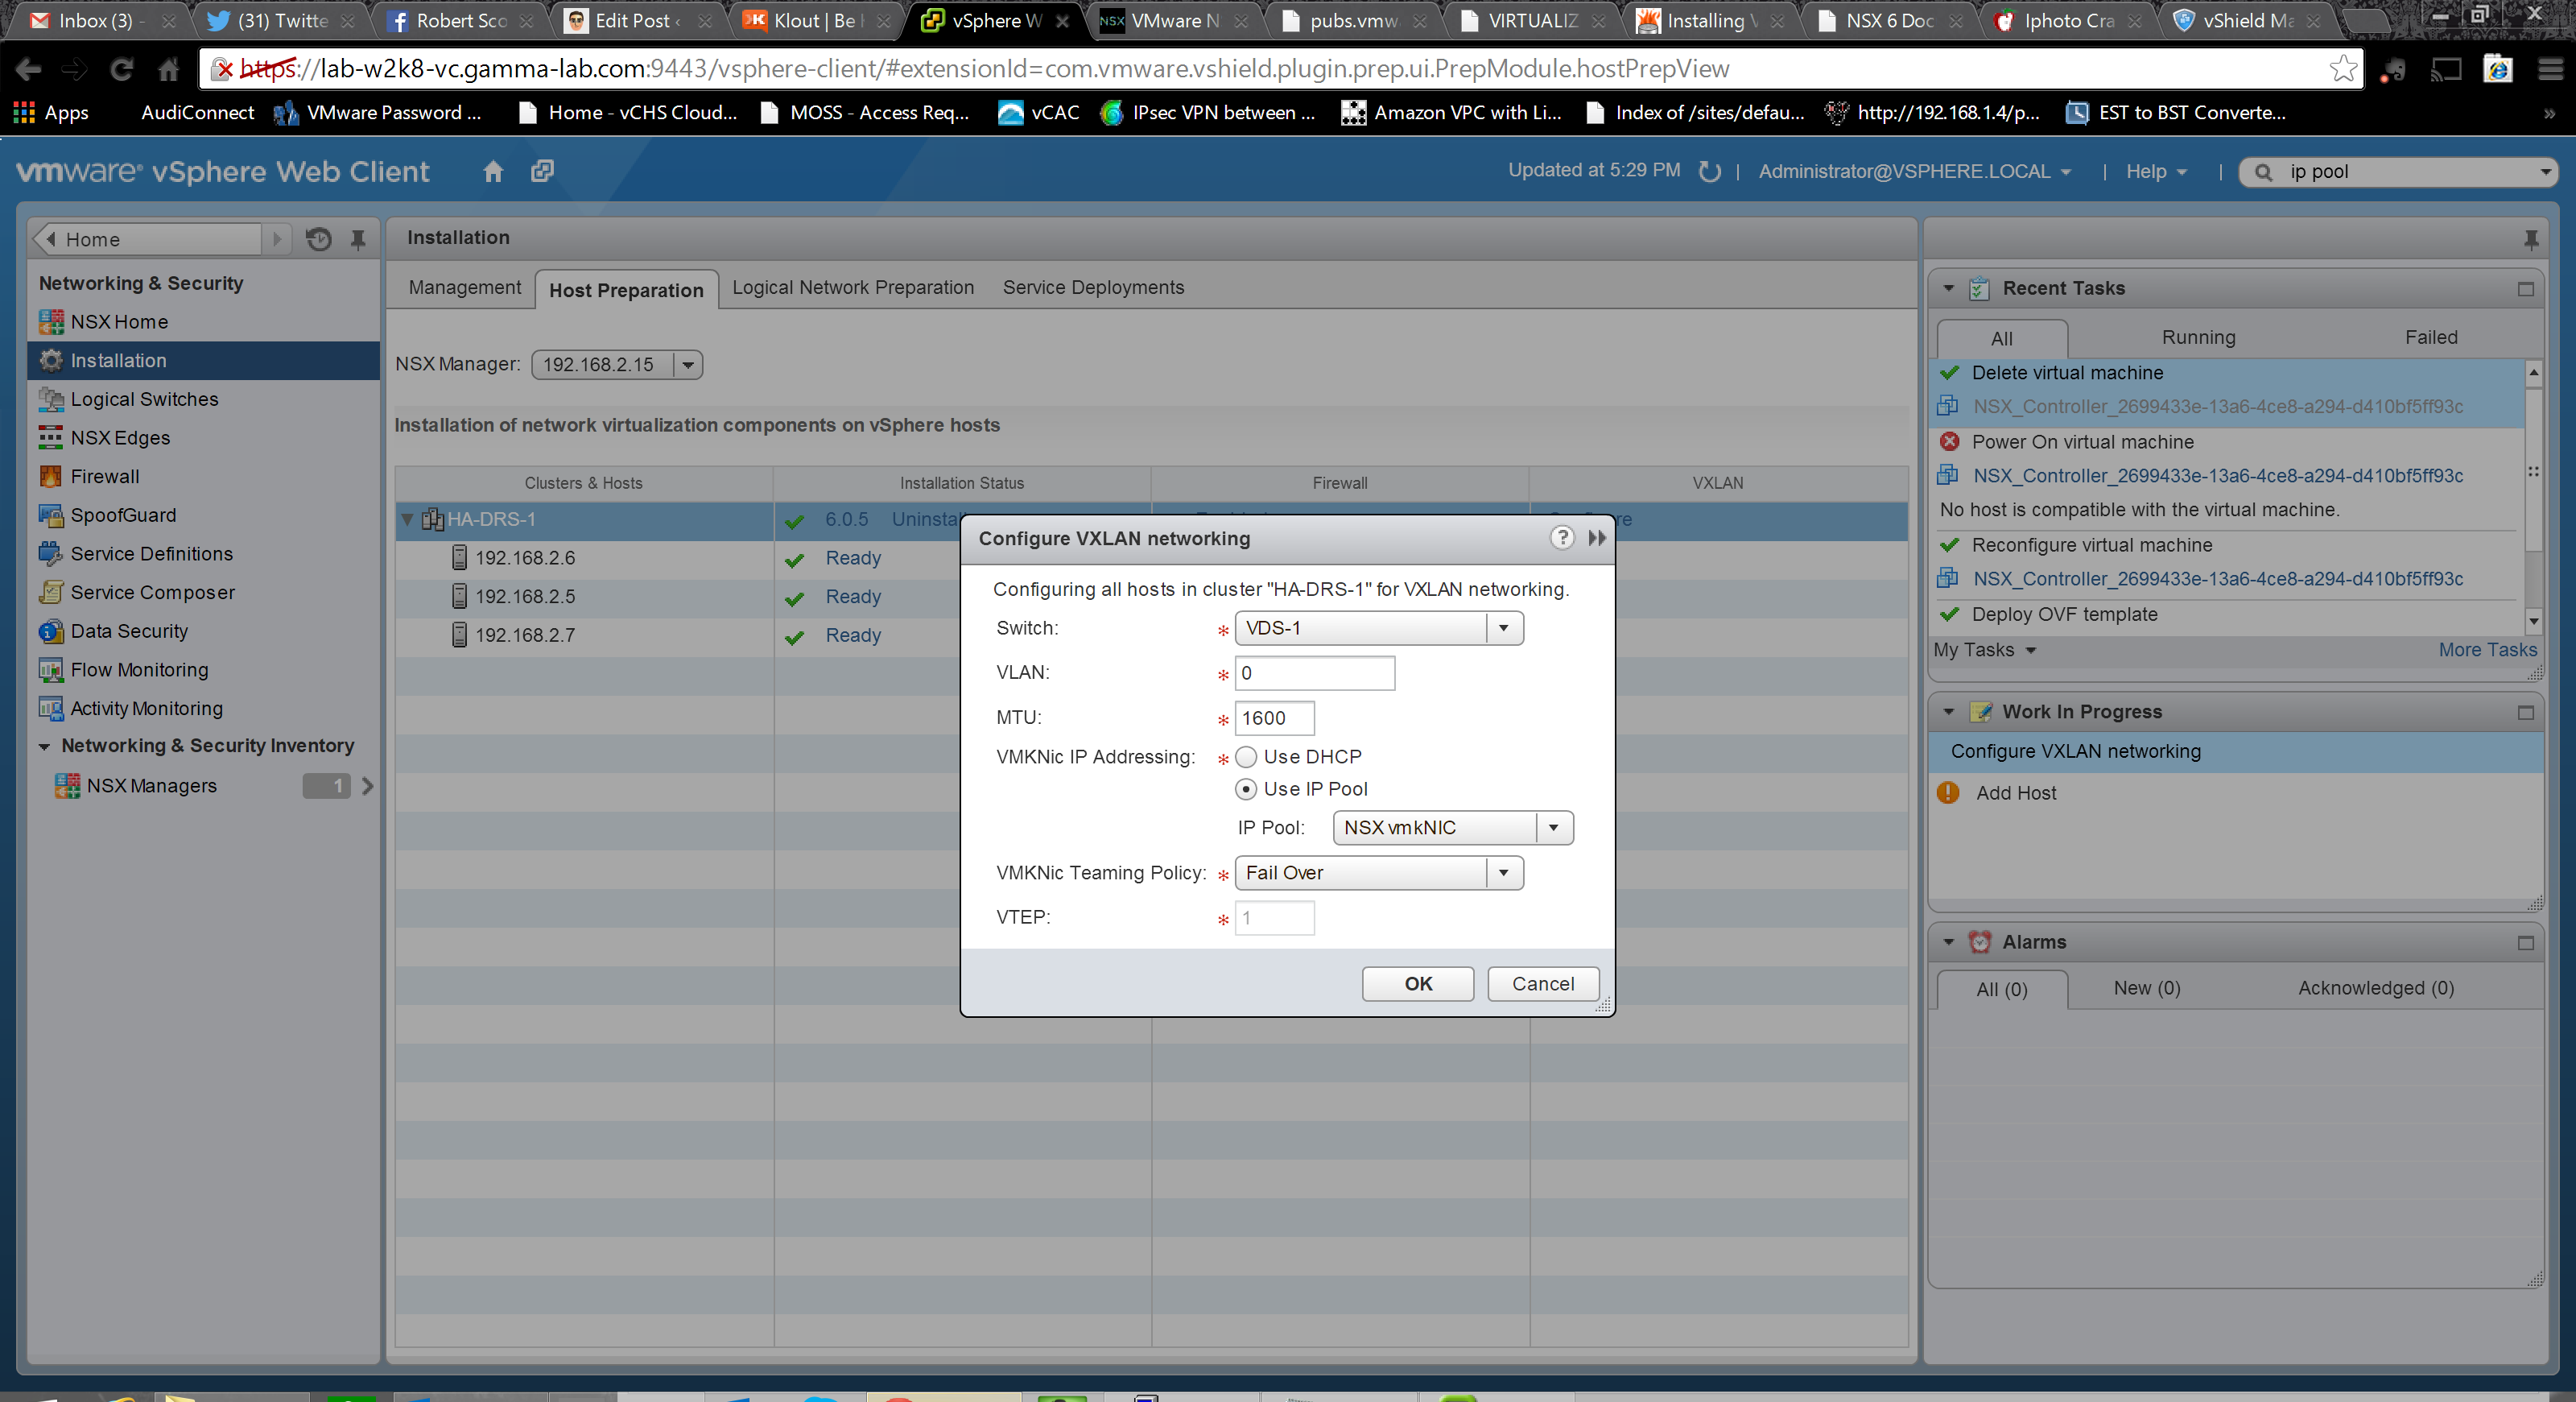
Here we can see the completed VXLAN config dialogue:
With the configuration applied, we now see additional details populated for the cluster including VTEP id and failover policy:
VXLAN is up and running in NSX, so let’s go ahead and finish off the config set. Click on SegmentID to create the SegmentID pool which will be used by NSX to allocate to VXLAN for the creation of vwires (dynamic VXLAN layer 2 domains). We can also configure multicasting here. Select a numerical range for the pool starting at 5000. I selected 5000-5999 and left multicasting off:

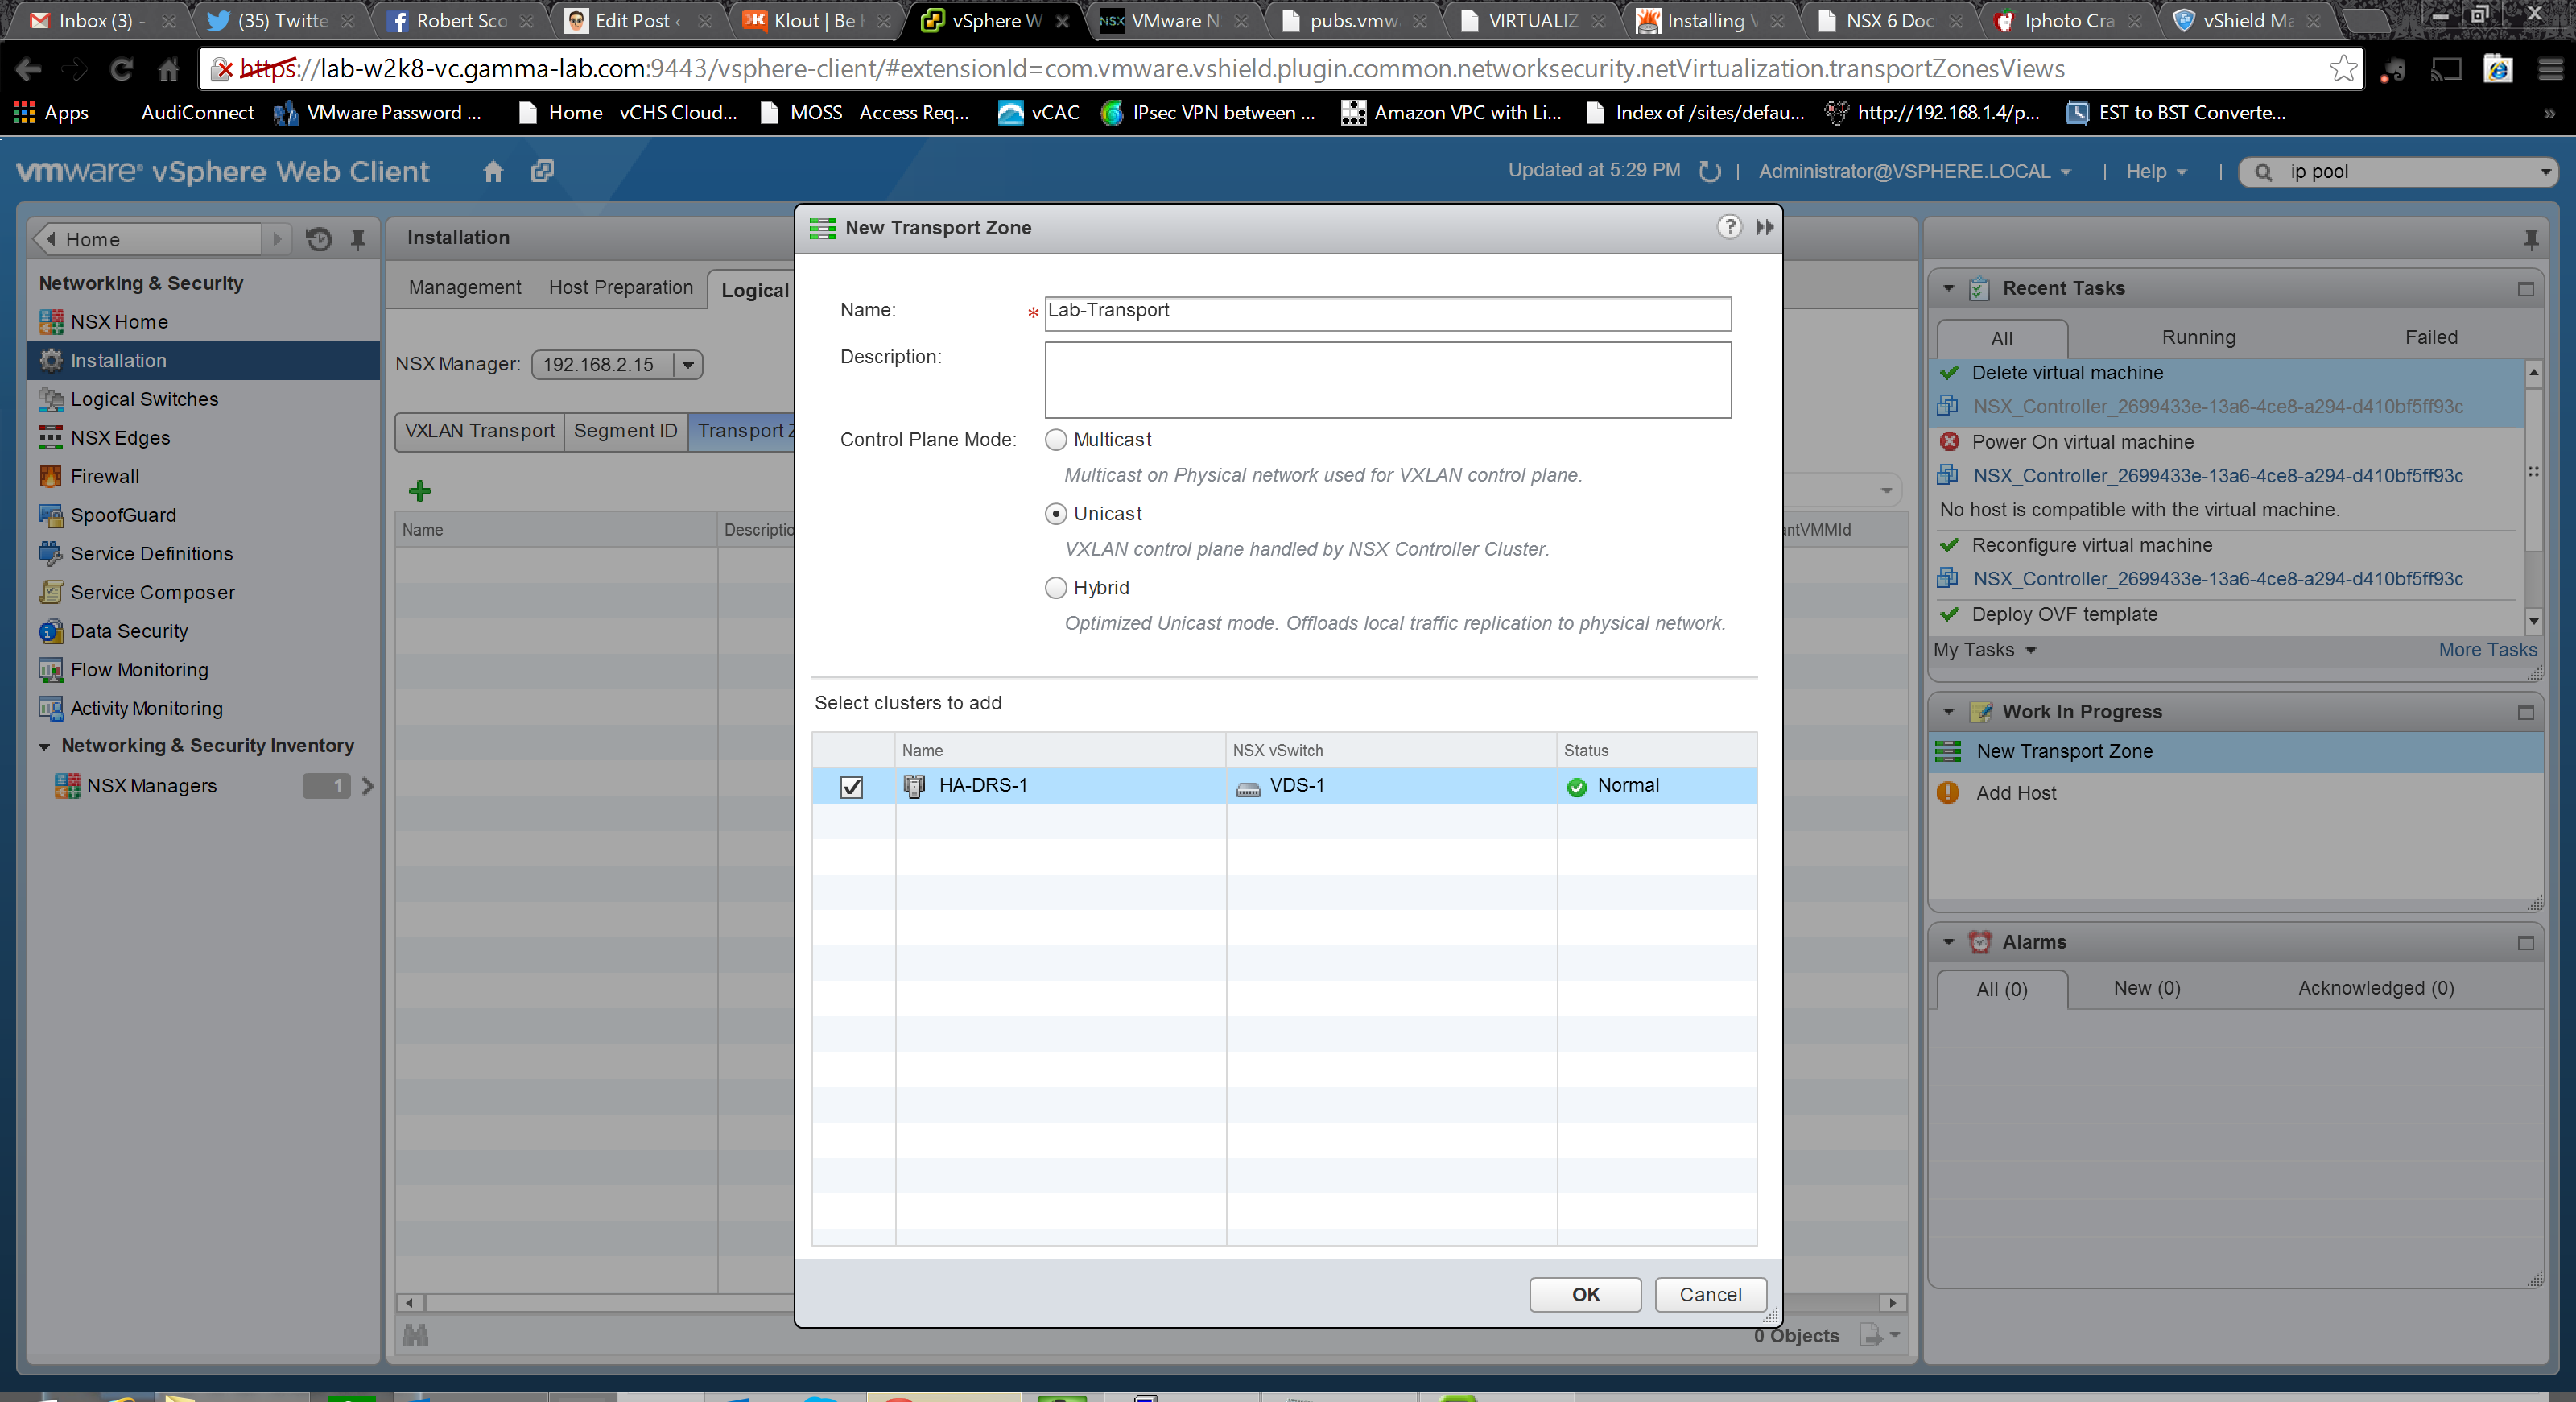
The last step in this config block is to setup the NSX Transport Zone. Provide a name and select a mode for the Control Plane interaction. I select unicast which works well in a lab setting where scale isn’t a big deal. In this case the control plane will be entirely managed by the NSX Controller. Alternatively the control plane activity could be offloaded to the physical network via multicast. The last option is a hybrid where local traffic replication is offloaded. The hybrid is probably the best match for production scenarios because of it balance of control efficiency and scalability. The last step is to add the prepared cluster to the transport zone:
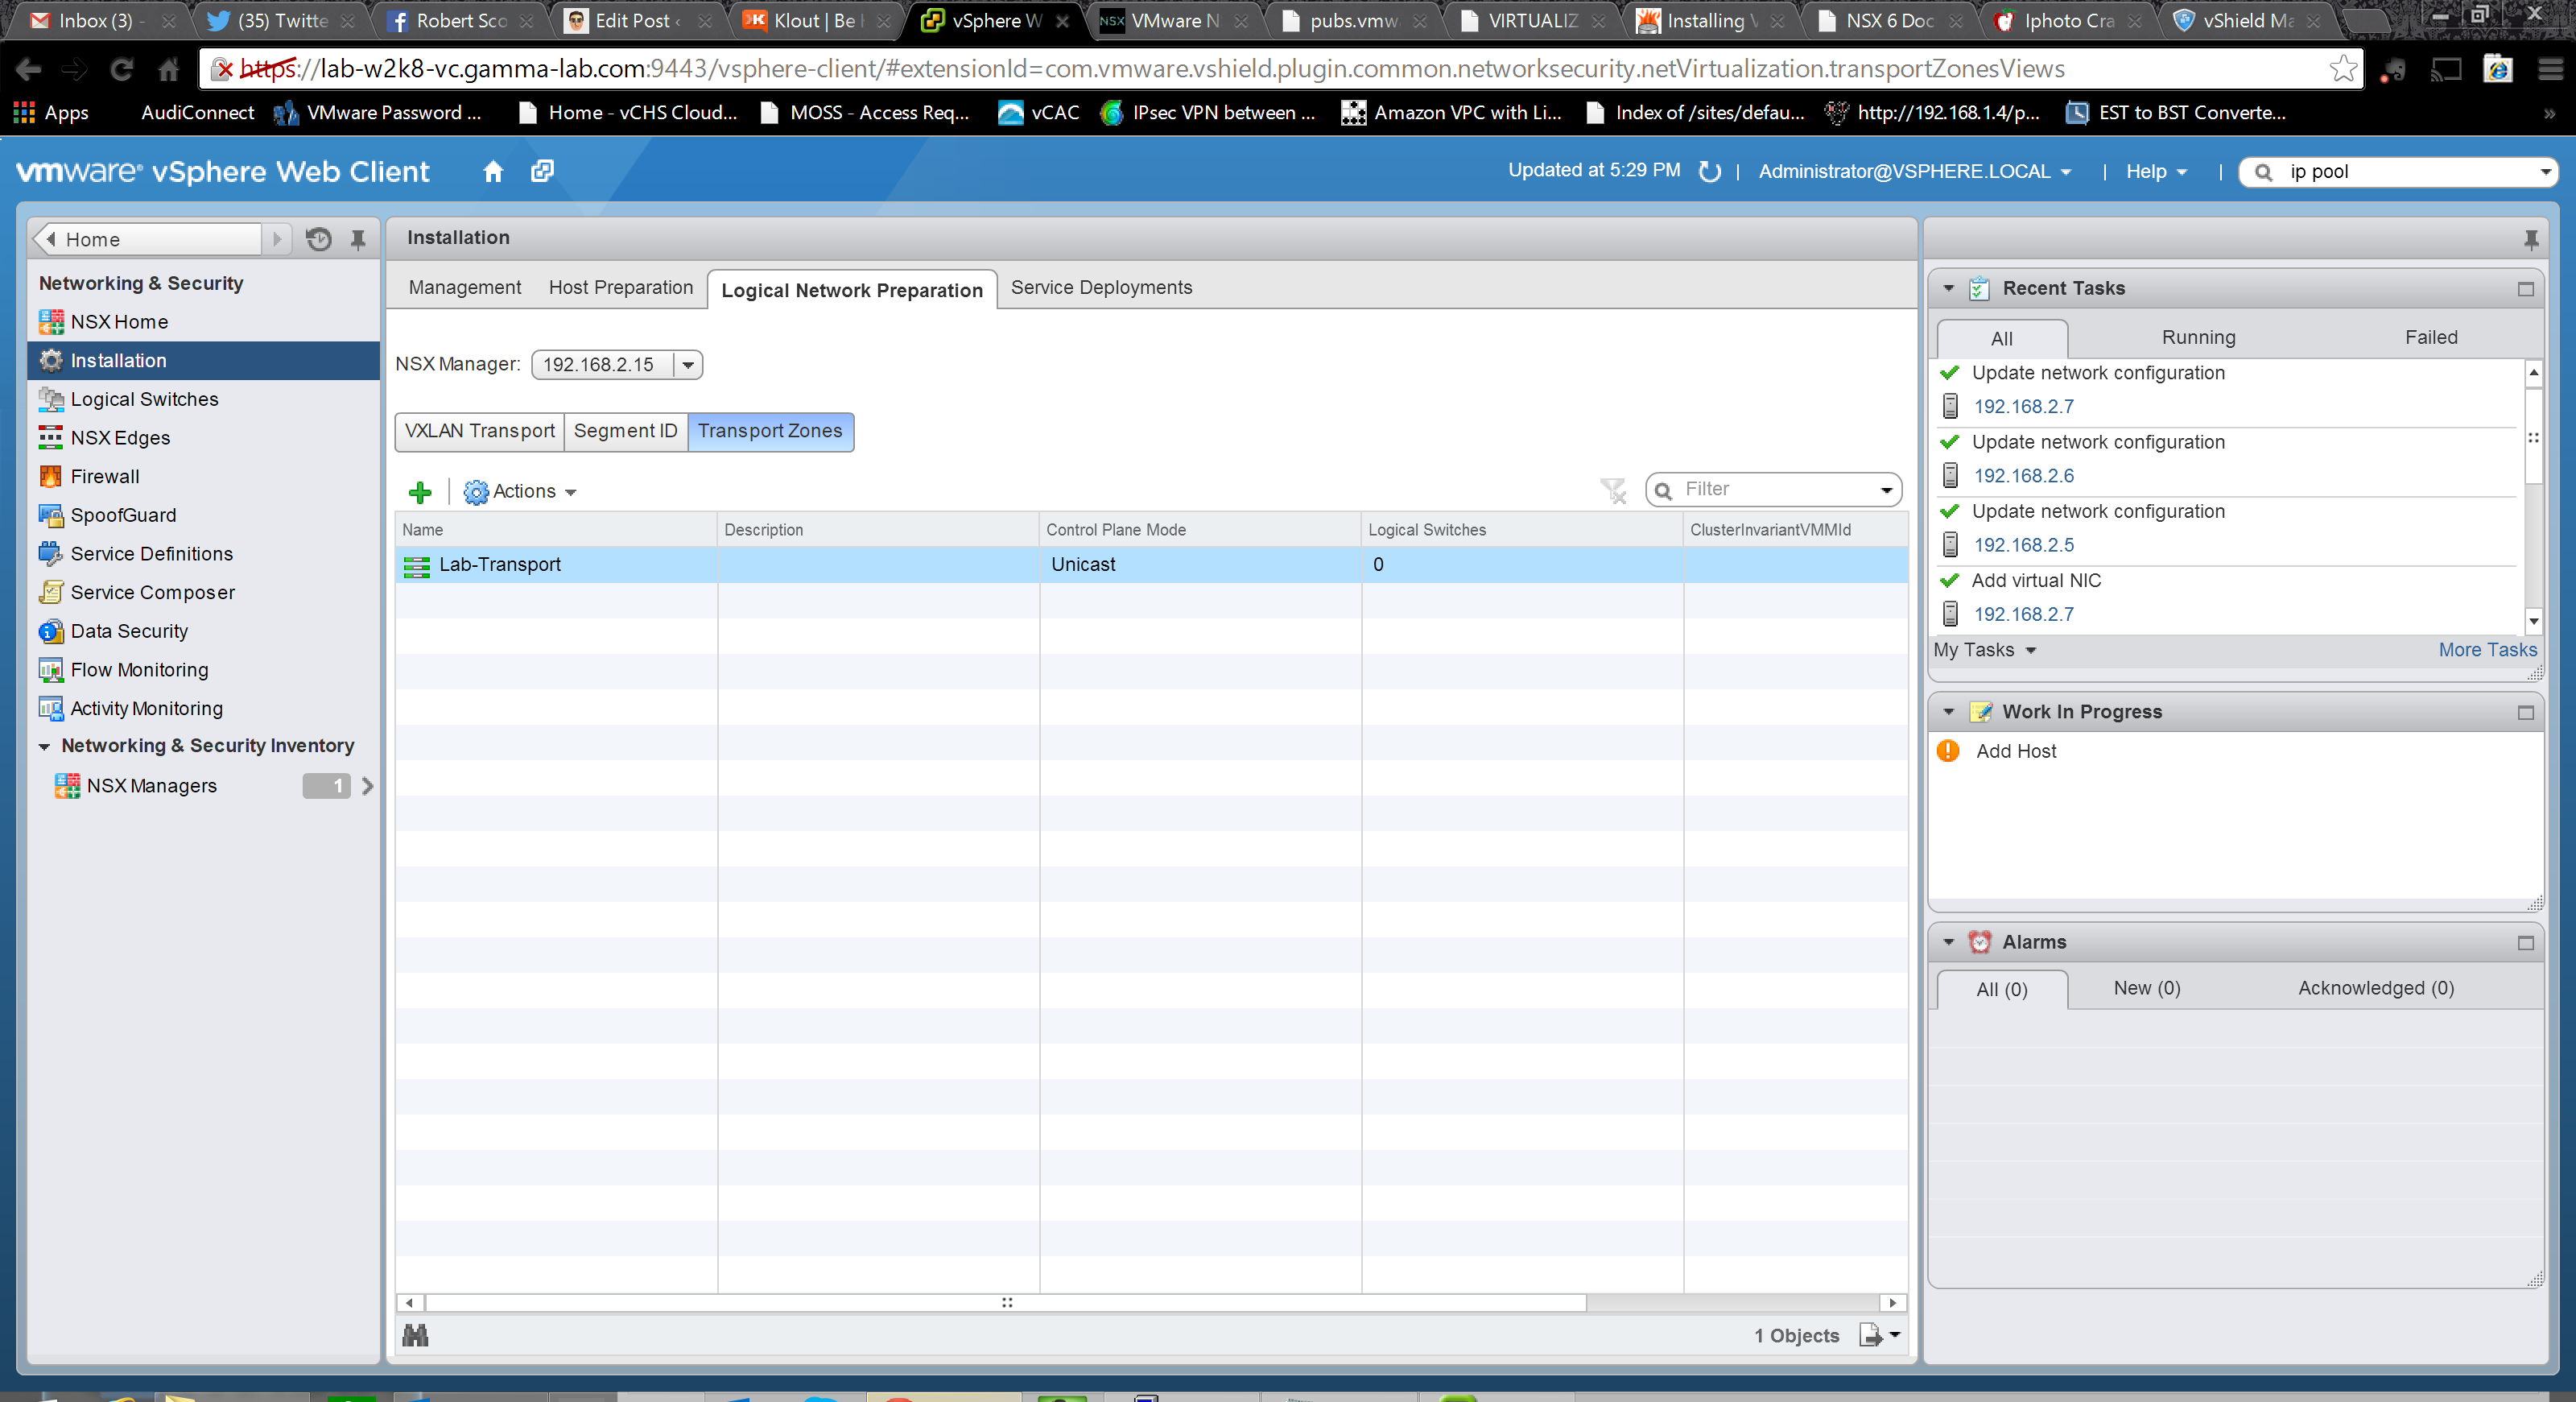
Here we can see the transport zone successfully added to the NSX configuration:
Next up is deploying the actual overlay network or “logical switches” in NSX terminology. Heady stuff! There is a pretty daunting list of pre-requisites in order for this process to work correctly. I’ve copied them directly from the implementation guide for reference and I will talk through each one because they require explanation:
- You must have the Super Administrator or Enterprise Administrator role permission to configure and
manage logical switches: This one is a no brainer. Have right permissions before configuring. Basically you need super user for this. - Network virtualization components must be installed on the clusters that are to be part of the logical switch: make sure that the hosts have been prepared (the above procedure)
- You have the minimum required software versions: this is standard stuff. Make sure that the version compatibility matrix is green between vSphere/vCenter/NSX
- Physical infrastructure MTU is at least 50 bytes more than the MTU of the virtual machine vNIC: this one is trickier. So the physical infrastructure MTU we can figure out. In virtualization, we can look at any flavor of vswitch as utilizing the actual physical NIC of the host as uplinks. So a given vSwitch has N virtual ports connected to virtual NICs connected to virtual machines, but also has X ports connected to host vNICs which actually map to real physical links. The pre-req here is to ensure that the Maximum Transmission Unit size on the physical NIC is 50 bytes larger than the VM vNIC. In our case the “physical” NIC is really the vNIC on the ESXi guest VM since we are nested. To check that we go to the host configuration and actually edit the settings of the VMkernel adapter under Networking (not the physical adapter):
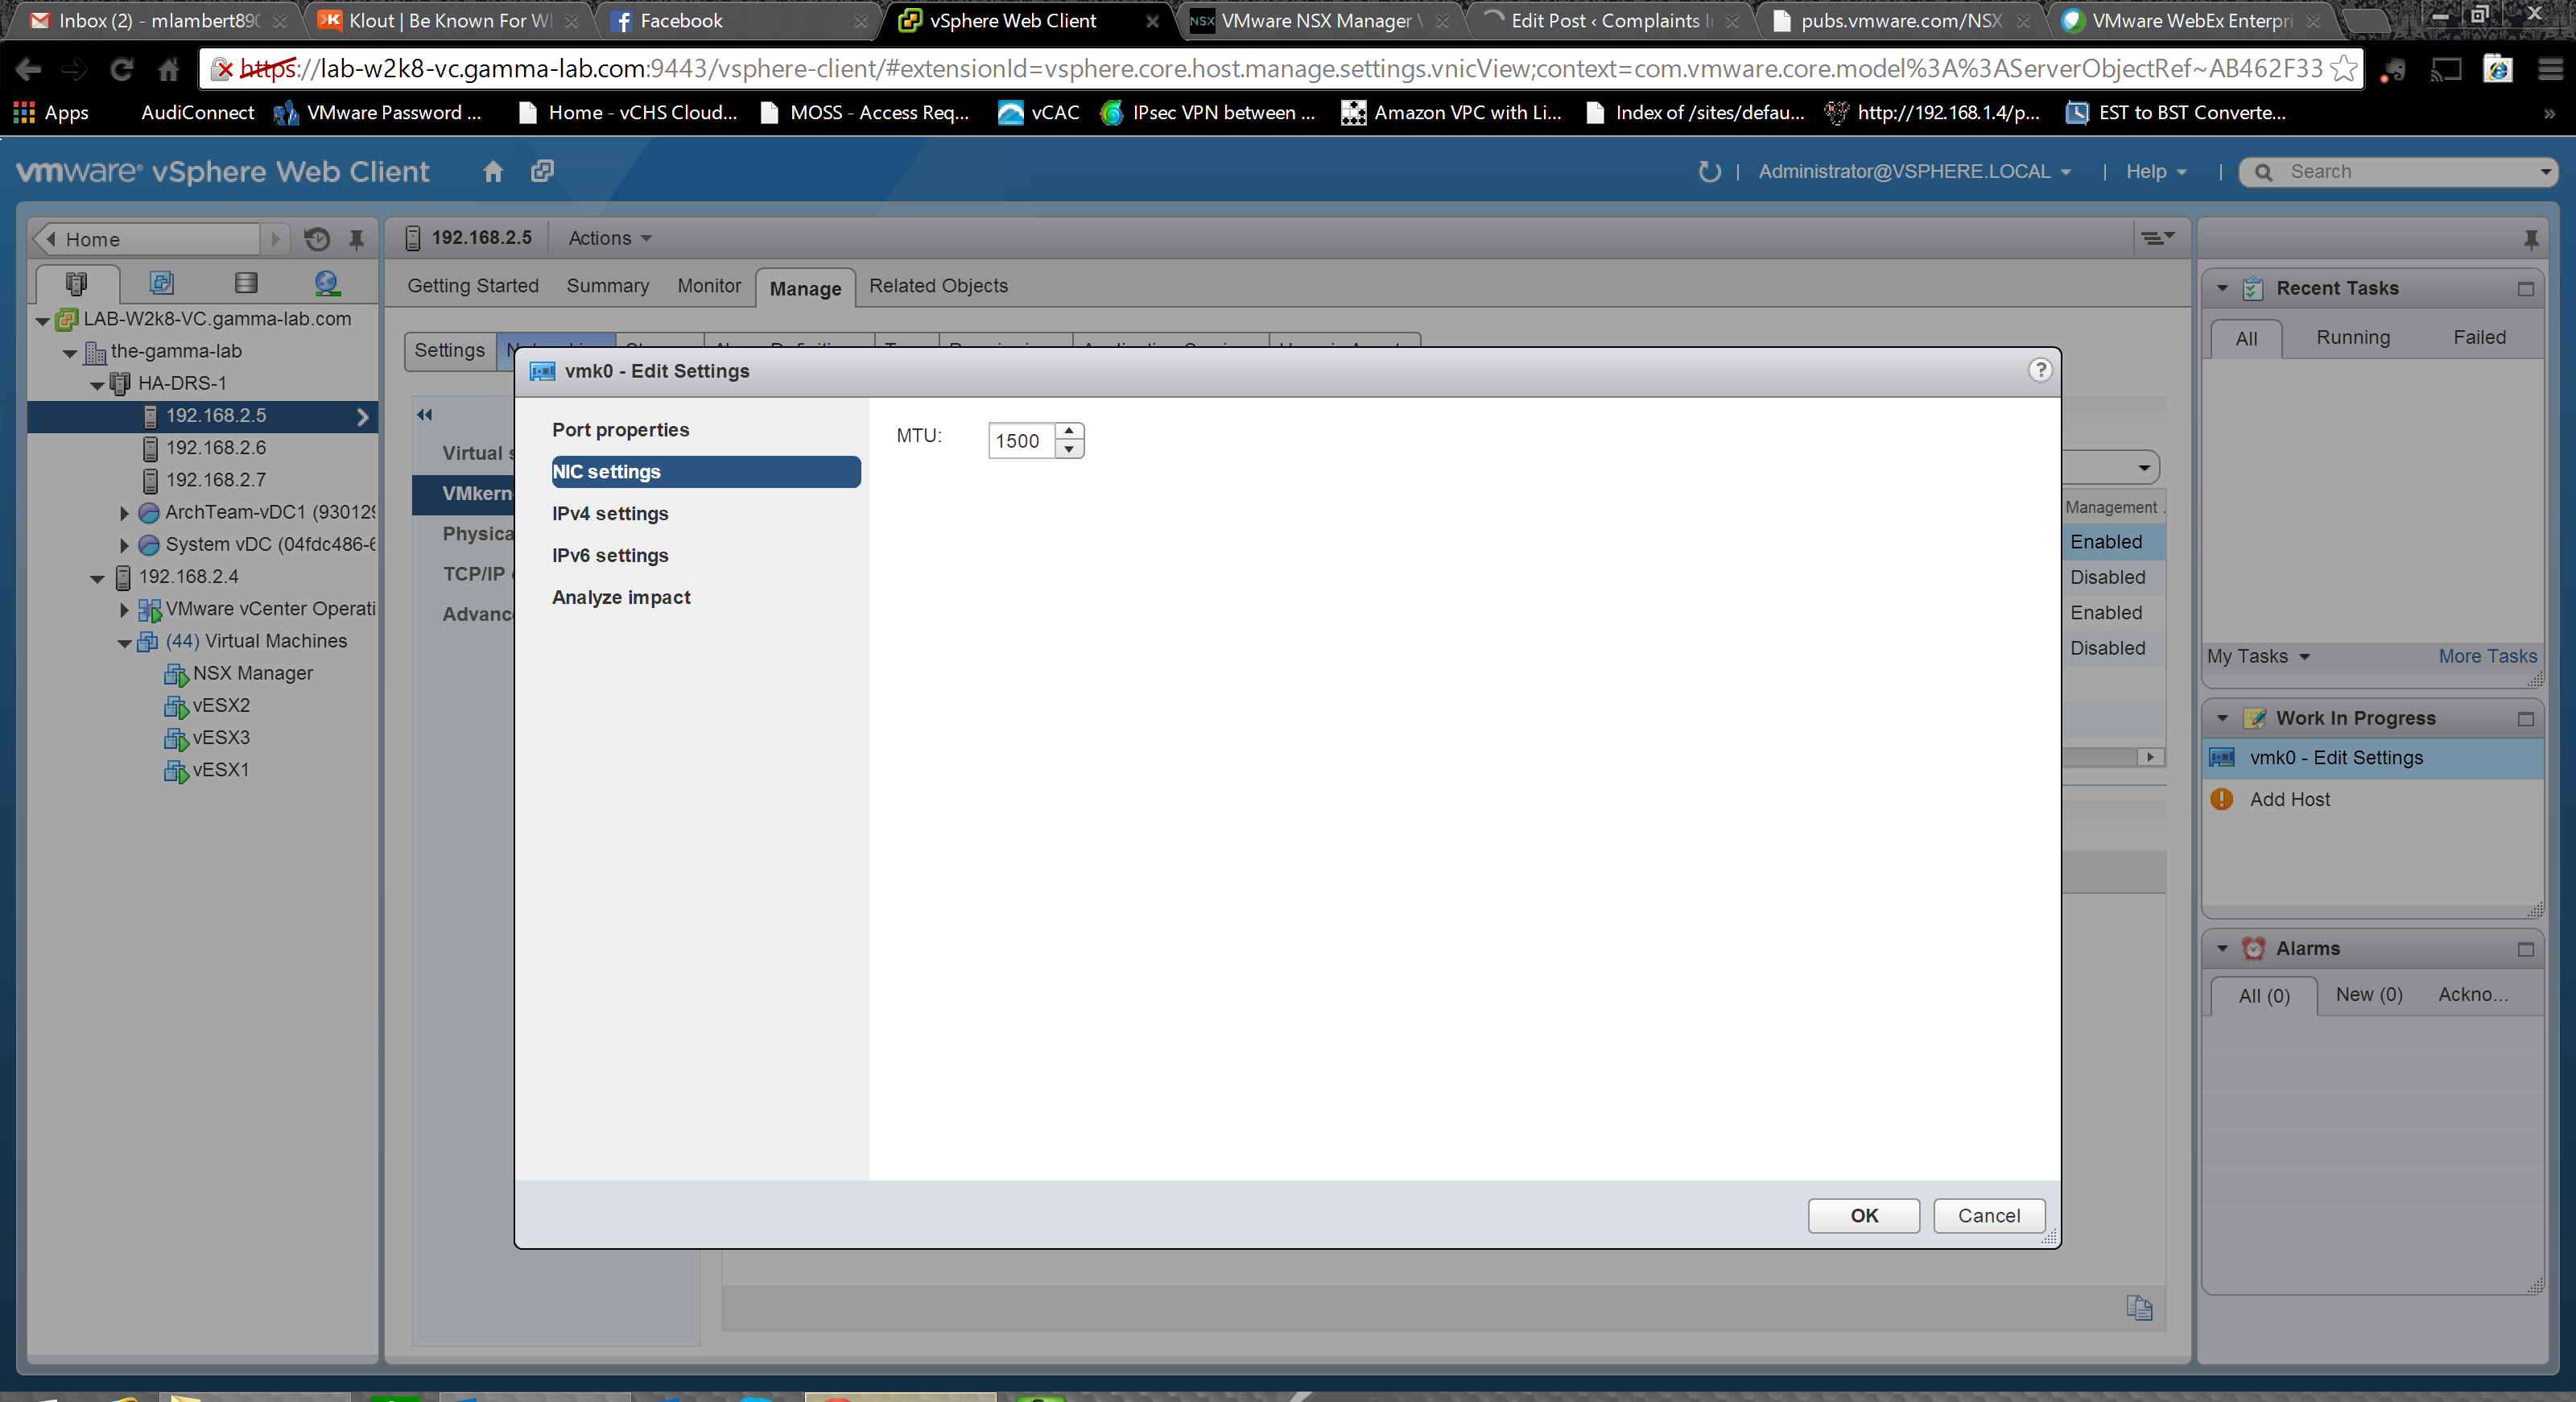
Our MTU is set to 1500. That doesn’t bode well. 1500 byte MTU is standard so almost certainly the “virtual machine vNIC” MTU is also set to 1500. Of course now it’s just a matter of figuring out just what the “virtual machine vNIC” refers to! To understand the answer to this it is important to understand how an overlay network really works. Consider this diagram:
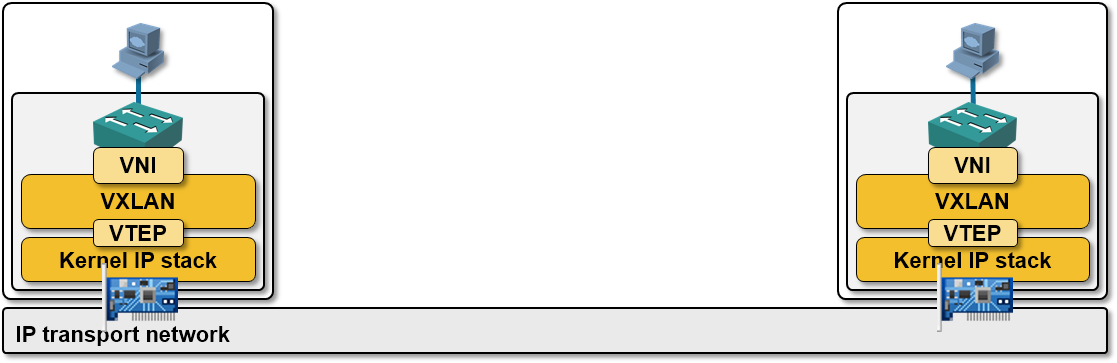
The easiest way to wrap ones mind around overlay networking is to walk through a “day in the life of a packet”. Remember that the guest OS has no clue that it’s being virtualized (for the most part, but close enough for this discussion). It simply formulates Ethernet frames and sends them through the NIC driver. An Ethernet conversation, of course, starts with an ARP broadcast to find the destination Ethernet address associated with the IP address you’re attempting to connect to. This ARP query is processed by the vNIC the way a physical NIC would and it is put “on the wire”. Of course in this case “on the wire” means on the virtual switch hosted by the hypervisor. If the destination address exists within the ARP table of the vswitch (meaning a VM also attached to the same vswitch and running on the same host), then the ARP query is passed to that host and the conversation never leaves the hypervisor. If this is not the case however (which means the destination VM lives on another host – common in a vDS environment even if the guests are on the same logical network), then the frame is sent down toward the physical NIC which is acting as the vSwitches uplink. In an overlay scenario the frame is intercepted by the handler before it gets to the physical NIC driver on the host. This is why for VXLAN we have to install a VIB. The handler catches the frame and then handles it. This means using its own logic to determine where the frame should go and then send it there. In the case of VXLAN this means over a Virtual Tunnel Endpoint (VTEP) to the correct VXLAN destination over layer 3. That is where the encapsulation comes into play. So we are taking an entire 1500 byte Ethernet frame and packing it into another one to send over layer 3. And this is where the larger MTU comes into play. Using a 50 byte larger MTU ensures we don’t have to fragment every time an overlay frame is sent. So what the pre-req is referring to is to set the physical MTU to 50 bytes larger than the VXLAN MTU (the “virtual machine MTU”) All documentation, however, really recommends setting it to 1600. I feel the documentation here should have been more clear as “virtual machine MTU” is pretty ambiguous, but there it is. Also worth noting is “logical switch” in NSX parlance is actually referring to “VXLAN”. So with all of this in mind, we can go ahead and change that physical MTU of the VMKernel NIC that is attached to the vDS to 1600.
- Managed IP address is set for each vCenter server in the vCenter Server Runtime Settings. See vCenter
Server and Host Management: This is a straightforward vCenter config option found in the vCenter properties:
- DHCP is available on VXLAN transport VLANs if you are using DHCP for IP assignment for VMKNics: this one catches me all the time as I don’t use a DHCP server on the transport VLAN. If you don’t you need an IP pool or the configuration will break since vNICs will get an autoconfig address (169.254). As we will see later, we’ll have an opportunity to associate an IP pool if we don’t want to deploy DHCP in the transport VLAN.
- A consistent distributed virtual switch type (vendor etc.) and version is being used across a given transport zone. Inconsistent switch types can lead to undefined behavior in your logical switch: this is straightforward – you must use either vDS or OpenvSwitch (for example)
- 5- tuple hash distribution should be enabled for Link Aggregation Control Protocol (LACP): this one is the prescribed distribution algorithm that you should use if you are aggregating vSwitch uplinks using LACP. In our case we are not using LACP, but in cases where it applies this is critical
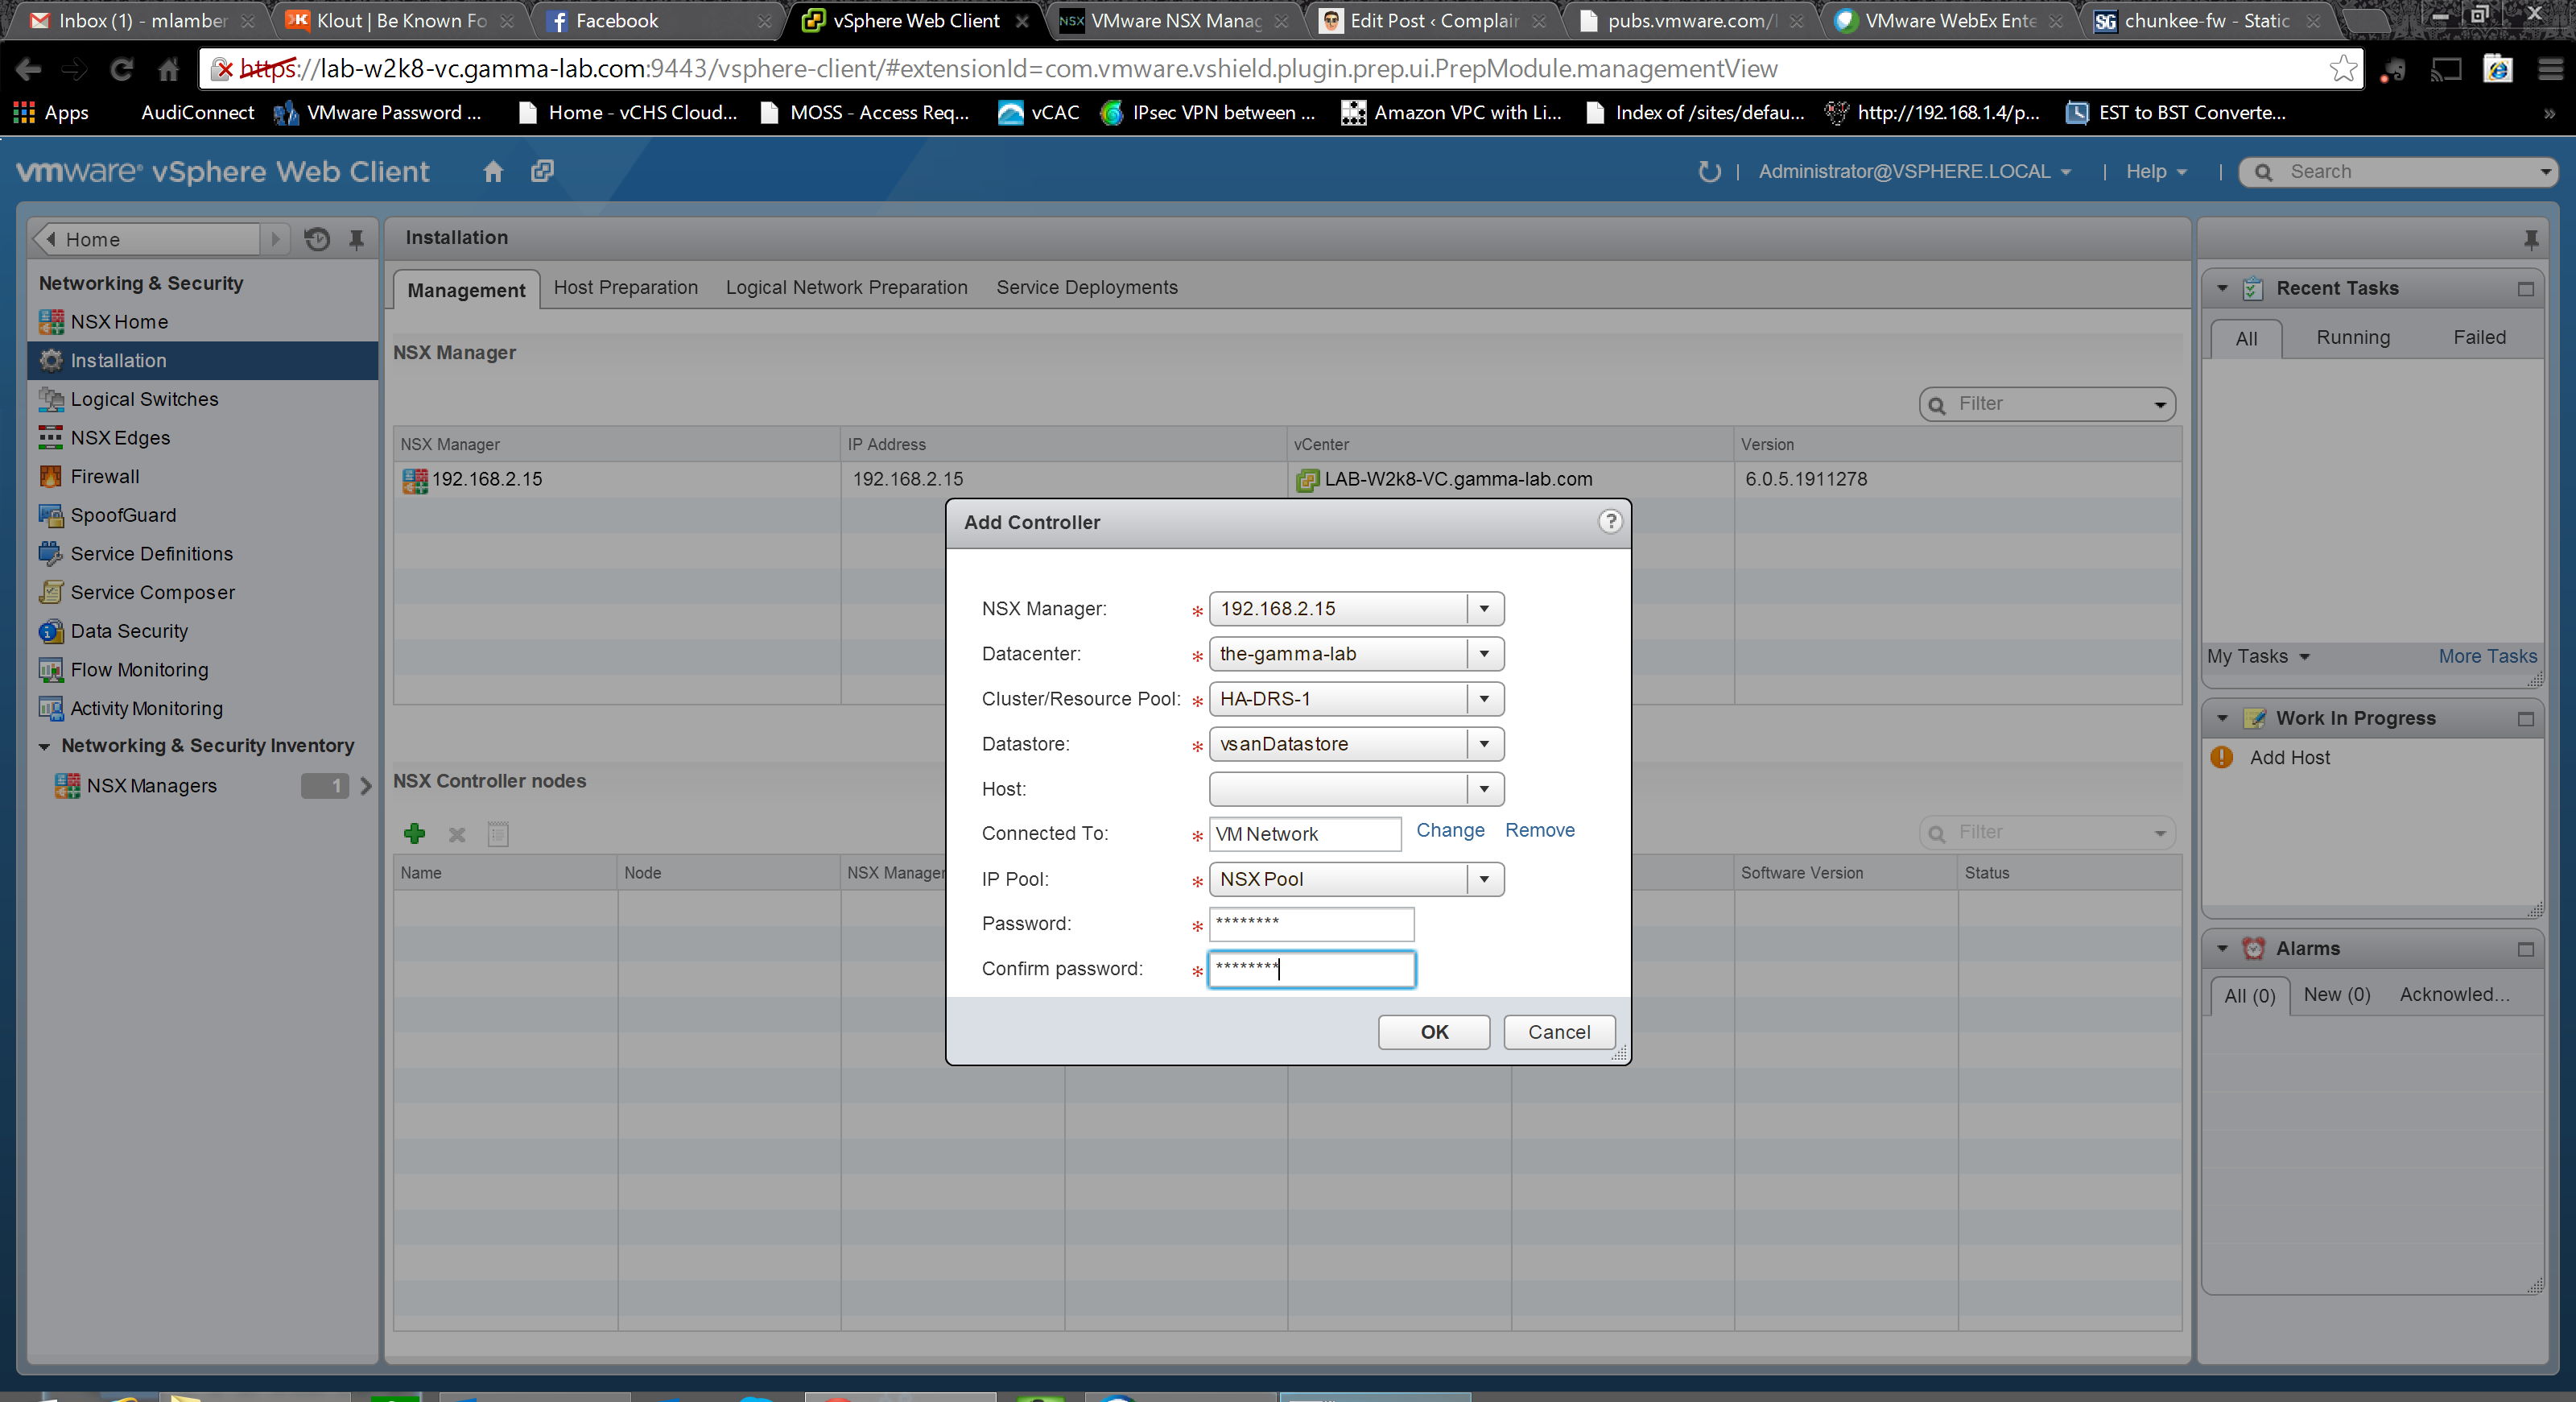
With the background detail on the pre-requisites in mind, we can move forward with the next step which is Deploying the NSX Controller Node. Head back over to the Installation section of the Network & Security plugin and select Management. Here we can click “+” to add our first Controller under NSX Controller Nodes:
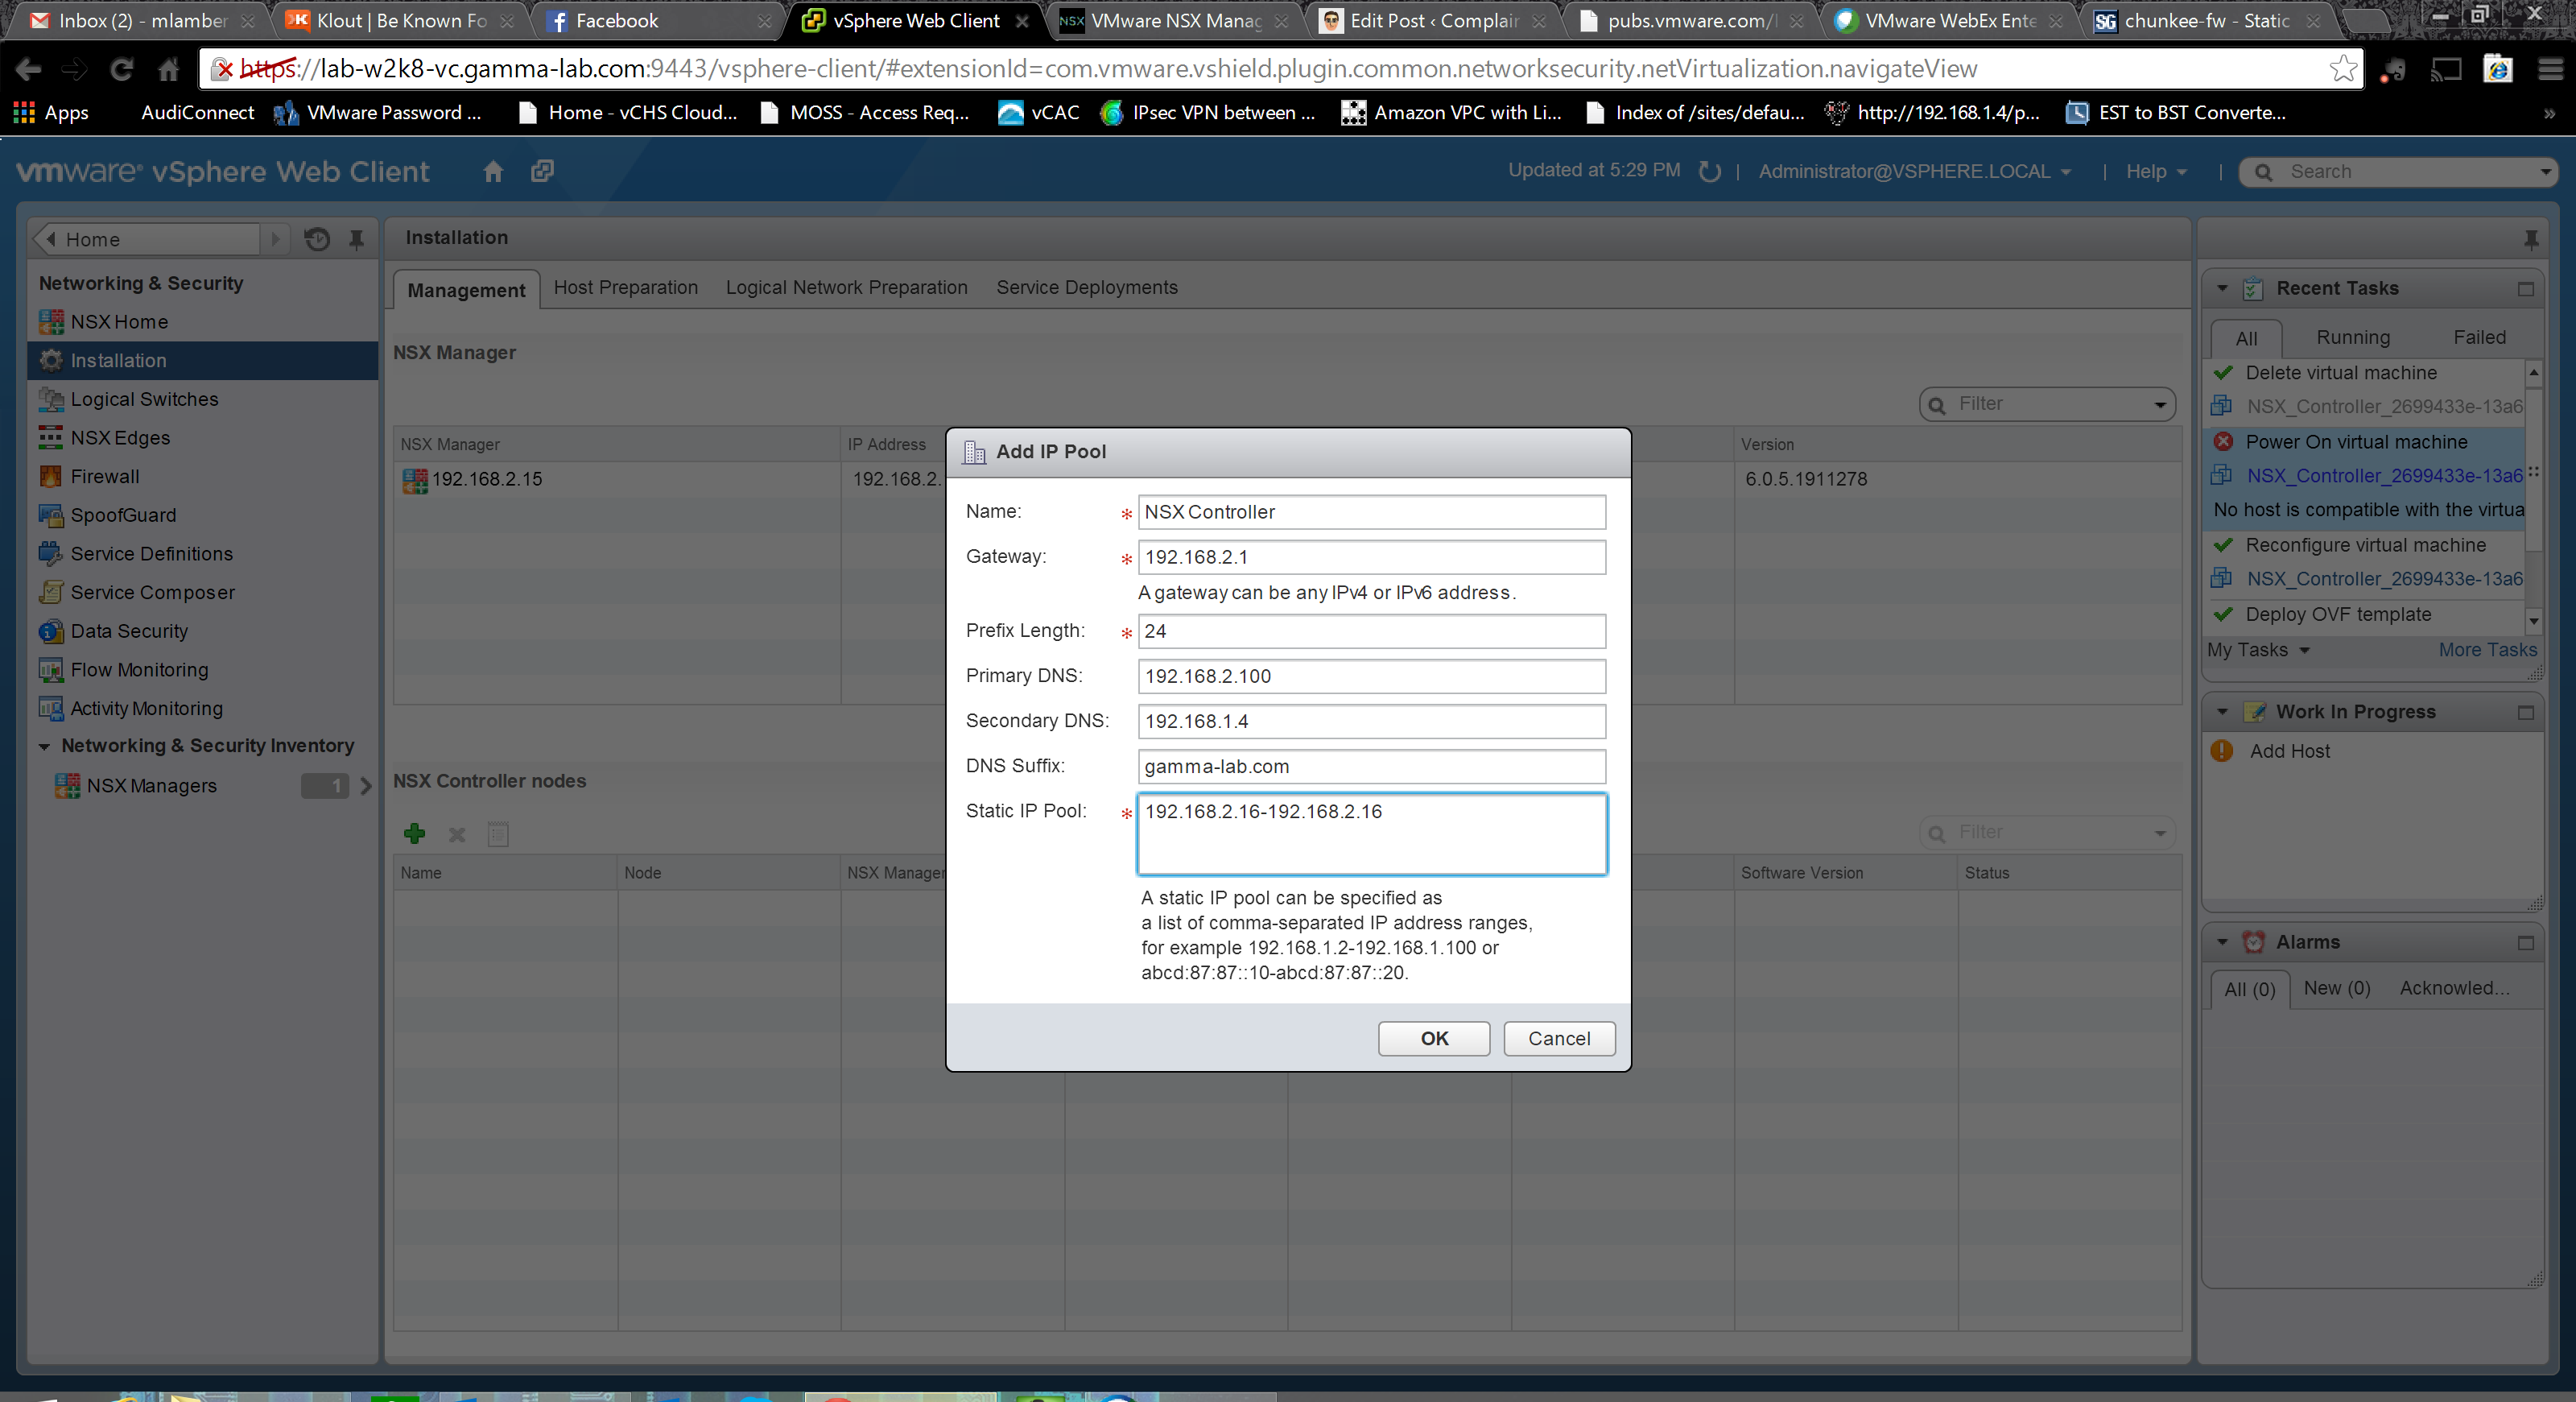
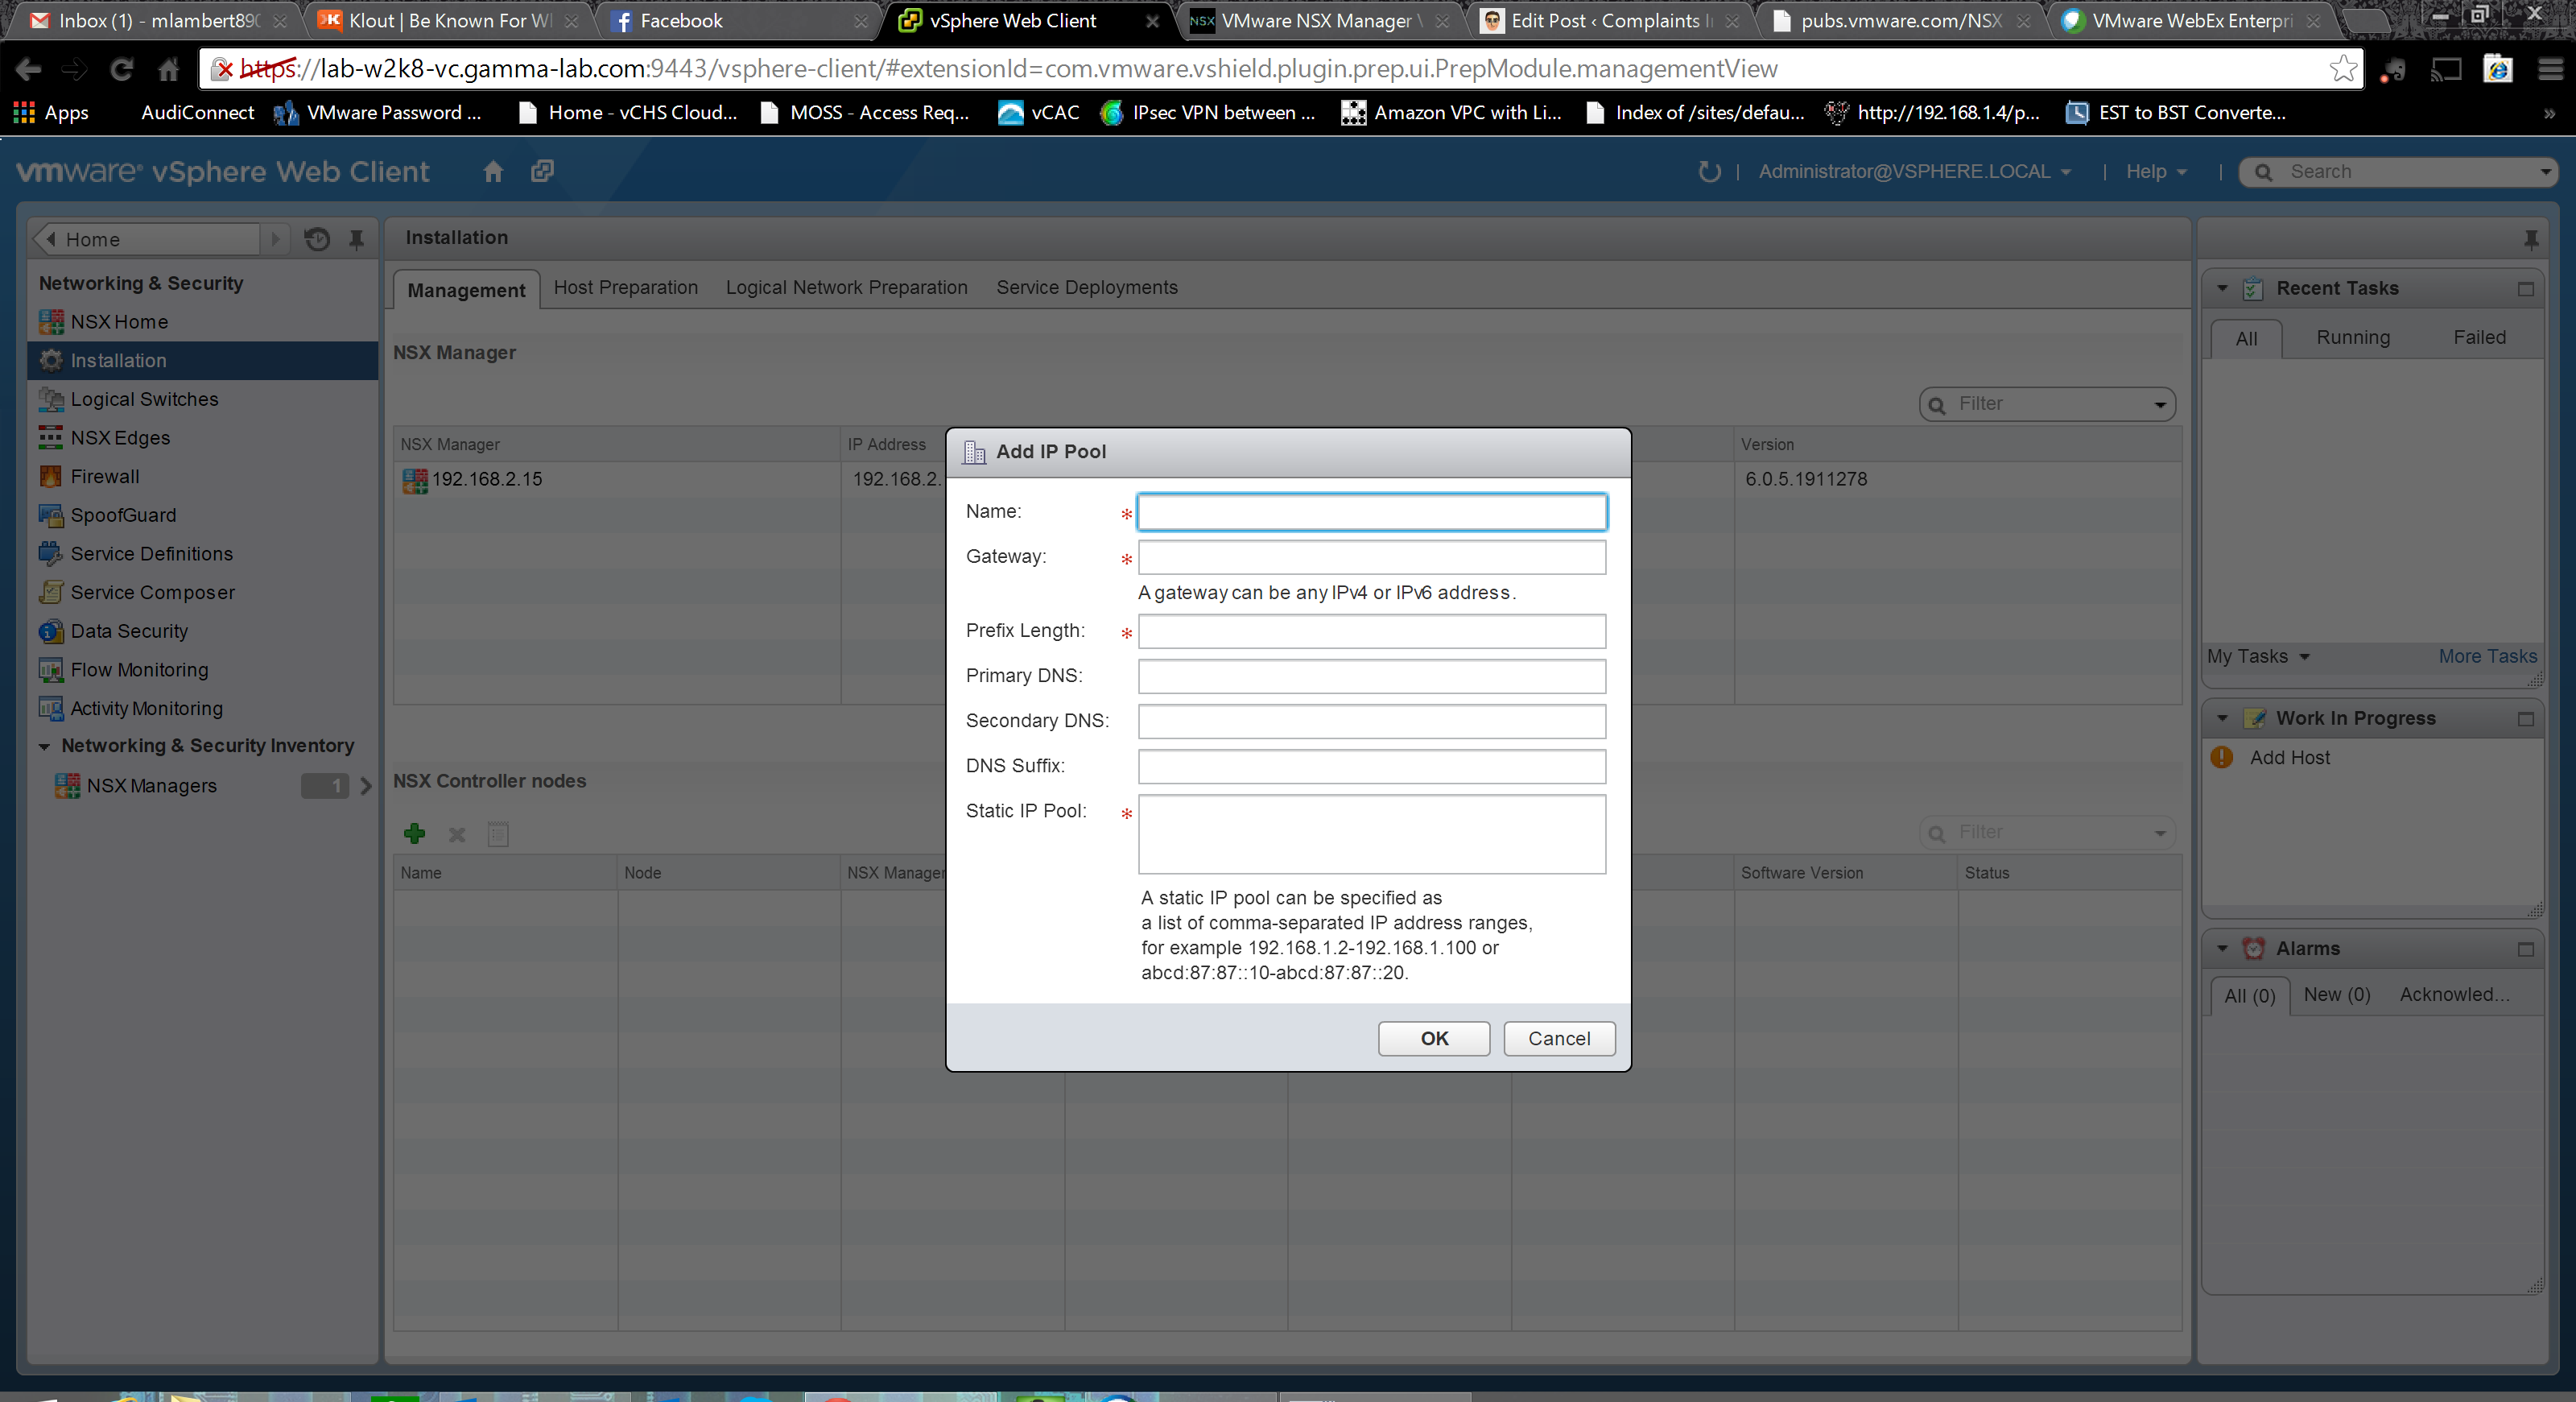
We have a bunch of questions to answer to configure our first controller. NSX Manager obviously refers to the NSX Manager we are pairing with, created in our first entry. Datacenter should be set to the vDC we are supporting. Cluster Resource Pool refers to the HA/DRS cluster we are NSX enabling. Datastore is the datastore where the controller VM should be created (note in this case we’re installing to a vSAN datastore – more on that later) and host is the host on which it should be instantiated. Connected to refers to the network to which the controller VM should attach while IP pool is how the node will be addressed. Finally password sets the admin password for the controller appliance.

A quick shot of the IP pool configuration. Easy stuff:
With everything configured for the Controller VM setup we can go ahead and click OK to create it. The workflow will trigger and start operating:

So how did it go? Well it didn’t. The workflow completed and the NSX Controller Nodes list stayed empty. Recent tasks indicated an extremely generic error of “No hosts is compatible with the virtual machine”. Hmmm. Not super helpful:
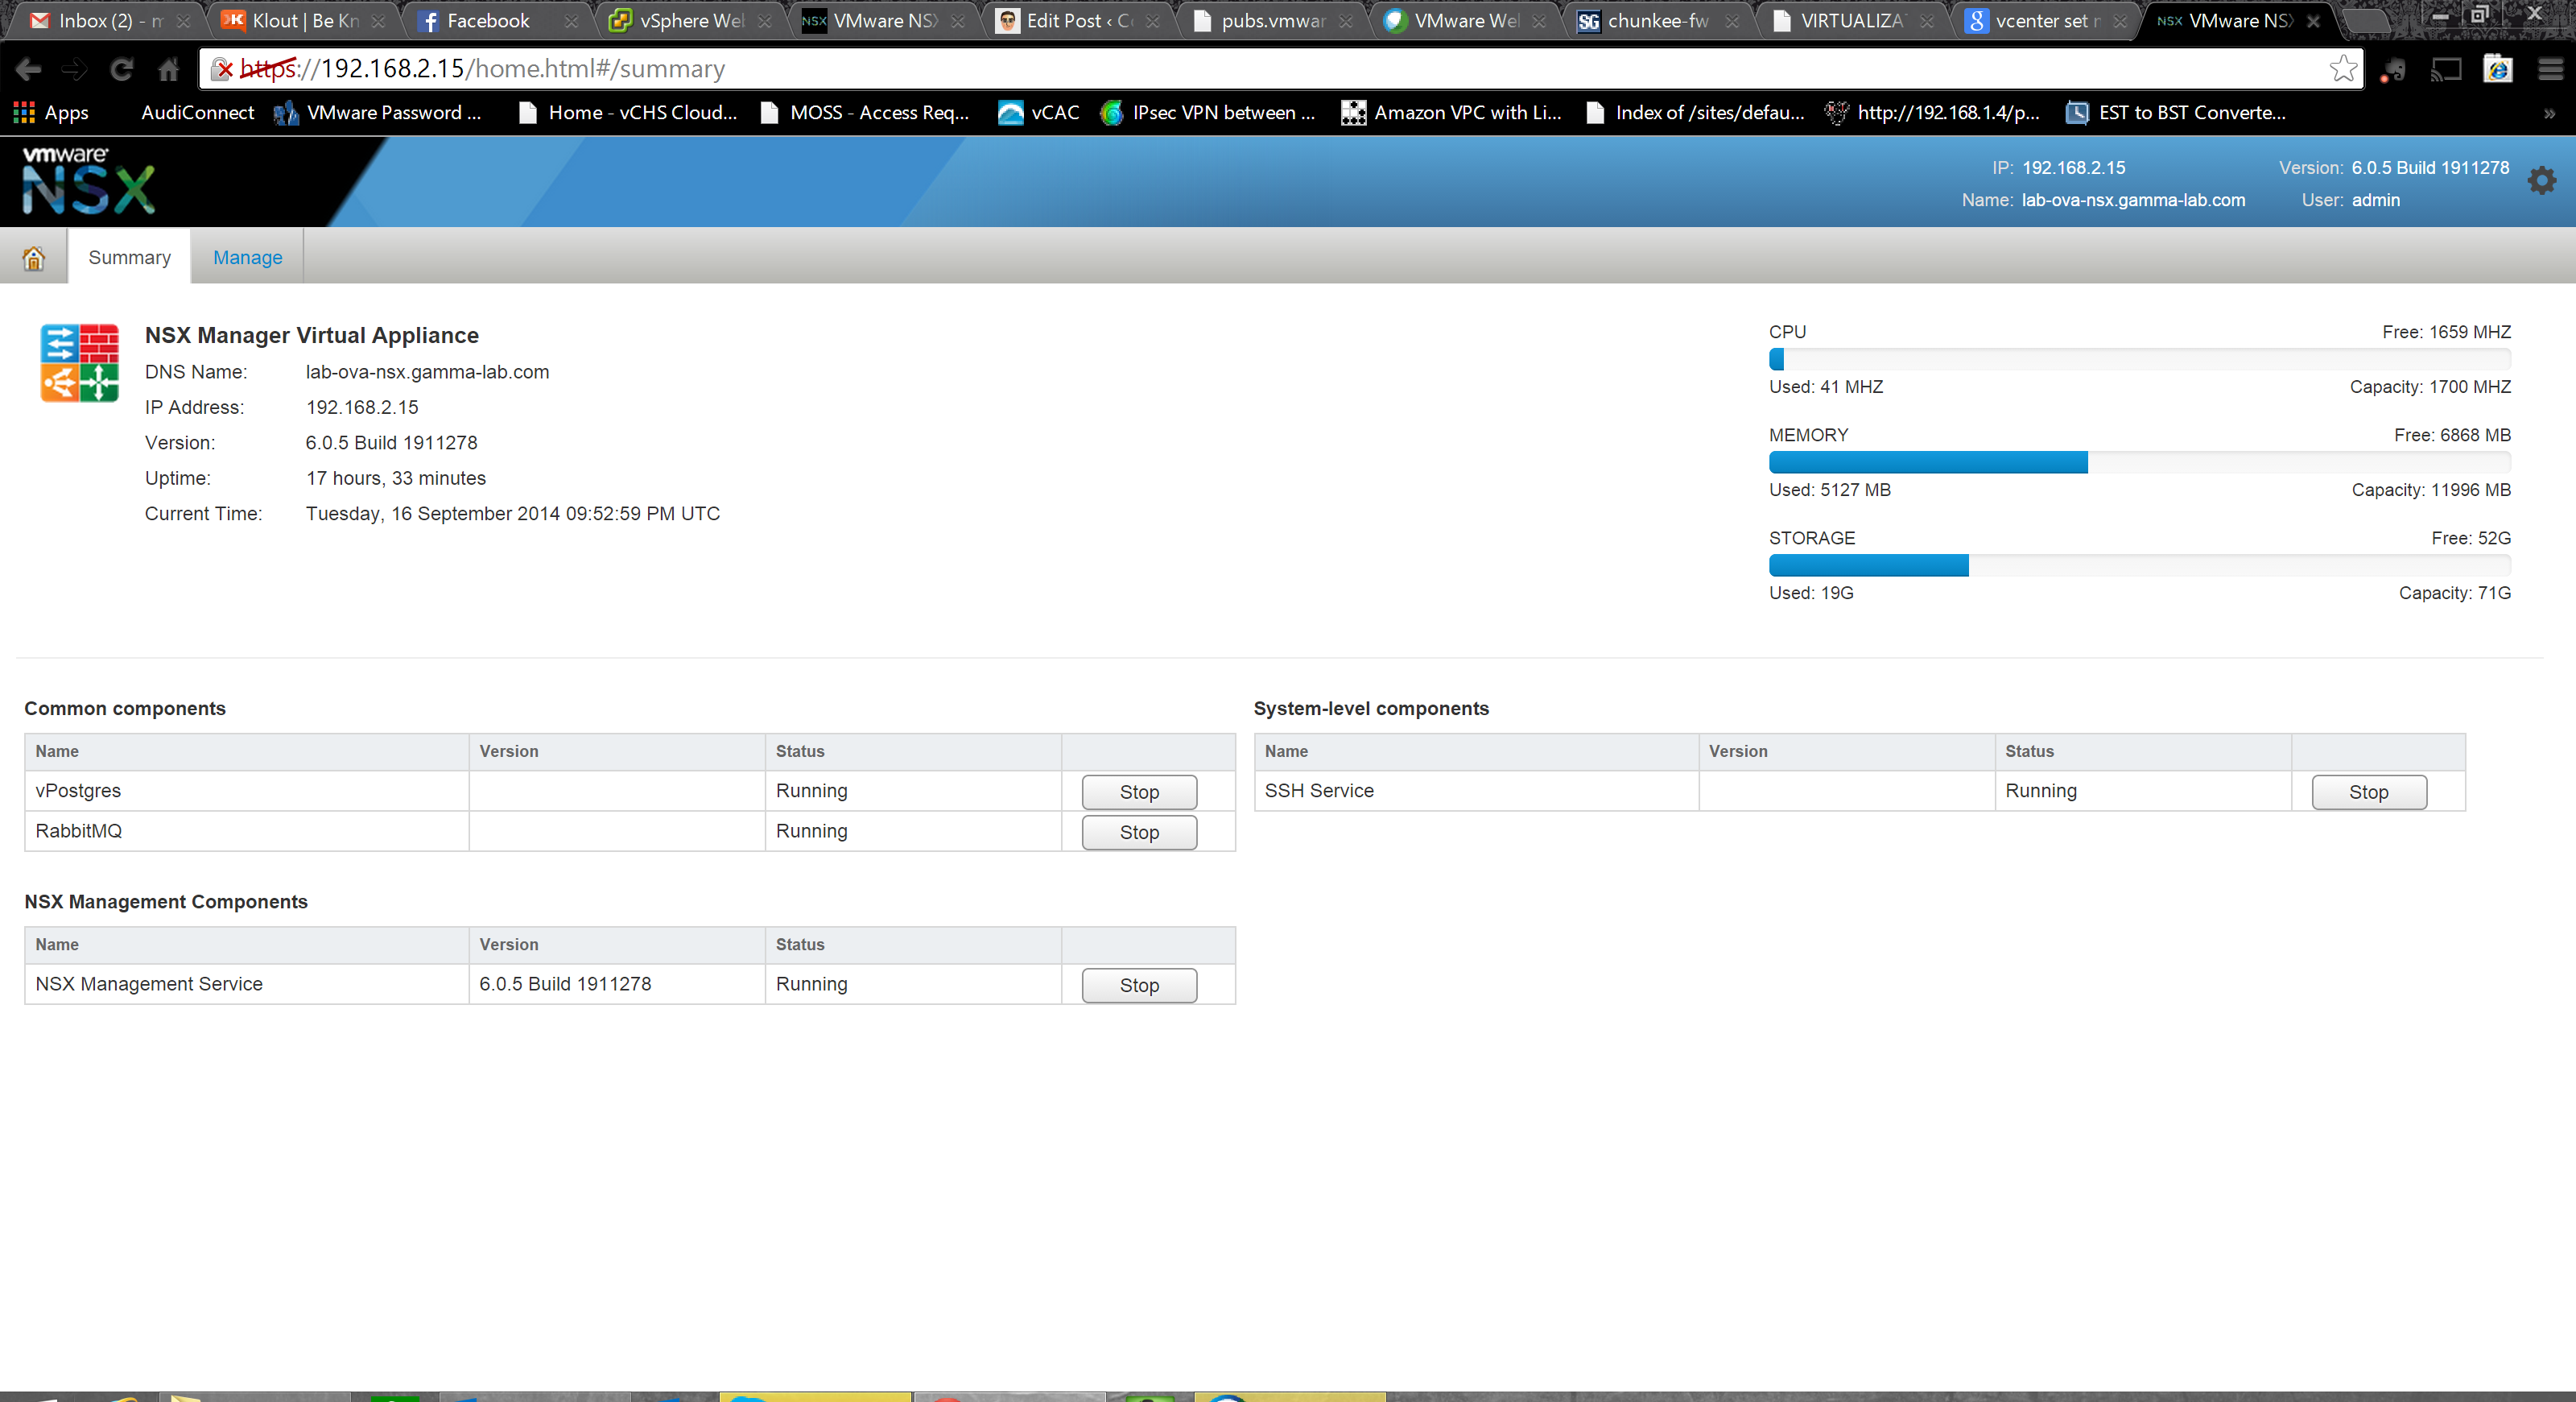
To get a deeper look, it’s time to SSH into the NSX Manager. Hurray! First we need to enable it, so head to the VAMI UI. From the Summary tab we can easily spot the SSH Service and a handy “Start” button:
With SSH running we can head to the CLI and check the log with the command:
show manager log follow
It’s a good idea at this stage to re-run the new Controller workflow to trigger the error again. This is what I captured as the workflow log:
2014-09-16 23:07:13.070 GMT INFO http-nio-127.0.0.1-7441-exec-2 ControllerServiceImpl:422 - about to create controller: controller-3 IP =192.168.2.16
2014-09-16 23:07:13.079 GMT INFO http-nio-127.0.0.1-7441-exec-2 AuditingServiceImpl:141 - [AuditLog] UserName:'vsphere.local\administra tor', ModuleName:'VdnNvpController', Operation:'CREATE', Resource:'null', Time:'Tue Sep 16 23:07:13.077 GMT 2014'
2014-09-16 23:07:13.085 GMT INFO DCNPool-2 VirtualWireInFirewallRuleNotificationHandler:59 - Recieved VDN CREATE notification for conte xt controller-3:Controller
2014-09-16 23:07:13.086 GMT INFO DCNPool-2 VirtualWireDCNHandler:43 - Recieved VDN CREATE notification for context controller-3:Control ler
2014-09-16 23:07:13.207 GMT INFO http-nio-127.0.0.1-7441-exec-2 TaskServiceImpl:101 - TF:Created Job with ID jobdata-3535
2014-09-16 23:07:13.221 GMT INFO http-nio-127.0.0.1-7441-exec-2 TaskServiceImpl:399 - TF:Scheduling Job jobdata-3535
2014-09-16 23:07:13.393 GMT INFO http-nio-127.0.0.1-7441-exec-4 UserSessionManager:43 - New session: XXXXXXXXXXXXXXXXXXXXXXXXXXX7898D
2014-09-16 23:07:13.464 GMT INFO http-nio-127.0.0.1-7441-exec-5 UserSessionManager:43 - New session: XXXXXXXXXXXXXXXXXXXXXXXXXXX6DEF2
2014-09-16 23:07:13.989 GMT INFO pool-9-thread-1 ImmediateScheduler:34 - TF:Schedule Now Job ID jobdata-3535
2014-09-16 23:07:14.002 GMT INFO taskExecutor-7 JobWorker:246 - Updating the status for jobinstance-13626 to EXECUTING
2014-09-16 23:07:14.059 GMT INFO taskScheduler-33 DeployOvfTask:173 - Deploying VM 'NSX_Controller_bc0ed3c4-5182-4448-af0c-dcb46eec3e9f ' using the OVF file.
2014-09-16 23:07:14.083 GMT INFO taskScheduler-33 OvfInstaller:335 - Resource pool id = 'resgroup-84'
2014-09-16 23:07:14.084 GMT INFO taskScheduler-33 OvfInstaller:336 - Datastore id = 'datastore-545'
2014-09-16 23:07:14.084 GMT INFO taskScheduler-33 OvfInstaller:339 - Host id = 'host-543'
2014-09-16 23:07:14.090 GMT INFO taskScheduler-33 OvfInstaller:141 - vApp candidate, Type = 'ResourcePool', Id = 'resgroup-84'
2014-09-16 23:07:14.095 GMT INFO taskScheduler-33 OvfInstaller:141 - vApp candidate, Type = 'ClusterComputeResource', Id = 'domain-c83'
2014-09-16 23:07:14.101 GMT INFO taskScheduler-33 OvfInstaller:141 - vApp candidate, Type = 'Folder', Id = 'group-h23'
2014-09-16 23:07:14.107 GMT INFO taskScheduler-33 OvfInstaller:141 - vApp candidate, Type = 'Datacenter', Id = 'datacenter-21'
2014-09-16 23:07:14.112 GMT INFO taskScheduler-33 OvfInstaller:141 - vApp candidate, Type = 'Folder', Id = 'group-d1'
2014-09-16 23:07:14.114 GMT INFO taskScheduler-33 OvfInstaller:359 - OVF is not being imported under a vApp and a folder has not been s pecified. Trying to associate with the root VM folder of the data center.
2014-09-16 23:07:14.460 GMT INFO taskScheduler-33 OvfInstaller:174 - Datacenter VM folder name = 'vm' id = 'group-v22'
2014-09-16 23:07:14.465 GMT INFO taskScheduler-33 OvfInstaller:105 - Searching for existing VM. Name = 'NSX_Controller_bc0ed3c4-5182-44 48-af0c-dcb46eec3e9f', Search root type = 'VIRTUAL_MACHINE', Search root id = 'resgroup-84'
2014-09-16 23:07:14.742 GMT INFO taskScheduler-33 OvfManagerImpl:120 - Creating OVF import spec.
2014-09-16 23:07:14.812 GMT INFO taskScheduler-33 OvfManagerImpl:122 - Created OVF import spec successfully.
2014-09-16 23:07:14.853 GMT INFO taskScheduler-33 OvfInstaller:498 - Setting value for key 'api_username'
2014-09-16 23:07:14.854 GMT INFO taskScheduler-33 OvfInstaller:498 - Setting value for key 'management_ip'
2014-09-16 23:07:14.854 GMT INFO taskScheduler-33 OvfInstaller:498 - Setting value for key 'keystore'
2014-09-16 23:07:14.855 GMT INFO taskScheduler-33 OvfInstaller:498 - Setting value for key 'api_private_cert'
2014-09-16 23:07:14.855 GMT INFO taskScheduler-33 OvfInstaller:498 - Setting value for key 'api_password'
2014-09-16 23:07:14.855 GMT INFO taskScheduler-33 OvfInstaller:498 - Setting value for key 'gateway_ip'
2014-09-16 23:07:14.856 GMT INFO taskScheduler-33 OvfInstaller:498 - Setting value for key 'cluster_ip'
2014-09-16 23:07:14.856 GMT INFO taskScheduler-33 OvfInstaller:498 - Setting value for key 'api_public_cert'
2014-09-16 23:07:14.857 GMT INFO taskScheduler-33 OvfInstaller:498 - Setting value for key 'netmask'
2014-09-16 23:07:14.857 GMT INFO taskScheduler-33 OvfInstaller:420 - Number of CPU cores set in the OVF import spec = '4'
2014-09-16 23:07:14.861 GMT INFO taskScheduler-33 OvfInstaller:425 - Number of CPU cores supported by the host = '1'
2014-09-16 23:07:14.862 GMT INFO taskScheduler-33 OvfInstaller:427 - Changing the number of CPU cores in the OVF import spec to '1'.
2014-09-16 23:07:14.862 GMT INFO taskScheduler-33 ResourcePoolVcOperationsImpl:320 - Importing VM into the resource pool.
2014-09-16 23:07:14.905 GMT INFO taskScheduler-33 ResourcePoolVcOperationsImpl:322 - Waiting for the HttpNfcLease to be ready.
2014-09-16 23:07:14.928 GMT DEBUG VcEventsReaderThread VcEventsReader$VcEventsReaderThread:301 - got prop collector update, but not for us:ManagedObjectReference: type = PropertyFilter, value = session[fa0b277c-c1cb-5f5c-cc78-b5e1e82a1bc4]5243239f-b58a-1539-609d-4d3e7e451 764, serverGuid = AB462F33-E3E0-4E86-BD55-984E0C95FBE1
2014-09-16 23:07:19.175 GMT INFO ViInventoryThread ViInventory:5004 - Virtual Center: Updating Inventory. new:0 modified:1 removed:0
2014-09-16 23:07:19.199 GMT INFO ViInventoryThread EndpointSVMUpdater:206 - Solution 6341068275337691137 is not registered
2014-09-16 23:07:19.239 GMT INFO ViInventoryThread ViInventory:1304 - 84/164 objects published.
2014-09-16 23:07:19.246 GMT INFO ViInventoryThread VimObjectBridge:943 - VimObjectBridge: Ending inventory update
2014-09-16 23:07:19.247 GMT INFO ViInventoryThread VimObjectBridge:222 - Processing 1 updates and 0 deletions for this transaction
2014-09-16 23:07:19.249 GMT INFO ViInventoryThread VimObjectBridge:229 - VimObjectBridge: Time taken to process transaction : 19
2014-09-16 23:07:19.249 GMT INFO ViInventoryThread ViInventory:1512 - Resolved, last version:220 num vc objs:90 num vimos:164
2014-09-16 23:07:19.683 GMT INFO http-nio-127.0.0.1-7441-exec-3 UserSessionManager:43 - New session: XXXXXXXXXXXXXXXXXXXXXXXXXXX19BEB
2014-09-16 23:07:19.792 GMT INFO http-nio-127.0.0.1-7441-exec-1 UserSessionManager:43 - New session: XXXXXXXXXXXXXXXXXXXXXXXXXXXC1AC3
2014-09-16 23:07:22.341 GMT INFO ViInventoryThread ViInventory:5004 - Virtual Center: Updating Inventory. new:0 modified:1 removed:0
2014-09-16 23:07:22.364 GMT INFO ViInventoryThread EndpointSVMUpdater:206 - Solution 6341068275337691137 is not registered
2014-09-16 23:07:22.400 GMT INFO ViInventoryThread ViInventory:1304 - 84/164 objects published.
2014-09-16 23:07:22.406 GMT INFO ViInventoryThread VimObjectBridge:943 - VimObjectBridge: Ending inventory update
2014-09-16 23:07:22.407 GMT INFO ViInventoryThread VimObjectBridge:222 - Processing 1 updates and 0 deletions for this transaction
2014-09-16 23:07:22.409 GMT INFO ViInventoryThread VimObjectBridge:229 - VimObjectBridge: Time taken to process transaction : 17
2014-09-16 23:07:22.409 GMT INFO ViInventoryThread ViInventory:1512 - Resolved, last version:221 num vc objs:90 num vimos:164
2014-09-16 23:07:22.722 GMT INFO ViInventoryThread ViInventory:5004 - Virtual Center: Updating Inventory. new:0 modified:3 removed:0
2014-09-16 23:07:22.746 GMT INFO ViInventoryThread EndpointSVMUpdater:206 - Solution 6341068275337691137 is not registered
2014-09-16 23:07:22.766 GMT INFO ViInventoryThread ViInventory:1538 - UNResolved, count:1 reason:Did not find child vimo for additional children in cache. By this time all children should have vimos in the cache
2014-09-16 23:07:23.048 GMT INFO ViInventoryThread ViInventory:5004 - Virtual Center: Updating Inventory. new:1 modified:1 removed:0
2014-09-16 23:07:23.072 GMT INFO ViInventoryThread EndpointSVMUpdater:206 - Solution 6341068275337691137 is not registered
2014-09-16 23:07:23.096 GMT INFO ViInventoryThread ViManagedVirtualMachineObject:244 - vnic change for vm-556: null to
2014-09-16 23:07:23.301 GMT INFO ViInventoryThread ViInventory:1304 - 85/165 objects published.
2014-09-16 23:07:23.317 GMT INFO ViInventoryThread VimObjectBridge:943 - VimObjectBridge: Ending inventory update
2014-09-16 23:07:23.318 GMT INFO ViInventoryThread VimObjectBridge:222 - Processing 4 updates and 0 deletions for this transaction
2014-09-16 23:07:23.320 GMT INFO ViInventoryThread VimObjectBridge:229 - VimObjectBridge: Time taken to process transaction : 219
2014-09-16 23:07:23.321 GMT INFO ViInventoryThread ViInventory:1512 - Resolved, last version:223 num vc objs:91 num vimos:165
2014-09-16 23:07:24.222 GMT WARN VirtualMachineDvfilterMonitor-1 VirtualMachineWorkQueue$WorkQueue:255 - Host not found for Vm vm-556, bypassing.
2014-09-16 23:07:24.223 GMT WARN VirtualMachineDvfilterMonitor-1 VirtualMachineWorkQueue$WorkQueue:279 - no host found for vm-556, remo ving.
2014-09-16 23:07:24.443 GMT INFO DCNPool-4 InventoryUtils:273 - Null hostId for VM vm-556
2014-09-16 23:07:25.944 GMT INFO http-nio-127.0.0.1-7441-exec-2 UserSessionManager:43 - New session: XXXXXXXXXXXXXXXXXXXXXXXXXXX73216
2014-09-16 23:07:26.014 GMT INFO http-nio-127.0.0.1-7441-exec-4 UserSessionManager:43 - New session: XXXXXXXXXXXXXXXXXXXXXXXXXXXB56C3
2014-09-16 23:07:26.807 GMT ERROR taskExecutor-18 ErrorCounter:56 - <AST>:0:0: unexpected end of subtree
2014-09-16 23:07:26.810 GMT WARN taskExecutor-18 AbstractActionEventListener:61 - User Identity Action Event Listener: Error happened w hen dispatch action events.
Cool detailed info, but unfortunately not shedding any additional light. As shown in bold, the story stays the same. It doesn’t appear that there were any errors leading up to the terminal condition, and according to log NSX now deals with template configuration mismatches elegantly (rescaled the template from 4 vCPUs to 1 to match the host limit). Of course logs aren’t always exactly correct, right? As it turns out, the template was attempting to create a 4 vCPU VM on a 1 CPU host. Luckily with nested adding CPUs is very easy. A quick reconfig of the ESXi guest VMs and a reboot and the controller configuration completed without a hitch:

Huzzah! Well that’s (more than) enough for this entry! Next up will take a deeper look at NSX implementation up the stack, edge device capabilities, and talk through some use cases. Stay tuned!
