
In the first entry we took a look at the Graphics Amp and rationalized why it landed at ComplaintsHQ to begin with. With that out of the way, it’s time to get things setup and prepared for installation. I picked up the AW15 at the Microsoft store for $1999 (newly reduced) plus a $400 trade-in credit (sending in an old MacBook) and for that price you get a pretty decent build:
| Display | 15.6 in 4K UHD IPS touchscreen (3840 x 2160), 10-finger multi-touch support |
| Processor | Intel Core i7-6700HQ 2.60 GHz with Turbo Boost Technology up to 3.50 GHz |
| Memory | 16GB DDR4 2133 MHz |
| Hard drive size | 256GB SSD + 1TB 7200 RPM HDD |
| Operating system | Windows 10 Home, 64-bit |
| PC type | Laptop |
| Optical drive | None |
| Media drive | 3-in-1 media card reader (SD/SDHC/SDXC) |
| Audio | Klipsch Audio |
| Video | NVIDIA GeForce GTX 970M graphics with 3GB graphics memory, Intel HD Graphics 530 |
| Ports | 3 USB 3.0 (1 powered) • 1 USB 3.1 Type-C with Thunderbolt support • HDMI • Headphone output • Microphone input • Alienware Graphics Amplifier port • LAN (10/100/1000) |
| Battery | 8-cell 92 WHr lithium-ion* |
| Camera | 2.1MP camera |
| Wireless | 802.11a/b/g/n/ac (Miracast enabled) |
| Bluetooth | Bluetooth 4.1 |
| Dimensions | 15.19 x 10.64 x 0.94 in (385.82 x 270.25 x 23.90 mm) |
| Weight | 7.00 lbs (3.17 kg) |
| Color | Silver |
| Other | Model number: Alienware 15 Touch ANW15-8214SLV • Backlit keyboard with 5 programmable macro keys and 10 programmable zones • Color-programmable touchpad • TPM 2.0 • Keyboard travel: 2.4 mm • Touchpad dimensions: 100 x 56 mm • Security lock slot |
Some highlights are the awesome 4k screen, the decent i7 6700HQ proc, and the Thunderbolt ports. Notable lowlights are the ridiculous 7lb weight. Let’s pause here. It’s just crazy that Alienware continues to be unable to produce a notebook that doesn’t feel laden down by bricks. OK end rant. Luckily these days I’m not on the road too much so the insane 7lb weight isn’t a deal breaker. It’s annoying though! OK this time end rant for real.
One thing in that part list that’s borderline is the storage subsystem. The 256GB PCI-E M2 SSD is awesome. Pairing it with a 1TB spinning platter HDD is less awesome. Luckily, along with the massive case and weight, on Alienware laptops you also get decent accessibility and upgradeability. So before we even turn it on, that HDD must go! To the screwdrivers!
The back of the AW15 is pretty clean and has a central access panel, held on by two Philips head screws, that just screams “open me!” It’s a decent guess that this is where the goodies are:
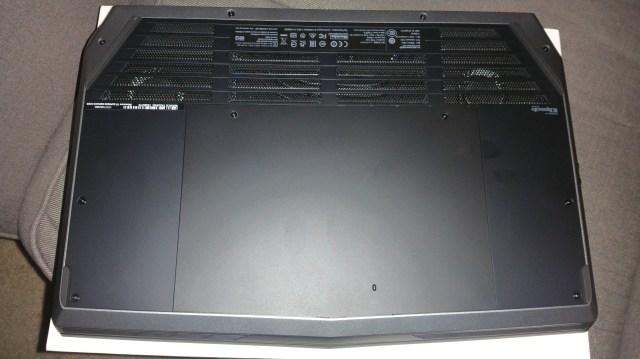
One thing worth noting is that the two screws (one at each corner) do not come fully out. They are fastened to the panel. This is handy for helping to not lose them, but also throws you off at first. In addition, as they loosen the panel will buckle in a most concerning way and, once loose enough (which is hard to determine since the screws are fixed), will have to be popped free from the internal clips using a most concerning amount of force. Net net it’s a bit trickier to get this panel off than it seems, so don’t be alarmed. Once off, things get much better:
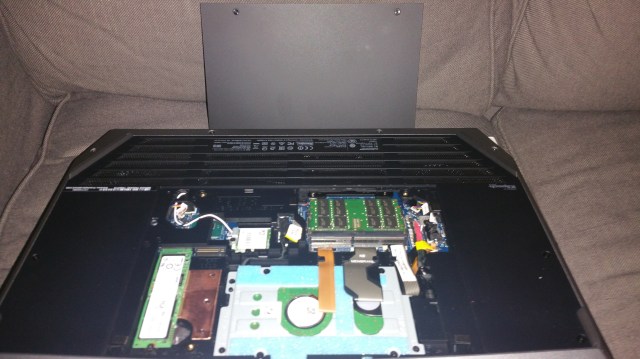
Here you can see the M.2 slot populated with a PCI-E SSD and, lookey here! A free 22110, 110mm, M.2 slot as well. Hmmmm…. This poses some interesting possibilities, but I don’t have any M.2 PCI-E on hand, so we’ll ignore this for today. Next to the M.2’s, you can see the bog standard SATA3 slot with the woeful hybrid HDD. It is held in place by screws at each corner and the SATA cable. The few other ribon cables (keyboard, mouse, WLAN) block it, but they can easily be shifted out of the way. Let’s get to removing!


The cable (shown in right hand photo) is tight in typical notebook fashion and needs to be finessed out. The connector is the usual laptop SATA connector and is “flat”. It is easier to pluck out (just lift), than connect (where you have to push down “blind” after lining it up). The corner screws are easy enough, but once out the front has to be lifted and the drive cage sort of shifted forward to clear the laptop case edge. It’s easy enough, but some caution should be used so the ribbon cables that lay on top aren’t disrupted. With the tray out we can see that the drive surface mounts to it in the usual way with 4 screws. Time to swap drives and have a look at what came standard:
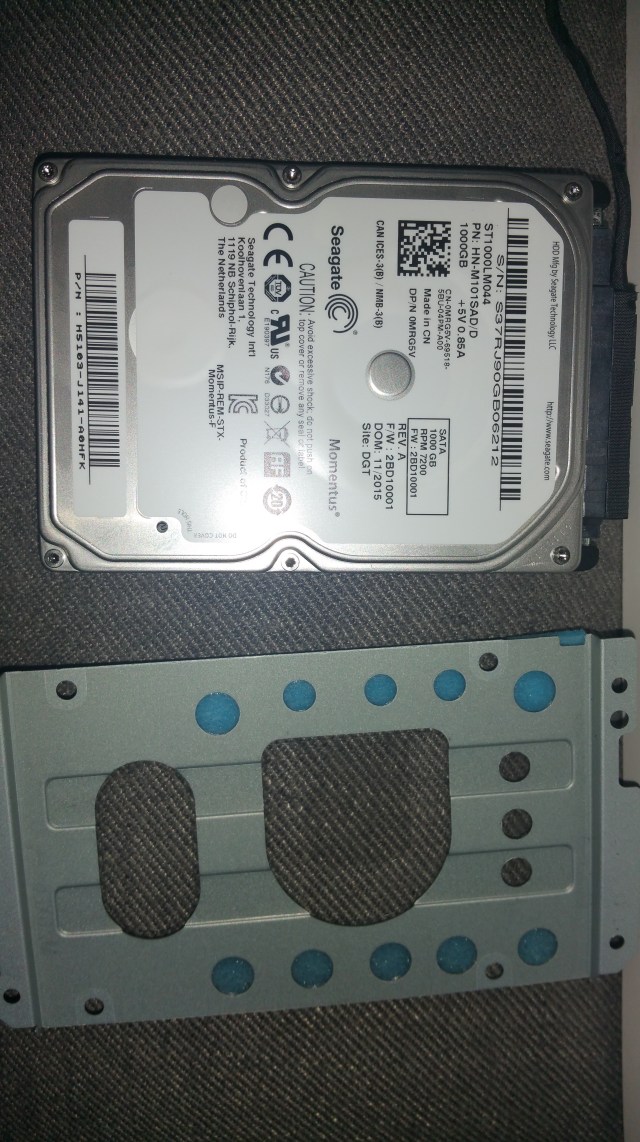
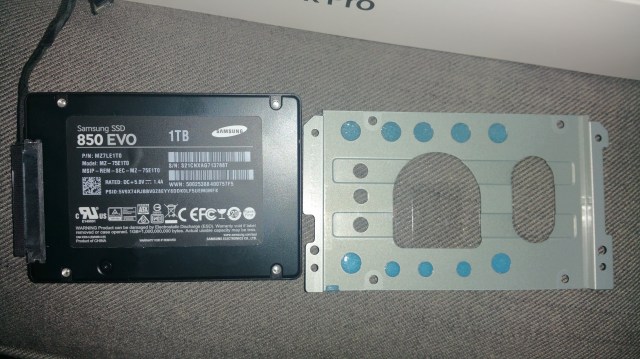
Seagate Momentus 1TB SSDHD hybrid drive. These are pretty standard issue and have been covered in these pages before. Not a bad drive, but not good enough, so out it goes! Samsung 850 EVO 1TB will take its place:
With the shiny new SSD in place we can seal the laptop back up and move on to the Graphics Amp! This thing has a cool, somewhat non-intuitive, toolless design. The trick is to slide the thumblock to unlock the case, and then lift the rear up, pivoting forward on its hinge. It all feels a bit shakey when doing it, but it does work well:


You can see the sliding lock in the pic on the left. That’s the only thing holding the case closed. On the right you can see the view of the top half pivoted up and towards the front. With the internals exposed, we can see that this thing is pretty much just a PCI-E slot, a PSU and a fan. This is a good thing. Once again, the PSU is a plain vanilla 460W. It’s a crappy supply, but is replaceable if you are so included (I am not). Installing the GPU is about the same as installing any GPU in any case (note… GTX980Ti. Baller!):
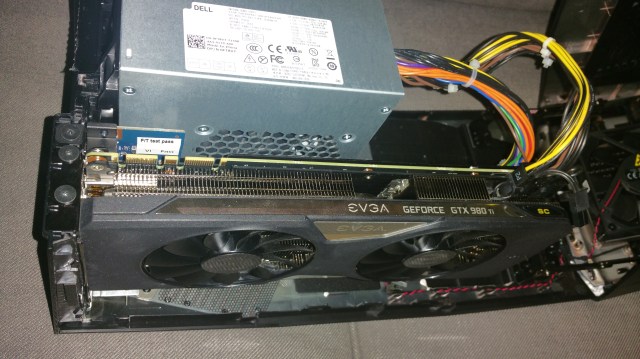
The power cables are sort of “docked” off to the side by default, so just unclip them when it’s time to connect:
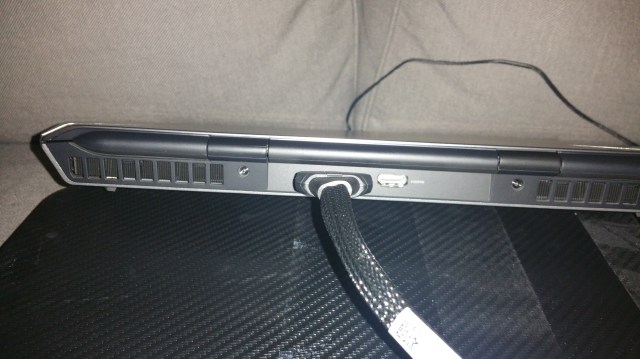
With the GPU seated and connected we can close it up and connect the external cables. There are just two… Standard power and the very nice thick ribbon cable for the proprietary data connector:

Which connects in the obvious spot on the laptop and gives you about 2 feet or so of slack (perfect for keeping the Graphics Amp under a nightstand!):
Well, that’s all she wrote for the hardware mods! Next up we’ll get Windows up and running and do some testing!
