Some lights are good, but what’s better than good? MOAR! PC lighting effects, and case designs that accommodate said effects, have come a long way; from the subtle to the probably obnoxious. The Corsair 570x provides a good basis for building a light-tastic rig and Corsair Link is a decent lighting system (unfortunately everyone has one now and none work together; a rant for a different day)
The 570X includes some basics. 3 SP120 RGB LED fans mounted up front as intake, connected to a 6 port RGB fan hub which is in turn connected to a “mini controller” that provides some basic lighting management via the physical case controls and does not integrate with Corsair Link (hey, what do you expect from a $300 case! 😮).

With 3 open ports on the hub, adding additional SP120 RGB fans and controlling them via the case controls is super easy on the 570x. Of course the only real spot extra fans can fit are rear or top exhaust. Rear is a no brainer, but top is typically real estate dedicated to an AIO in the 570x, and the Corsair AIOs don’t include RGB fans. Swapping out the included fans requires some trade offs that are worth highlighting and were the inspiration for this entry.
Since the resident lab “gaming beast” was scheduled to undergo open, er, case surgery for the nitro boosting installation of Optane 900P (more on that in a future entry!) anyway, the time seemed ripe to up the ante on lighting and take a closer look at utilizing those two open RGB fan hub ports (open ports must be filled!) Since the H100i v2 which cools the beast has 2 convenient fans that look ripe for replacement with tacky LED goodness, this seems like a no brainer. So what’s the catch? Well the deal with the H100i v2 stock fans (known as the “SP120L”) is this:
- 4 pin PWM connectors allowing for integration with fan speed control at the Corsair AIO pump header
- Fan speed: 2700 RPM
- Fan airflow: 77 CFM
- Fan dBA: 37.68 dBA
- Fan static pressure: 4mm/H20 – note: this is the total SP for the H100i. Its important to note that this figure always gets misrepresented as per fan because the H100i fans are always run as a pair. For single fan comparison the static pressure is 2mm/H20
Now, let’s look at the SP120 RGB “High Performance”:
- 3 pin PWM connector
- Fan speed: 1400 RPM
- Fan airflow: 52 CFM
- Fan dBA: 26 dBA
- Fan static pressure: 1.45mm/H20
What we can see here is that there are a few gaps in features that need to be analyzed:
- 3 pin vs 4 pin means that while the fan header on the H100i pump can obviously power the SP120s, it cannot control their speed. The real world impact is that they will always run at 1400RPM
- 33% loss in CFM
- .55mm/H20 loss in static pressure per fan or 1.1mm/H20 total for the pair
There is no way around the fact that this definitely adds up to a loss in cooling performance. What this translated to in our observations on an overclocked 8700K set to 4.9Ghz all cores and auto voltage (yikes!) was 2-3C during Prime95 max heat. With either fan setup, this configuration eventually pushes the system well into the upper 90s and both will hit 100 and throttle eventually, so not a giant difference. Worth nothing though that there is a price to pay here for looking sharp, which is too bad!
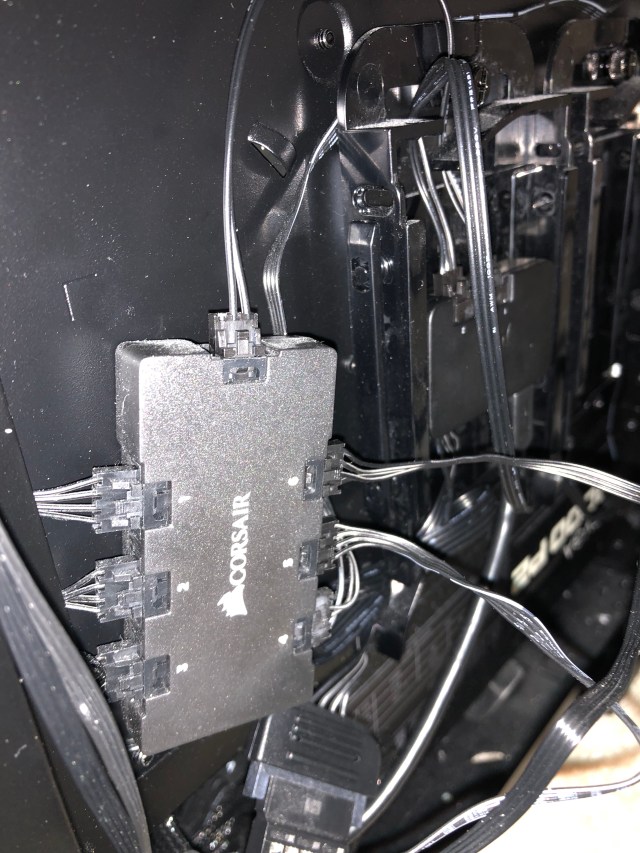
So why not just use one of Corsairs higher performing static pressure fans like the H120? Well, an unfortunate limitation of the Corsair lighting control system is the culprit there. The Corsair Link system sees each port on the controller as a device. Each device must be classified in the software config and there can be only one device classification per port. In the case of a hub, this effectively means all fans on the hub must be the same model.
One way around this on the two port limited Lighting Node Pro might be to use either multiple Lighting Node Pros and multiple fan hubs, or use multiple fan hubs on one Lighting Node Pro and give up the LED strip daisy chain. For anyone wondering, the Commander Pro does not help here either since it also is limited to two LED ports.
With that background out of the way, on to some install notes! First up, unboxing the Lighting Node Pro (on sale for $49 at Best Buy as of this writing):
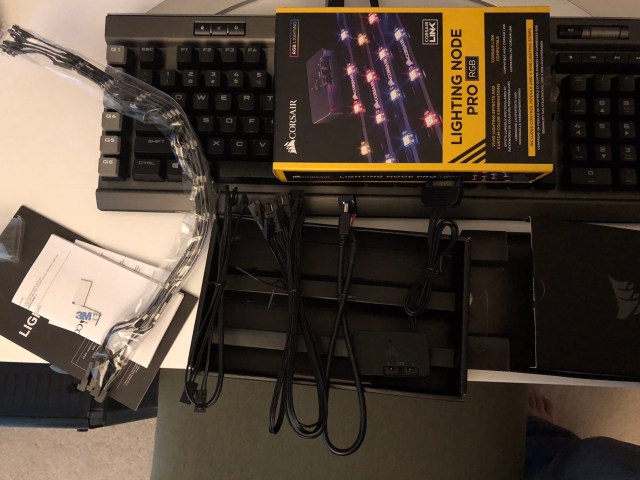
Surprisingly nice packaging from Corsair is unwrapped to reveal:
- 4 x LED strips – adhesive packed for permanency and also magnetic if you want to be able to move them around. We went magnetic and left the adhesive intact
- 4 x “extension cords”, for lack of a better term, for the LED strips (M to F)
- 1 SATA power cable – this was a surprise, the LNP uses SATA power rather than Molex or drawing from USB

- 1 micro USB to USB header connector (and if your mobo has only one USB header, yes you have a problem if you already have an H100i)

- One hub to “LED port on LNP” connector cable
So about that USB header limit thing… The Maximus X code is one such board where only one header is free. I mean who might need more than one USB header on a $300 Z370 enthusiast motherboard, right? /sarcasm Now it’s true that in some cases two USB devices can be piggybacked on one header by utilizing the two rows of pins for two separate cables. Each pin row is identical and represents one device since the header supports two device connections. The problem in this case is that the Lighting Node Pro does have both rows pinned. That’s a strong signal that the LNP uses two device entries, so we didn’t the risk of mangling cables. And, sure enough, once everything was finally finished, you can see on the software side that the two different lighting ports on the LNP do indeed count as two separate USB devices.
So with piggybacking both the LNP and H100i on one header out, options become pretty much limited to a Frankenstein setup. In this case, double entendre intended, the 570X does have lots of holes, for lack of a better term, through which a cable might pass. The solution here was to use a regular micro USB cable, strip the head insulation from it, exposing the bare metal connector (which should be fine – plugged in it is well away from contact with any surface):

With the head size thus reduced, the cable was able to pass through one of the 570x rear openings and connect up to one of the motherboard external USB connectors:

With the USB question out of the way, the rest is pretty smooth sailing for the LNP. It comes with some double stick tape tabs to afix it to somewhere on the case, but the 570x has lots of surface area on the right hand side, where the hub and mini commander are found, that works great for it:
With the LNP nestled in place and it’s USB connection sorted out, power is just a matter of utilizing one of the SATA power connectors off the PSU. The way cable management works on the 570x, one should be quite close by and it can be seen in the pic above as well at the bottom.
Next up is to surgically remove the stock fans of the H100i. A top mount H100i install in the 570x leaves lots of breathing room, but tall RAM (like the Corsair LED RAM that was also installed as part of this update to the gaming beast – replacing perfectly functional RAM with new RAM because lights being a clear sign of insanity) will block removal of the lower fan screws, so RAM has to come out. Otherwise removing the fans is an easy 4 screws:

As mentioned, the SP120 fans are 3 pin PWM, but they connect up fine to the 4 pin headers on the H100i; just remember speed will always be at max:

In place, the fans look no different than the outgoing stock fans, other than the opaque blades. It would be kind of cool if Corsair would mark fans with their factory spec, but you know…

With everything installed, cable management will need to be redone. On the 570x, its pretty easy to get a decent looking finished product even for a slob. There are lots of channels and hidey holes you can use:

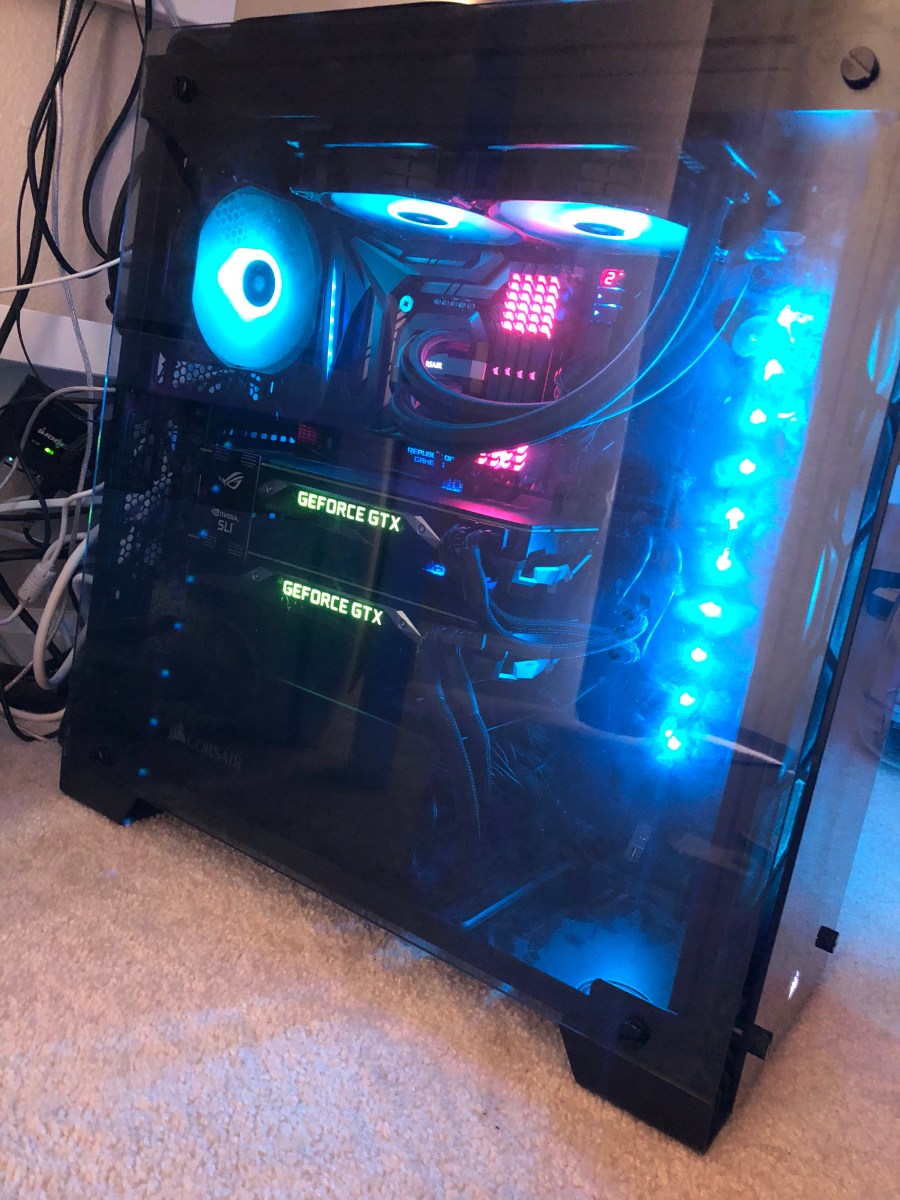
Fans installed, next step is the LED strips. These are extremely easy after the fans, and simply connect up to the other LED port on the LNP and then daisy chain off each other, using one of the extension cords to get additional slack where needed to fit the design concept. In our case, we went with two vertical and one horizontal strips on the back, forming a kind of upside down u-frame along the metal surfaces, with the intent of creating ambient light against the wall, and one vertical strip inside the case between the motherboard edge and fan bays to create some ambient light inside the case in addition to the fan light. The finished product can be seen below. Rear panel, lit up:

And front interior lit:

With all lighting done and hypothetically functional, it was time to fire up the beast and configure Corsair Link! We didnt grab a shot, but this shot courtesy of Tech4Gamers gives the general idea:

You can see above how the LED channel #2 config (the fan hub) requires that a single device type be explicitly set. In this case it is “RGB SP Fan”. At that point any device on that hub which is of a different model will not work. The other channel is set to RGB LED Strip and controls the daisy chain. Any newly added fans that get installed on the hub have to be added in software by clicking the “+” and applying. Corsair Link doesn’t auto discover devices on the hub.
In addition to all of the above, Corsair Vengeance LED RAM was installed as well and can be seen in both the feature pic for this piece and the clip below. Well that was a lot of lighting work, but the finished product does seem worth it! (If a bit tacky). A video does it justice:
To recap, seen above are the following parts:– Corsair 570X
– Maximus X code lighting effect on breath
– 2 x EVGA GTX1080Ti FE
– 4 x Corsair Vengeance RGB Pro 3200
– Corsair H100i v2
– Corsair K95
– Corsair M95
– 4 x Corsair LED strips (3 rear, one front, magnet attached)
– Corsair LED hub + Lighting Node Pro ( built in case Mini Node controls get disconnected and LNP gets connected allowing Corsair Link to software control all fans)
– 6 x Corsair SP120 RGB – 3 up front, one in back, 2 replacing the H100i v2 fans. Note re: the H100i – The SP120are slightly lower cfm (slightly lower RPM) and are 3 pin PWM. Since the H100i header needs 4 pin PWM to control the fans this means the SP120s run at max full time when connected to the H100i. This wasn’t a problem since I normally run the H100i fans at max regardless. The SP120s are about the same thermal perf and slightly quieter
