
One of my more popular entries has been connecting an EC2 VPC to pfSense by way of an IPSEC tunnel. Not surprisingly VMware’s vCHS also provides this capability so in the spirit of connecting pfSense to everything I enthusiastically set out to give it a try.
The first step is to locate the vCHS side of the IPSEC tunnel config. In this case we need to jump into the “advanced view” which, in vCHS terms, means jumping on over to the vCloud Director interface. There are a bunch of links into this advanced interface and it is important to keep in mind that you need to be on Windows to run the UI (boo, hiss! yes yes, I know):
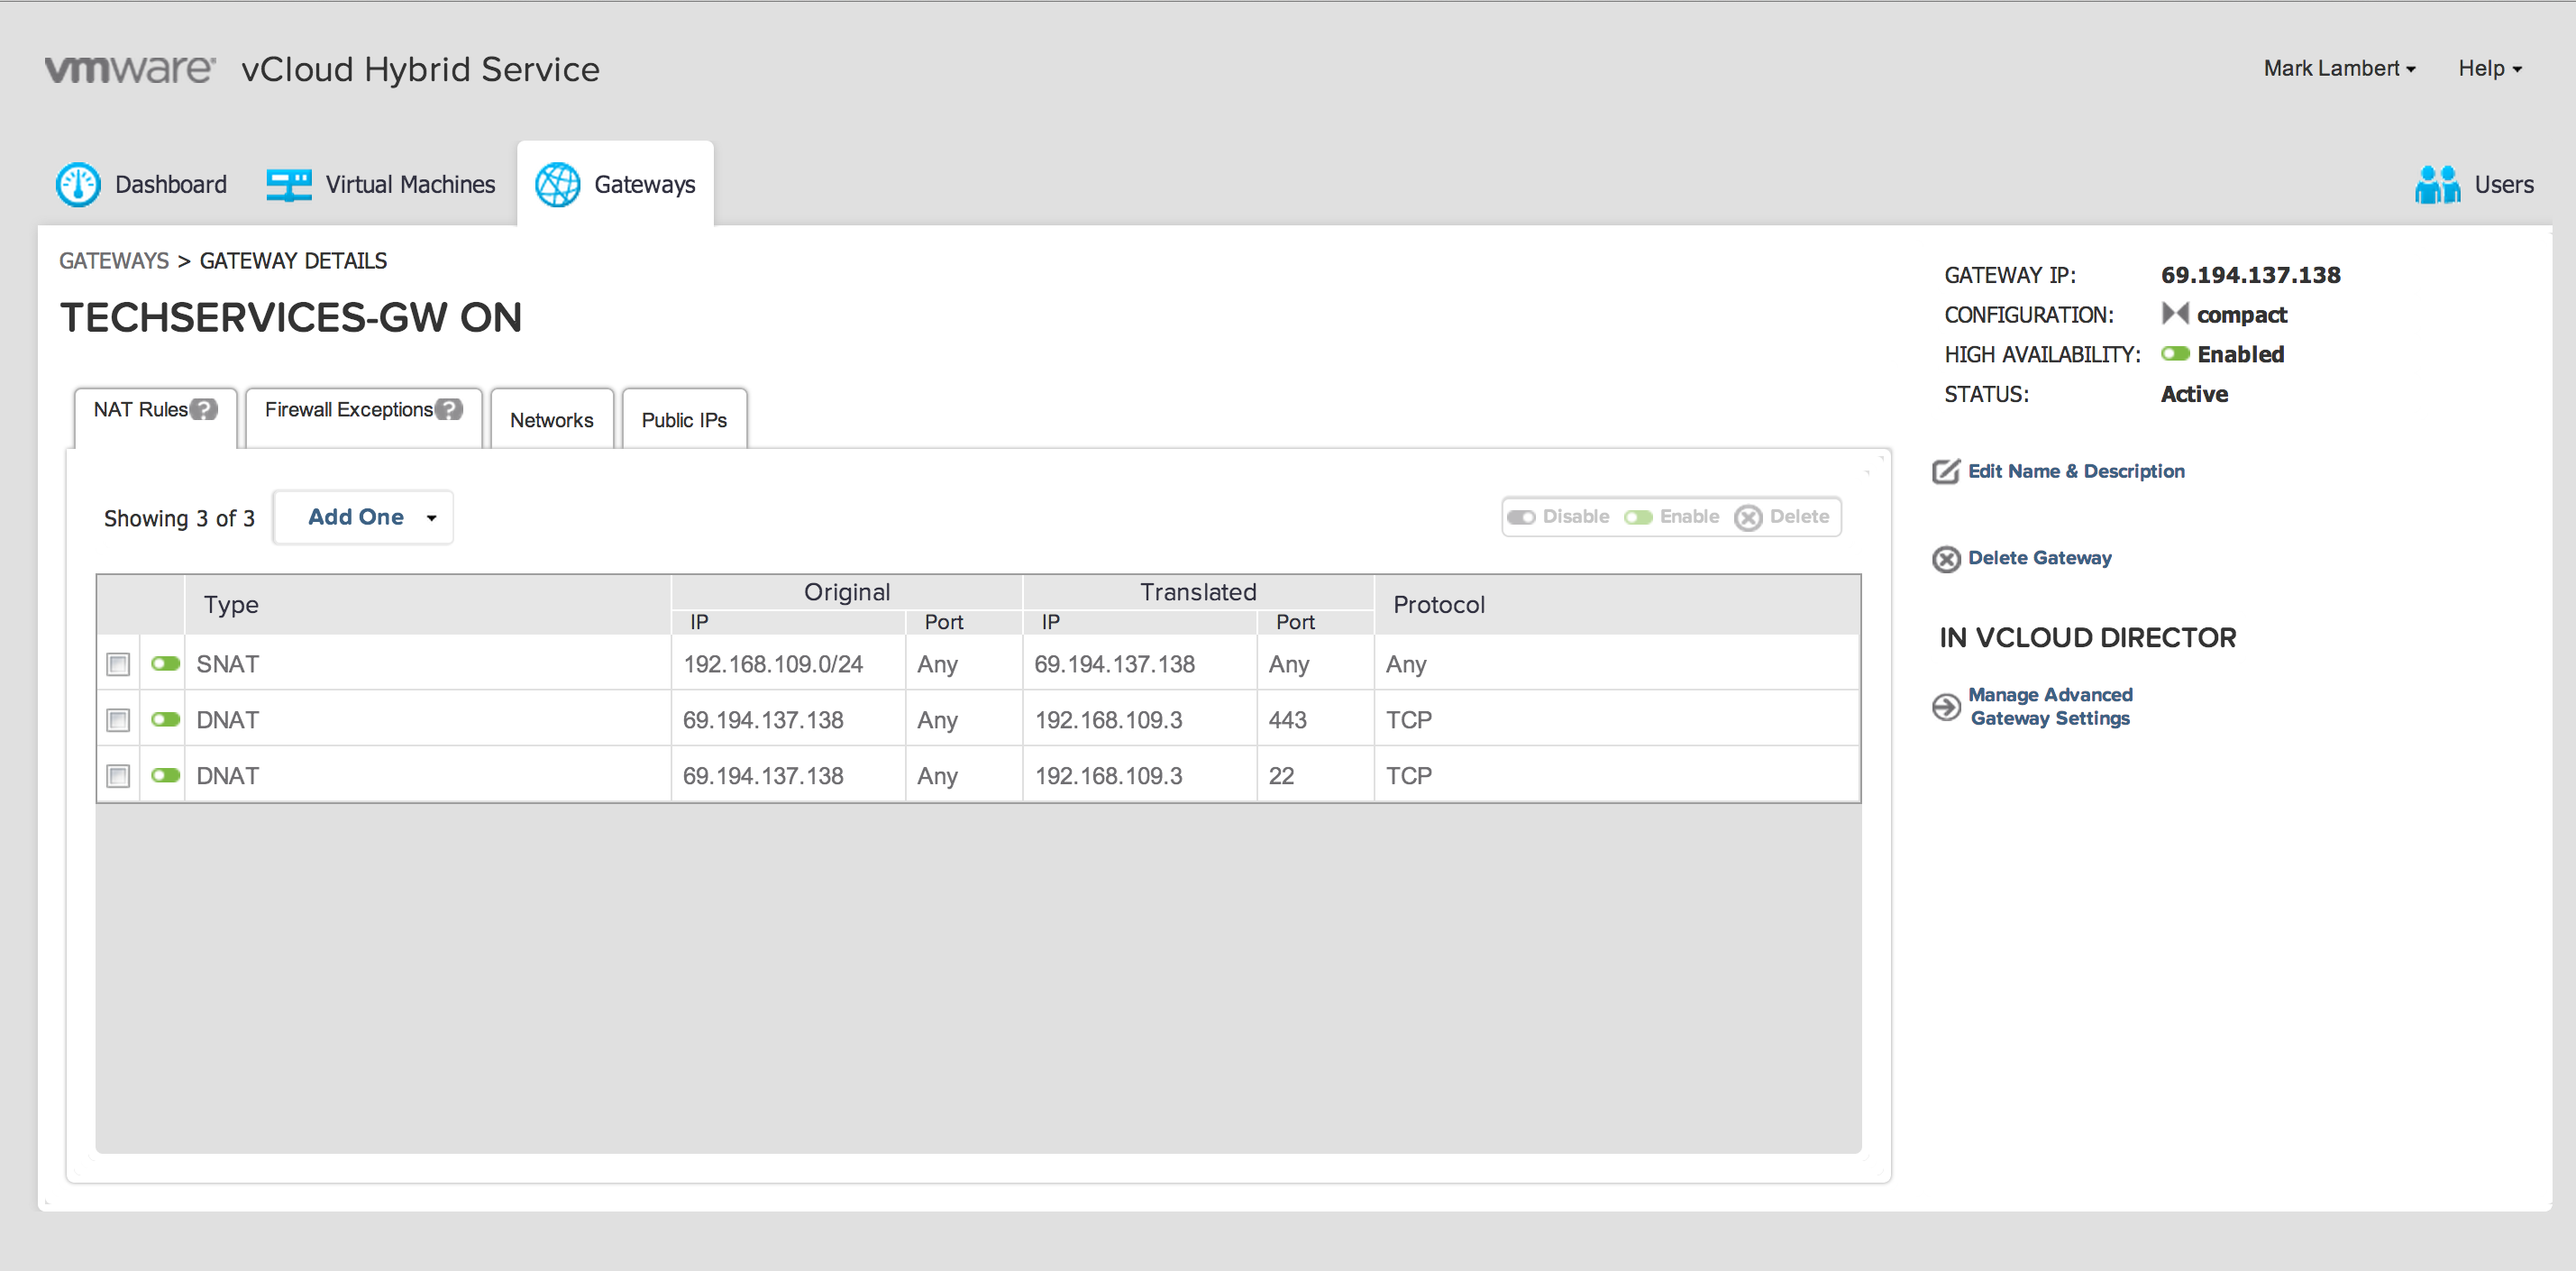
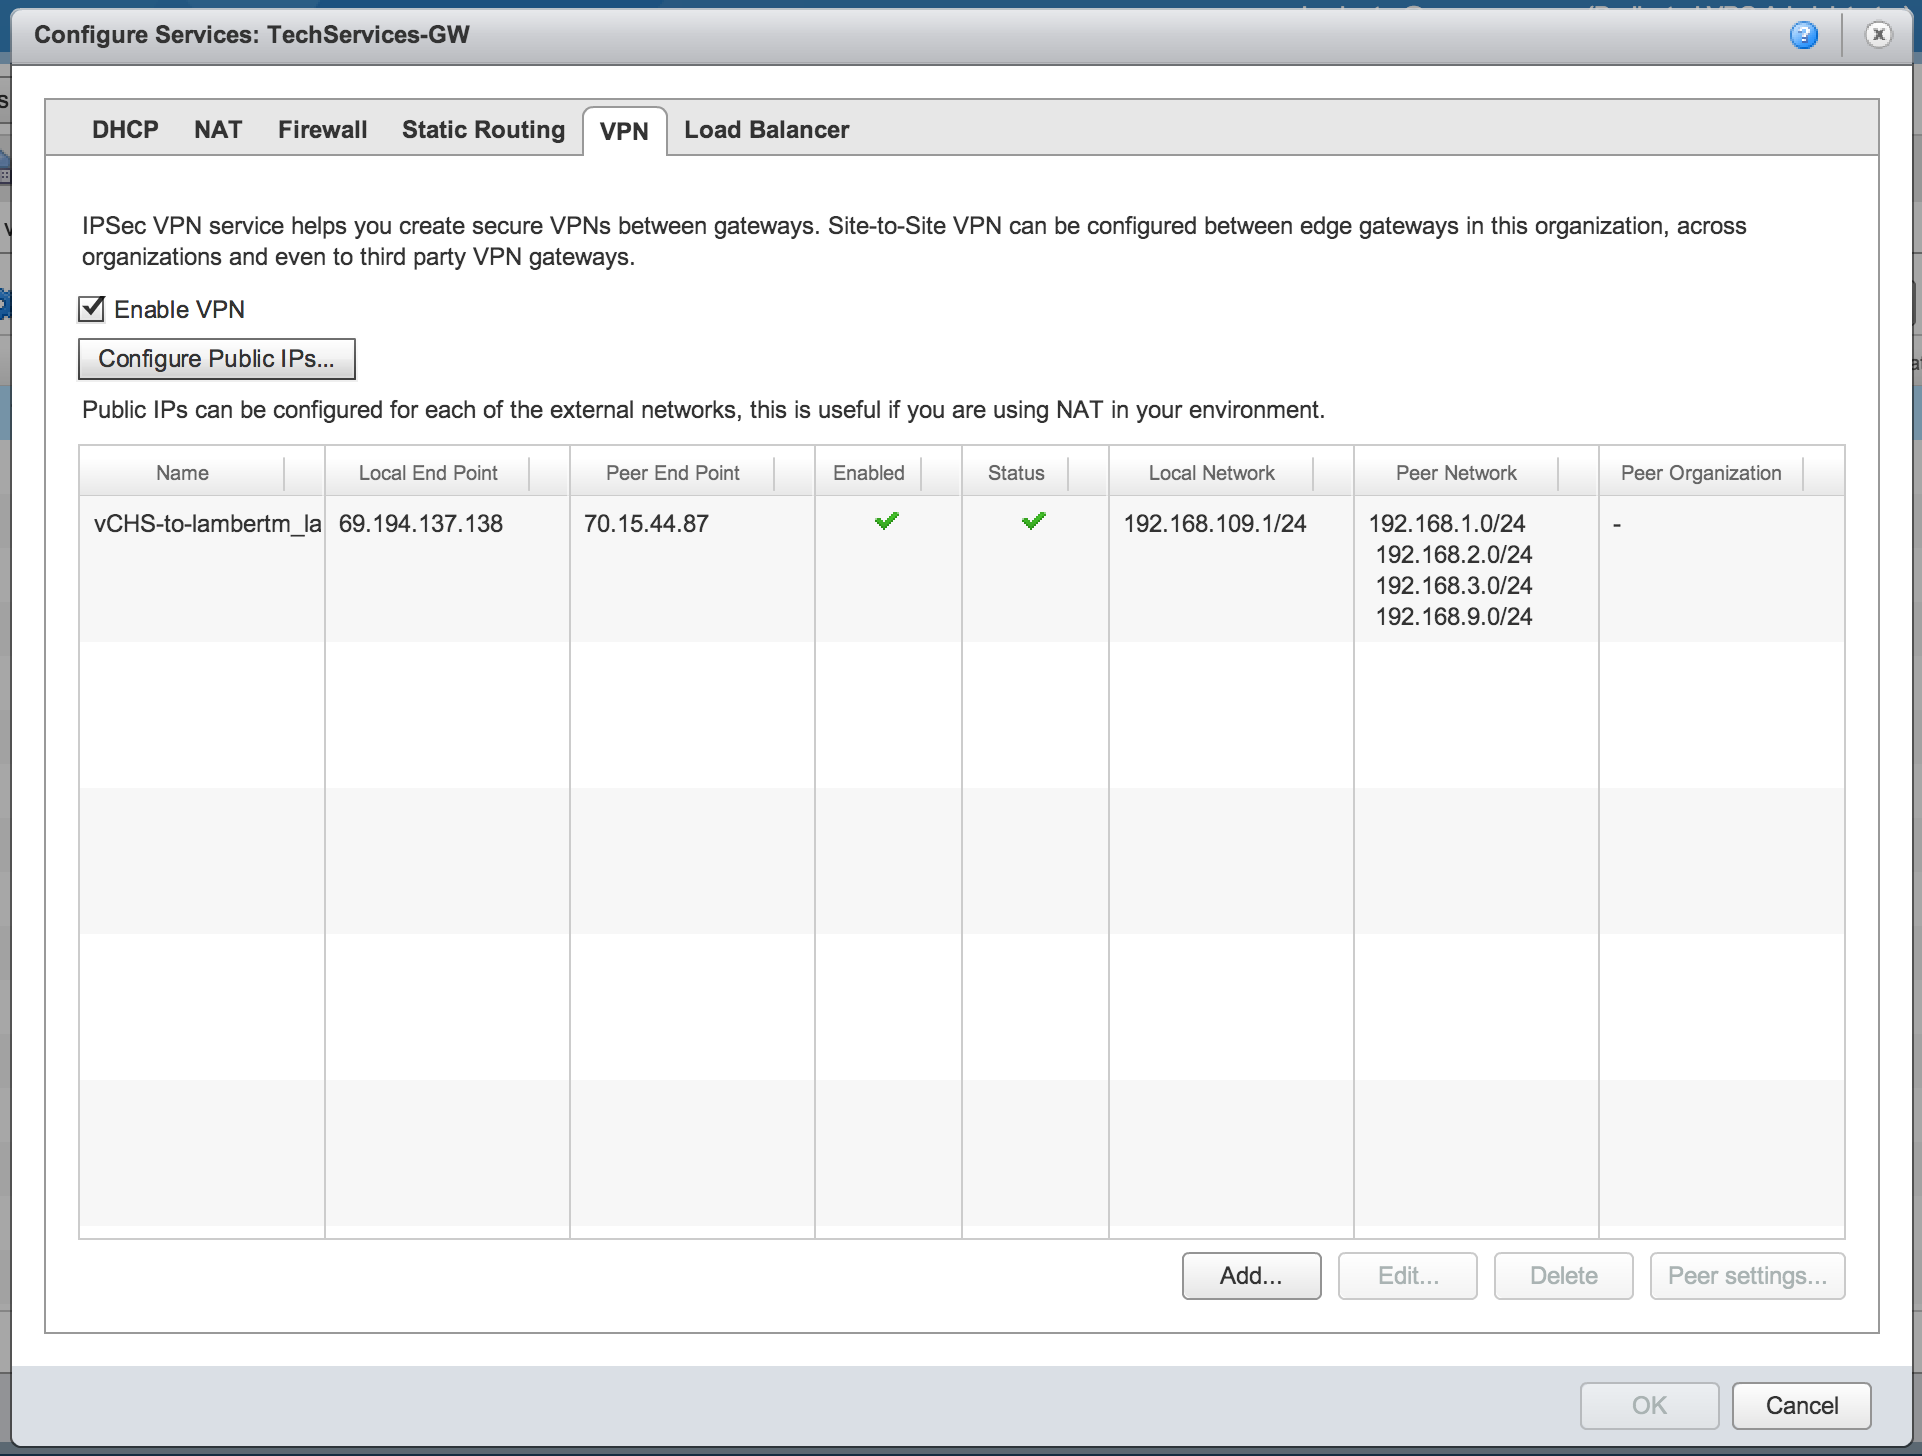
Above we can see the Gateway configuration tab in vCHS. To transition to the vCD UI, we click on “Manage Advanced Gateway Settings”. For anyone curious, this is going to bring us to the direct configuration of the vShield Edge which, within vCD and vCHS, is the virtual appliance that provides the edge services. On Windows a browser session will spawn and, if it isn’t IE, you will get a warning. The warning is ok (it works fine in Chrome) and clicking on “Continue” will bring you to vCD. Within the vCD UI, we’re looking for the “Administration” section and, with the Organizational vDC highlighted, the Edge Gateways tab: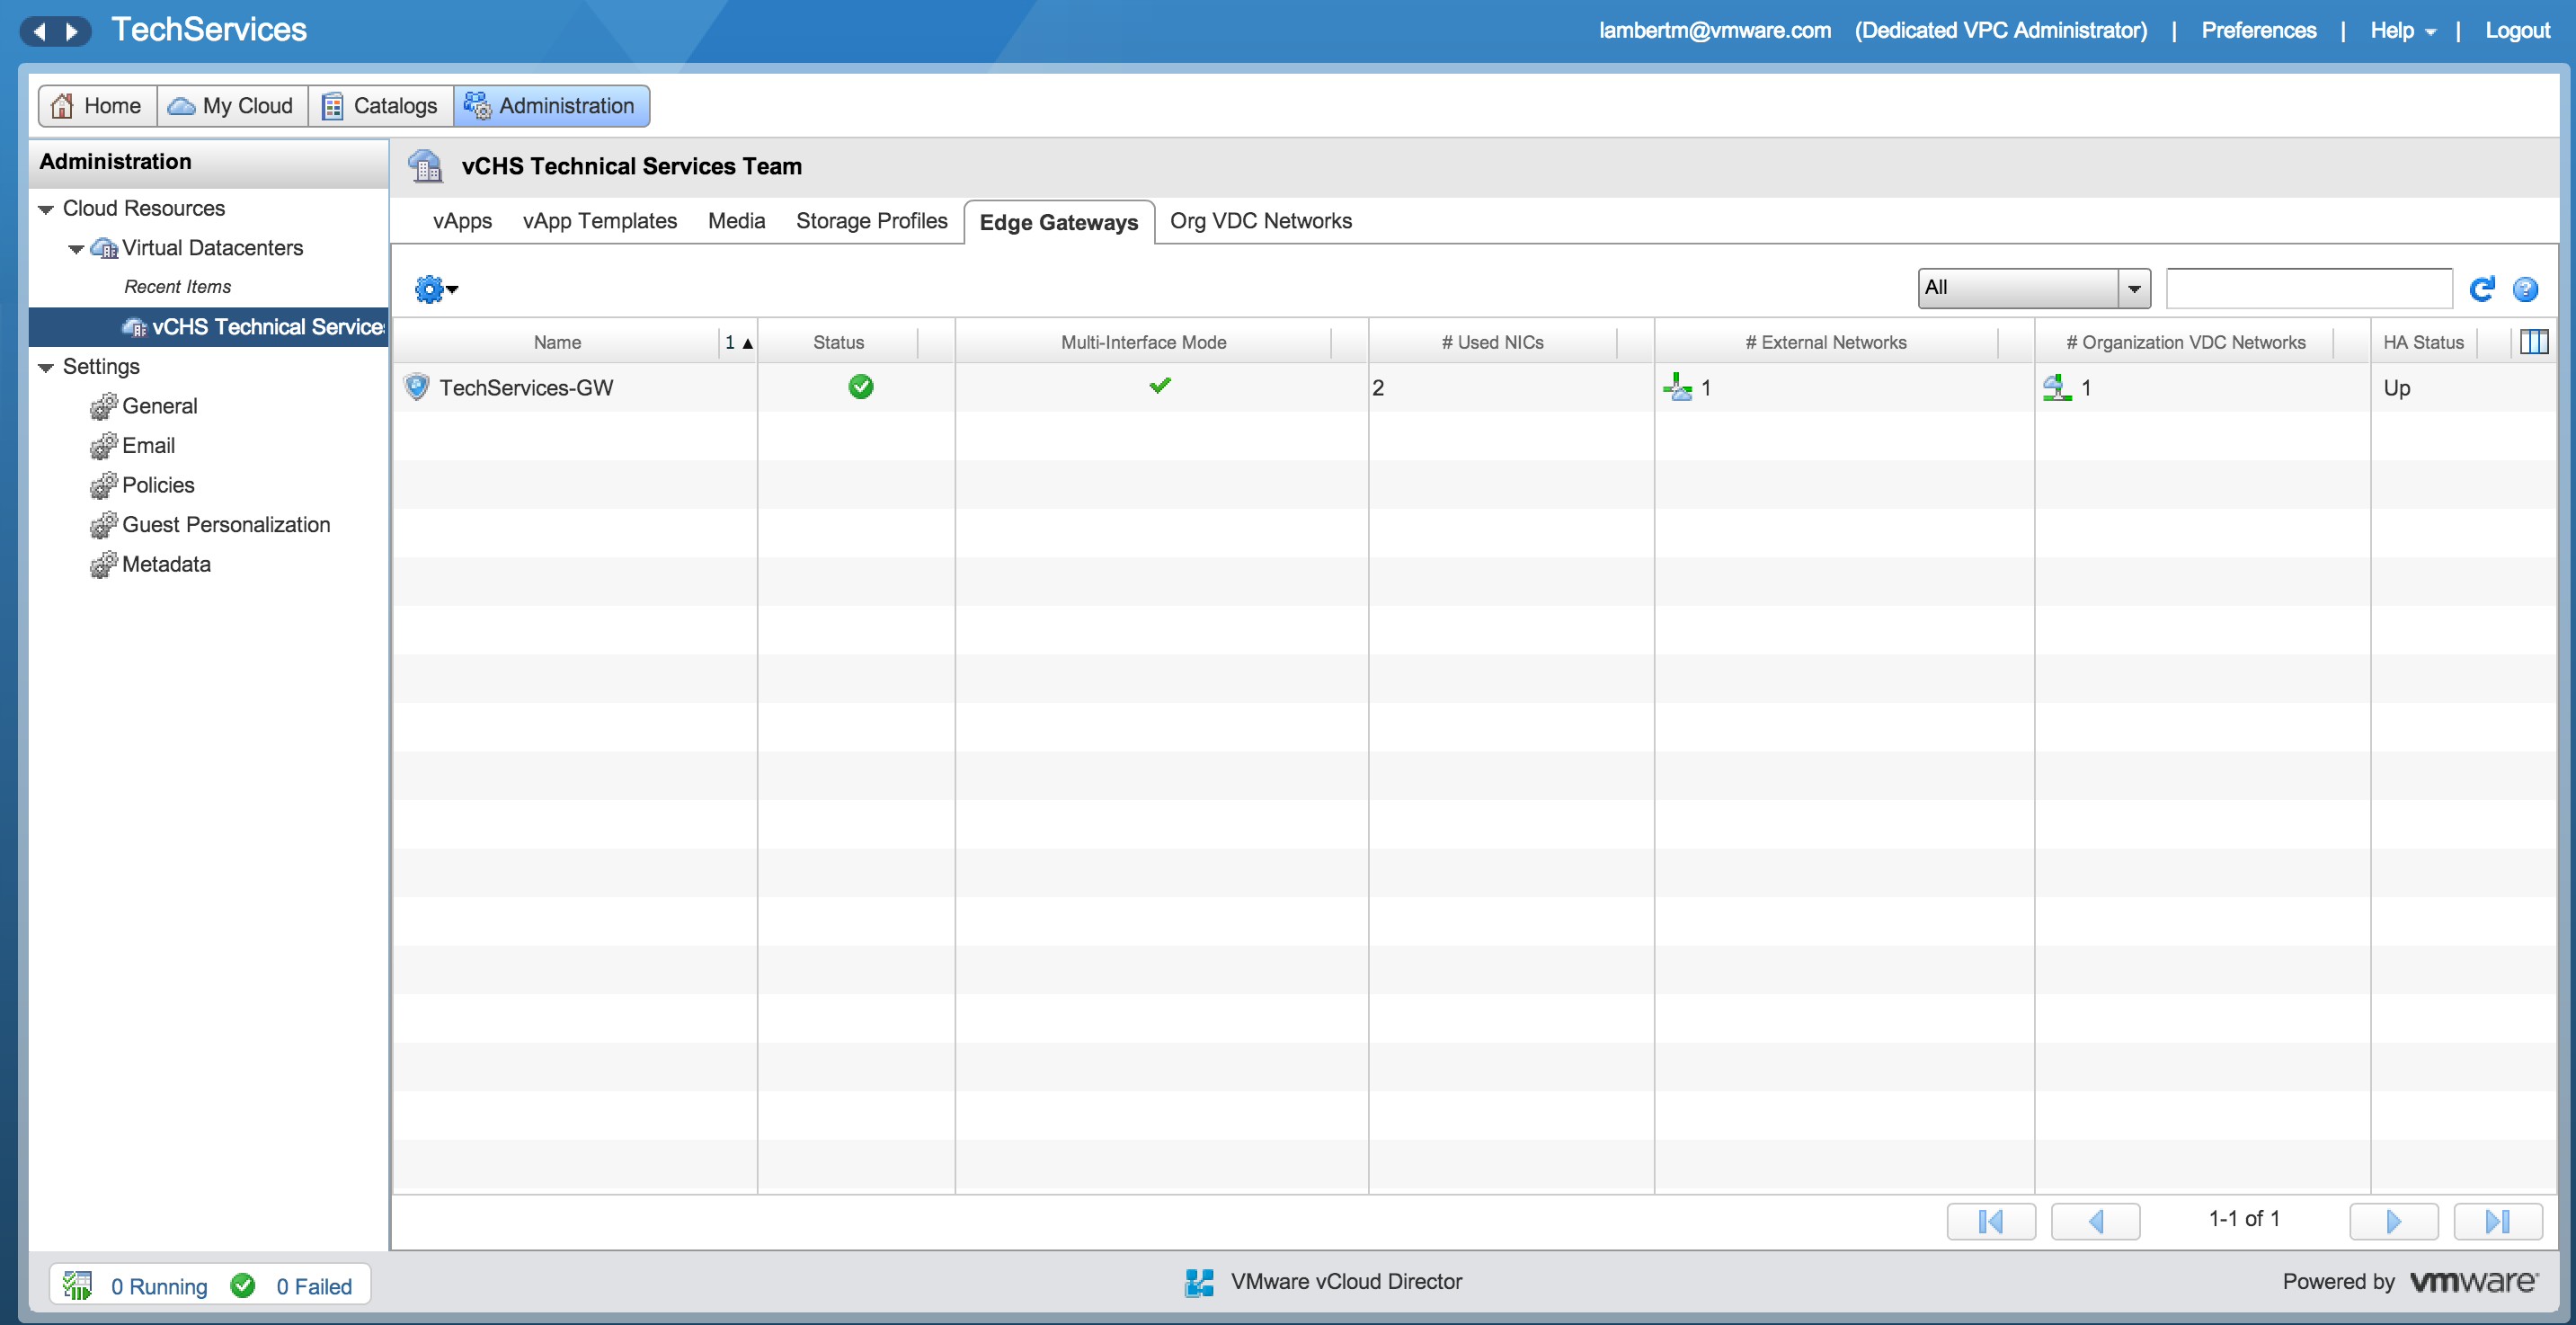 Right clicking on the Edge Gateway will bring up a properties menu. The option to select here is “Edge Gateway Properties”. This is where NAT, Firewall, Load Balancing and VPN settings are configured. In this case we want to select the VPN tab, “Enable VPN”:
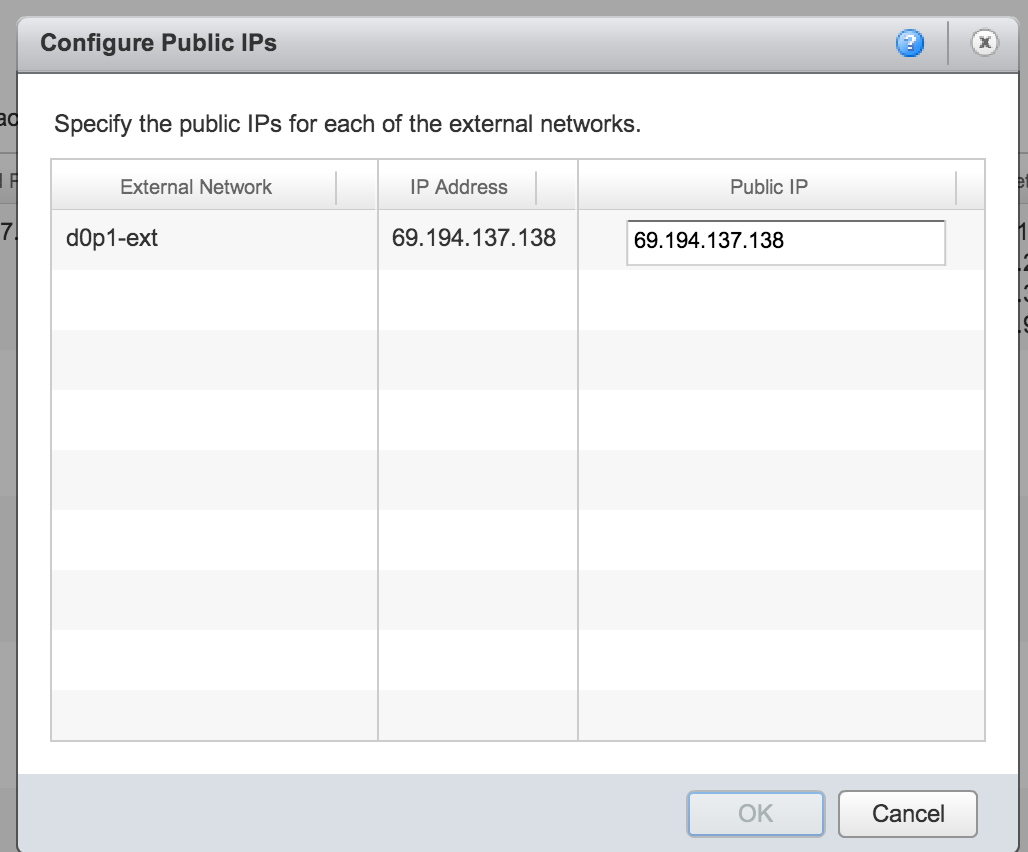
With the VPN enabled, the first step is to configure the Public IP of the vCHS IPSEC endpoint. Depending on how many IP’s have been allocated for use by this gateway, there will be one or more possible entries here:
WIth the IP configured we can now go ahead and add a new IPSEC tunnel entry. This is familiar territory if you’re comfortable with IPSEC (easier than normal actually). If not, some explanation is required. I’ll go field by field with a (brief) summary of each entry (this dialogue box is too long so I split it):
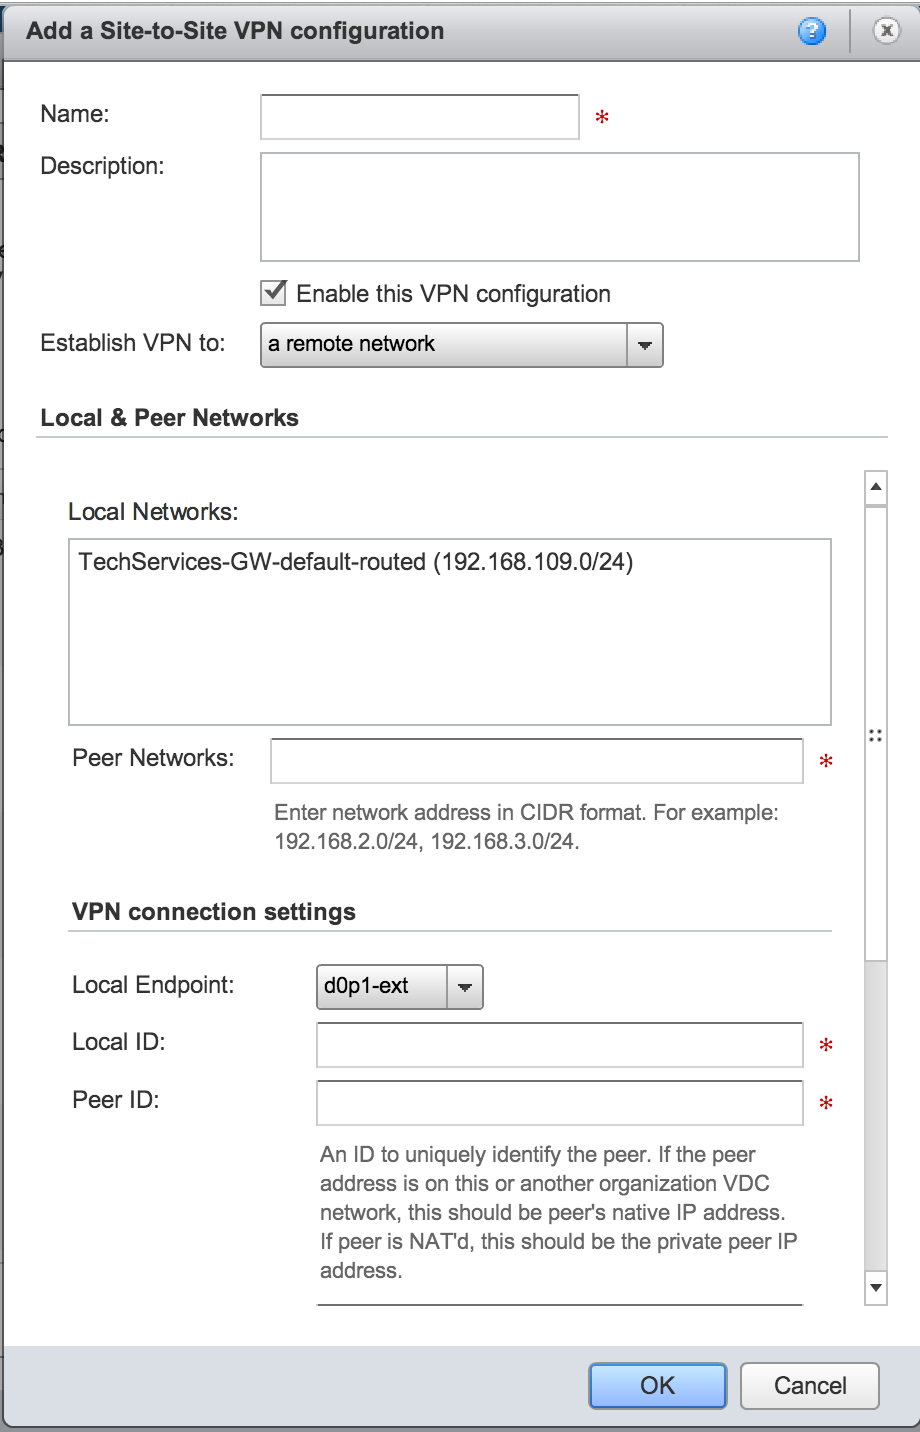

NOTE: Make a note of these values. You will need them when setting up the pfSense side.
- Name: a name for the IPSEC connection
- Description: a description for the IPSEC connection
- Establish VPN to: vCHS allows you to configure IPSEC tunnels both within vCHS (either within your organization, or to another organization network) as well as to your remote on-premise network. For our purposes we will select “a remote network”.
- Local Networks: this is where you select the vCHS organization networks that will be visible to the remote endpoint being connected (visible from on-prem)
- Peer Networks: the networks on the on-prem side of the IPSEC tunnel that will be allowed to pass traffic through. These are the networks that will be visible and reachable from vCHS.
- Local Endpoint: the vCHS Edge Gateway being configured is selected from the drop-down here.
- Local ID: In order to establish a secure tunnel, IPSEC endpoints need to identify each other. The identifier of the vCHS endpoint (the vShield Edge) should be entered here. It’s usually a good idea to utilize the IP address of the endpoints for simplicity as their identifier.
- Peer ID: In order to establish a secure tunnel, IPSEC endpoints need to identify each other. The identifier of the on-prem endpoint should be entered here. It’s usually a good idea to utilize the IP address of the endpoints for simplicity as their identifier.
- Peer IP: This is the IP address of the public interface on-prem that is establishing the IPSEC tunnel with vCHS.
- Encryption Protocol: IPSEC is an encrypted IP channel between two endpoints. It supports a range of different protocols for establishing this secure channel. The options here are AES, AES256 or triple DES (3DES) and the important thing is that both sides must match (vCHS and your on-prem network edge).
- Shared Key/Show Key: in able to establish the secure tunnel, IPSEC endpoints must have a way to authenticate each other and mutually validate each others authenticity. The simplest method for authentication is pre-shared key (PSK) and this is sufficient for static endpoints like site-to-site VPN. vCHS requires PSK and autogenerates one when a new VPN connection is created. Clicking “Show Key” will allow you to copy and paste this key to your on-prem endpoint configuration.
- MTU: the IP MTU is the IP MTU 🙂 The allowed maximum size of the IP packet. 1500 being the standard for ethernet. In some cases, depending on endpoint device configurations, a lower MTU may be required. If so, this is the spot in the vCHS vShield Edge configuration to set it.
With all settings populated, a completed configuration will look something like this:
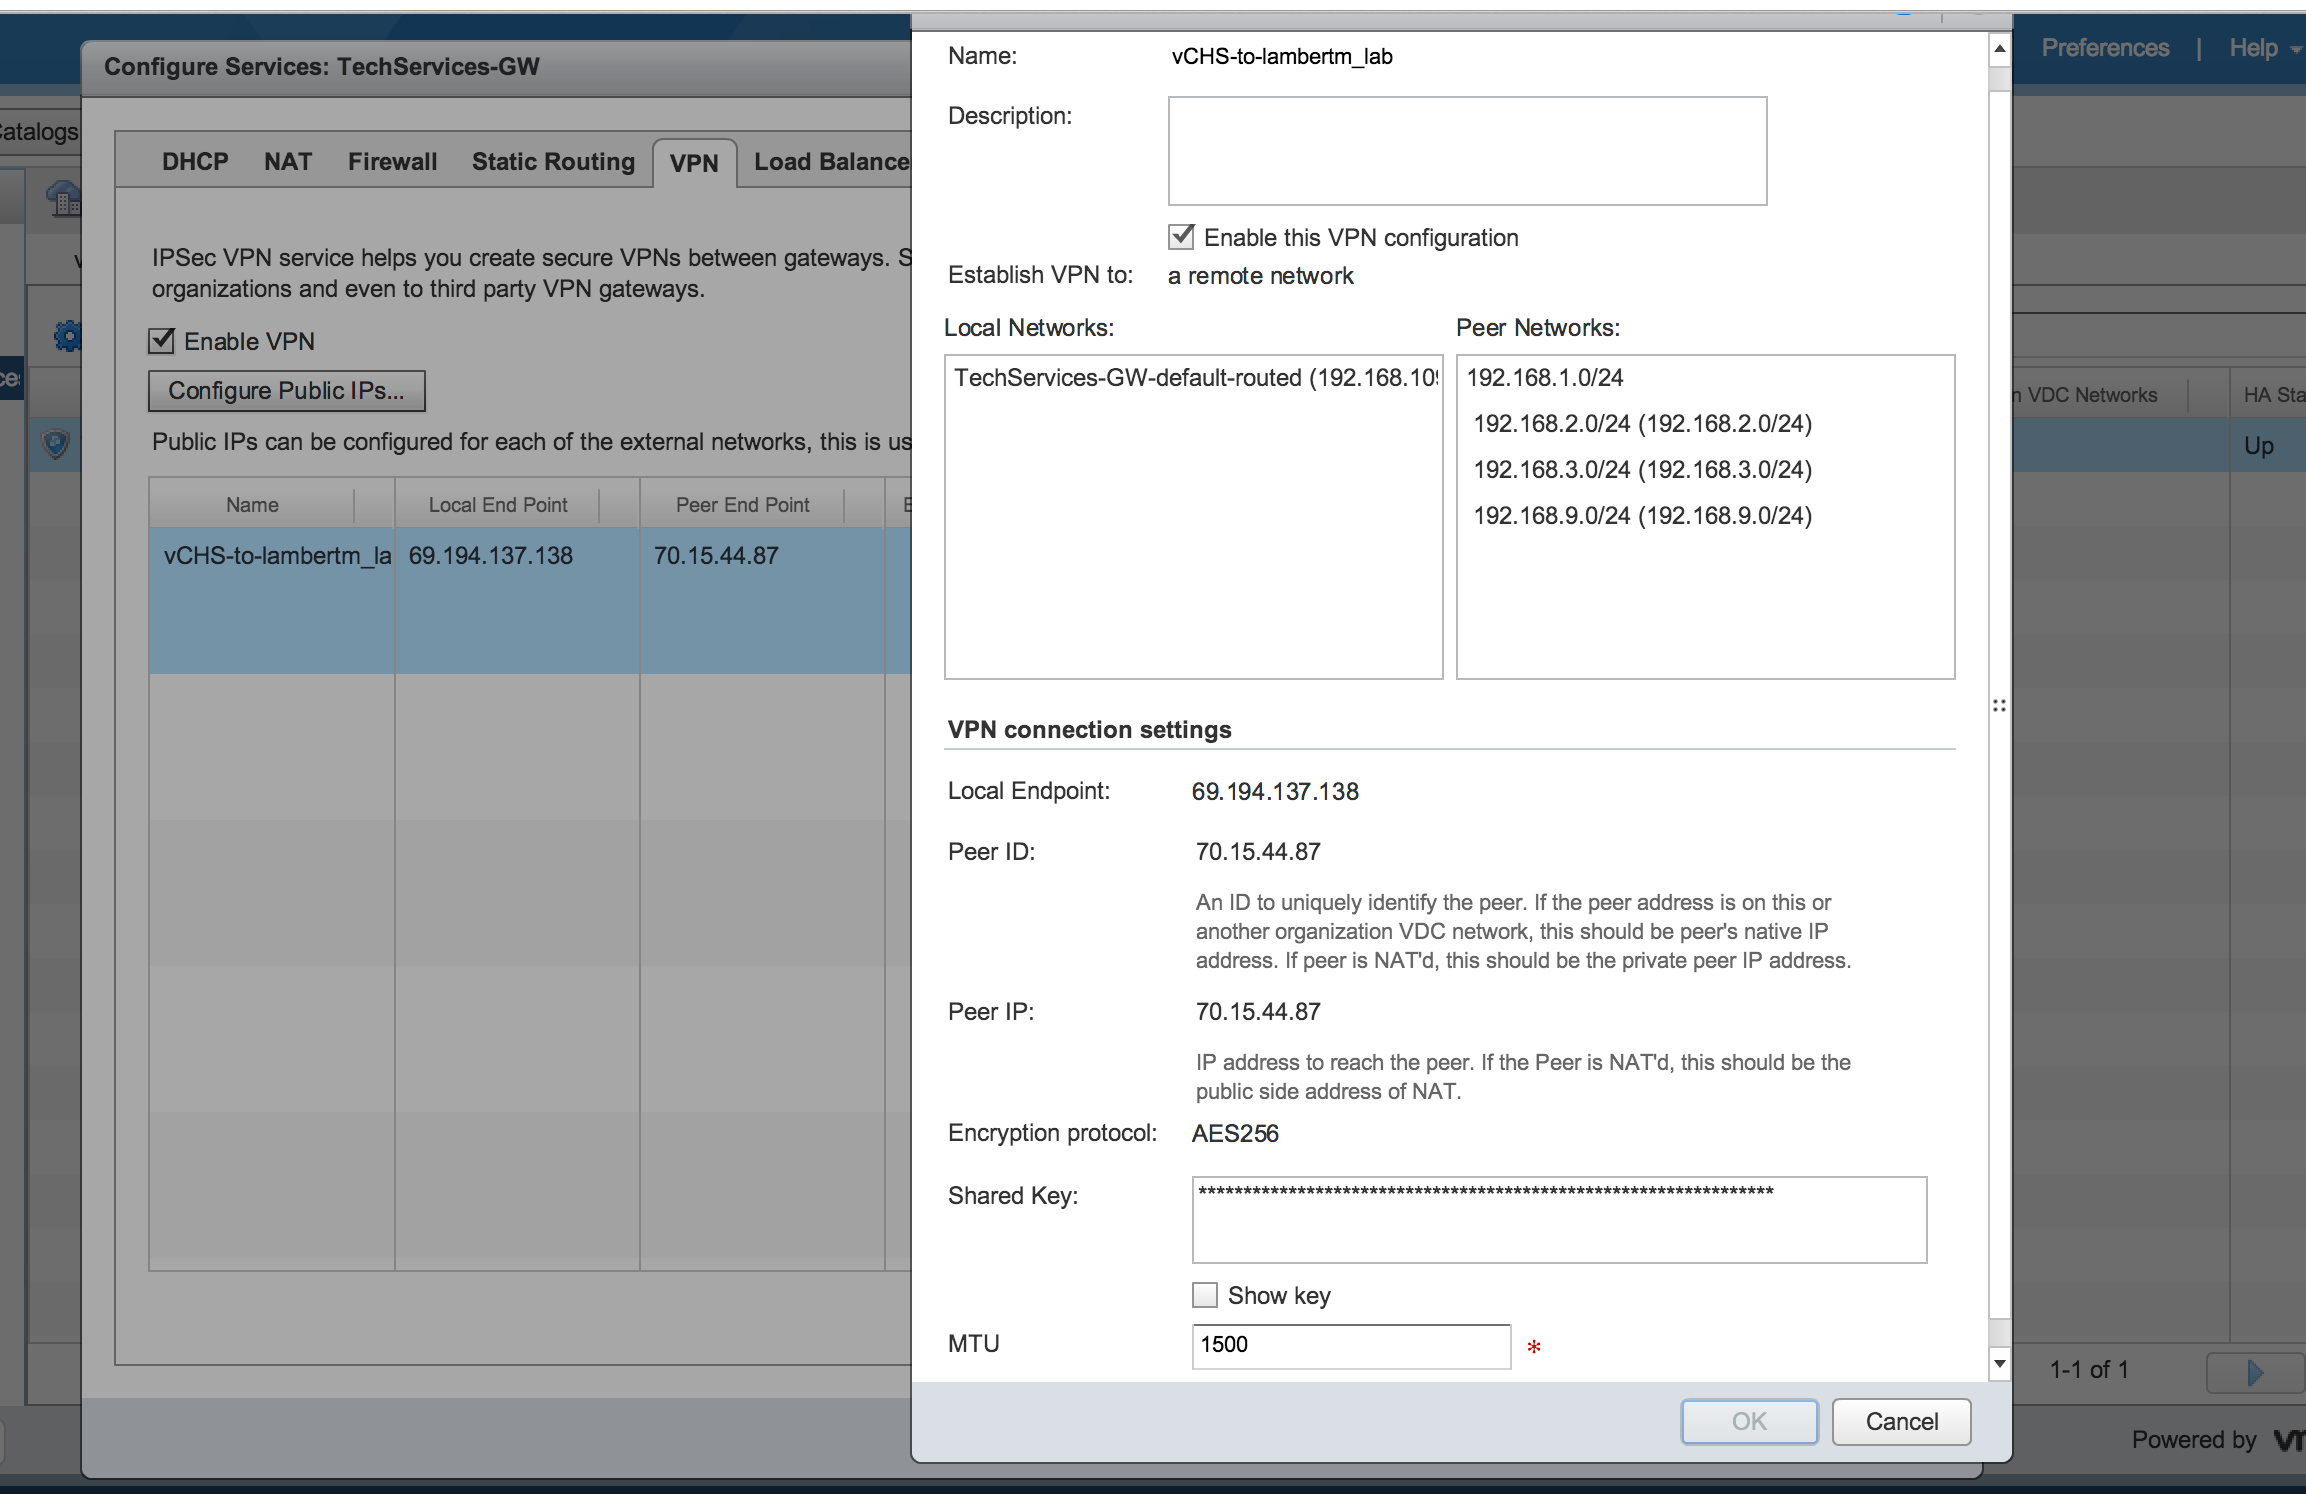
Of course your mileage can (and should) vary! So at this point we have vCHS nicely configured and in theory should be able to connect right up. One thing to be mindful of is that the devil is in the details with IPSEC and there is no margin for error. pfSense (and any rich endpoint device on-prem) will be more complicated than the vShield Edge config and have quite a few more options, so this is a good point to brush up on both general IPSEC and also the operations of your endpoint device. Always remember that IPSEC works in phases. The first phase is where the two endpoints identify and authenticate each other and establish a secure channel using an agreed upon protocol. The next phase is where network peering through the tunnel is established. One or more phase 2 entries will map to a phase 1 entry and it is the phase 2 entries that establish the actual network connectivity (phase 1 simply creates the tunnel) When things are wrong, the log entries can often be a bit cryptic. For example what looks like a phase 2 error could potentially actually be a phase 1 failure causing a cascade effect, so pay close attention to every entry in the log when troubleshooting a failure. So with these warnings in mind, lets have a look at a working pfSense IPSEC config for vCHS. First up is the view of how things will look off of the VPN->IPSEC tab once you are successfully configured. Here you can see the Phase 1 entry and its relationship to Phase 2:
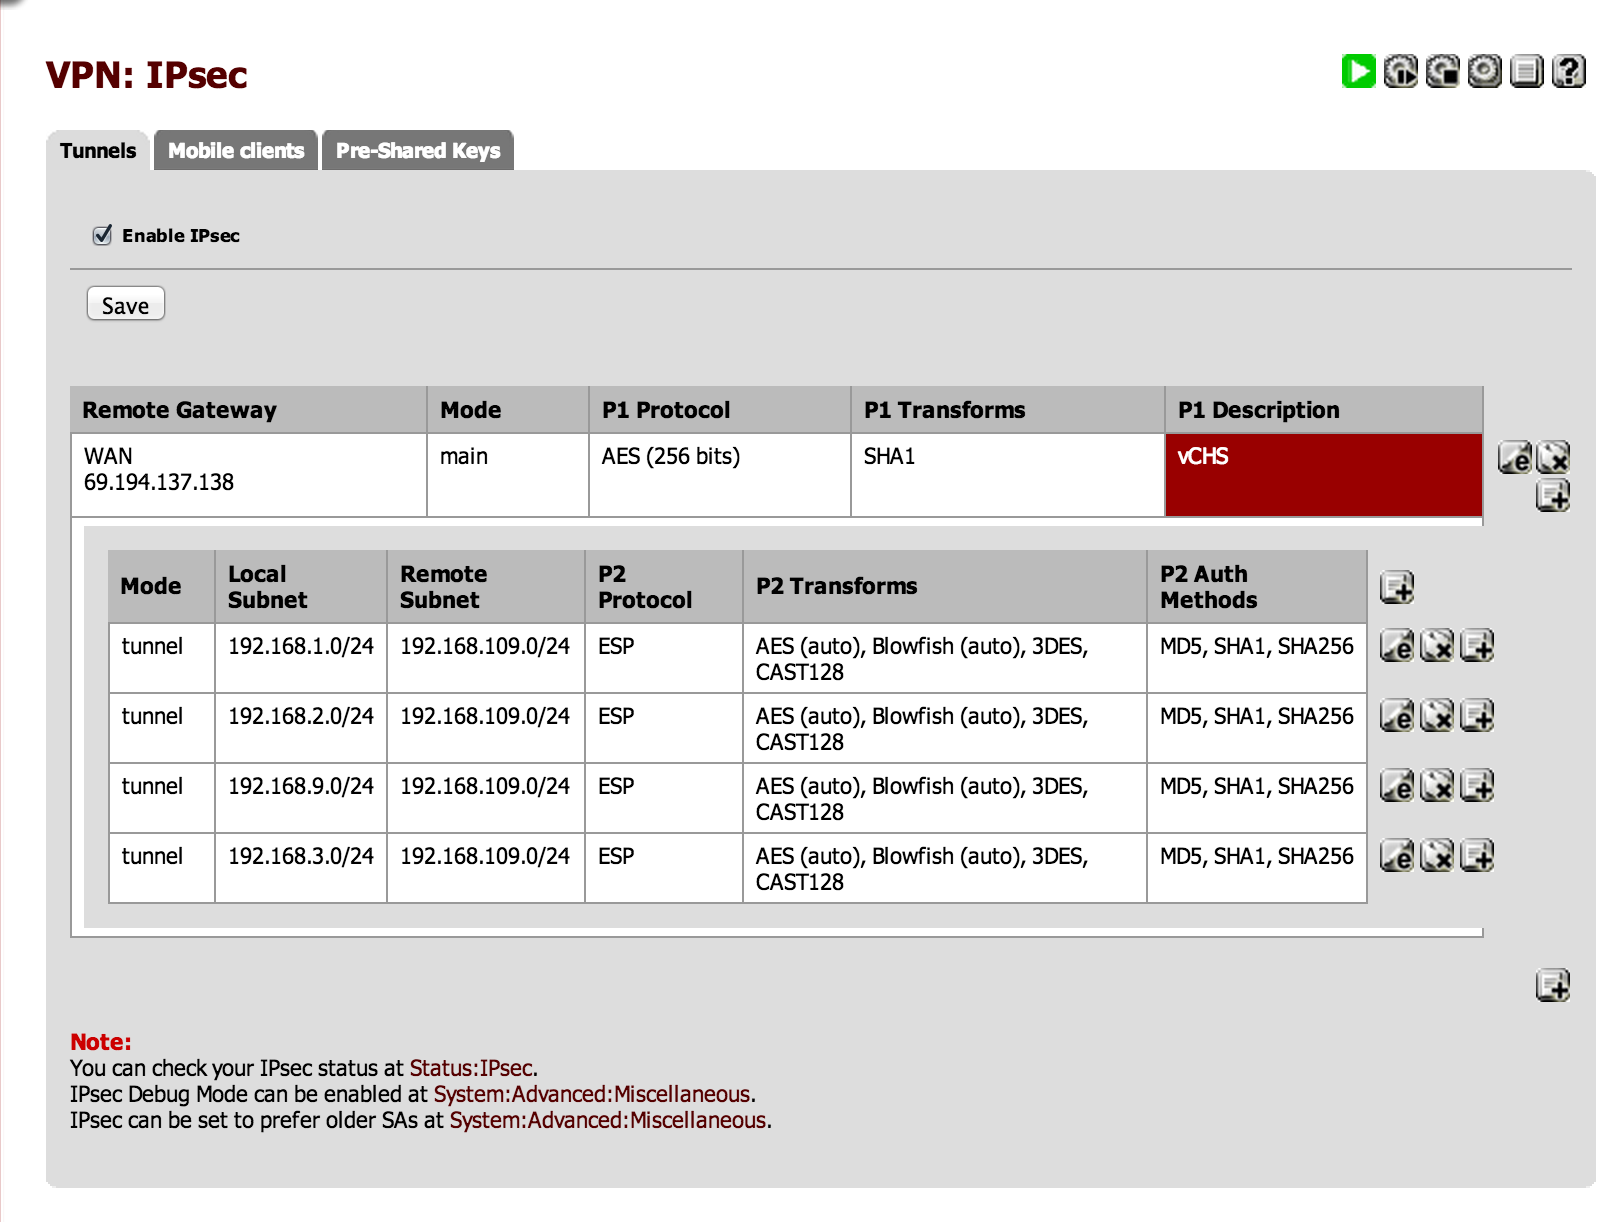
To create a new IPSEC tunnel the first step is to click on the “+” icon. This will invoke the IPSEC VPN configuration page. It’s a long and detailed one so I split it in half and (badly) stitched it together:


The important bits to focus on here are:
- Remote Gateway: this is the IP address of the vCHS endpoint
- Authentication Mode: vCHS will require Mutual PSK (pre-shared key) so that is what should be selected here
- Negotiation Mode: IPSEC supports two modes for establishing the tunnel – “main” and “aggressive”. Main mode is a multiple packet exchange and is more secure. Aggressive mode attempts to consolidate identification and authentication into a single packet exchange and is faster and, in some cases, more flexible. My advice is to lead with Main Mode and fallback to Aggressive Mode if the circumstances require it.
- Identifiers (My and Peer): the key is to match what was configured for these values on the vCHS side. In this case “Peer” is vCHS obviously and, once again, using IP address as an identifier makes things easier generally.
- Encryption Algorithm: as mentioned above, the key here is to make sure both sides match. In our case we are selecting AES as the encryption protocol and 256 bits as the key size.
- Hash Algorithm: the mutually agreed upon hash protocol for ensuring message integrity In the case of vCHS the correct choice is SHA1.
- DH Key Group: IPSEC relies on the diffie-hellman (DH) internet key exchange (IKE) protocol for establishing the encryption keys used to secure the tunnel. Each side must agree on a key grouping (key size). In the case of vCHS (and in most similar cases actually), select 2.
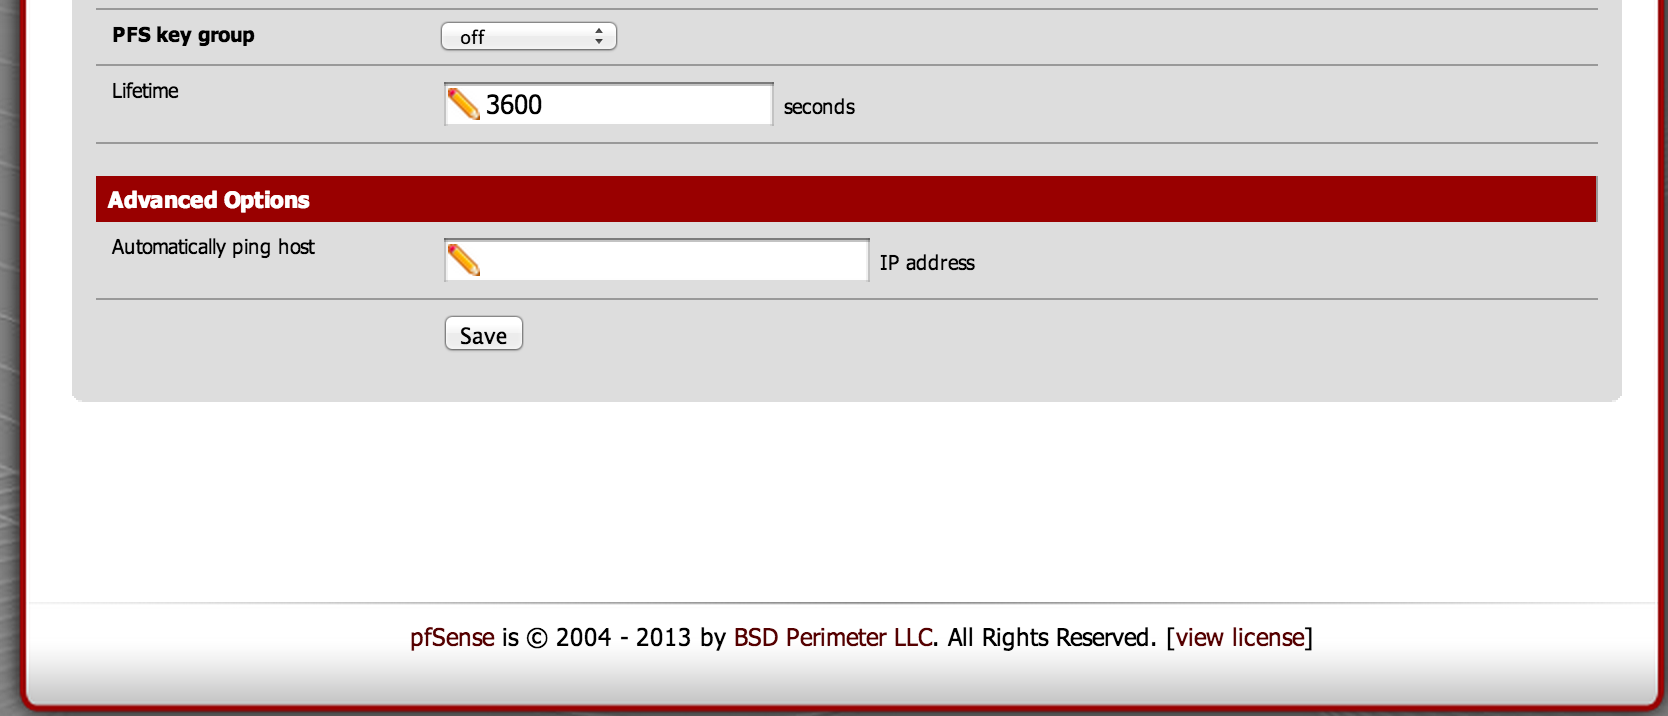
Other values can be left at default or, situationally, changed. For example “NAT traversal” may be required if your pfSense endpoint is behind a NAT and not directly connected to the internet. If this is your case it is also worth noting that the endpoint identifier IP would be the IP of the pfSense gateway and not of the NAT (but obviously vCHS would be connecting to the public IP presented by that NAT endpoint). Lifetime is another value that might be changed based on individual requirements. The lifetime specifies the time after which the endpoints will renew the tunnel connection.
With Phase 1 established, we can go ahead and create a Phase 2 entry to get traffic flowing through the tunnel. To add a Phase 2 entry, click on the “+” icon below the Phase 1. This is also a long config page so once again I split it:
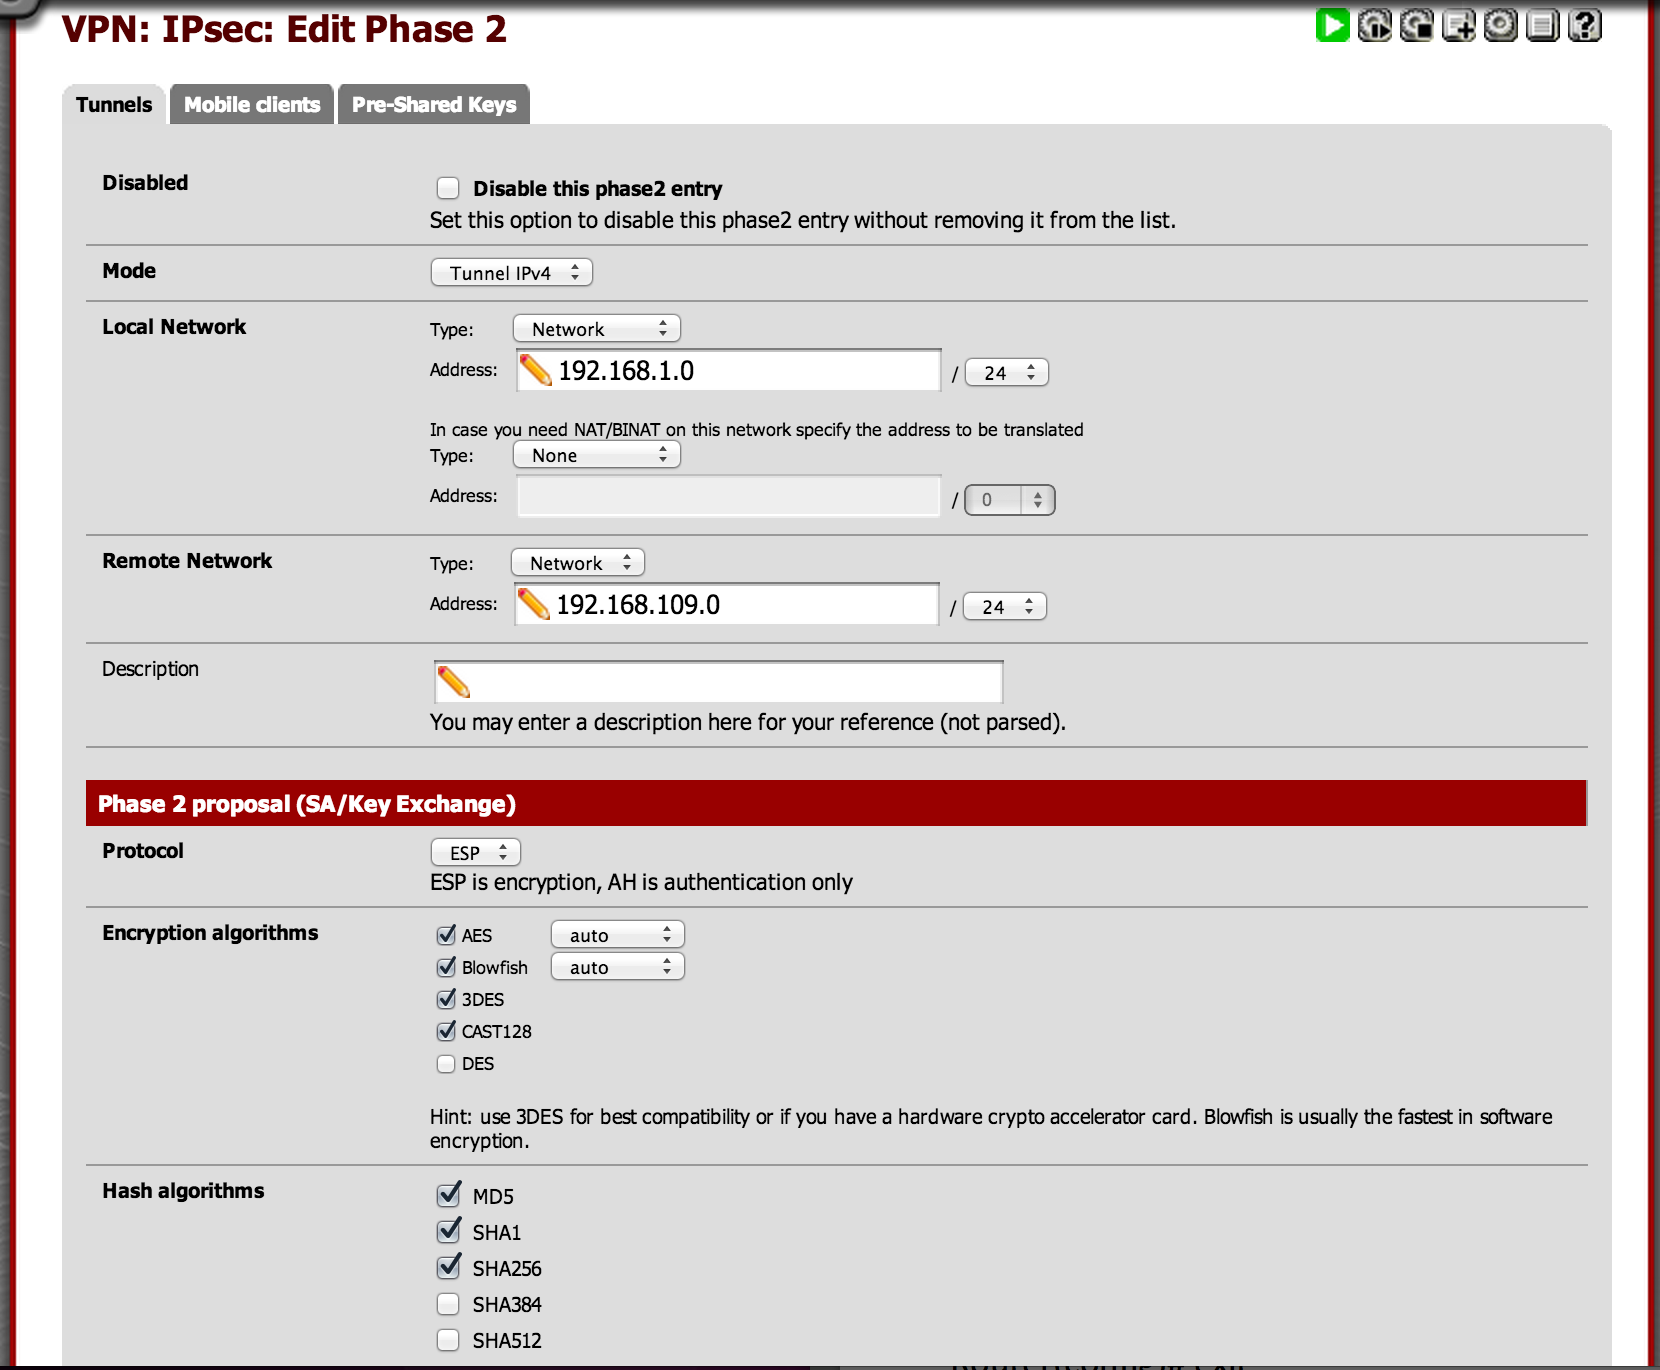
The key things to enter here are the remote endpoint network and the local endpoint network being peered. In my case I create a Phase 2 entry for each local subnet because I have many local subnets and one remote. Your mileage certainly will vary on this one. For all of the other options default is fine. Encryption and Hash options can be narrowed to what is specified in Phase 1, but don’t need to be.
With Phase 1 and Phase 2 both configured, the IPSEC tunnel should come online. If it is successful, it will look like this in vCHS:
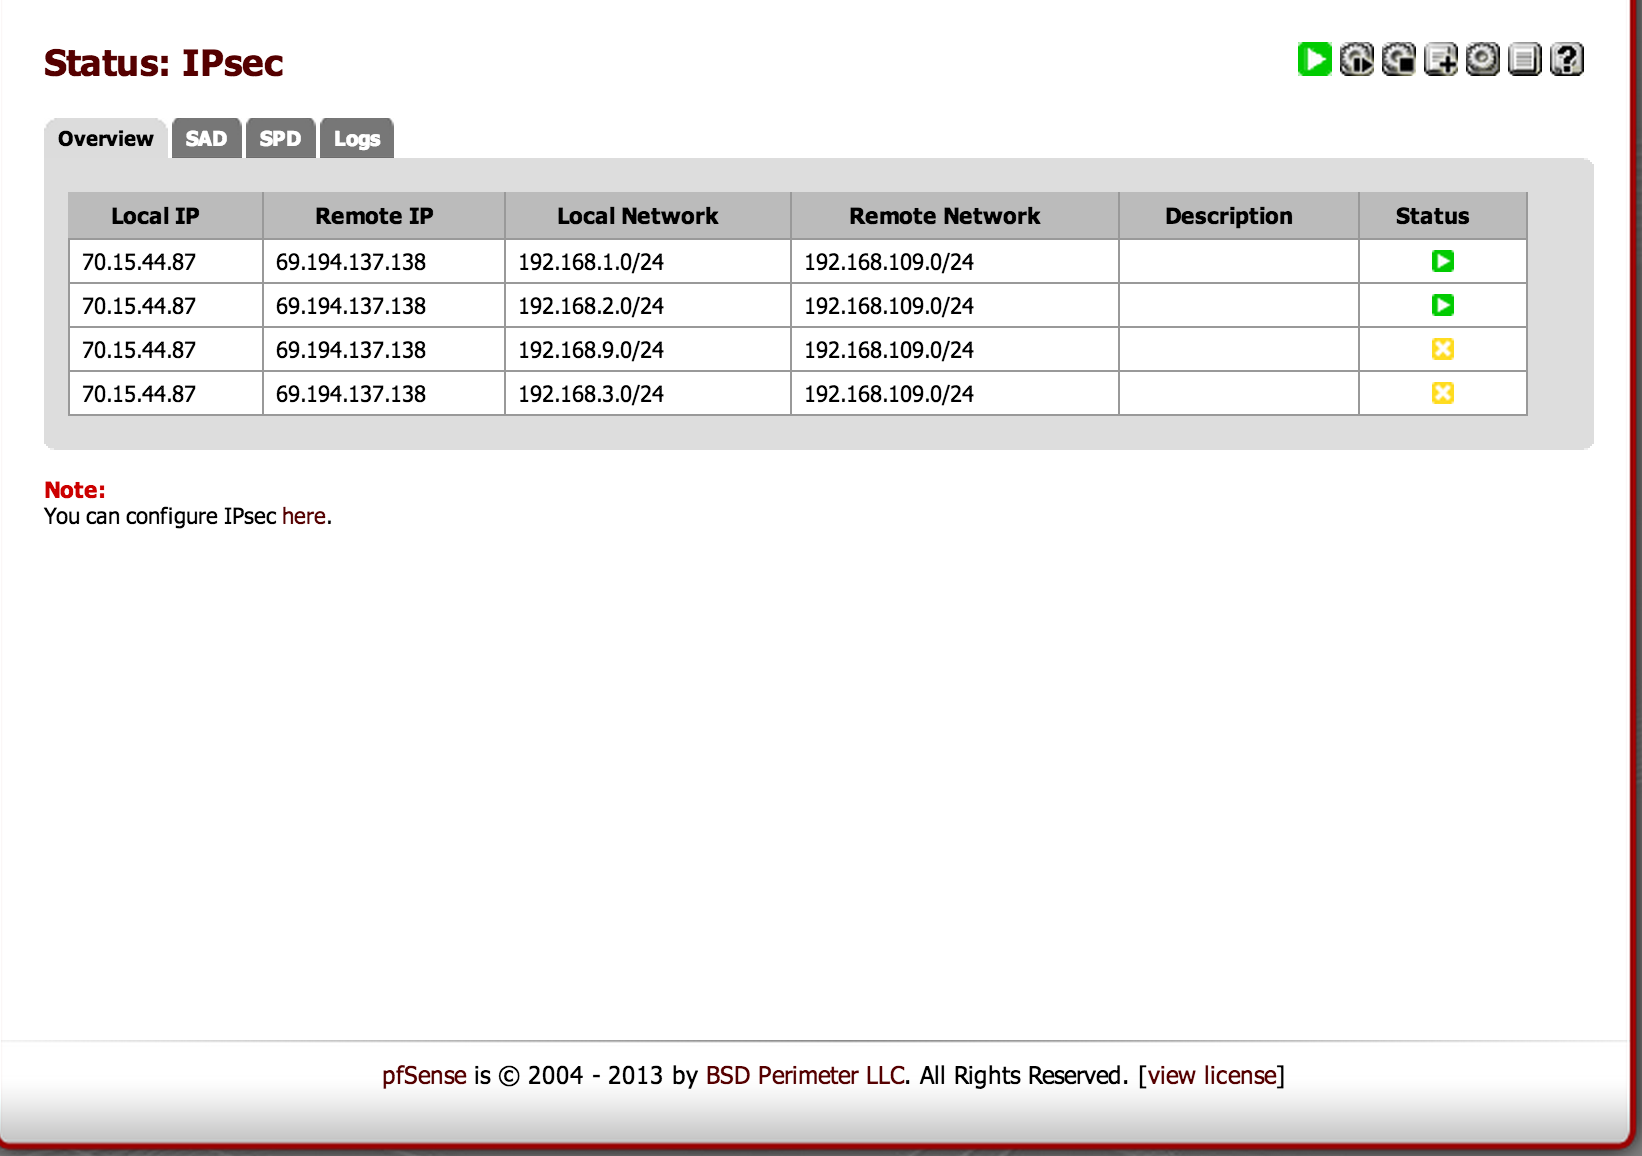
Notice that “Status” has the green check. On the pfSense side, this is how things should look off of the Status->IPSEC tab (note, in my case 192.168.3.0 and 192.168.9.0 are currently unreachable for other reasons and as a result were yellow):
With our tunnel online and happily passing traffic, the last step is to update the pfSense firewall so the remote subnet can pass traffic through. In my case there is one remote subnet, 192.168.109.0, that needs to be added:

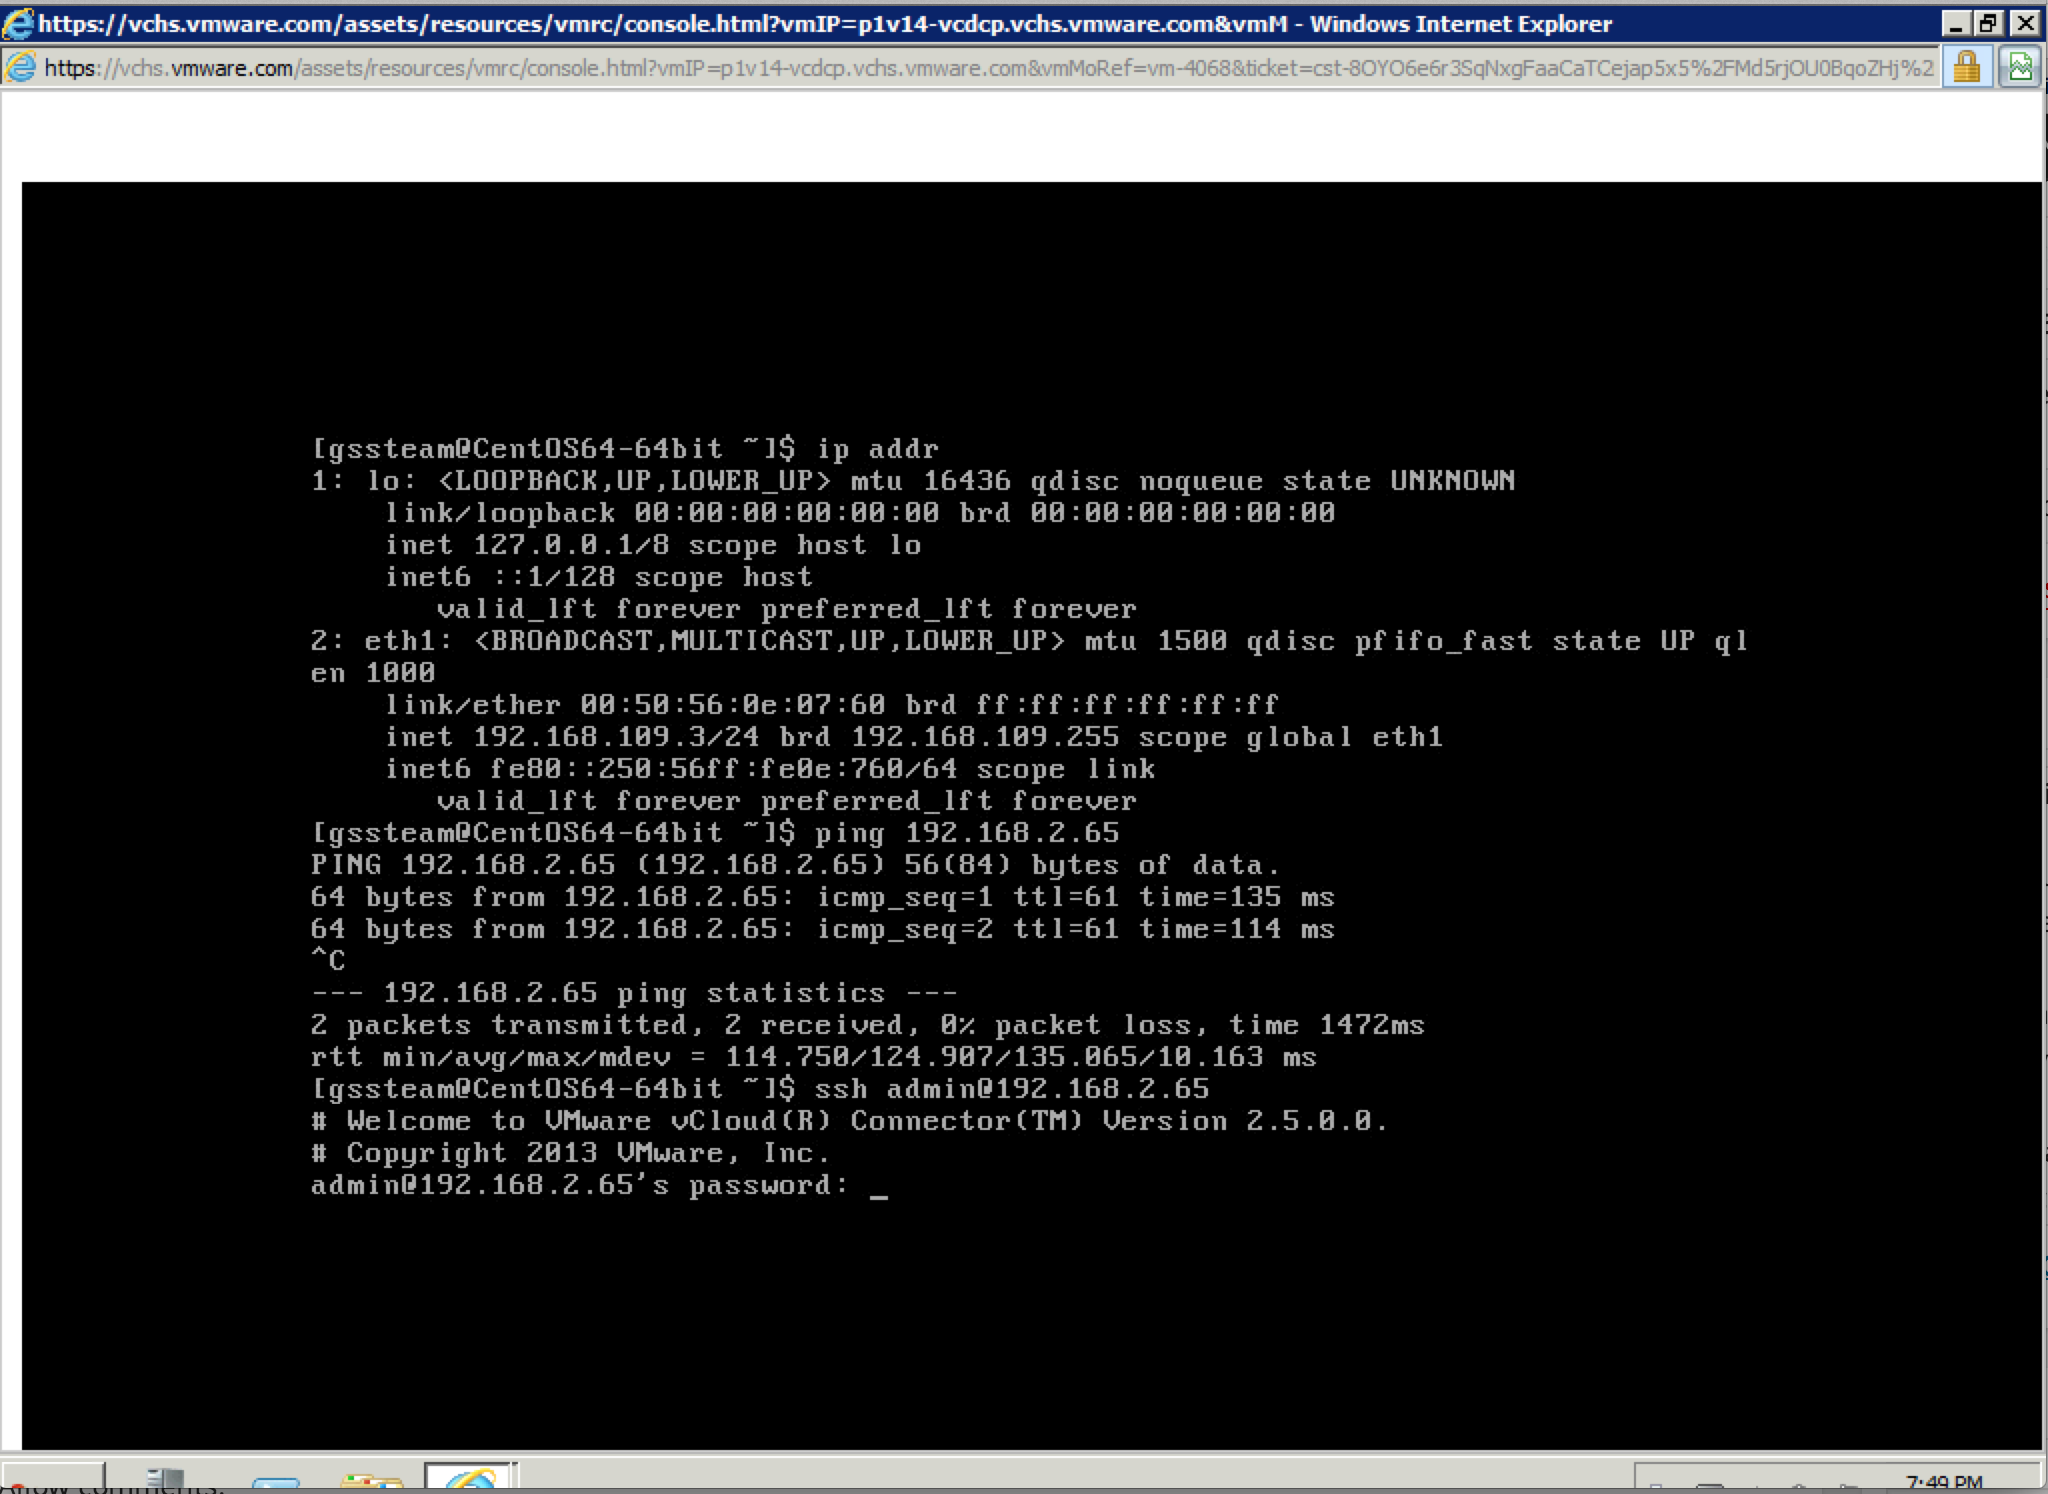
Nothing fancy here, just the usual pfSense firewall rules configuration. If all goes well, you should be able to connect from a vCHS host to an on-prem host. Here is an example of SSH originating in vCHS (192.168.109.0) reaching through the tunnel to a vCC Node I have on 192.168.2.0:
And with that we have… Hybrid Cloud! Hope this was helpful and, when in doubt, dust off that IPSEC handbook and pay close attention to what the logs are telling you.
