
I know that there have been (literally) thousands of articles written on nested ESX, but I decided to do one anyhow as, over time, I plan to build on this foundation entry with some content that actually will be new and interesting as it relates to hybrid cloud (stay tuned for that). So with that out of the way, let’s review some basics about “nested ESX”.
What is Nested?
Nested ESX is exactly what it sounds like. The idea is that you install ESX into a guest VM on a physical ESX host. What you end up with is hypervisor on hypervisor thereby making the CPU time slicing and overall resource allocation and consumption even more complex. So why would one do this? Well as it turns out, this is a fantastic setup for lab testing. You can basically build multiple virtual datacenters on a single machine and do nifty things like SRM testing. So certainly not something one would recommend for production, but literally miraculous for labs.
Whats the Catch?
There’s always a catch, right? Well nested is no exception, although the good news is that “out of the box” support has gotten better and better with each iteration for what started essentially as a skunk works science project. So today there is no ESX command line hacking required, believe it or not, and ESX is actually recognized as a valid (if unsupported) guest OS. All of that said, there are some caveats to be aware of. The first one concerns networking. To understand what the catch is here we first must consider what is happening in a standard ESX installation:

With virtualization, we have a physical host, running a hypervisor OS, which abstracts physical resources into virtual resource pools and brokers their consumption by guest operating systems. So the physical uplinks which connect the host to a physical switch are connected through software to a “virtual switch”. As virtual machines are created and deployed onto the host, they are configured with a set of virtualized hardware. This hardware is either passed through (hardware virtualization), brokered by special software support in the guest (paravirtualization), in some cases, emulated. With x86 virtualization, the CPU is time sliced and instructions are passed through. So “virtual CPUs” are essentially timeshare units on the actual physical CPU. I have a more extensive article on the various flavors of x86 virtualization that provides more background on these concepts. Under ESX, networking is interesting in that there are two options. Using the VMware VMXNET virtual network interface you are using a paravirtualized driver which requires installation inside the guest OS and as a result delivers optimized performance. Alternatively, the host can emulate the function of the Intel E1000 NIC and trick the guest OS into thinking one of those actually physically exists at a given PCI I/O address range. Whichever approach you choose, ultimately the virtual NIC will be connecting to the virtual switch. The diagram above captures the flow. The key point here is that the relationships are all 1:1. A guest OS has one (or more) NICs that connect to the virtual switch, but it basically replicates how the physical world would work. Now consider what happens when it is a hypervisor in the guest OS.
As expected, what happens is a bit of a mess. Now you have a guest OS virtual NIC being used as the uplinks for yet another virtual switch which in turn provides a connection point for additional virtual NICs that connect guests. Where we run into trouble is that the foundation host (the physical one) managing the base virtual switch has no idea about any virtual NICs that are provisioned by a guest OS hypervisor. As a result, this traffic get’s dropped. In turn, any destination traffic headed anywhere other than the virtual NIC belonging to the guest OS that the host does know about (our “primary guest”) will be dropped. So what is the answer here? Well it turns out we really need two things. First, we need MAC addresses that are unknown to the physical host to be allowed to pass (these are the MAC addresses created by the guest OS hypervisor for its guests). In addition, we then need a way for all of those guests sitting unknown up in the second hypervisor to participate in the main virtual switch. Luckily ESX does provide two enabling configuration options that solve both of these problems. Let’s take a look:

Doesn’t this look promising? Let’s go through them one by one:
- Promiscuous Mode – this one is exactly what it sounds like. When enabled on a virtual switch port group, that switch essentially becomes “full broadcast”. Any VM attached will be able to see all traffic in the port group. Why is this? Simply put it ensure that the primary VSS’s ignorance of the existence of MAC addresses upstream from it doesn’t matter. Since every frame will be broadcast, these frames will hit the virtual port whether the switch intelligence thinks that port is a valid destination or not. In other words this is a sledgehammer fix to the problem. It would be much cooler if a VSS had intelligence to actually recognize nested and learn upstream MAC addresses, but maybe that is something for the future (or maybe it won’t matter because we will all be on NSX!)
- MAC Address Change – this setting deals with the problem going the other way. This setting basically allows the guest OS to do locally administered station address control of its virtual NIC MAC address. This is us telling the virtual switch intelligence to not worry about it if the MAC address allocated to the guest VM virtual NIC happens to change.
- Forged Retransmit – a companion setting, forged retransmits basically says that the virtual switch shouldn’t be concerned if MAC address 00:00:00:00:00:0B suddenly shows up at the virtual port where 00:00:00:00:00:0A had originally attached.
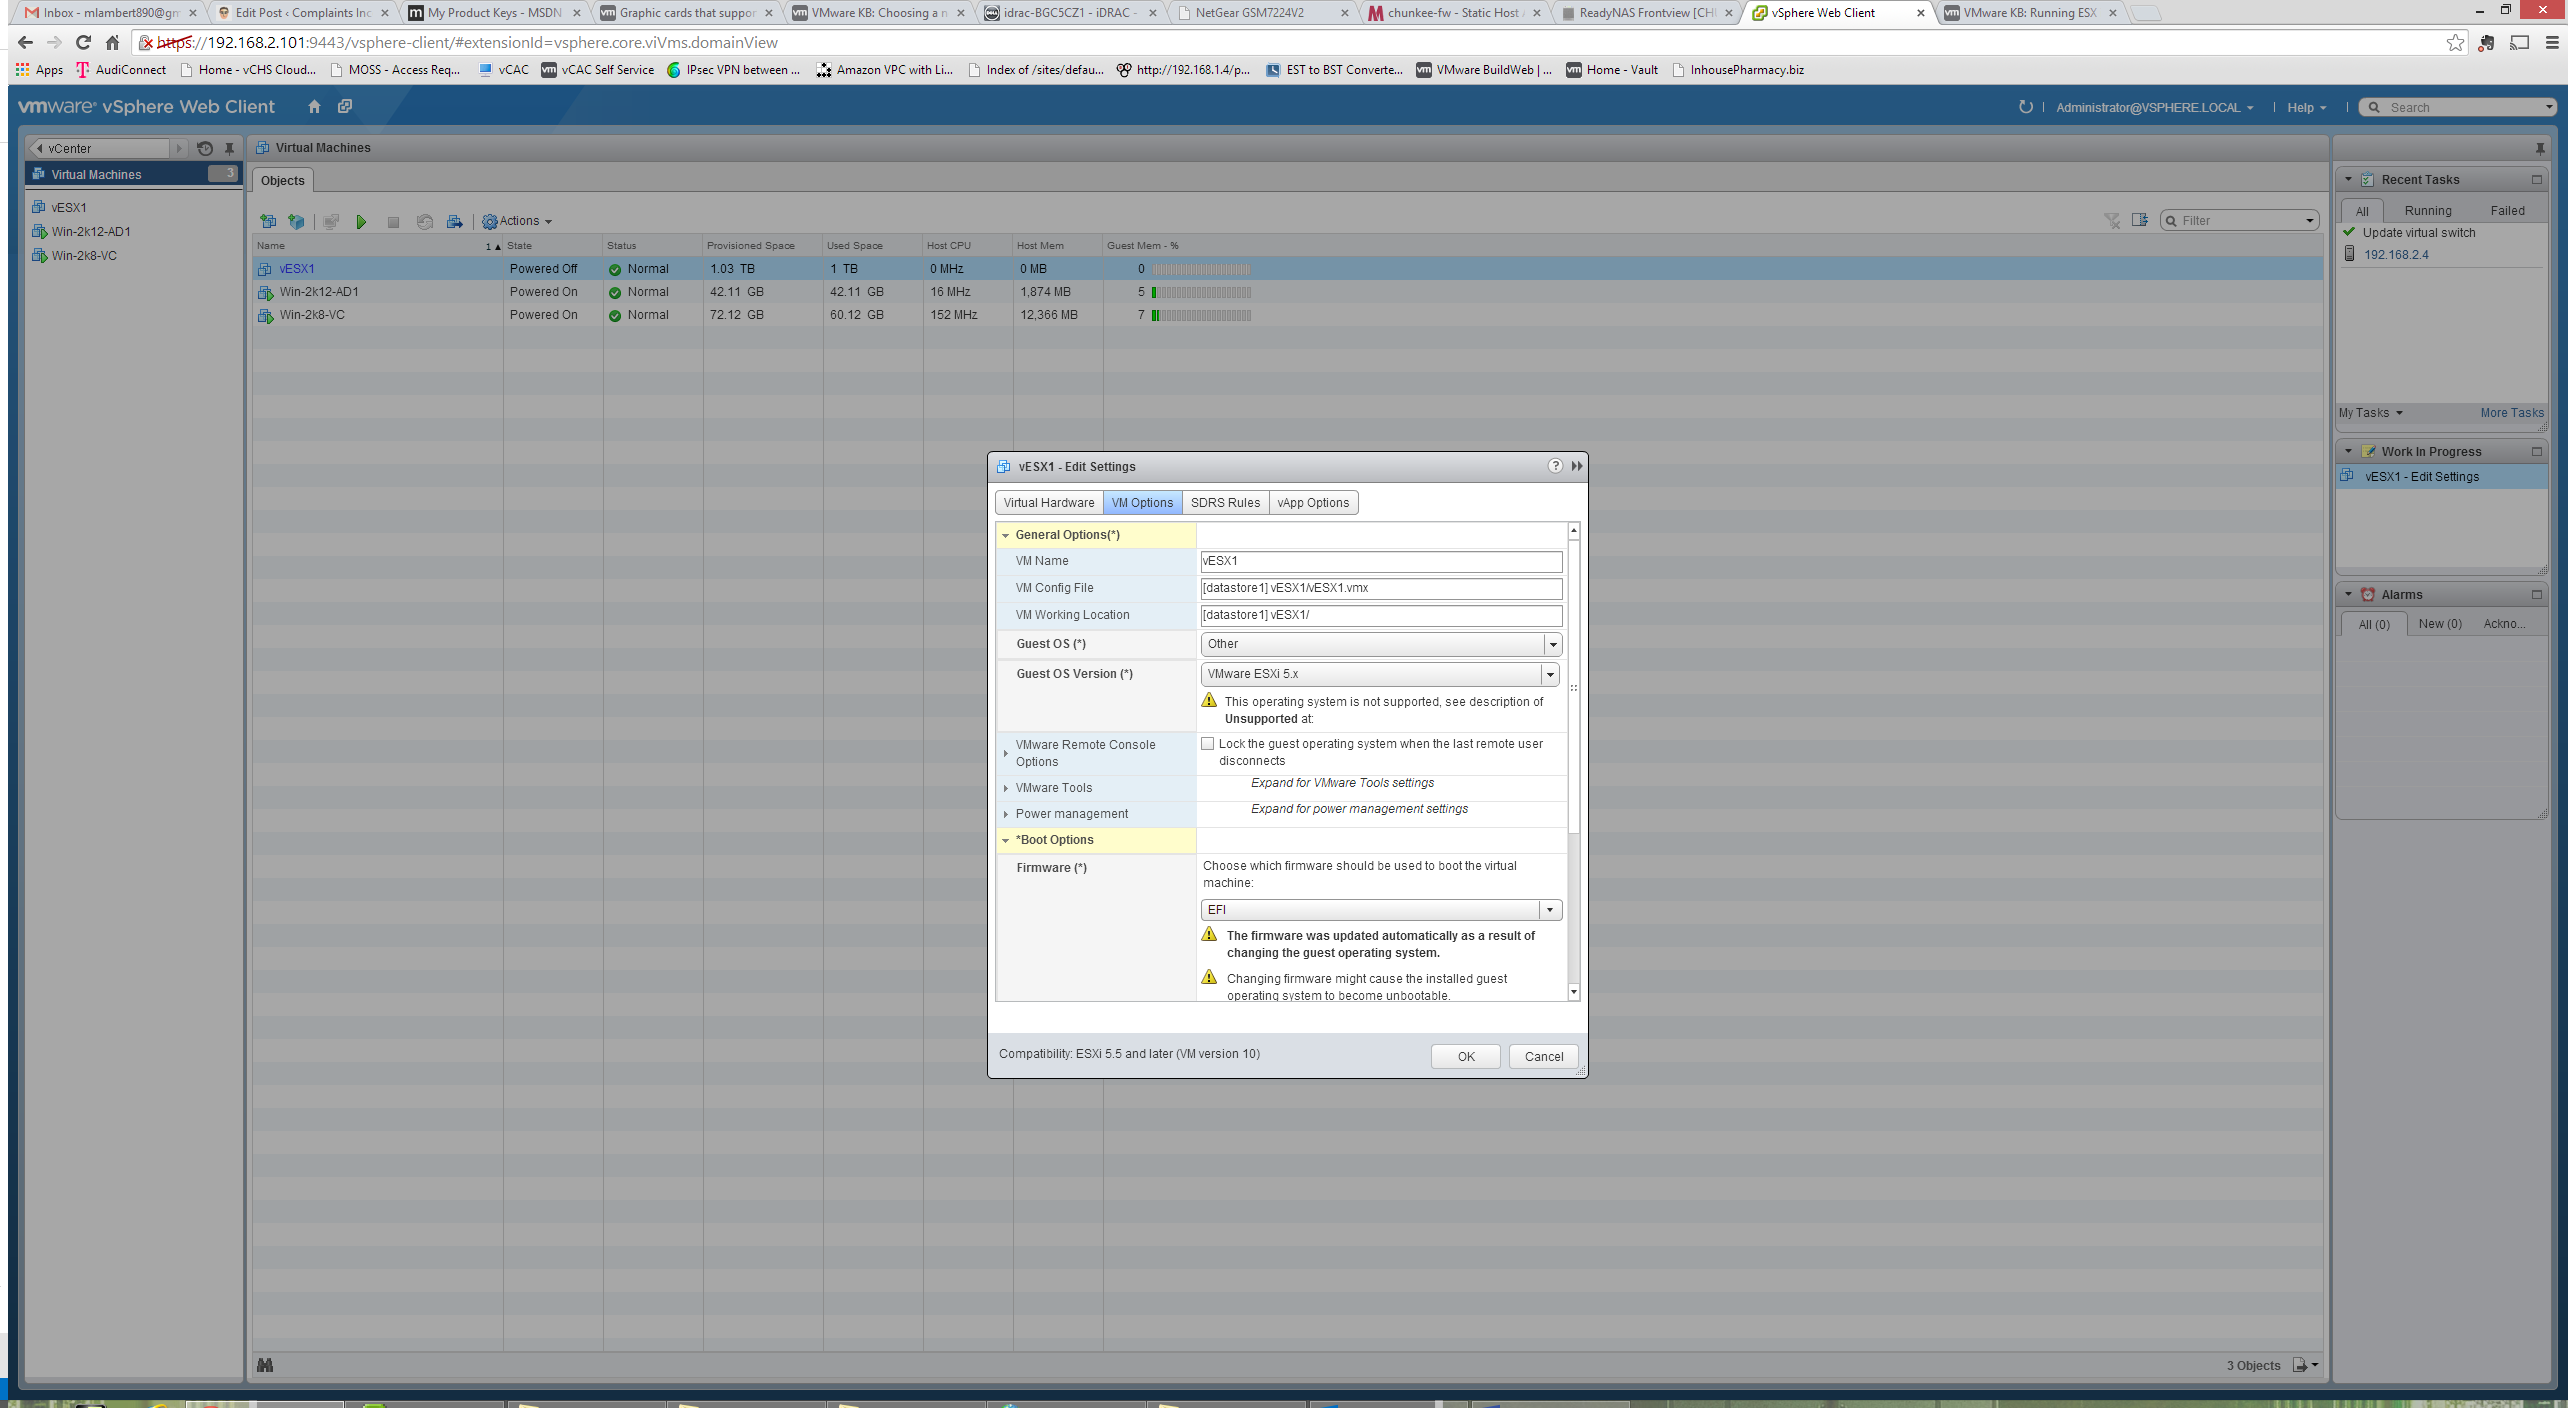
Taken as a group, these settings allow traffic to flow out from nested guests (MAC changes and forged retransmits) and the return traffic to flow in to them (promiscuous mode). So with that networking configuration done, we must be good to go right? Well not so fast! There is more that needs to be done for nested to work. The next complication comes from the configuration of the virtual machine itself. After all, we are going to be installing a hypervisor into this guest. These days, the virtual machine monitor is no longer a pure software thing. Even VMware (the grand daddy of x86 VMMs and last to move away from pure software) now utilizes CPU and chipset support for virtualization – namely Intel VT and AMD V. As a result, this support (normally obscured from the guest) needs to be exposed to it. For these options we actually need the vSphere Web Client to configure them (interesting requirement that basically makes vCenter mandatory for nested implementations in one way). Luckily I do have a vCenter that I put up immediately after the initial ESXi 5.5 install on the physical host. I documented the setup as a sidebar in case anyone would like to see the latest changes in both Windows and vCenter.
If we bring up the settings in the web client for a new virtual machine we are looking for the extended options under CPU:

What we want here is two things:
- Expose Hardware Virtualization to the Guest OS: this means that the guest will be able to identify and access hardware based virtualization support in Intel VT and AMD-V
- CPU/MMU Virtualization: this setting locked on “Hardware” for both ensures that hardware accelerated virtualization will be provided to this guest for both CPU instruction set as well as I/O MMU operations. The alternative is “Automatic”, but since we are installing hypervisor on hypervisor we know we will need it
In addition to these settings, once the VM has been created (and it can be in the immediate “configure settings” step that follows initial creation), we can set the OS to correctly reflect our guest. As we can see here, “VMware ESX 5.X” is now selectable as an OS under “Other”. This step, incidentally, should alleviate the old need to set hvh.enable=true in the 5.0 and 5.1 days in order to get 64 bit guest on virtual hypervisor to work:
With the above we now have everything we need to get started deploying virtual ESX guests. Installing these, with the pre-reqs done and the caveats in mind, is as easy as deploying any other OS. If you follow the Windows guest deployment installs, but make sure to address the VM config caveats above, and point to the VMVisor Installation ISO, you will have no issues. Similarly, adding these virtual ESX hosts to vCenter is exactly as described in the vCenter configuration entry for the physical host. The behavior is exactly as expected. One thing I did choose to do was create a dedicated VSS for each virtual ESX host, and assign a dedicated NIC to it. This is a very straightforward operation from either client by selecting Networking with the Host as a focus and choosing “Add Networking”:
Because the virtual ESX is really just a guest VM from the primary host view, we select new Virtual Machine Port Group:
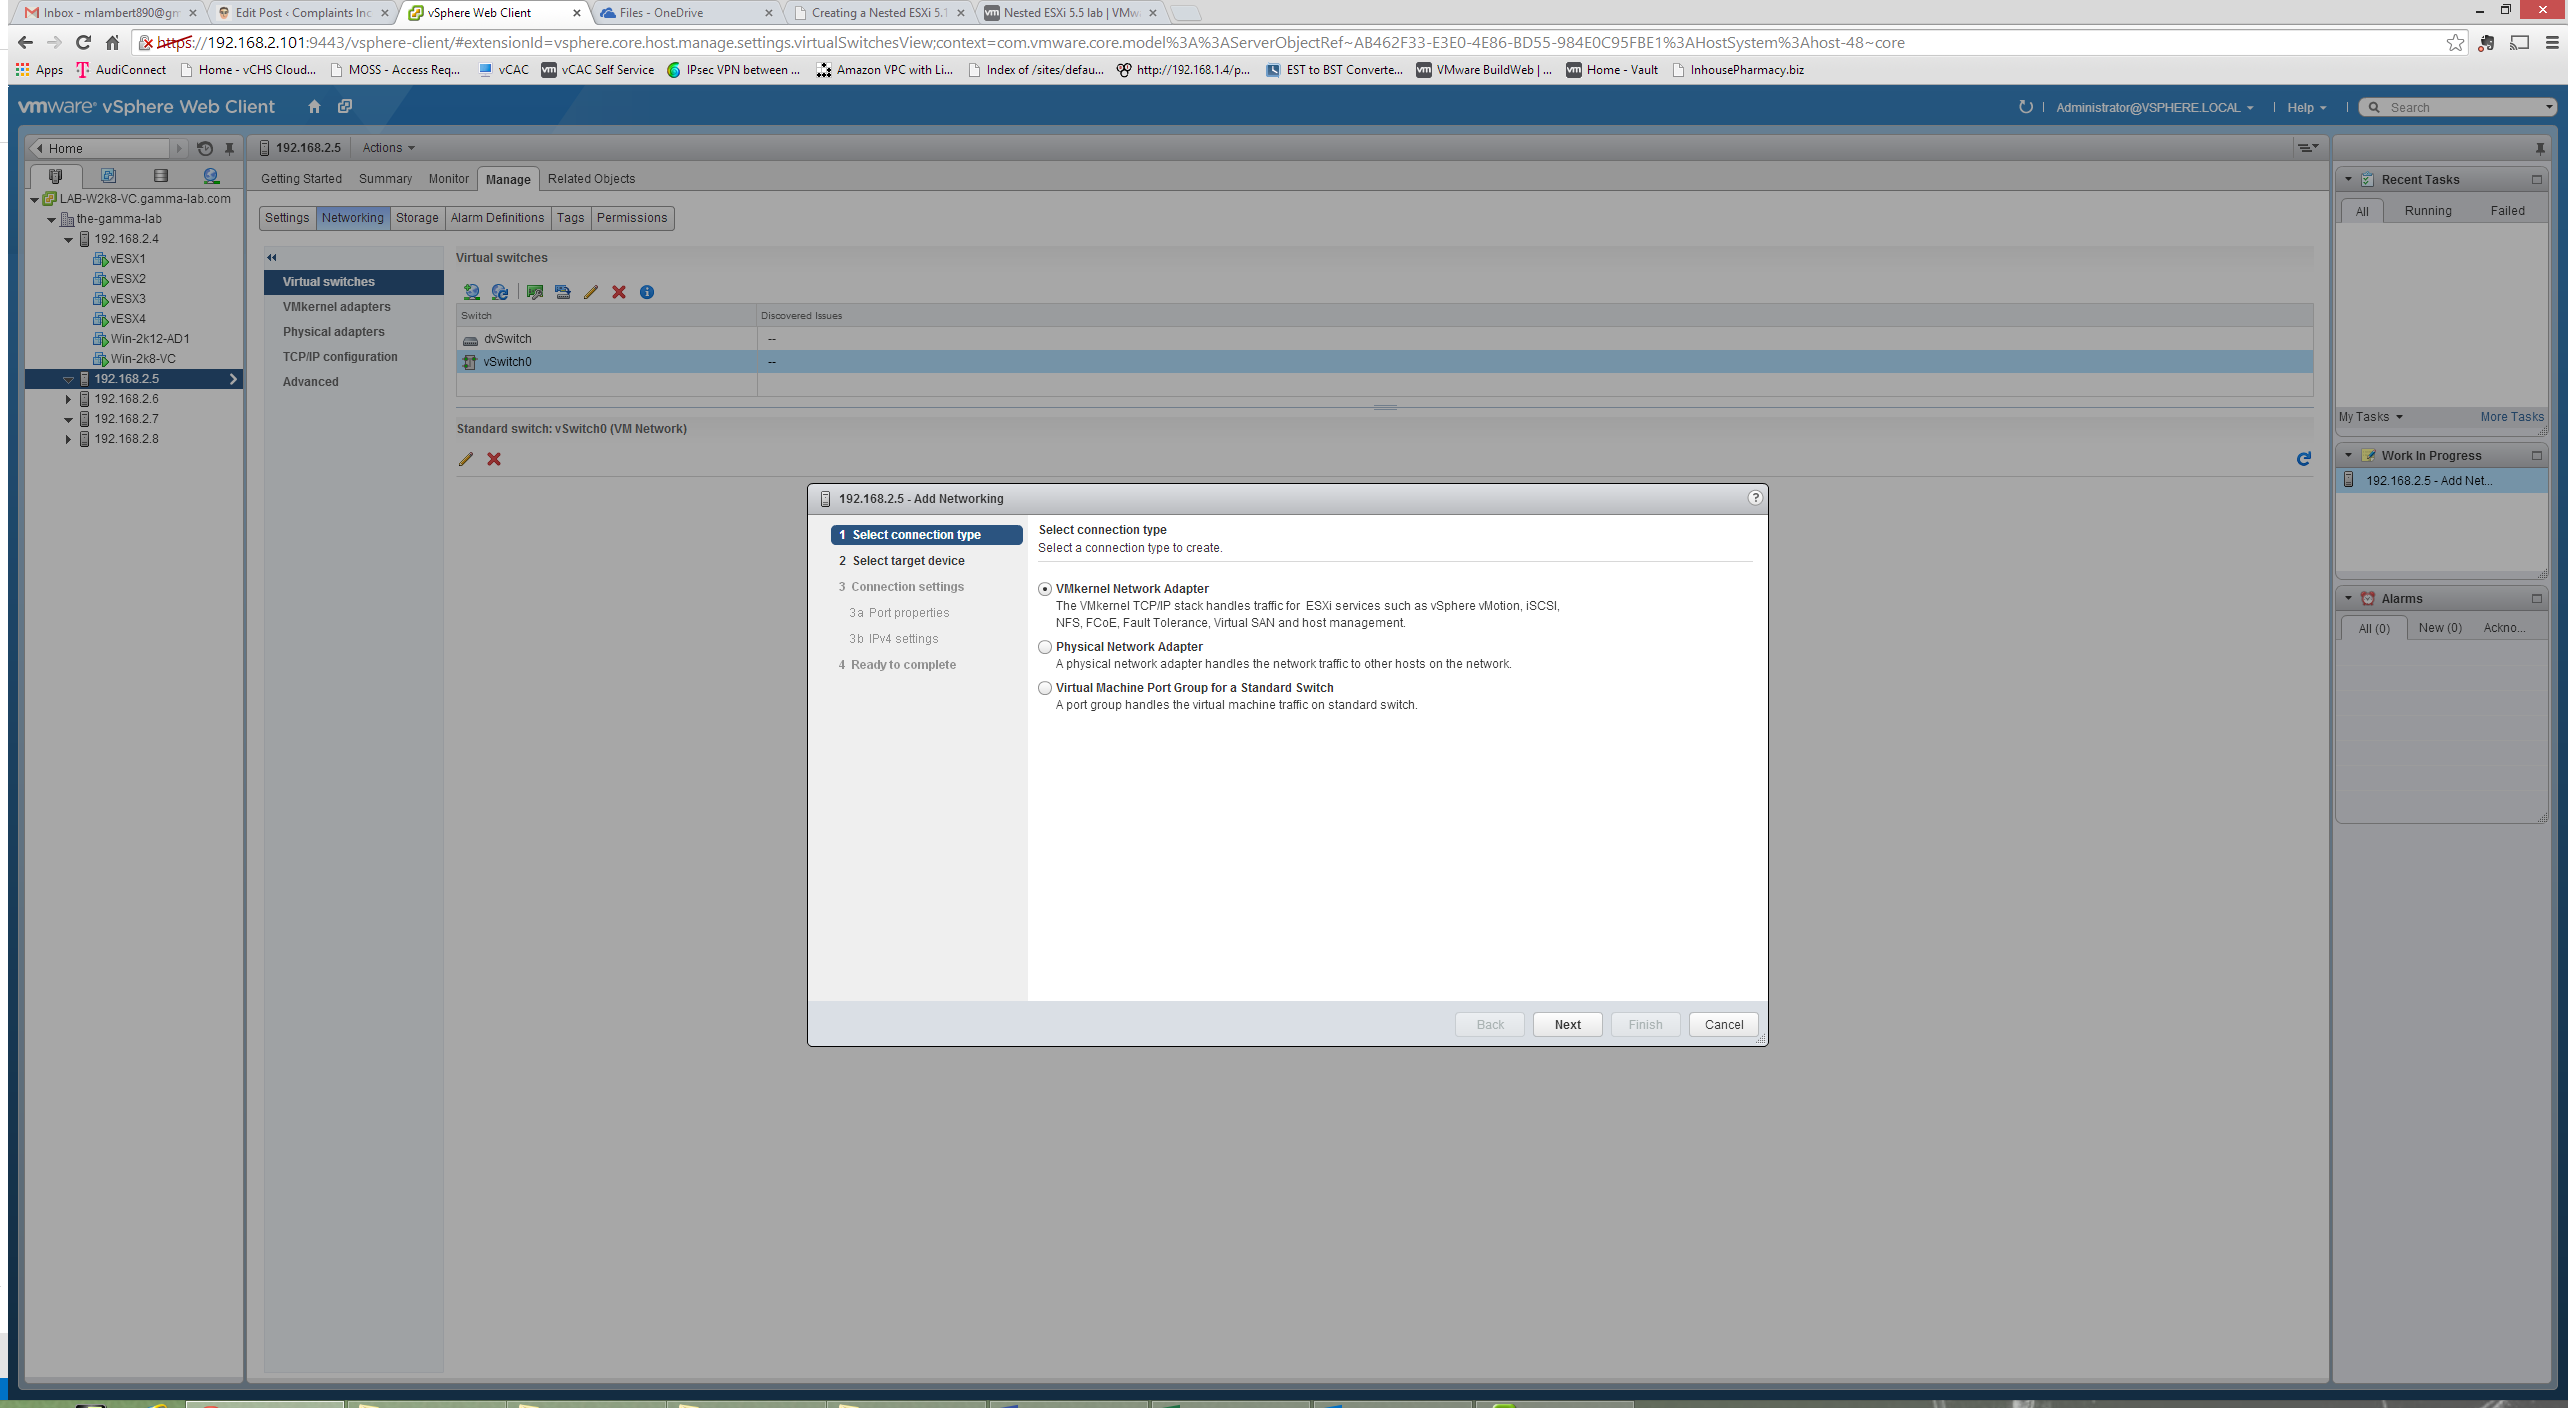
We want to go ahead and Create a New Virtual Switch here since we are dedicating VSS to virtual ESX guest:

Here we will have an adapter list where we can checkbox assign an available adapter to the new VSS. In this case my configuration is already complete so no adapters are showing, but this would be a straightforward selection followed by a straight click through on the remaining options (including naming the new VSS):

When building the VM for the nested ESX guest, I attach the network adapter to the associated VSS. So in my case 4 nested ESX instances map to 4 VSS hosts and 4 physical NIC ports on the host. Speaking of architecture, this is ultimately what I am targeting as my design:
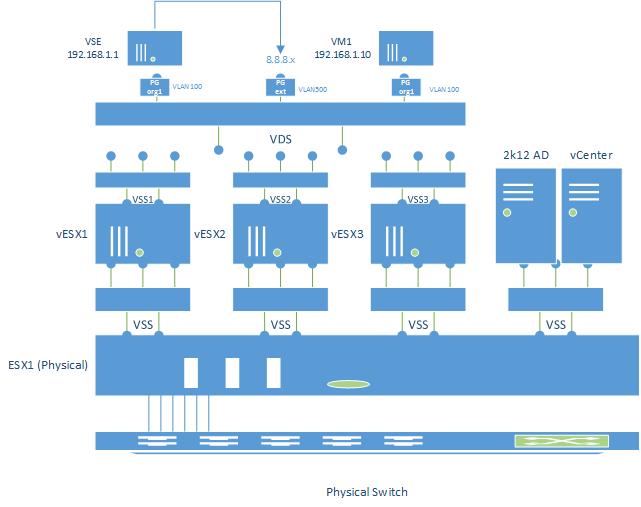
Some points worth calling out here:
- I am planning 4 virtual ESX hosts rather than 3. They will have 32GB of RAM, 1TB of disk, 4 vCPUs (2 virtual dual cores) and a 15GB SSD (for vSAN).
- Each virtual ESX will be connected to a dedicated VSS on the main host which will have a dedicated physical NIC
- all of the virtual ESX hosts will be joined to vCenter
- a VDS will be configured across the virtual hosts only
- I plan to ultimately install vCloud Director on top of all of this and configure tenant organizations (the VLAN and network config info up top)
- vCenter and AD will run on the physical host along with some other core bits (vCenter Mobile Access, maybe one or two other things). The main host is left with 5TB of disk, 10GB of SSD, 64GB of RAM, and 4 full time CPUs.
- I may separate the 4 hosts into 2 vCenters in order to be able to simulate two sites and do SRM (still debating this)
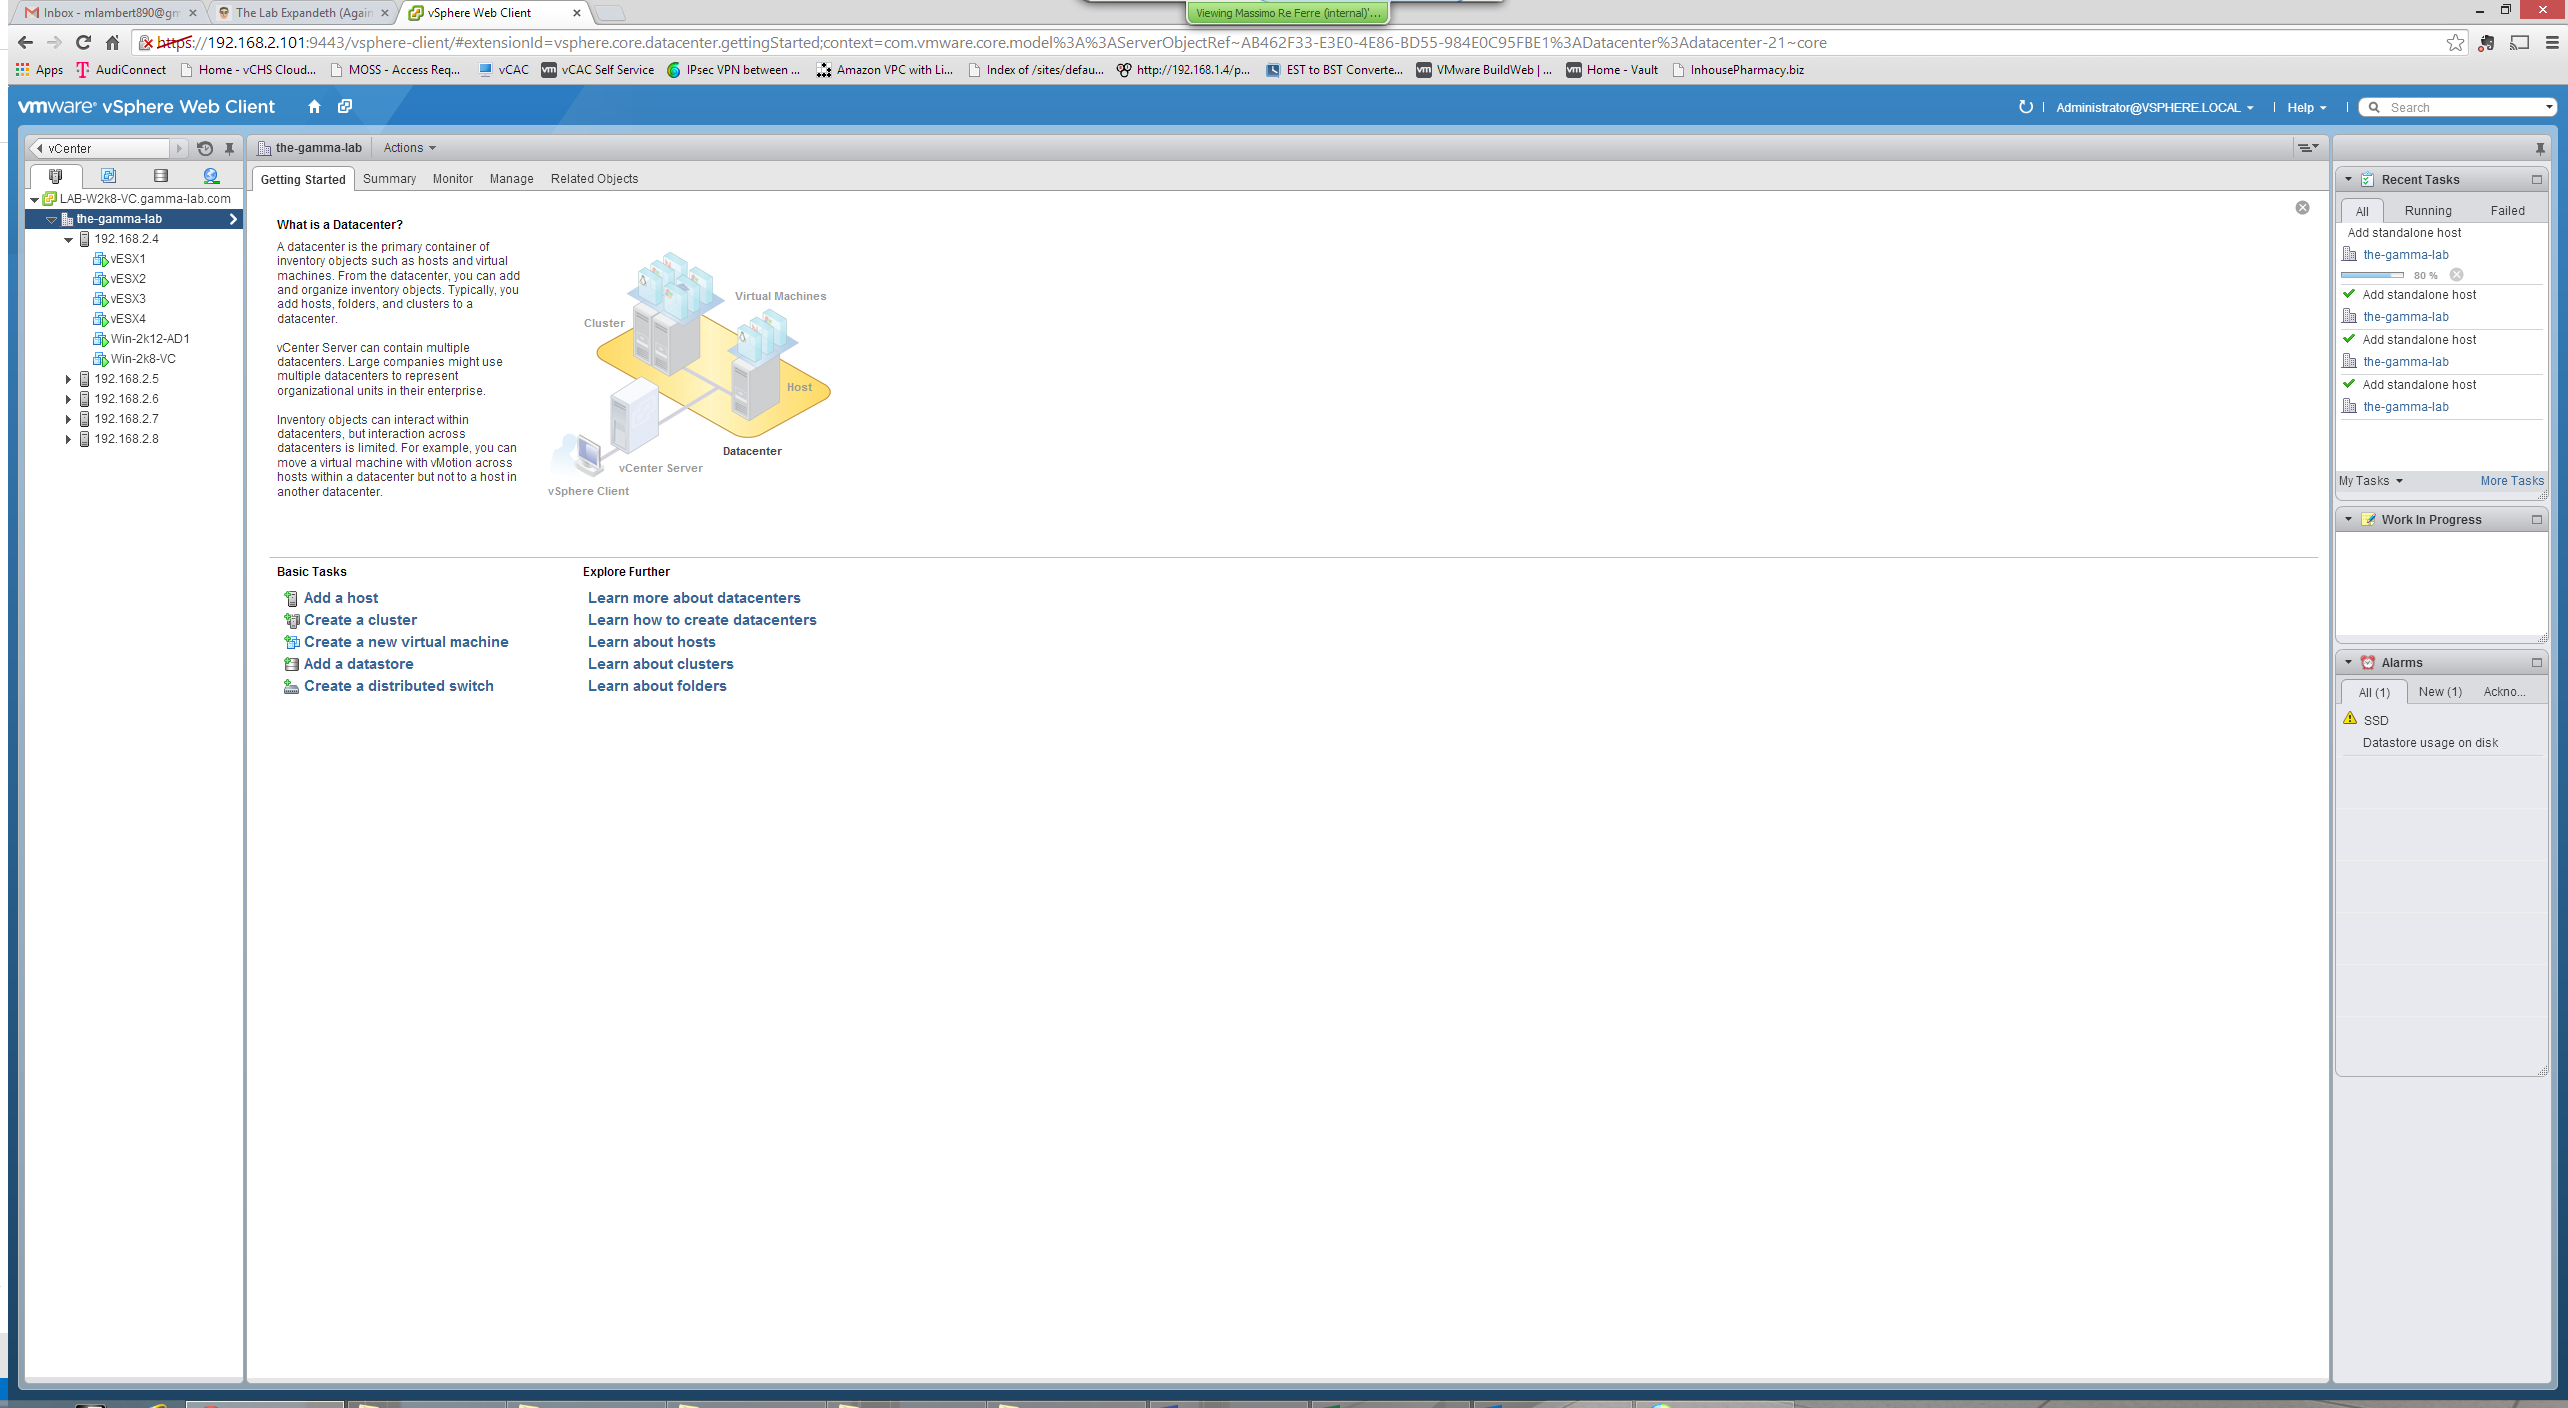
OK, with the above architecture in mind, let’s go ahead and create a virtual ESX guests. And *poof*, we’re done! Cooking show style here seems appropriate, so I will show the final product:

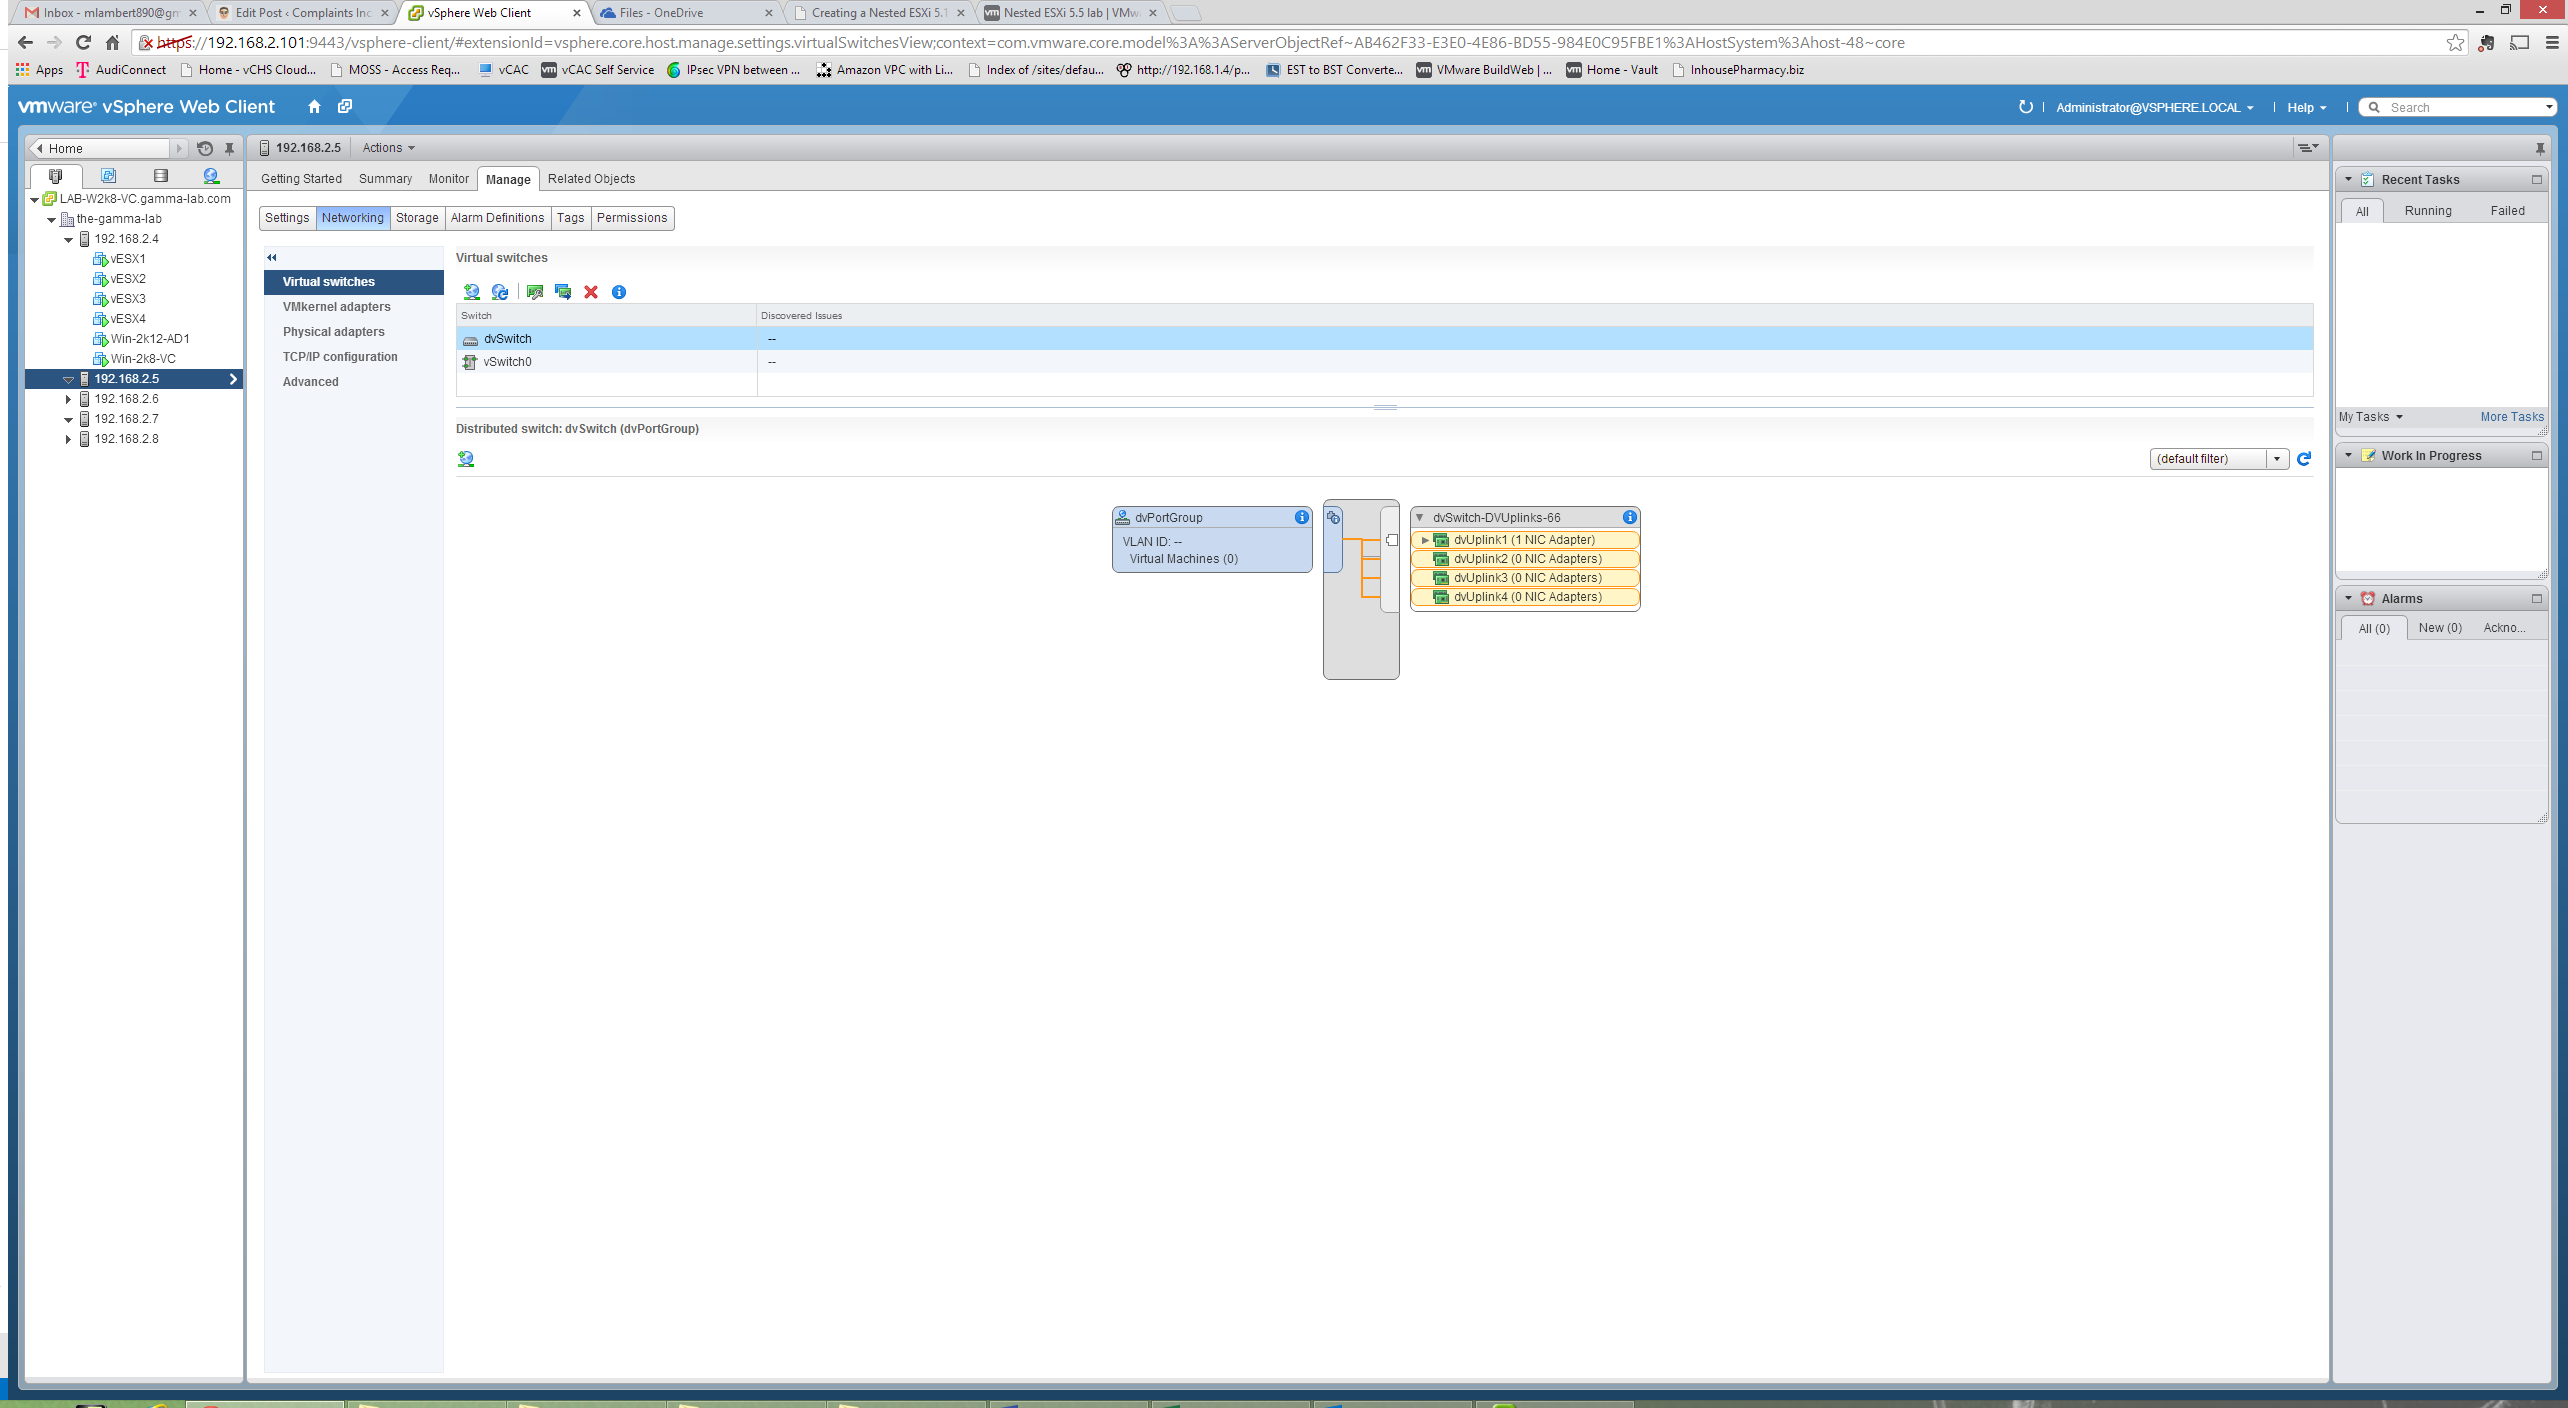
Above we can see the physical host (192.168.2.4) with it’s guests (vESX1-4). Below it we can see each of these guests represented as hosts in vCenter – 192.168.2.5-8. The last step for this entry is to create a distributed virtual switch for these hosts so we can get started with some more advanced configuration like VXLAN and vCD. As a refresher, a virtual distributed switch requires a dedicated NIC to assign as the vDS uplink. Well in this case, since our hosts are virtual, this is as easy as it gets! We just need to go into the VM settings for each virtual host and “add” a new “network adapter”. The only catch is this will require a reboot for the new (virtual) hardware to be recognized by the (virtual) server. Once complete, we can go ahead and create a new vDS by selecting “Create a distributed switch” with the virtual datacenter as the focus in the web client:
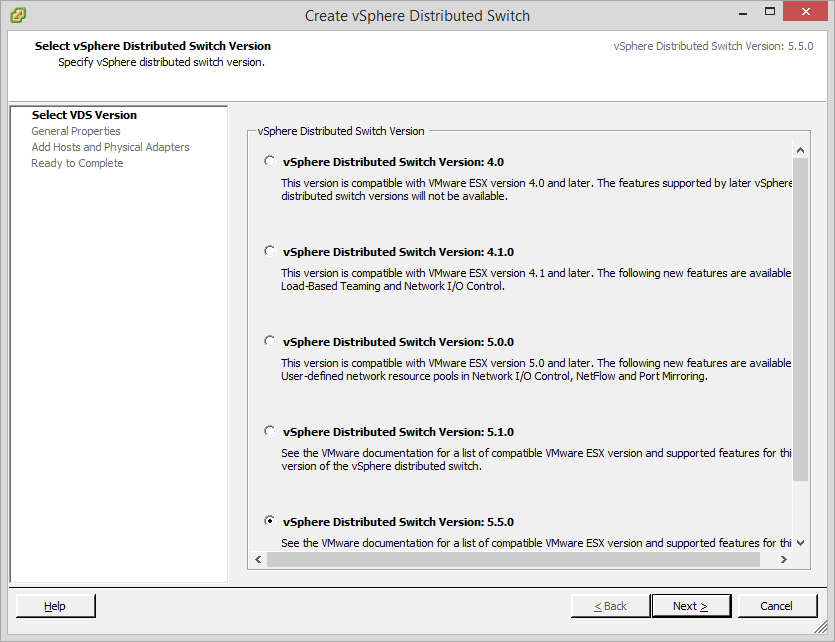
First we choose a version for our switch (I choose current for maximum compatibility with my scenario which is “testing new stuff”):
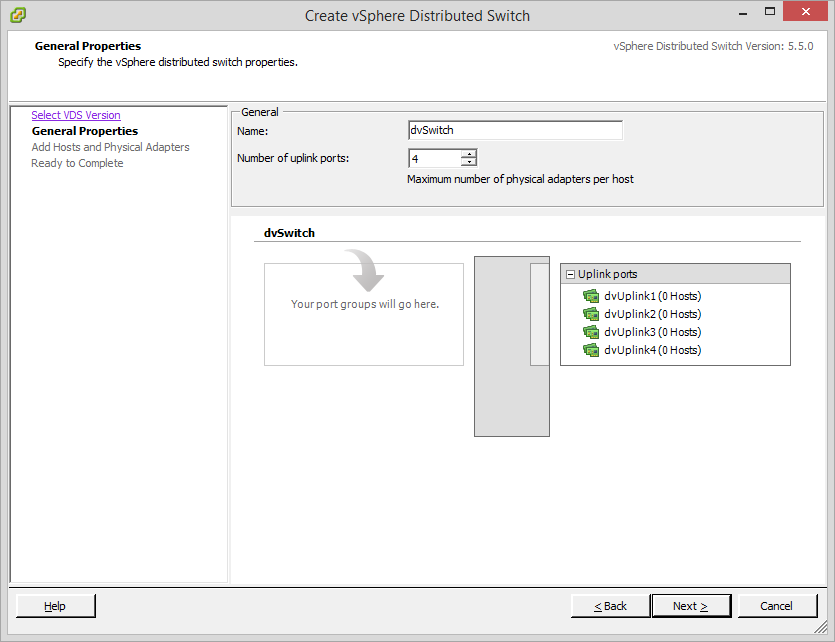
Next we can name the switch and set the number of uplink ports which governs the number of “physical” connections per host (in our case just vNICs, but also largely irrelevant):
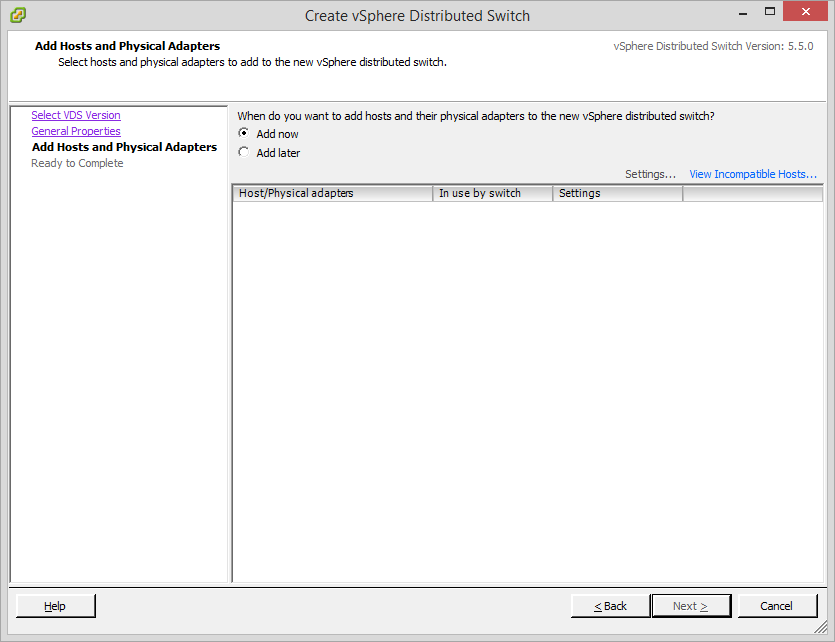
We now decide if we want to add hosts now or later (I choose now – Carpe Diem!):
Next dialogue we are given an opportunity to select the hosts that will participate and the available NIC that will be connected to the vDS. We can see here the NICs I added to each host VM (vNIC1) for this purpose:

Next step is just to commit the config and create the switch. As we can see below everything went as smooth as can be and the 4 virtual hosts are now linked by a vDS! We are now about 70% of the way towards our diagram and all of the foundation has been laid, so this is a good stopping point. Hope you enjoyed the (million and first) entry on Nested and stay tuned for the next entry!

