
This is another one of those super specific niche entries. If you read the title and think “that really doesn’t sound like anything I’d consider fun“, then it’s probably safe to skip this one!
For everyone else, it’s safe to assume that you have spent some time trying to get DD-WRT to behave like a proper router and, in particular, have spent time working with VLAN isolation both in general and, specifically, 802.1Q tagging.
With my newly increased focus on VMware technologies and testing, I knew I had to beat my lab into better shape. Chronicled in these pages way back when I built it, some may remember that my lab hangs off of my “production” network by way of a DD-WRT. The topology looks roughly like this:

Some noteworthy components:
Cisco SLM2008 – this is a small business series switch from Cisco that supports 802.1Q VLAN tagging across 8 gigabit ports. I believe it is pretty close to the cheapest managed switch they sell (roughly $200)
Netgear WNR3500U – this is a bog standard and utterly boring wireless router with one big exception. It can be flashed to the latest (and last) version of DD-WRT and since it is Broadcom BCM4718A based, and has 64MB of firmware space, supports most of the good features (most noteworthy being 802.1Q tagging via the GUI)
PF Sense – PF Sense is one of my absolute favorite open source projects. The appliance addition of the phenomenal PF project gives you an enterprise level firewall that you can deploy onto any old PC. I use PF Sense as my internet gateway for anything more advanced since it understands pretty much everything you’d ever want to do (BGP, RIP/RIP2/OSPF/OLSR/etc, IPSEC, and on and on). I threw a switch behind my cable modem and just hang both the PF Sense and the standard D-Link (used as the NAT router for all normal egress) off of it. Since the cable MSO’s give you at least a few IPs, you can pull off having multiple NAT routers which works out well for more advanced home setups like this one.
When I first pieced together my lab subnet and deployed VMware into it, I never really got around to puzzling through the complexities of 802.1Q on DD-WRT (it’s anything but straightforward). This is understandable considering it is a real hack turning a standard WAP into a proper wired router, but since it wasn’t a primary priority at the time, I set it aside.
Having recently revisited my vSphere config to isolate vMotion traffic into it’s own VLAN on the SLM2008, I decided I should pull the VM network traffic off of the default VLAN and put it in a tagged VLAN on general principal. Of course at that point the DD-WRT is involved since VM traffic can’t just stay local to the SLM2008 like vMotion traffic can, so I braced myself for some pain.
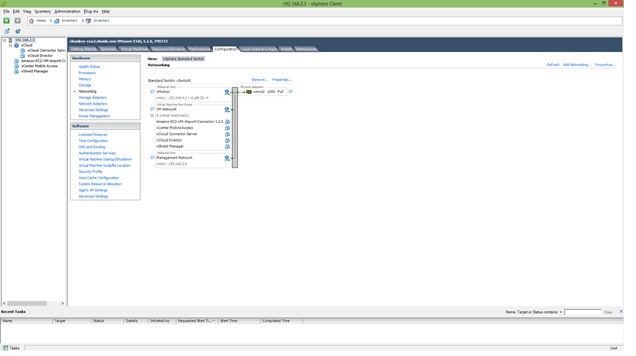
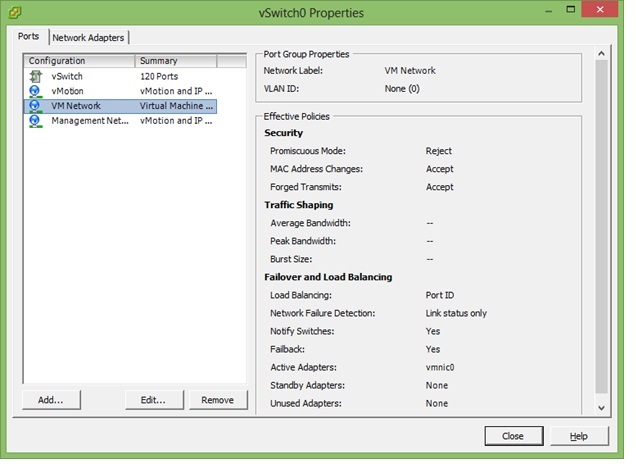
On the vSphere side, life is of course quite easy! I simply visited each host, dug down into it’s configuration, and in particular it’s network configuration, and adjusted the properties of the VM network port group of the appropriate vSwitch. Here we find the properties of the vSwitch:
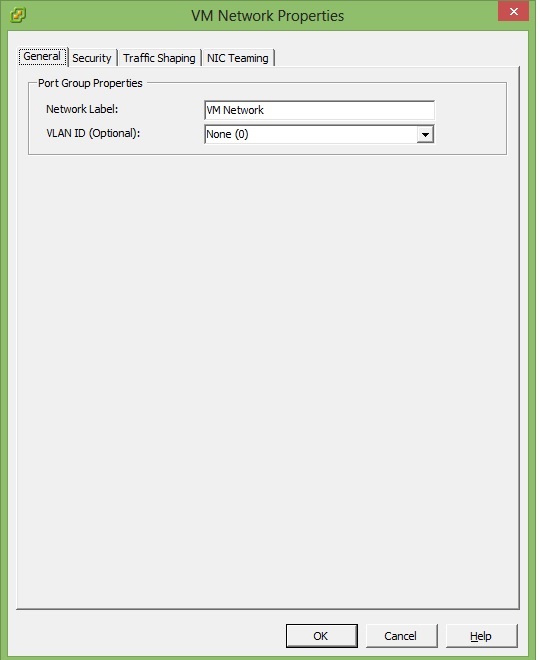
And this is what the properties dialogue looks like:
Super simple to go ahead and add a VLAN ID. This is a free form text field. In my case I chose to just enter a “2” since VLAN tagging in DD-WRT is pretty limited (1-15):
With that change made to vSphere, of course all VMs immediately dropped off the map. I kicked off a continual ping which would let me know when I had finally hit on a working 802.1Q DD-WRT config (assuming I ever would!) In the DD-WRT GUI, there are really two areas of focus that need attention: the network page and the VLAN page. In my case things were fairly straightforward, but this is because I had done lots of pre-requisite work in preparation for a VLAN isolated config. Just to review some of these steps:
- WAN port totally disabled – it is absolutely possible (and preferable in my opinion) to isolate individual LAN switch ports under DD-WRT and assign VLAN identifiers (and IP configuration) to them. Unless you require more than 4 ports, the WAN port really isn’t needed so can be turned off. Even though it is possible to add it to the switch, and treat it like a standard port, if you look at the physical architecture of these routers, and if you have a look at the actual Linux OS config, you’ll notice that there is some default VLAN definition and bridging that makes the WAN/LAN separation happen in the standard config. Rather than deal with the possible trouble that comes from overriding that, I’d rather just shut it off.
- Security/SPI Firewall totally disabled – since this is an internal router, and the WAN port is being disabled, I go ahead and completely disable the firewall. If internal security is required, of course it is possible to leave it enabled and work on getting the rules right, or to go ahead and visit the Linux config and implement IP tables directly (strongly recommended if required at this level of customization in my opinion).
- WLAN fully disabled – I’m not using the wireless capabilities of the WAP at all since I am making it a wired router, so I go ahead and fully disable that capability. Once again, if you take a look at the standard config and physical layout, you’ll see there is even more complexity in the WLAN – the secondary eth port and the bridge group. No sense adding complexity if it isn’t required.
Before getting into the VLAN bits, one last piece of pre-requisite review. In this case I’ll use a screen cap and just present my Basic Setup page:
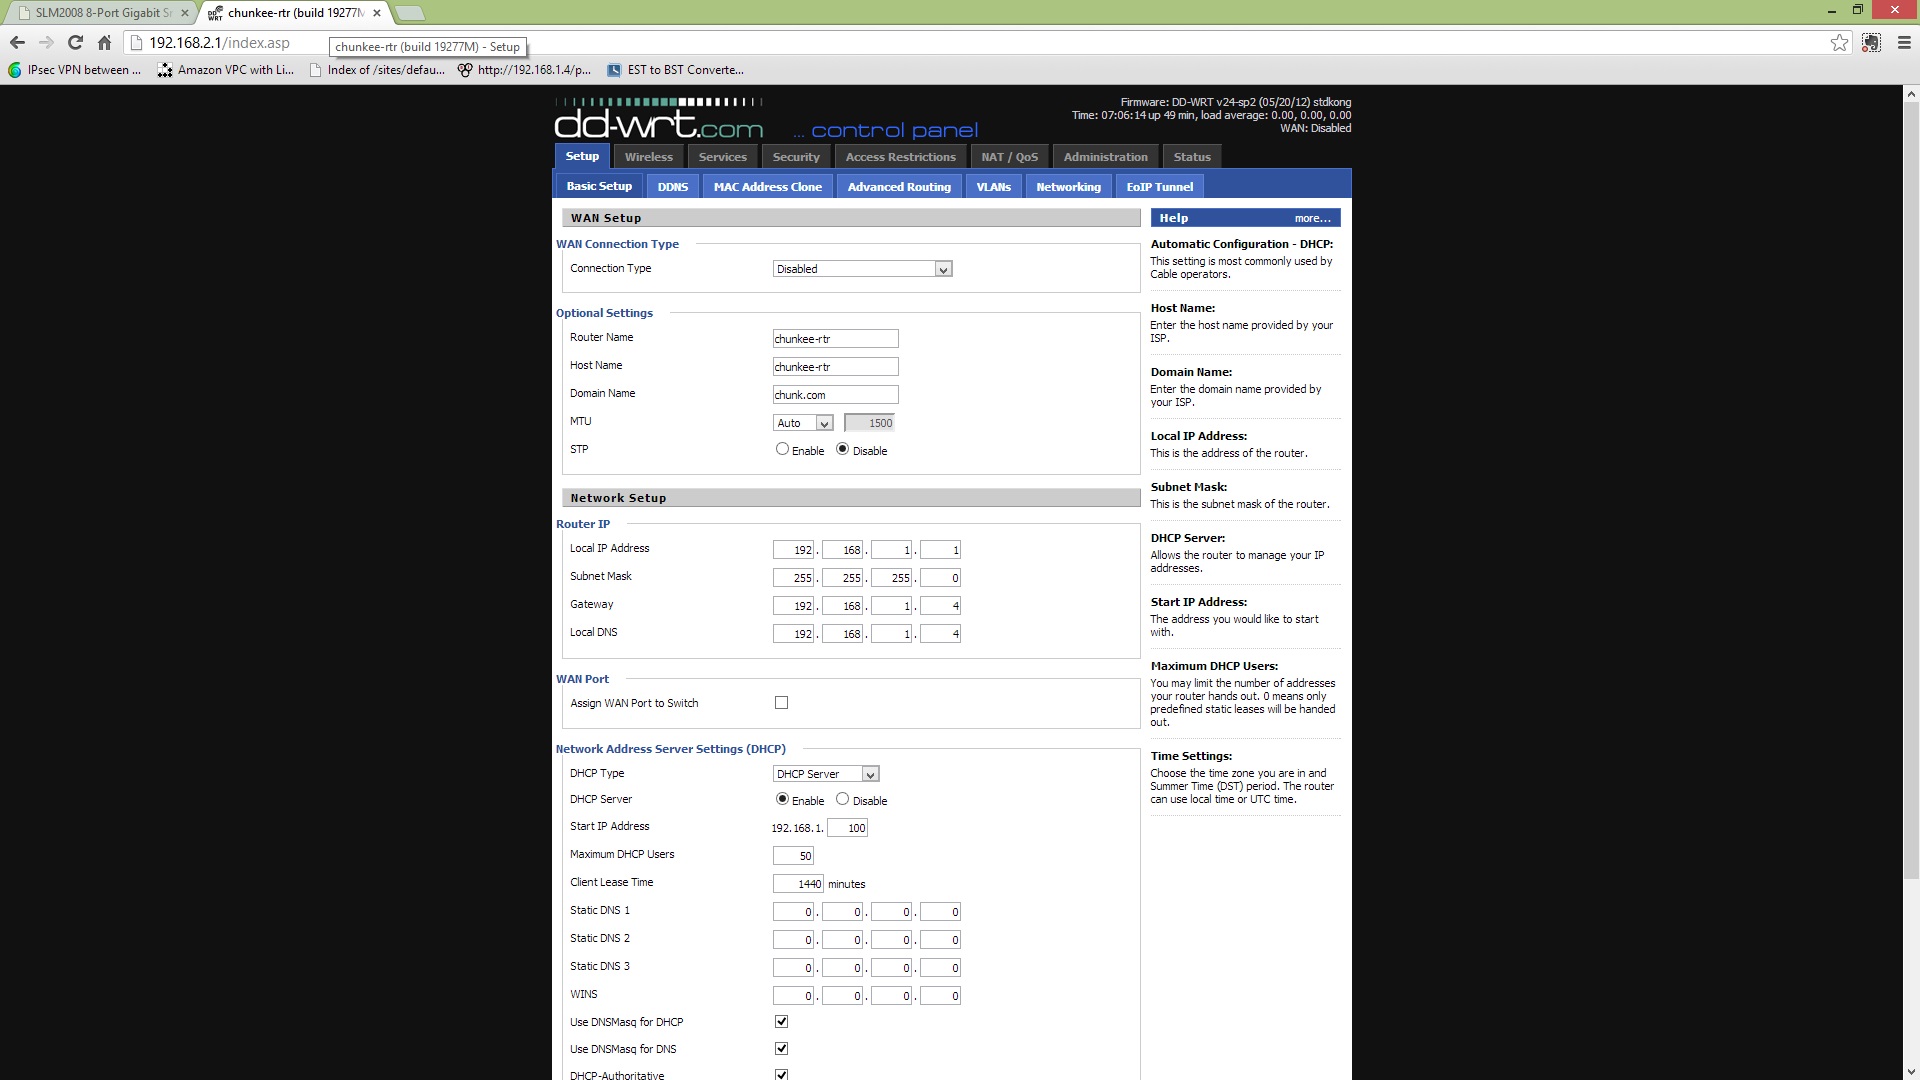
As discussed, the WAN port is disabled and the Router IP is set to the configuration required by the production network (meaning the port connected to the standard, non 802.1Q and unmanaged, gigabit switches that my network outside the lab is based on).
Next up is the VLAN setup page:

Here we can see the heart of the 802.1Q isolation config on DD-WRT. Again, the key here is to have hardware that actually supports these capabilities, and in addition has large enough firmware that configuration of these bits can be achieved via the GUI. If the former isn’t the case, then VLAN tagging won’t be possible at all, but even if tagging is supported, if GUI support isn’t there then command line configuration will be required. That is out of scope for this entry, but there are some good walkthroughs out there if you do some searching on the DD-WRT support forums. In my case everything is supported so we simply enable tagging on the port that is in the lab, and check off all of the VLAN definitions that have been defined on the lab switch.
The last DD-WRT piece of interest is the Networking tab:
This is where we assign the IP configuration to the virtual interface that has been allocated by the switch intelligence for the newly assigned VLAN. The key steps are:
- locate the entry for the VLAN being configured (VLAN2, VLAN3, etc)
- click the “unbridged” radio button to tell the router to enable layer 3 functionality for this virtual interface and expose the IP config
- assign an IP address and a subnet mask that matches the IP range you have selected for the network segment represented by the VLAN id
- save lots of times and then apply a few times (DD-WRT is weird that way)
Some pointers… It is best not to use “VLAN0” or “VLAN1” as these are often either reserved, or unavailable, on other devices!
With DD-WRT configured, it is time to take a look at the (much easier) SLM2008 configuration. Most people probably don’t have this device, so I’ll just show the two relevant VLAN configuration pages for anyone curious how the GUI looks. First up the basic VLAN management screen where defining and deleting VLANs is as easy as entering some freeform text and clicking “add” (or “delete” as the case may be):
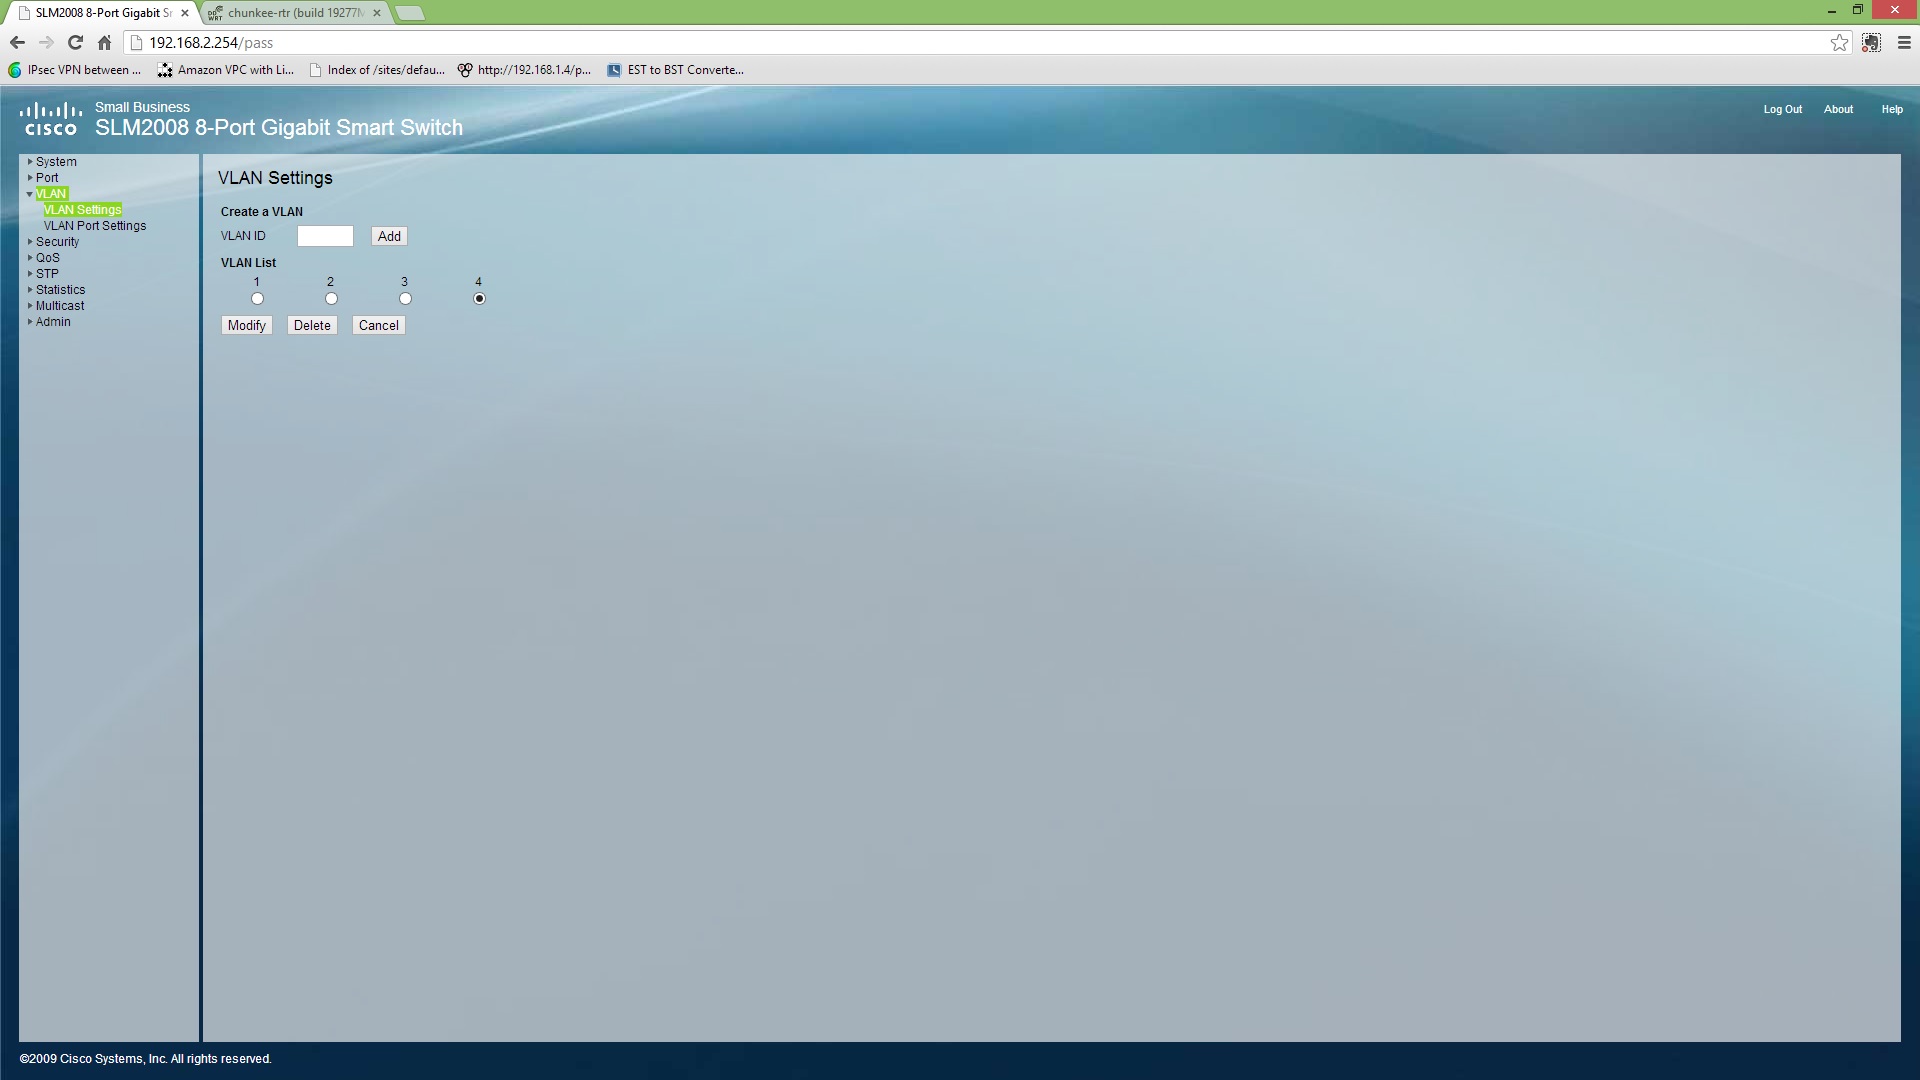
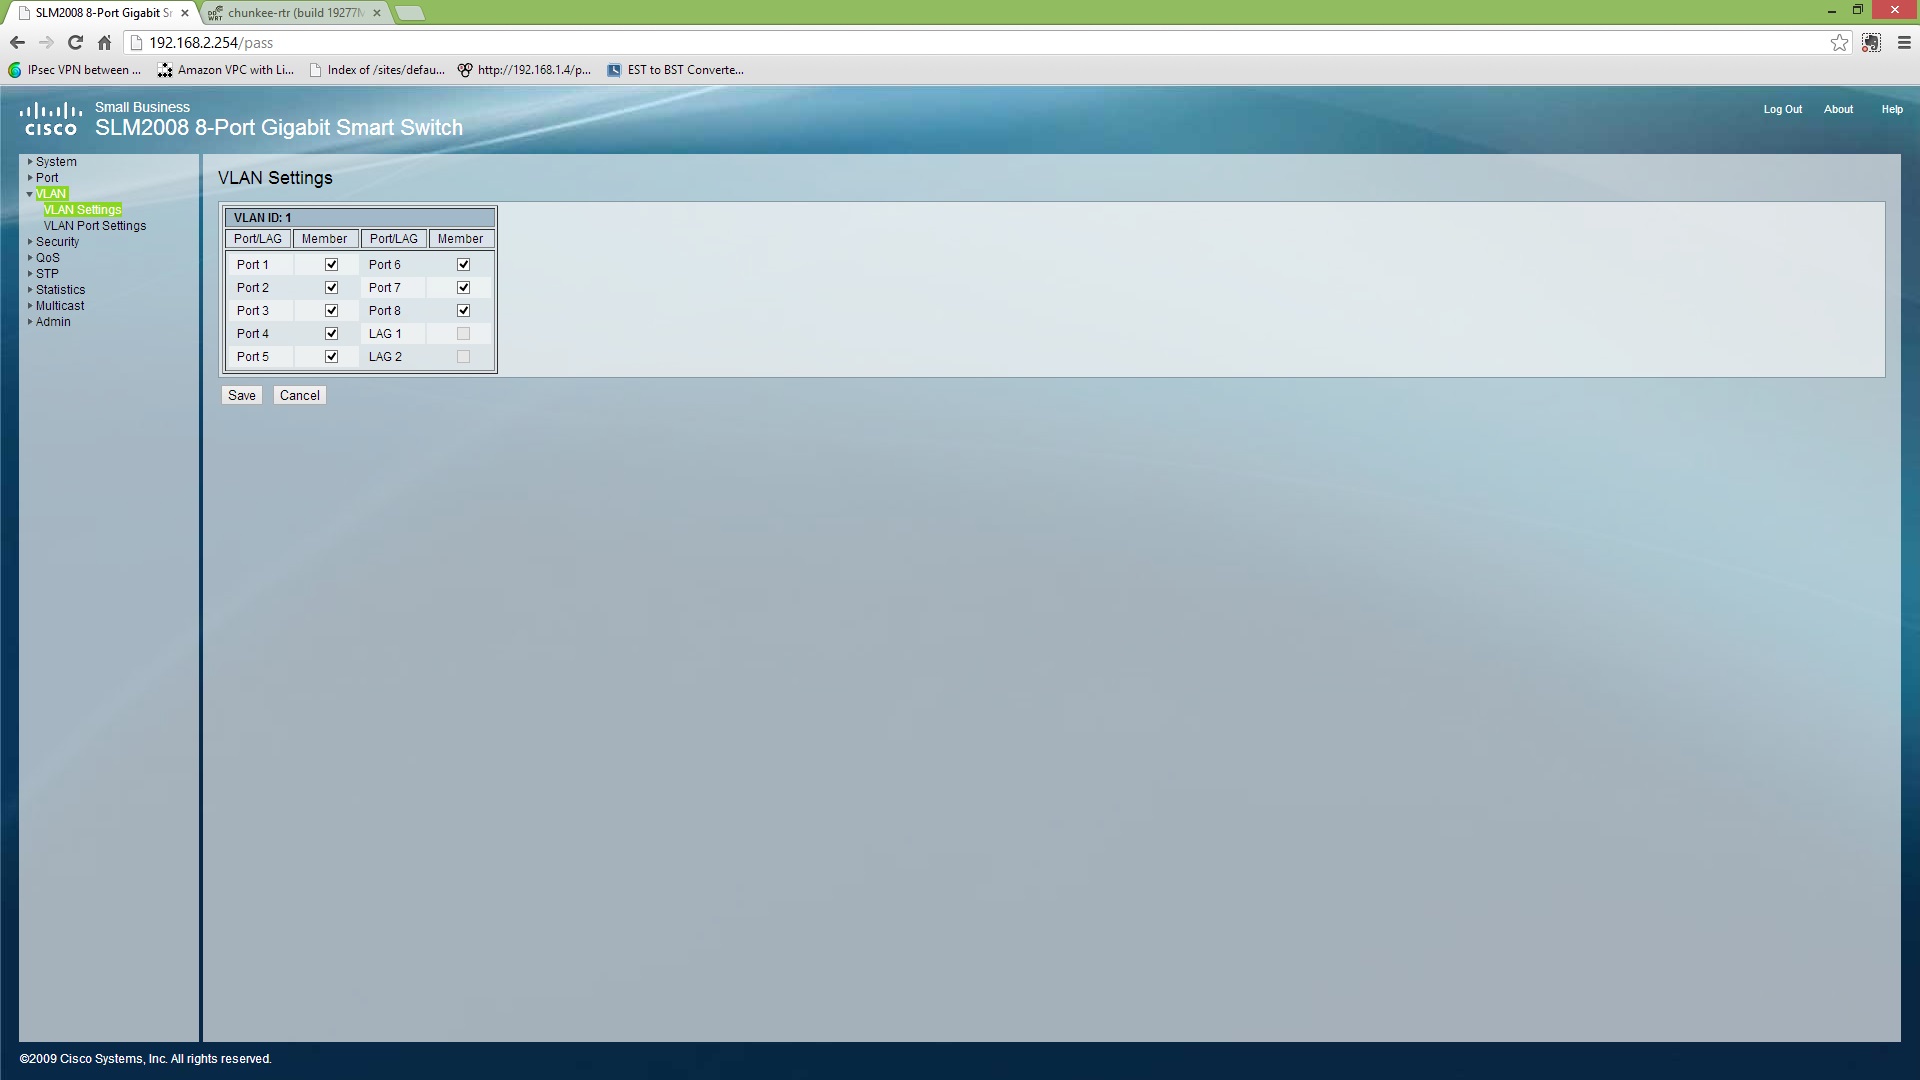
For each VLAN, at time of creation it can be applied to individual ports or, in the future, the port configuration can be revisited by selecting “modify”:
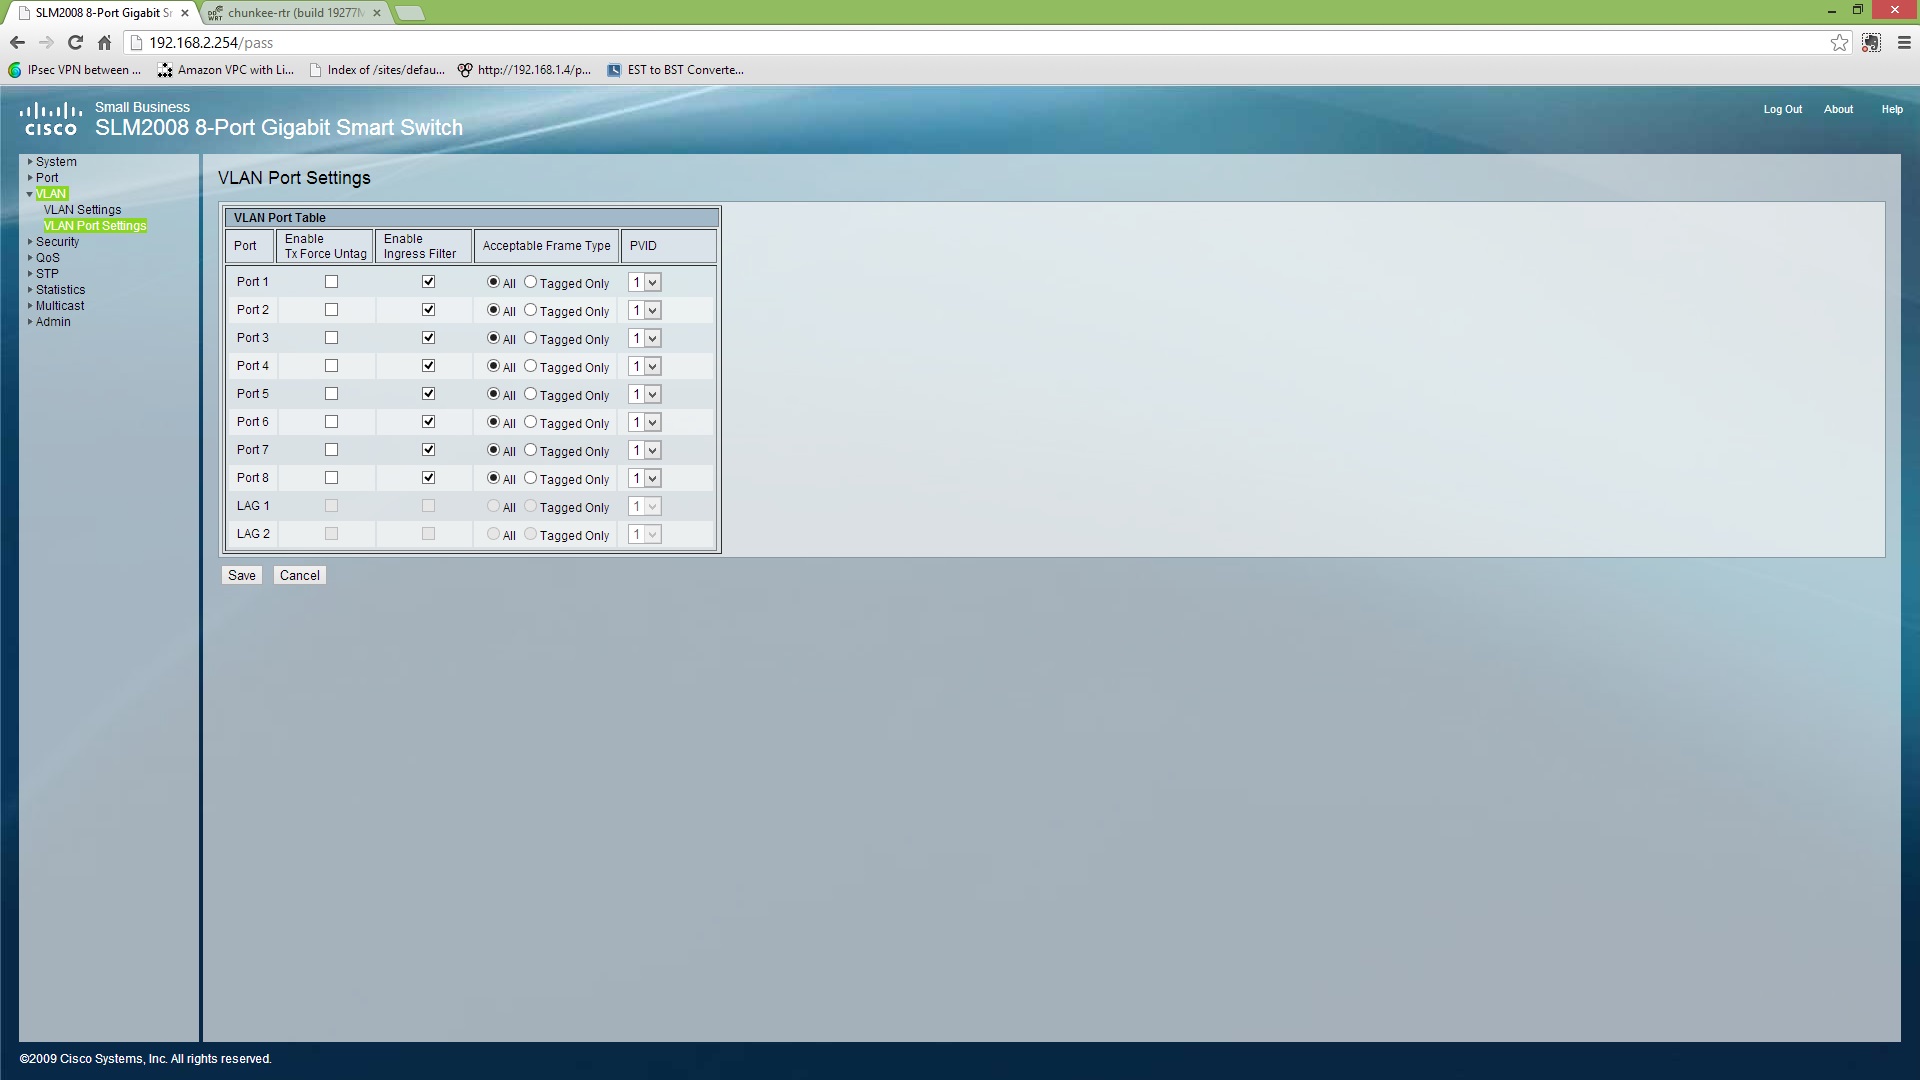
Last up, the GUI also presents an option to get all of the VLAN configuration at a glance, and modify some important settings. From “VLAN Port Settings”, filtering, tagging restrictions and a PVID (default tag) can be assigned on a per port level:
With all of these configuration updates in place, my trusty ping started showing response and everything was back to normal (just now with VLAN tags!). Hopefully this entry was of use to anyone that is running a similar setup (all 5 of you!)
