
What’s this now? How can a bizarre collection of obscure acronyms ever be a viable subject for the “dummies” treatment? Well considering that we now have Quantum Physics for Dummies, and Neuroscience for Dummies (yes, those are legit), it seems worth a shot! The subject at hand is connecting your on premise vCenter installation (VC) to the VMware vCloud Hybrid Service (vCHS) with an eye on Data Center Extension (DCE). DCE is the capability which allows you to stretch layer 2 domains from your on-prem vSwitch to the cloud by way of the SSL VPN feature baked into the vShield Edge appliance (more on that later). This is a hot topic in cloudy VMware circles and has already been the subject of plenty of fantastic articles covering both concept and step-by-step implementation. It’s fairly complex stuff even for those well versed in VMware concepts though (as I learned myself during my recent home lab exercise!), so I decided that there might be some additional room to add value here. My focus will be a bit different since the detailed approach is well covered by both the top bloggers and this excellent VMware produced video series.
Where I decided some folks might need an extra helping hand, before diving into deep whiteboarding and step-by-step screen shot instructionals, was with a simple introduction to what all of these components really are. What their names are, what they do, and why they are there. Consider it a kind of component cocktail party with only super geeks on the invite list! Without further ado, let’s get to the stars of the show…
Hello, my name is…
VMware vCloud Hybrid Service (AKA – vCHS)
This guy probably needs no introduction, but just in case… The vCloud Hybrid Service is VMware’s entry into the public cloud arena – specifically the IaaS space. Built on vCloud director, and utilizing standard VMware technologies (like VXLAN for example), vCHS comes the closest of any public cloud service to allowing “seamless” hybrid cloud and preserving existing process, tooling and training. At the simplest level you can sign-up, login to the portal once you have access, and start deploying virtual machines from a catalogue of base images (featuring various flavors of Linux and Windows) standard IaaS style. At the opposite end of the complexity spectrum, you can actually take an existing on premise network configured on your local vSwitch and stretch it to the cloud instance via VPN (the subject of this entry).
vCenter
vCenter of course needs less of an introduction than vCHS. vCenter is VMware’s central management server and, essentially, the core of the VMware universe. To leverage the advanced capabilities of vCHS you will need to install a vCenter server into your environment. This is a subject that is as old as time (in blogosphere terms) so I won’t get into it, but suffice it to say that vCenter is the foundation requirement for the rest of the components we will be discussing today.
vCloud Director
Having started its life as an interesting project called “Lab Manager”, vCloud Director is an abstraction layer on top of standard vCenter designed to allow for multi-tenancy. For all of it’s power and ability to abstract physical resources into virtual resource pools and allow for both their management and consumption, vCenter really is a single tenant affair. To keep it simple, multi-tenancy means that you want to be able to have totally foreign entities living side by side blissfully unaware of each other. Imagine a service provider servicing both Coke and Pepsi with the same set of gear and each is none the wiser and isolated well enough to satisfy compliance and security officers. To accomplish this bit of technical sleight of hand, vCloud Director introduces lots of new concepts including more advanced resource pooling that can be arranged into hierarchical tiers (think compute and storage divided into “gold, silver, bronze” based on how performant, and thereby valuable, it is), more granular role based access control that can be partitioned by a new unit known as an “Organization” (read as “tenant”), hooks to chargeback mechanisms since generally in a multi-tenant scenario you’re charging for things, and last but certainly not least, much more complex networking. The networking bit is really the “secret sauce” here today and is important to understand. If you consider the intersecting requirements of an environment that is both multi-tenant and virtual, certain must have capabilities start to become clear. In a virtual environment we abstract all physical resources so they can be consumed by virtual machine guests. This includes the network of course. Hosts obviously have a finite number of physical network interfaces that connect to the physical network infrastructure. As virtualization has matured the sophistication of the abstraction of these physical connections has increased. These days with vCenter you typically have either the virtual distributed switch or a Cisco Nexus 1000v. Both of these components are layer 2 network switches implemented as software and able to aggregate multiple hosts. As expected these virtual switches support grouping ports (virtual ports in this case) into port groups, assigning VLAN ids to those, etc. Guest virtual machines have virtual network interface cards that connect to a virtual port group and the traffic is bridged to the physical network by way of the hosts physical NICs which serve as uplinks.
This is all great with a single tenant, but when you layer in multi-tenancy, and even worse automatic provisioning, things unravel a bit. With multi-tenancy you have the need not only for isolation but also for potentially overlapping or conflicting IP ranges to cohabitate. The easiest way to accomplish this is to utilize the old faithful VLAN construct, but when you consider really dense tenancy scenarios, it becomes apparent that the inherent 12 bit (4096) VLAN id limit can become a problem. In addition, all of these tenant networks ultimately have to connect back to the physical world in order to be able to do anything meaningful outside of their private domain. This means that you need, at the very least, some sort of virtualized router and some level of virtual capability on the physical infrastructure. On the switching side 802.1Q tagging and port trunking can accomplish a lot (within the 12 bit limit), as can private VLANs, but ultimately the sprawl is really occurring inside the hypervisor so there is a lot of incentive to solve for it there. Similarly, modern routers can virtualize their routing tables using Virtual Routing and Forwarding (VRF), maintaining separate routing table contexts for discrete VLAN groupings, but again looking at it from the perspective of the most desirable place to solve it, we are drawn back to hypervisor based solutions. Finally, the last bit of complexity, while not exclusive to multi-tenant environments, is an area that becomes much more urgent within multi-tenancy and that is workload mobility. It is very tempting, when building a “cloud” service, to spread the service across a large physical footprint. The ultimate goal is to have the freedom to move workloads around at will.
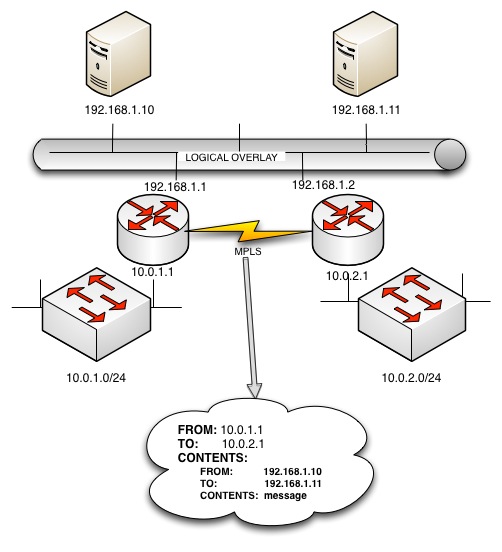
Unfortunately networks are, by their nature, tied to physical location. The entire point of the network is to be a physical location addressing scheme and historically, identity and location have been inexorably entangled. That is changing these days with the advent of “overlay networks”. The idea here is that you start with a basic physical network implementation, architected in the legacy way (routed layer 3 domains across a wide area sitting on local switched layer 2 domains) where IP addresses (and MAC addresses) tell you both “who” something is as well as where it is. On top of that legacy network, you overlay an entirely new logical network, using more agile and advanced encapsulation technologies, that separate the concept of where things are from who they are. What this approach ultimately allows is for two IP addresses from the same subnet (192.168.1.2 and 192.168.1.1 for example) to exist in two physically discrete locations separated by the internet. More simplistic approaches to overlay networking seek to solve equally important, but less complex, problems. VXLAN from VMware extends the distributed virtual switch model beyond the boundaries of a shared physical layer 2 domain between the participating hosts, by encapsulating all of that virtual switch layer 2 traffic in layer 3 packets sent between them. vCDNI (or vCloud Director Network Isolation) supplements VLANs with its own network isolation construct known as a fence ID allowing vCloud Director to internally isolate lots of tenants while only consuming a single VLAN on the physical network (used for transporting tenant packets between hosts when need be). All of these network virtualization standards have a role to play and sometimes overlap (causing confusion), but it is clear that the future direction is towards achieving that complete separation of location and identity we touched on earlier. Both the traditional physical networking vendors (Cisco with OTV and LISP for example) as well as the virtualization players (VMware by way of Nicera, NSX) are taking a run at this space. What we have with vCHS and the datacenter extension capability is really the most rudimentary implementation of this kind of advanced architecture (stretching layer 2 through a VPN and utilizing VXLAN on the vCHS backend for service scalability), but its a good start and provides immediate value using well known existing components. Because pictures are fun, a very conceptual view of overlay networking (hey, its a “for dummies” approach right?)
So as a quick review… vCloud Director was designed to take the great server virtualization we all know and love and make it multi-tenant. To do this it introduces all sorts of new things to deploy and configure and worry about. Some of them are obvious. Things like organizations and user accounts. Some are an extension of things we already had. In this case things like resource pools in tiered groups with access controls around them or virtual machine templates collected into catalogues. And some of the new features are a bit more complex by necessity. Networking falls into this category because it’s just plain hard to pour 20 different network topologies (for 20 different tenant organizations) into one base network topology (even if it’s virtual). vCloud Director answers this challenge by utilizing some of the cool emerging overlay networking technologies under the covers (VXLAN and vCDNI) to make the traditional virtual distributed switch port groups that are the base networking foundation of vCenter more agile and dynamic. Finally, in order to facilitate the consumption of these network resources, vCloud Director gives us two new network types. An organization network is exactly what it sounds like. It is a port group on the underlying virtual switch that has been allocated for use by an organization. One or more organizational networks can be configured by administrators and associated with an organization and attached to one or more organizational virtual datacenters (and as a reminder, in VMware terminology a “virtual datacenter” is simply a logical collection of related virtual resources – networks, storage groups, VMs, etc).
In addition to organizational networks, vCloud Director provides one more level of abstraction and that is vApp networks. This one is important because it is currently the basis for the stretched deployment (datacenter extension) scenario with vCHS. A vApp is simply a logical grouping of one or more virtual machines that are intended to be managed as a unit. vApps are deployed into organizational virtual datacenters within an organization. vApp networks is shared networking configuration common to all VMs within the vApp. vApp networks connect to organizational networks, or are isolated. This hierarchical approach allows for a lot of flexibility, but isn’t always intuitive and can get a bit confusing. One more picture before we move on:
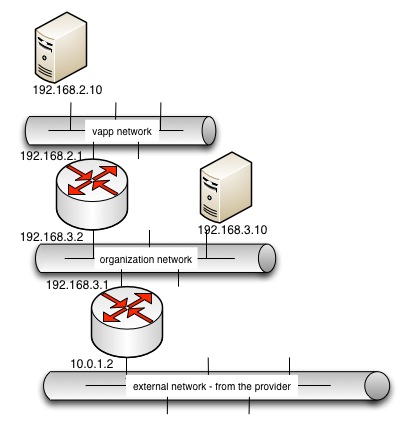
If you’re wondering “ok, but what are those routers?!” then hold that thought! It’s a good one and we’re (slowly) getting there!
vCloud Connector
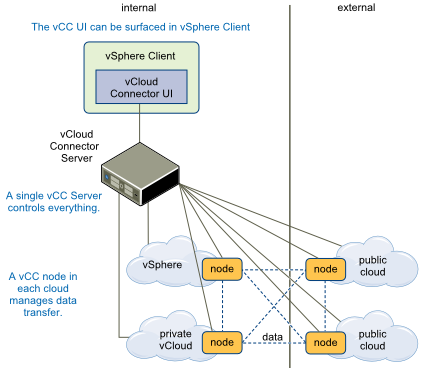
So far we’ve done a lot of review that possibly you skipped over, but now we’re getting somewhere. Even experienced folks might scratch their heads over this one! From the name one can infer that it is something which connects vClouds, but that’s about it. As it turns out, that’s actually enough. The vCloud connector is essentially a gateway of sorts that aggregates multiple installations of VMware’s core virtualization platforms. vCloud connector can aggregate both vCenter (standard centrally managed virtualization) and vCloud Director (including vCHS). Here is how it looks at a high level (courtesy of VMware):
vCloud Connector setup and implementation is a bit complex and you need to do a fair bit of it in order to enable hybrid cloud scenarios for vCHS. Let’s have a look at the basic components:
vCC Server
The vCC Server is downloaded as an appliance, which is quite handy, and deployed in the usual OVF deployment fashion. By default it will boot up and not really do much of anything. The purpose of the vCC Server is to be the central point of command and control for various vCloud Connector nodes that will be subsequently deployed. The first step in getting the server working is to connect to it with the console, turn on it’s networking and give it an IP, and then surf over to that IP via SSL to port 5480 and start setting it up. It requires a license key and there are core and advanced levels of functionality dependent on the licensing level. The datacenter extension capabilities require the enterprise license and are considered advanced functionality. There are plenty of guides that walk through setup of the vCC Server and provide the default password, step-by-step approach, and GUI screenshots. Rather than repeat all of that, let’s just summarize. vCC connects multiple vCenters and vCD instances and vCC server is the command and control. It is a hub spoke model where nodes (associated with the connected clouds) do all of the work and the server monitors status and is used for central configuration and deployment of them. It is a licensed product and needs a key matched to the functionality desired. Installation of the vCloud Connector Server will result in a nifty vCloud Connector add-on being added into vCenter allowing management of the Connector UI through the vSphere client. The server can also be deployed into a vCloud Director Cloud providing Connector services for an entire vCloud.
vCC Nodes
The vCC Node is also downloaded as an appliance, which is also quite handy, and is also deployed in the usual OVF deployment fashion. By default it too will boot up and not really do much of anything. The purpose of the vCC Node is to connect an organization to the vCloud Connector server. vCC Nodes are deployed in a 1:1 relationship with the organization they are enabling and the configuration is straightforward. For connecting vCenter installations (labeled “vSphere” in the UI setup) you simply provide the vCenter IP address or domain name and credentials. For vCloud Director or vCHS you provide the URL of the Organization being linked and the credentials. Once the vCC Node has been setup and has successfully connected to the organization being attached, the node must be registered with the vCC Server. This requires a quick trip back to the vCC Server UI where “register node” can be found on the “Nodes” tab. What is required here is the IP address of the node itself as well as a repeat of the URL and credentials of the organization it represents. This is a good thing to make a note of as it can feel odd to be entering the same thing again, but that is in fact what is expected. Once a node has been registered with the vCC Server, advanced functionality can be enabled by clicking the little “gears” icon next to its registration entry and selecting the desired capability. In the case of “stretched deployment”, credentials will have to once again be supplied and, of course, a valid advanced functionality license key must be in place.
IMPORTANT POINT HERE: With vCHS, the vCC Node component is part of the service. So you are not deploying a node for vCHS, you are just registering the service node with your vCHS server. To register the service node, you go through the normal “register node” process, but as the URL for the node you use the URL of your cloud instance with a TCP port of 8443. So this will end up looking like:
https://pXvY-vcd.vchs.vmware.com/cloud/org/orgname:8443
vCC UI
The last bit, and the most important since it ties everything together, is the vCC UI. As previously mentioned the installation of vCC Server provides an add-on for vCloud Connector that can be accessed from the “Home” section within the vSphere client when connected to the vCenter server with which it is associated. Within the vCC UI, any “clouds” to which nodes have been connected can be managed centrally by adding them under the “clouds” section. The registered nodes will be pre-populated for inclusion and supplying their credentials will trigger an inventory update that populates the view with the resources found within those organizations (templates, vApps and VMs).
The vCC UI is super important for hybrid cloud and vCHS because it is here that most of the magic happens. When initiating a datacenter extension, it is here that the stretched deployment is kicked off. Hybrid cloud administrators will find themselves returning to the vCC UI quite a bit during the initial phases of a hybrid cloud deployment, so it is good to get familiar with the layout and some of the quirks. One thing I found is that UI updates can be a bit slow and there is a lot of data flowing back and forth. It is best to be patient here and let the UI populate. Don’t click away and don’t click ahead. Don’t refresh (as tempting as it can be!). Give the UI a moment to populate, when in doubt do a “reload” and give it a bit longer, and have a coffee and something else to look at at hand during the slight pauses. This is the best approach and ensures that you won’t inadvertently cause the UI to trip over itself and show you stale data (or error out).
Overall, the general workflow for vCloud Connector is:
- deploy the vCC Server OVF
- enable and configure networking and connect with a browser to the web UI
- configure the license key, admin password, name, time, etc (housekeeping)
- start deploying some nodes
- configure the nodes with connection info matching the organization they will be connecting to
- register the configured nodes with the vCC Server
- visit the vSphere client and invoke the vCloud Connector Add-On
- add each connected cloud, node by node, to the “clouds” view
- return to the vCC server and enable advanced functionality, per node, within the node view (stretched deploy in this case)
- have (relative) fun!
vShield (and by vShield we mean vShield Edge)
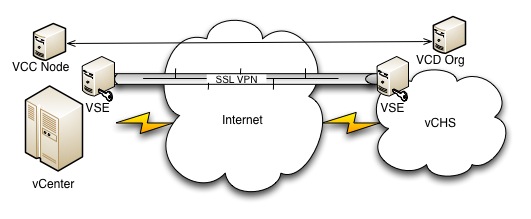
Last but not least we have the star of the show, the mighty vShield (Edge). Remember that lingering question from the conceptual picture above, “so what is the router there representing?” And remember that we discussed how within a multi-tenant implementation where the network has been virtualized a virtualized router would be awfully handy? Well vShield Edge is that virtual (sort of) router. At this point, vShield has been absorbed into vCloud Director and vCHS (by extension) and has become “vCNS” or “vCloud Network and Security”. In short, vShield Edge is a virtual security appliance that provides a host of cool functionality that comes in handy when interconnecting loads of virtual networks and port groups: NAT, firewall, DHCP, VPN and load balancing. It also provides basic (static) routing. In the conceptual diagram above when we show a vApp network routing to an organization network which routes to an external provider network, it is the vShield Edge (or VSE for short) that is providing this routing functionality. It is important to note that the VSE is a NAT router somewhat similar to the WLAN router you may be using to read this entry. It supports both source (egress), and destination (ingress) NATing, to allow traffic to get into and out of the hosts on the virtual network, and can also do straight routing as long as static routes have been defined. Each virtual network, be it organizational, provider or vApp, is ultimately a port group on a virtual distributed switch (whether directly or by way of something advanced like VXLAN or VCDNI). The VSE’s maintain a connection to the 2 port groups they are linking and, in that, they are the “secret sauce” here. In addition, when we are talking about stretched deployment scenarios and the datacenter extension wizard, it is the built in SSL VPN functionality of the VSE that is enabling the capability. VMwares SSL VPN implementation in vShield supports TAP mode VPN basically (where layer 2 is fully encapsulated into the VPN tunnel) and the vCloud Connector handles aggregating the resource view of the two disparate clouds. vShield Edge services are baked into vCHS and to enable complementary functionality on prem, a vShield Edge must be deployed into your vCenter or vCloud. There are lots of guides for this so just remember that it is a mandatory pre-requisite. Before we wrap, one more conceptual drawing that ties this all together:
Notes from the Field
In doing this I came across a few pointers that might be helpful and wanted to share:
- Going to repeat this again because it’s important – let the vCC UI take it’s time and populate the UI fully before jumping ahead of it
- Watch out for case – there are spots where things might be case sensitive and it can bite you. To be safe when referencing named entities, just match case exactly. I believe this is the case with organizational names, but possibly not. Either way it can’t hurt to match case.
- When deploying a vShield Edge, if things are going sideways and you are getting vague errors, try rebooting the vShield Manager (as me how I figured this one out at around 4am!)
- Start with, end with and live in that vCC UI. It can be tempting to poke around directly in the interfaces of the various components, but the stretched deployment wizard takes care of everything if the pre-requisites are met (and not being able to get it to work is a good indicator that they haven’t been)
- Keep in mind that currently, you can stretch deploy vApp Networks. So the target is a virtual machine within a vApp. That is the scope of the stretched deployment. And you are stretching from on-prem to vCHS. Might seem like common sense, but it is definitely worth noting.
- When in doubt, reinitialize! At the last mile of my stretch deployment I ran into an odd problem where the wizard would launch, I could select the Org vDC just fine, but no org networks would populate the drop down no matter what I tried. The solution turned to be pretty effortless, yet maddening. To fix it I went to the entry for vCHS under “Clouds” and simply chose “update”, reentering the same password used previously. After that I did one final “reload” (I had done a dozen prior). Lo and behold that worked! The moral is sometimes “reboot it” still applies!
That’s it for now! As I play with this more now that I have the datacenter extension scenario working expect additional entries. Thanks for reading!
