
While not quite as delicious as a real cake, virtual cake can still be pretty satisfying! In this case of course I’m talking about the oddly pronounced VMware vCloud Automation Center, aka “vCake”. For those not familiar with it, vCAC is the core of VMware’s management and orchestration play. It serves as a workflow automator, self-service portal, chargeback/showback mechanism and resource management platform. If you’re familiar with BMC CLM, Cisco Intelligent Automation for Cloud, or any of the other popular orchestration systems, then vCAC will make sense. If not, the idea is that as IT shops attempt to move to a service provider model, ultimately they will need to automate as much as possible. The ideal end-state is to present a website that is a customer/user facing front end to IT services from which developers in business line IT can make requests for servers and resources. Access to these resources is controlled through policy and approval workflows, and a monetization component tracks how much these resources cost so you can charge back for them. Offerings can be presented to users from a pre-defined menu (database server, web server, etc) and once approved, the provisioning of these resources can be automated by a workflow orchestrator. In a nutshell, if you want your IT shop to look like Amazon EC2, then at some point you need to take a serious look at this kind of software. It is the next generation of IT Service Management (moving beyond service catalogs and basic config management)
Many entries back I left off having vCAC up and running, but I never got around to actually doing anything with it. That changed this weekend and I am pleased to report a successful case of vCAC provisioning into AWS EC2! Before diving in, there are some architecture components worth noting. No sense redrawing the wheel, so here is a terrific architectural view of the vCAC components courtesy of Dutch virtualization virtuoso Eric Sloof:
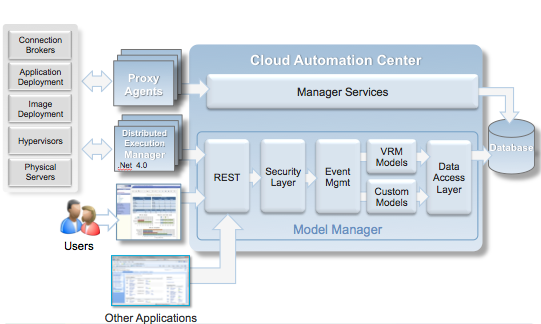
As you can see above, vCAC is a fairly complex, modular architecture. Of course at it’s heart is a database. In this case SQL Server since vCAC is a Windows based platform. The other components require some more explanation:
- Model Manager: the vCAC Model Manager is essentially the command and control of the vCAC architecture. Automation systems at their core are based on an interrelated collection of defined workflows (operations to be performed) and interfaces (connections to systems on which those operations are being performed). Approvals, access control, auditing and presentation are all components of this foundational structure. The Model Manager is broken into two components, a web service and a data access component. These two components are always installed together. Not surprisingly the basic building block of the Model Manager is called a “model” and is made up of the following elements:
- Secure Multi-Tenancy — Controls who can see what data and who can execute which business logic, leveraging existing authentication and business groupings
- Unified Data Model — Exposes data from the vCAC database and external databases within the model through a secure auto-generated REST API
- Editable Business Logic — Specifies the workflows and activities to be executed
- Execution Policies — Regulate when and where then business logic is executed
- Distributed Execution Managers: DEM’s are the workhorses of vCAC. If the Model Manager is all about defining and controlling workflows, DEM’s are all about actually executing them. The DEM’s come in two flavors:
- Orchestrator – The Orchestrator role is responsible for tracking the task last and progress of the Workers and scheduling new work
- Worker – The DEM Workers actually execute the workflows that have been scheduled by the Orchestrator
- Agents – in the time honored tradition of all the agents that have come before, vCAC agents connect systems to the vCAC core and collect information from them as well as performing operations on them. There are agents available for the core hypervisors (XEN, Hyper-V and obviously ESX) and also for WMI to directly connect Windows systems. In addition there is an integration agent for VDI implementations. PowerShell scripts that allow vCAC to plug in to XenDesktop.
- Portals – like any good automation system, vCAC also provides customizable web portals. A consumption portal (the Self Service Portal) and an administrative portal for managing the service. Both provide dashboard functionality for reporting as well as the functions required for each class of user (consumer or admin).
In case anyone is curious, in a lab environment it is absolutely possible to “one-box” all of this. I have everything running on a single VM in my lab. So what does it take to get vCAC connected to something (EC2 in this case) and performing something useful? I’ll skip the basic setup bit. It’s complex, dependency laden, and documented to death. There’s even a book length PDF on the topic! So let’s pull the Rachel Ray move and skip forward to the part where the hair has been pulled, what’s left has turned a shade more grey, and vCAC is happily up and running! After that process what you are left with is a pretty complex clean slate and set of building blocks. The next challenge is figuring out where to begin. I’ll cover the bare minimums for a lab environment here.
There are some foundational constructs that must be created initially. Configuration begins by visiting the admin portal at http://vCACserver/vCAC (substitute https if SSL is enabled on your implementation) Logging in you will be greeted by this view:

At this point it is worth an overview of what must be created in order to be productive:
- Endpoints: Everything begins with the endpoints! (sorry) Endpoints in vCAC are the connected systems that vCAC will orchestrate. They can be either physical (managed via the WMI agents), virtual (managed via the vCAC agents installed and configured to connect to various hypervisors during the install phase) or they can be “Cloud”. Out of the box vCAC can connect to vCloud Director (imagine if that weren’t there?) and, drumroll, EC2. To get started creating, select vCAC Administrator from the portal main menu and then select Endpoints. Here is a shot of my configured endpoints:
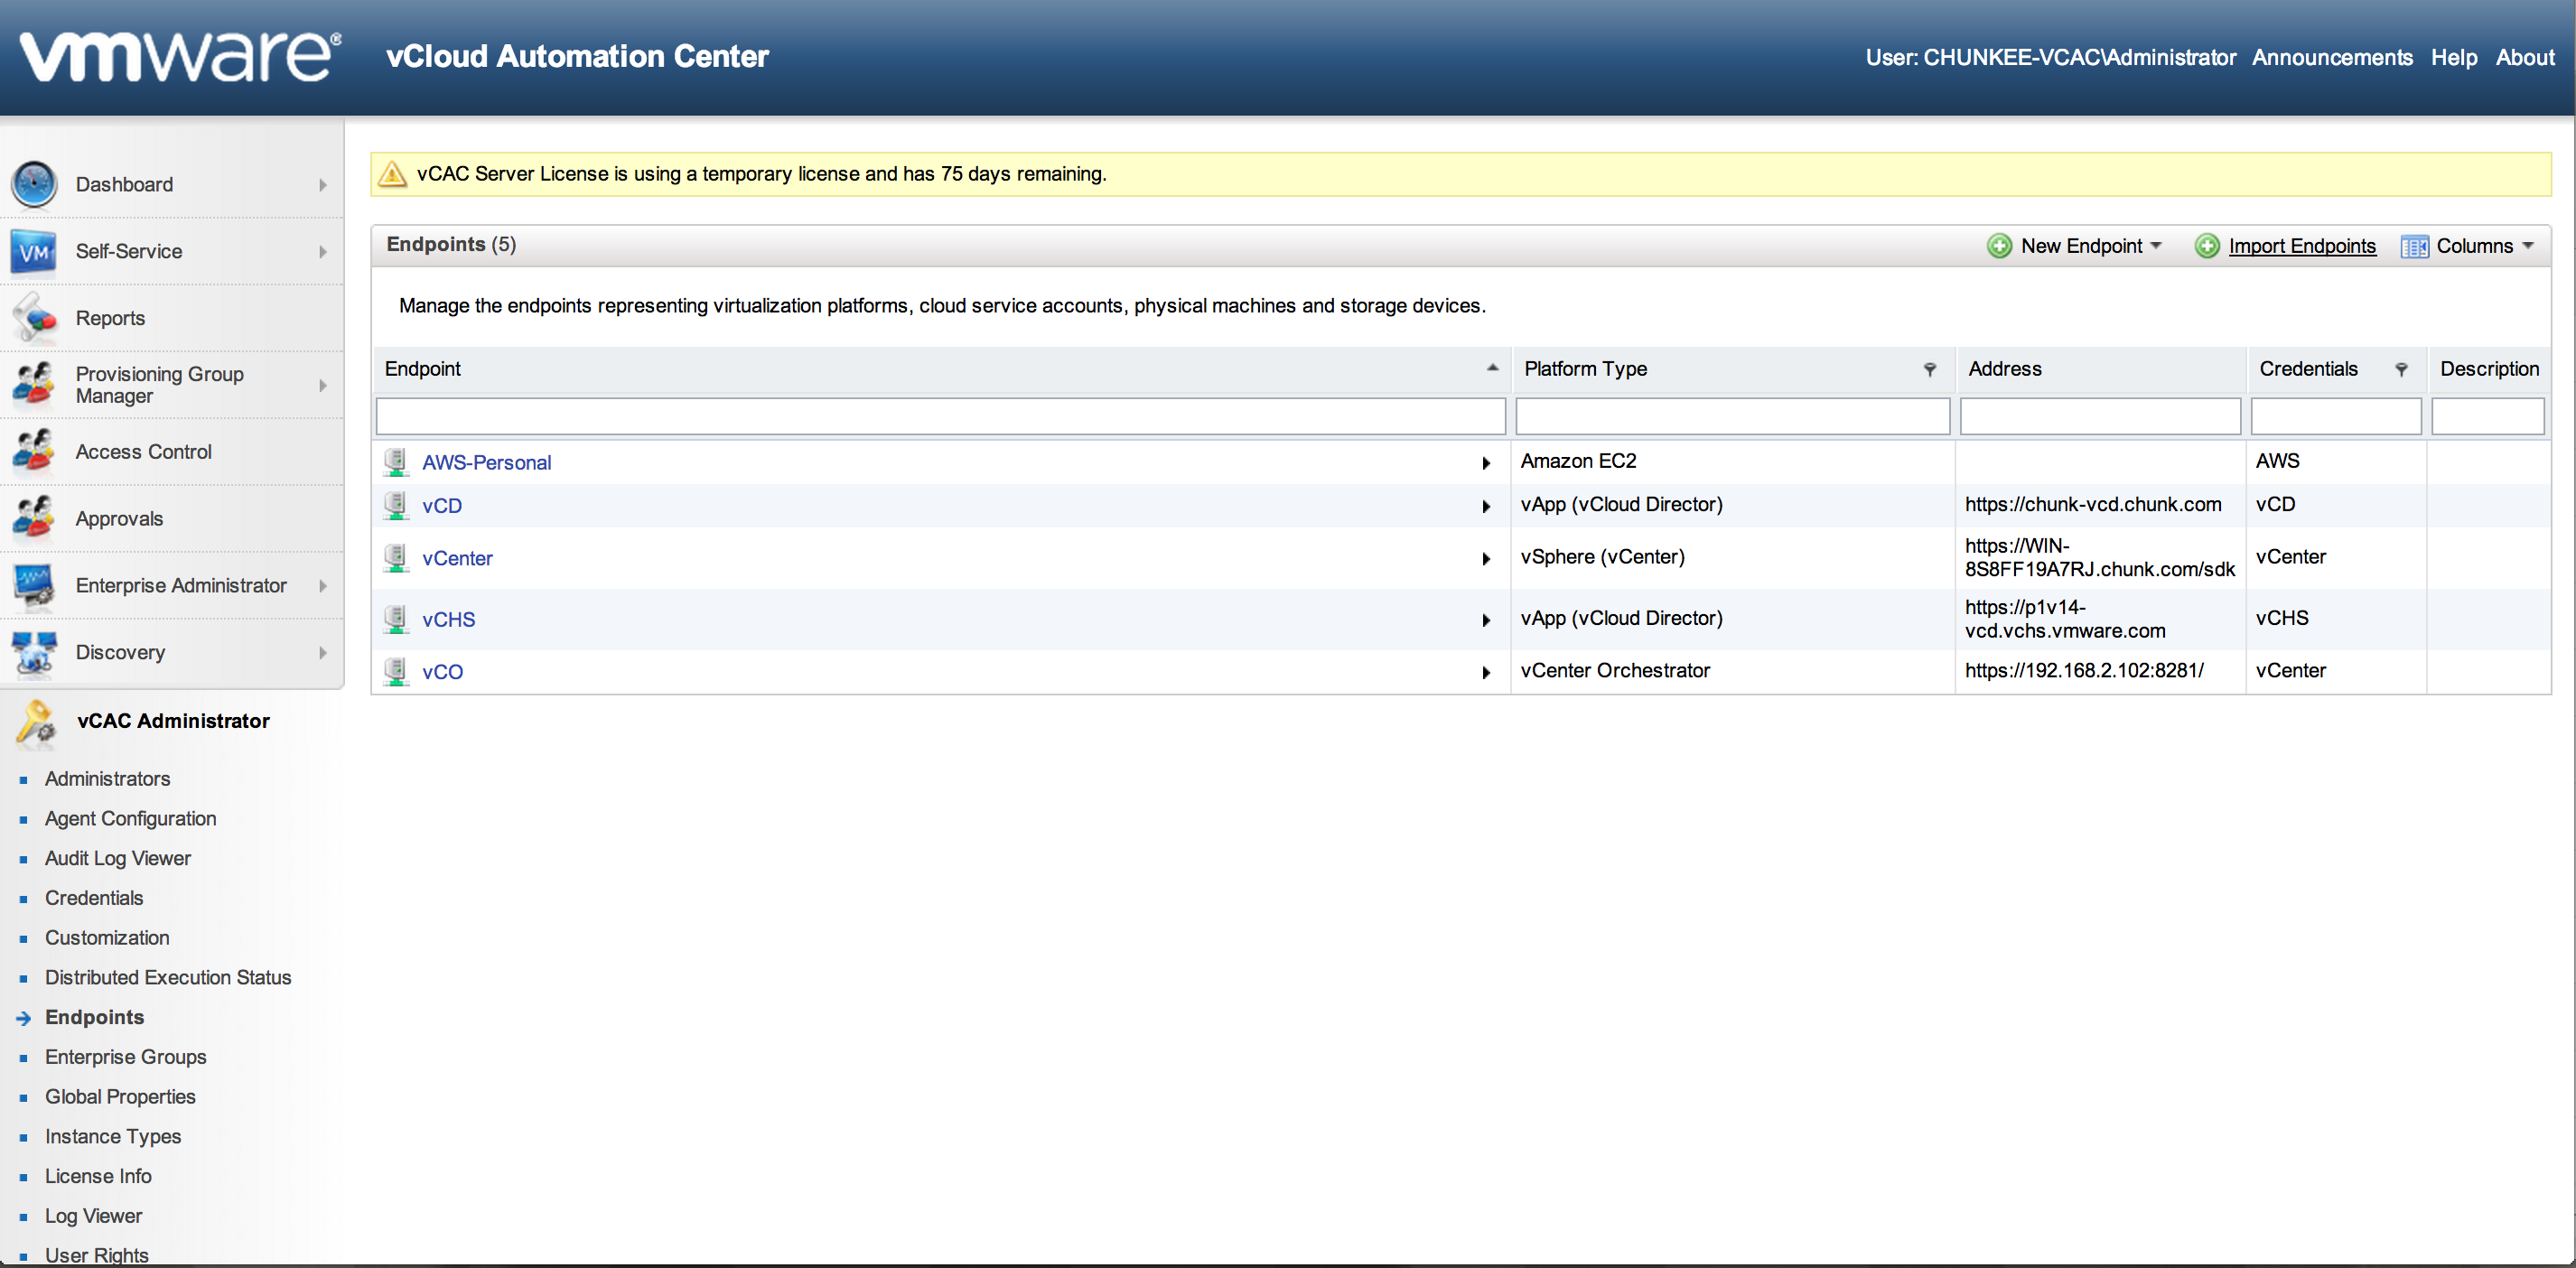
Here you can see configured agents for EC2 (AWS-Personal), vCloud Director (vCD), vCenter (vCenter), vCloud Hybrid Service (vCHS – more on this in a future entry) and vCenter Orchestrator (vCO – more on this in the future as well – vCAC to vCO is an interesting topic). Sticking with the AWS case, to setup an AWS endpoint you need some basic info. Click on “New Endpoint”, select “Cloud” and “EC2” and you will see the following:
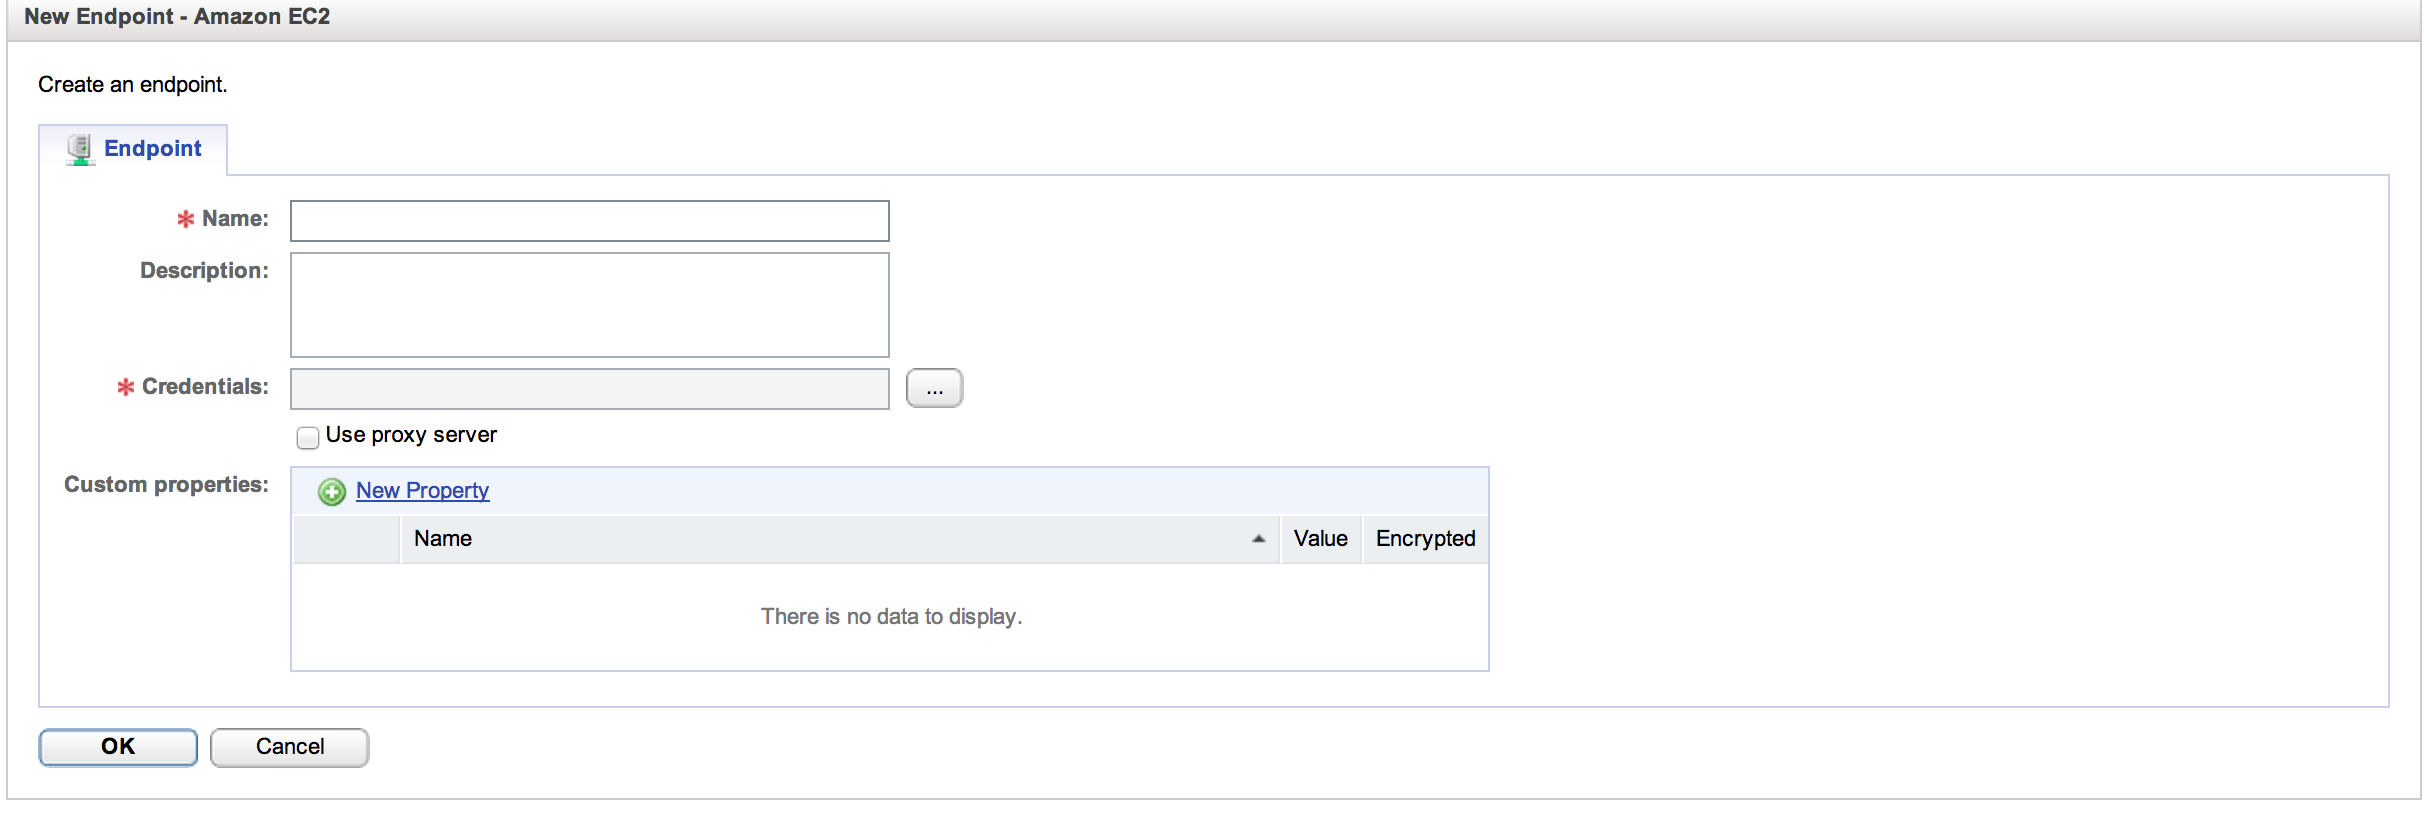
Name is straightforward; just use a familiar name that makes sense. Credentials is where it gets interesting. vCAC managers credentials as separate entities from the services those credentials entitle. Let’s take a look at the credentials dialog that will appear after hitting the ellipses:

As you can see, multiple credential entities have already been defined in my setup. If any of those applied, they could simply be selected. In this case we will create a new pair by selecting “New Credentials”. Give them a name and description and then provide a username and password. For AWS, the username and password are the access key and secret key of the AWS top level account. This piece is important since this is the foundation on which all of the EC2 interactions will be built. Once the endpoint has been created, hovering over it with the mouse pointer will bring up a menu for that entity (this is how the vCAC UI operates). Selecting “Data Collection” from this menu will trigger the initial data collection event. The UI is a bit buggy here and doesn’t reliably update in real time. Check the log link under vCAC Administration to verify that data collection was successful. If everything goes well, the basic connection between vCAC and EC2 will not be ready and online. Next step is to create the required constructs to utilize it.
- Enterprise Groups: Enterprise Groups are collections of resources provided by the end points. Once an end point has been successfully initialized, it’s time to assign its resources to an Enterprise Group. Here is a shot of my configured groups:
 In my case I assigned each end point to a dedicated enterprise group. Other combinations are also perfectly acceptable. One group can contain resources from multiple endpoints and a single end points resources can span multiple enterprise groups. To see this in action, click “New Enterprise Group”:
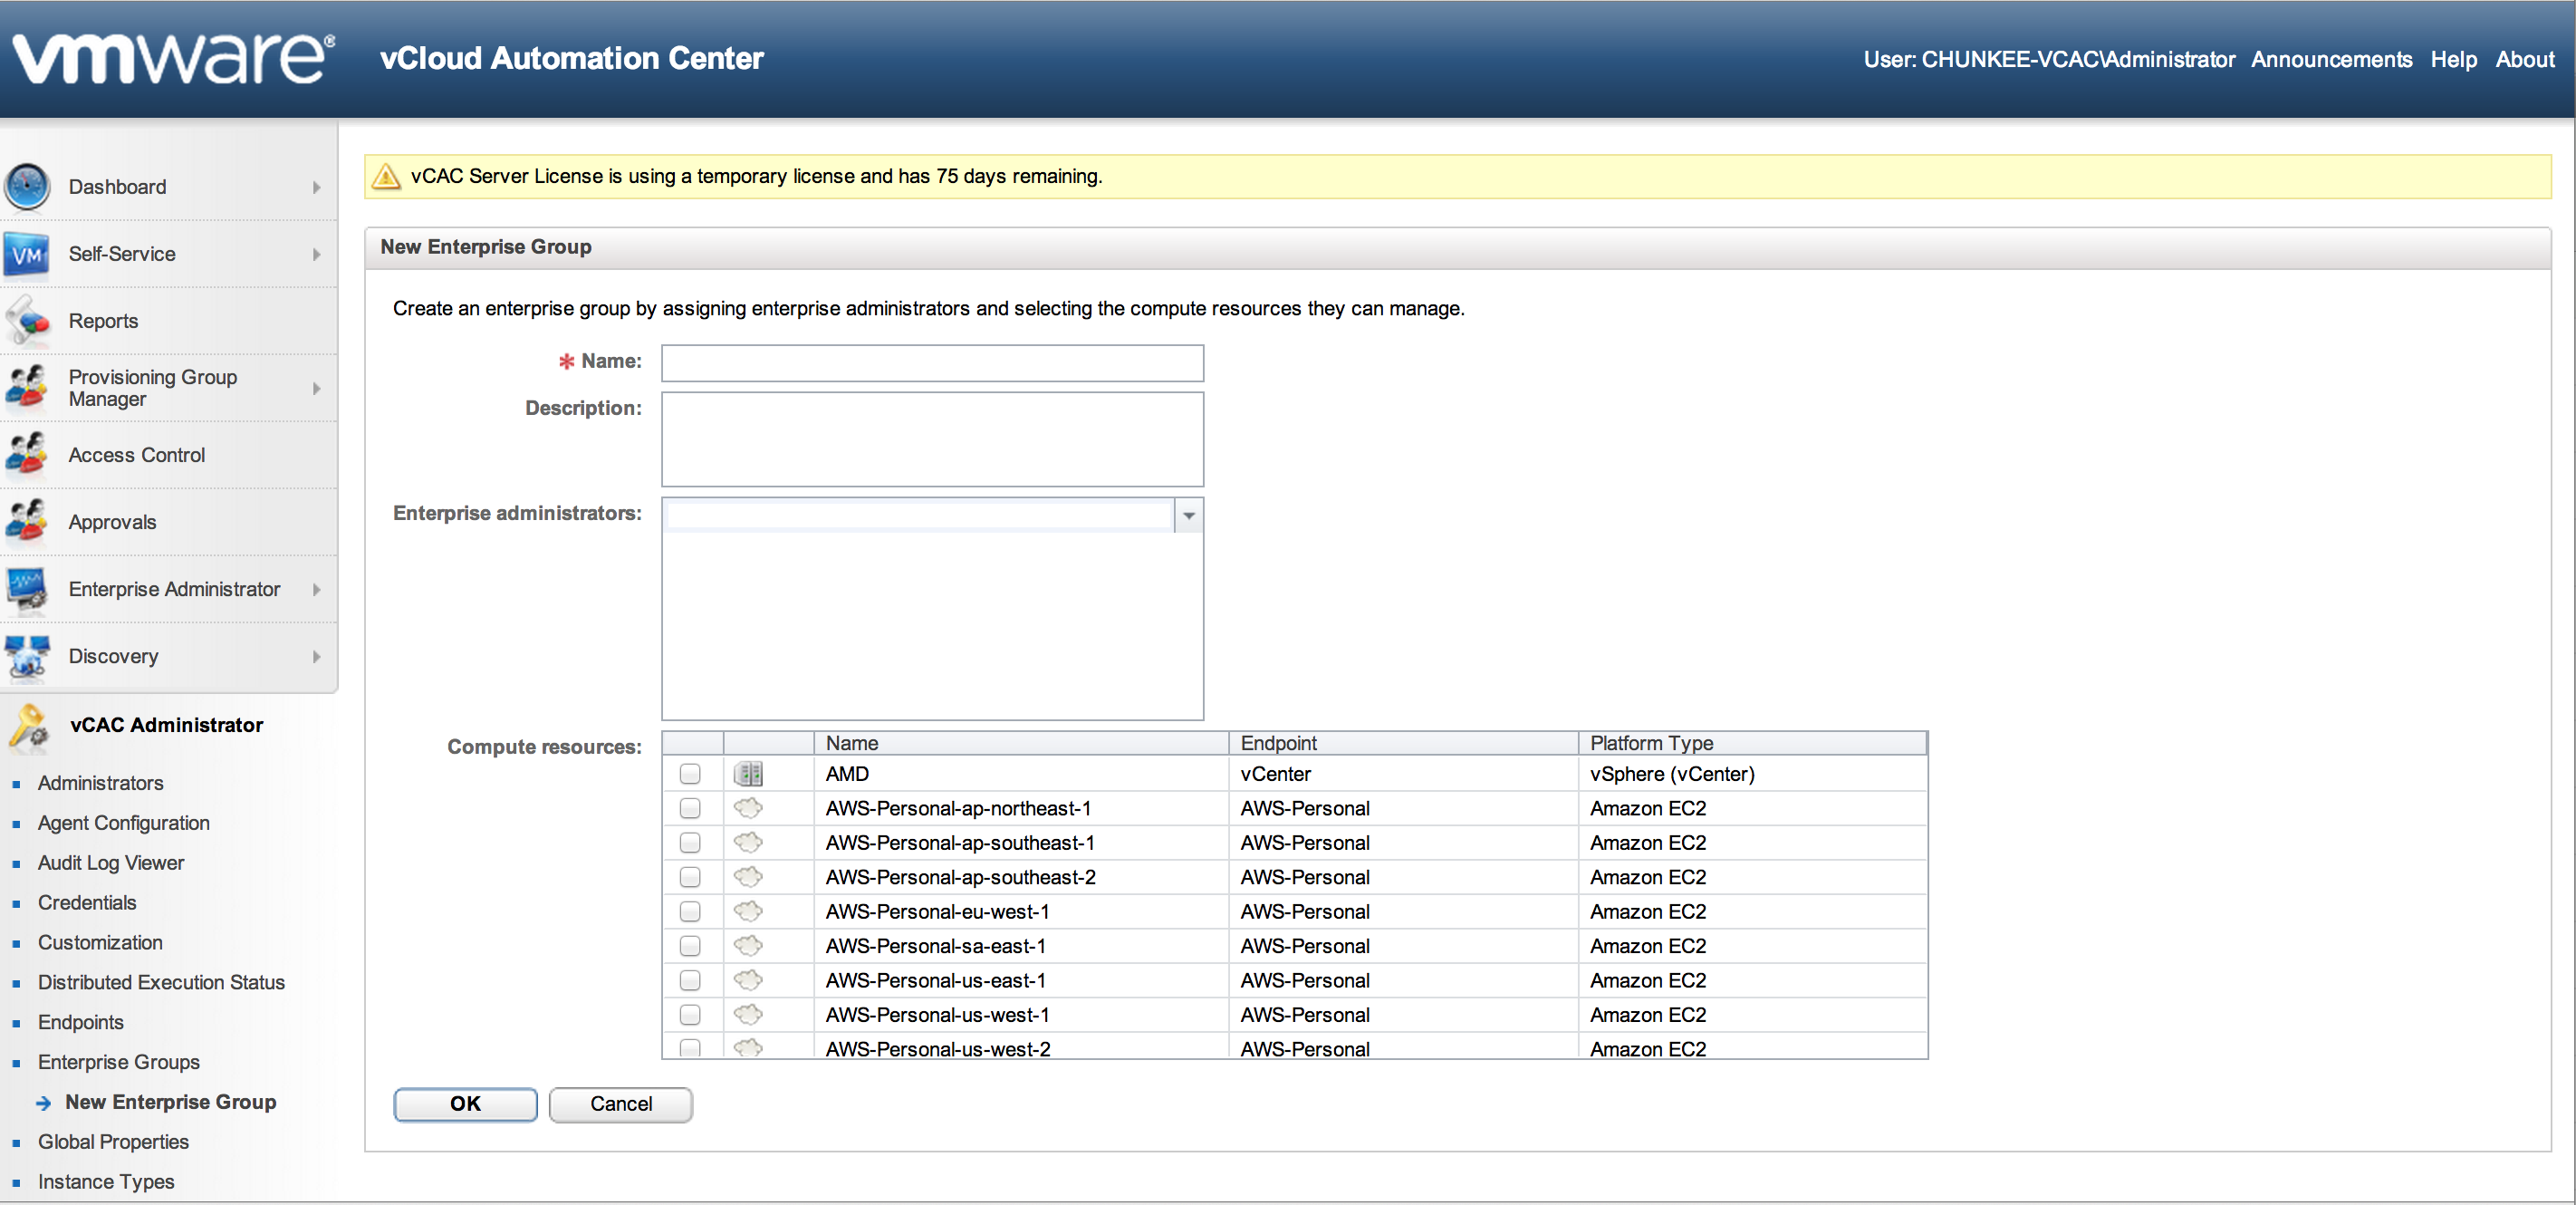 As you can see this is super straightforward as long as the end points are functional. Simply give the group a name and check box off resource collections from the list and click OK to create it.
With these two bits created, we now have usable resource collections. The next step is to setup the consumption. Side of the equation. There are a number of base constructs that must be created here as well:
- Provisioning Groups: Provisioning Groups are a collection of machine consumers (end users that are entitled to request resources). To request machines, a vCAC user must belong to at least one provisioning group. Each group has access to a set of local blueprints used to request machines. Establishing provisioning groups, and the baseline access control they represent, is a pre-requisite step for setting up the resource consumption constructs. Here is a look at my provisioning group list, followed by the dialog required to set one up:
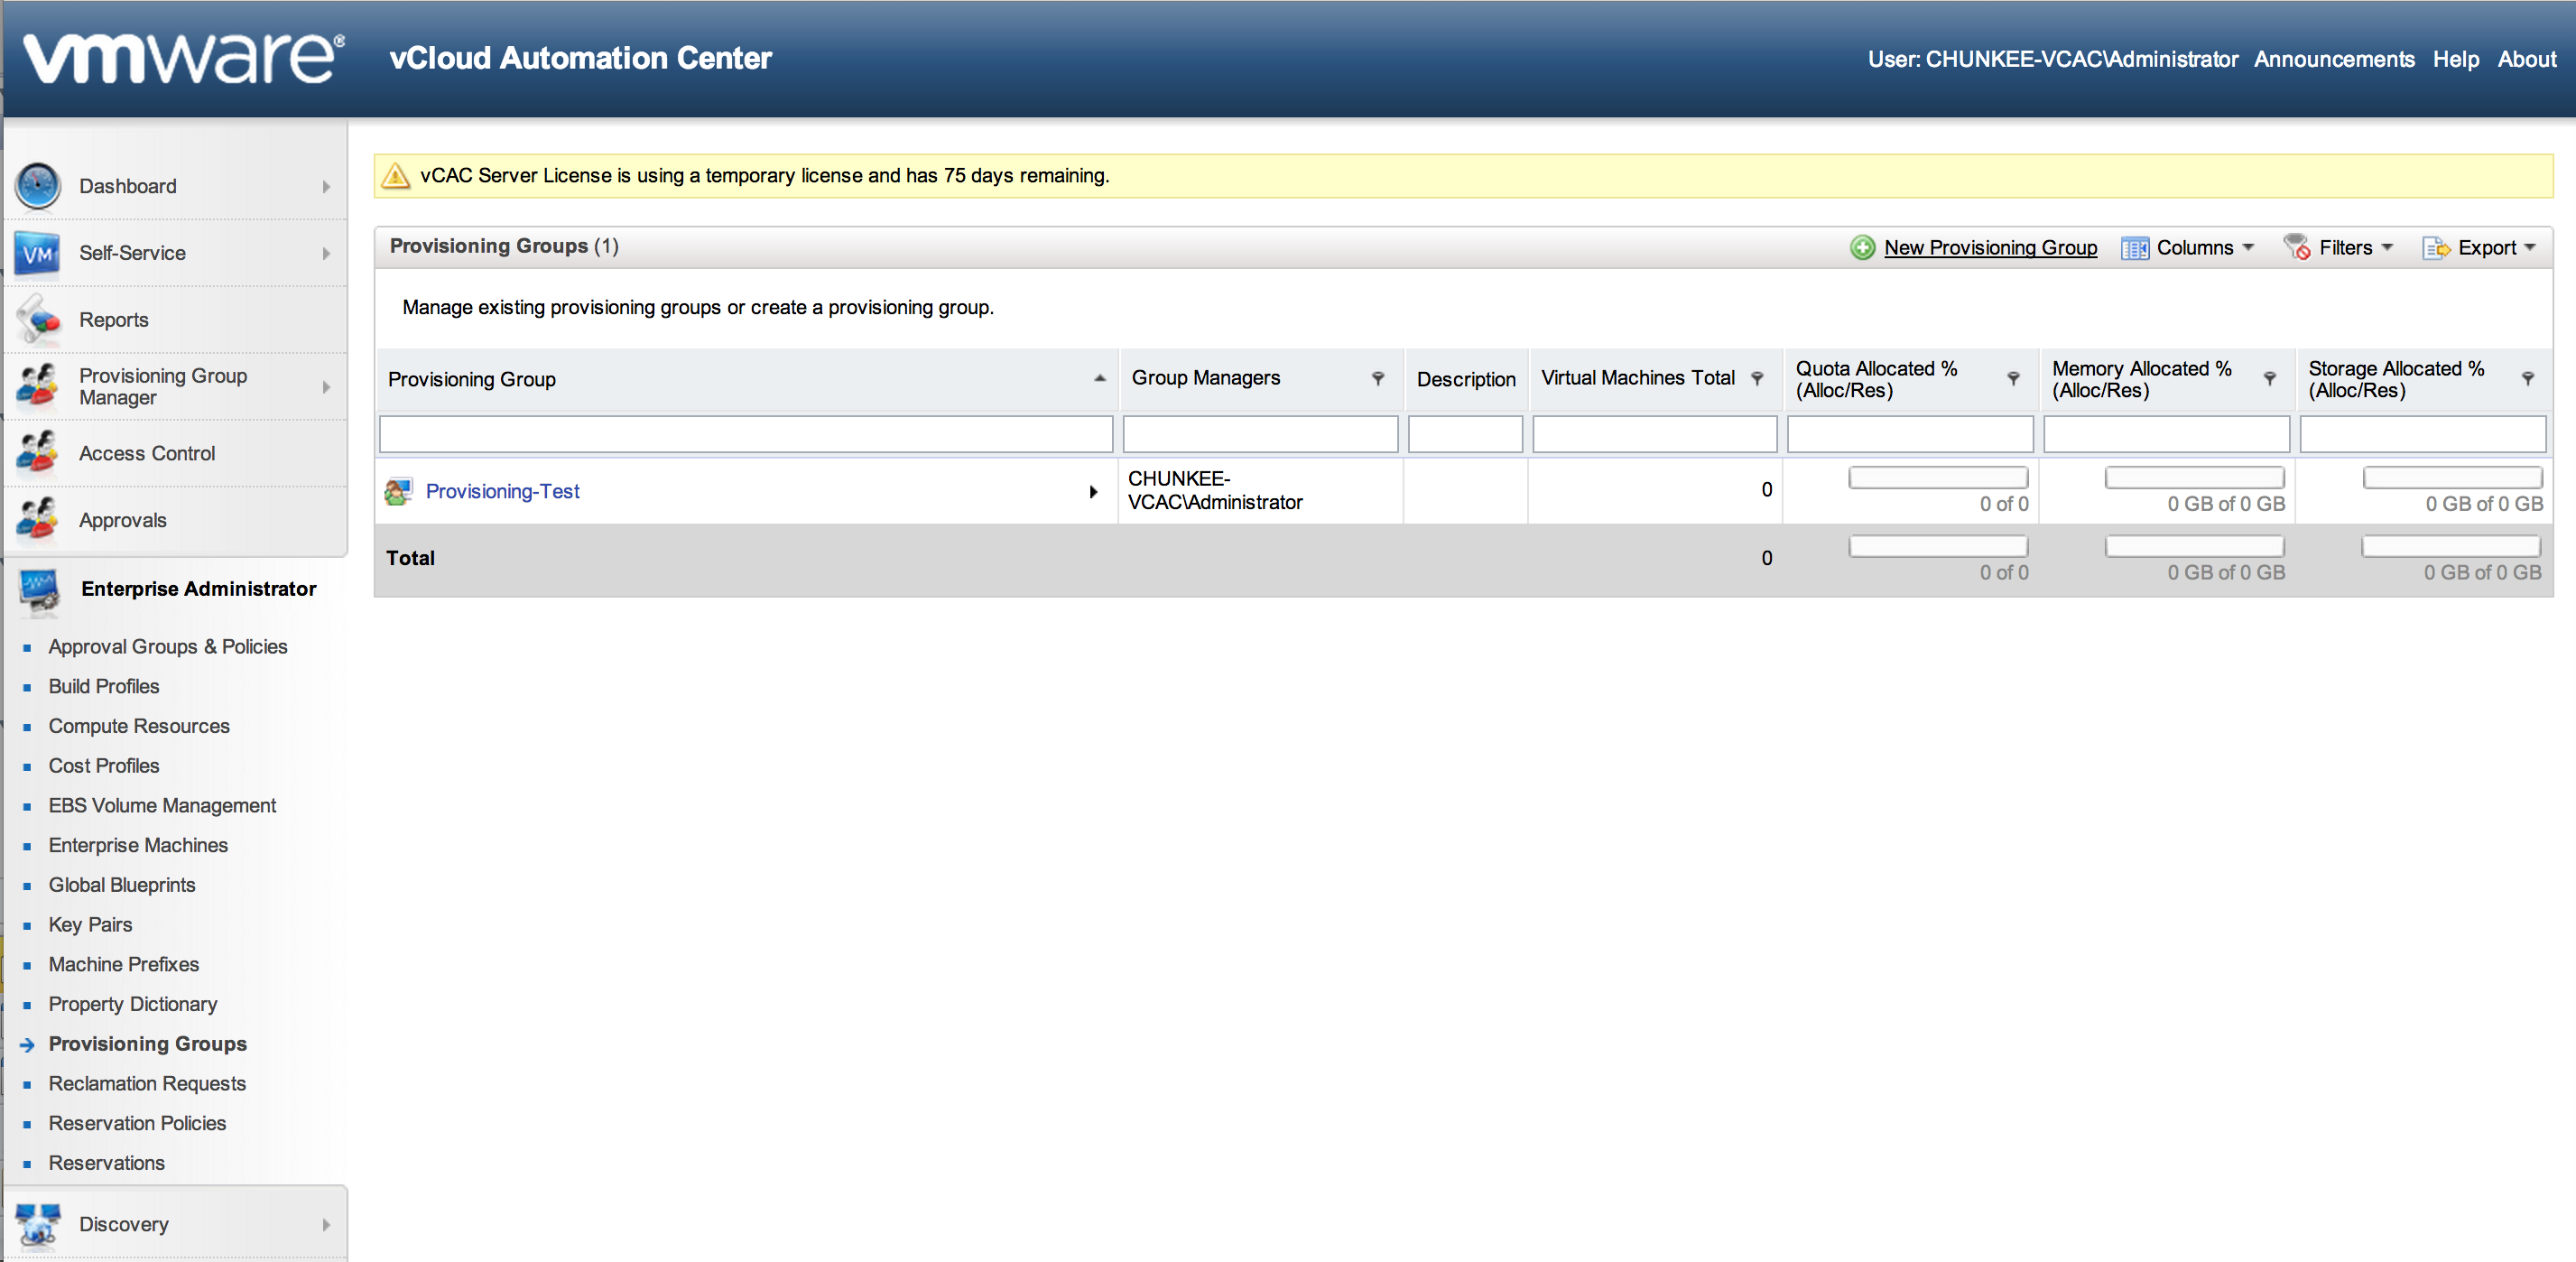
Note that here you can setup a default machine prefix and a name. In addition, and this is important, you set the various roles that have access to this Provisioning Group. This part is vital for lab testing because the administrator does not have access to these constructs by default. If you login to the consumption portal as an admin and are greeted with a message of “You have not been granted access to this portal”, this is the reason. Be sure to enter the identity of some user for each section here. In my case I added administrator to all roles:

- Reservations: Reservations are pools of resources allocated from the end points that are reserve for vCAC use. If you think about the component parts here, you have a provider (vCD, EC2, etc) that has some amount of capacity that is exposed for consumption to the use that the end point was configured to connect as. vCAC is an automation workflow that will allow end users to consume these resources. In any real scenario it is likely that an administrator will want to parcel out access to these resources. Rather than allow every end user to consume all of the resources provided by the end point, far more likely is that some percentage of these resources will be allocated into one or more pools for consumption – this is the function provided by the reservations. Here is a look at mine:
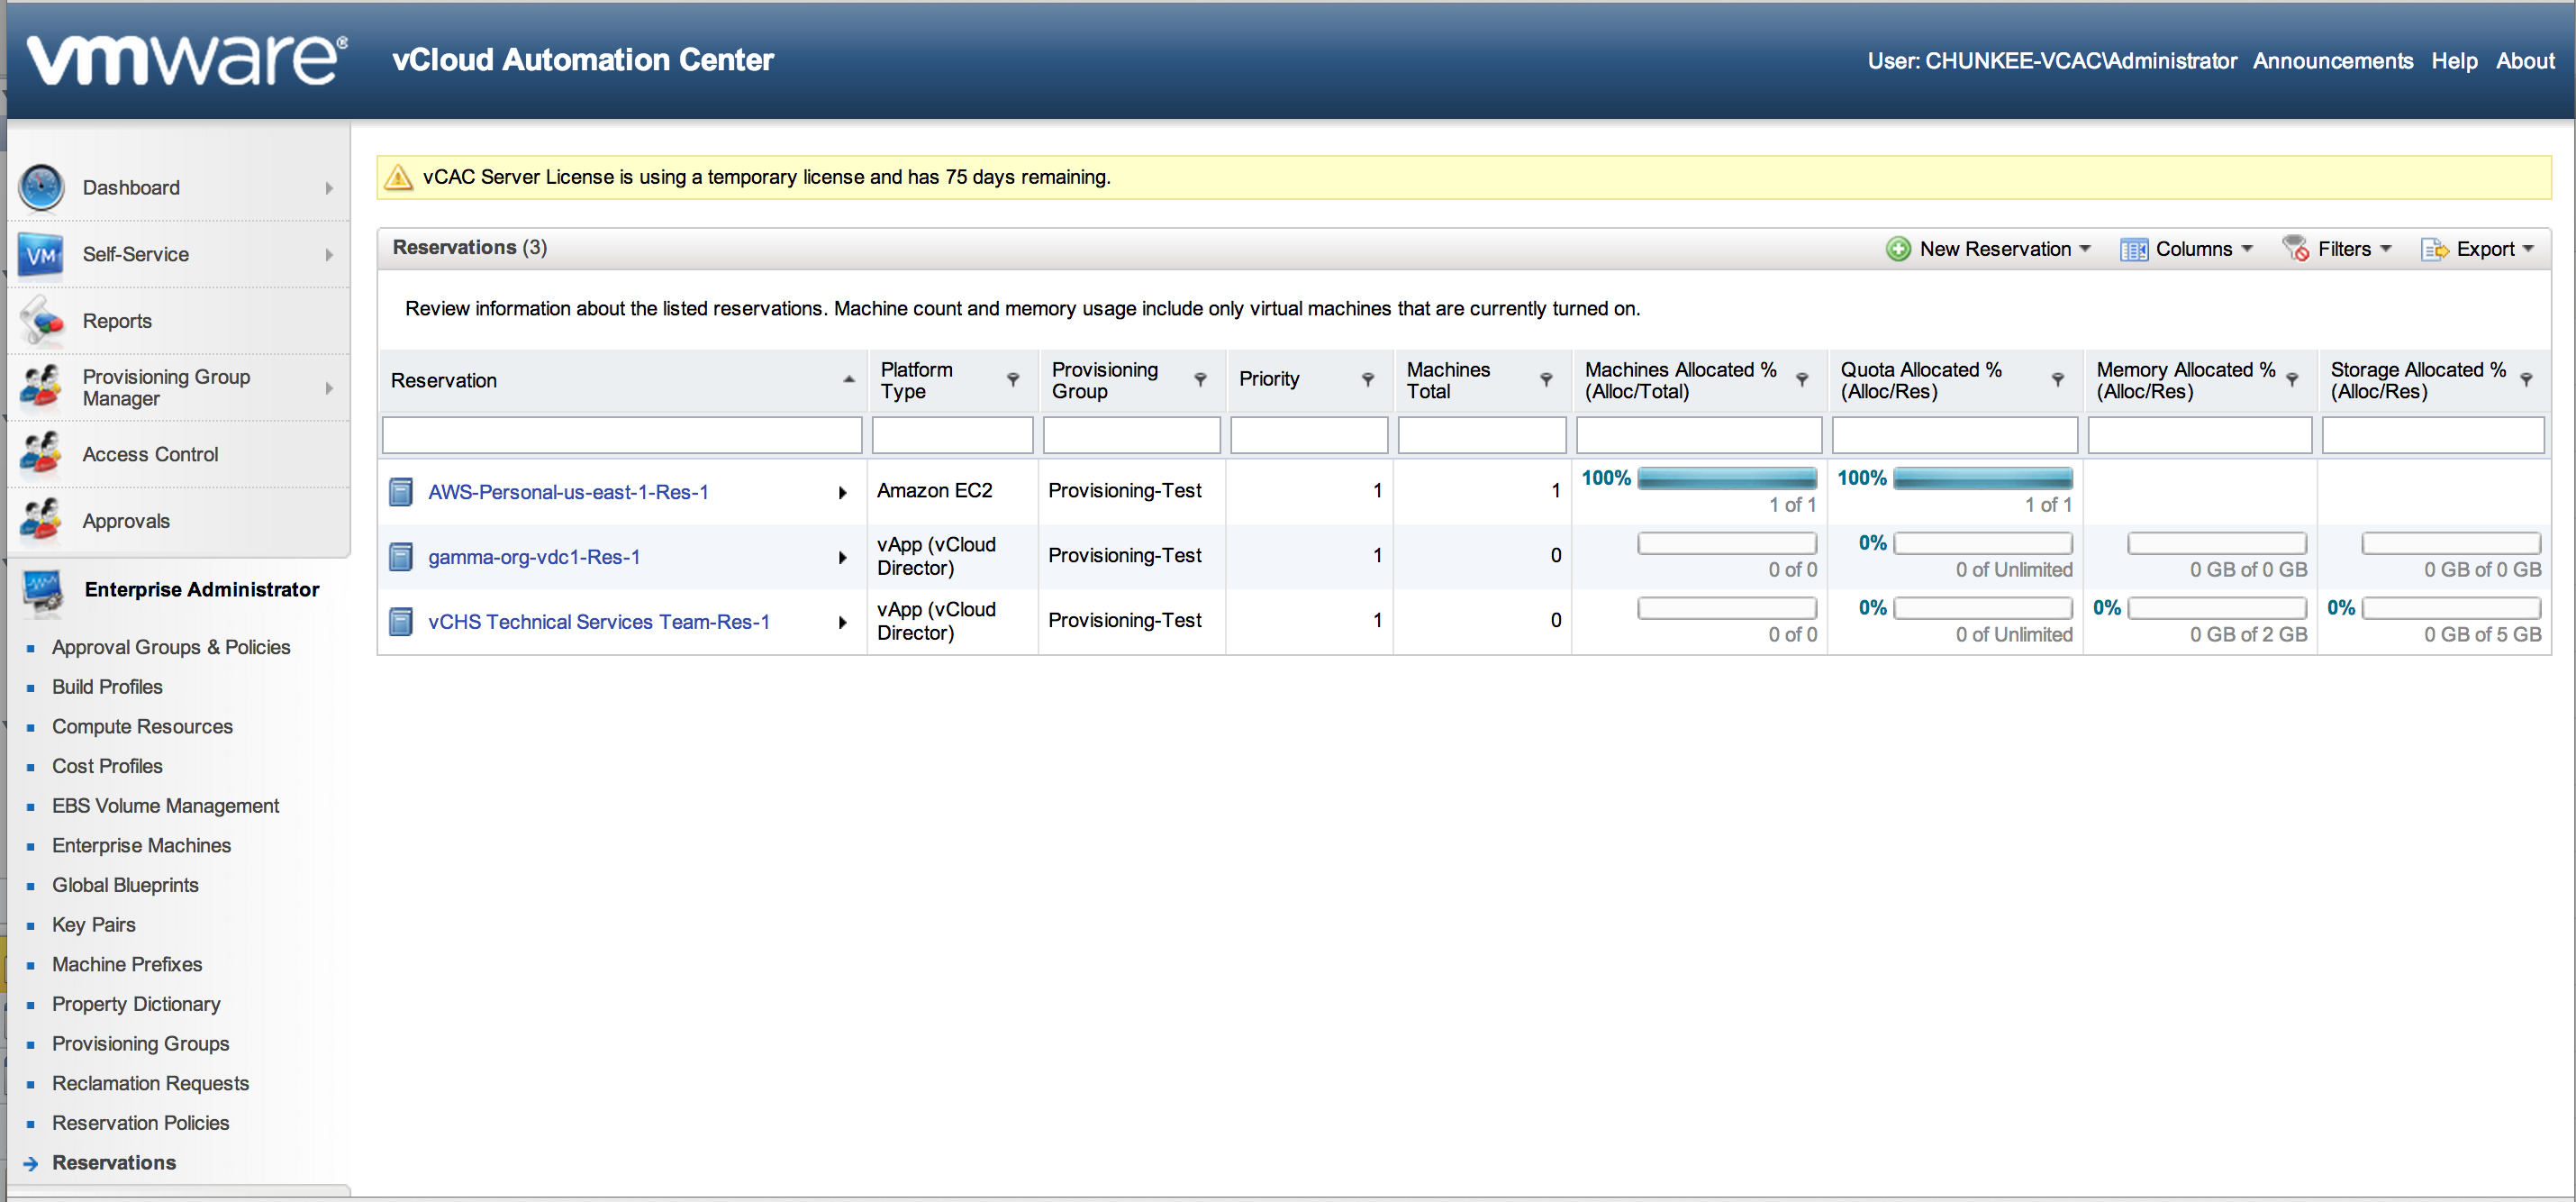
To get started, click “New Reservation”. Note below that “provisioning group” (who is allowed to request resources from this reservation” is a required component for creating the reservation. So in this case we have a clear answer to the chicken and egg problem! Create the entitlement first, then create what they are being entitled to. Here is a shot of my configured reservations:
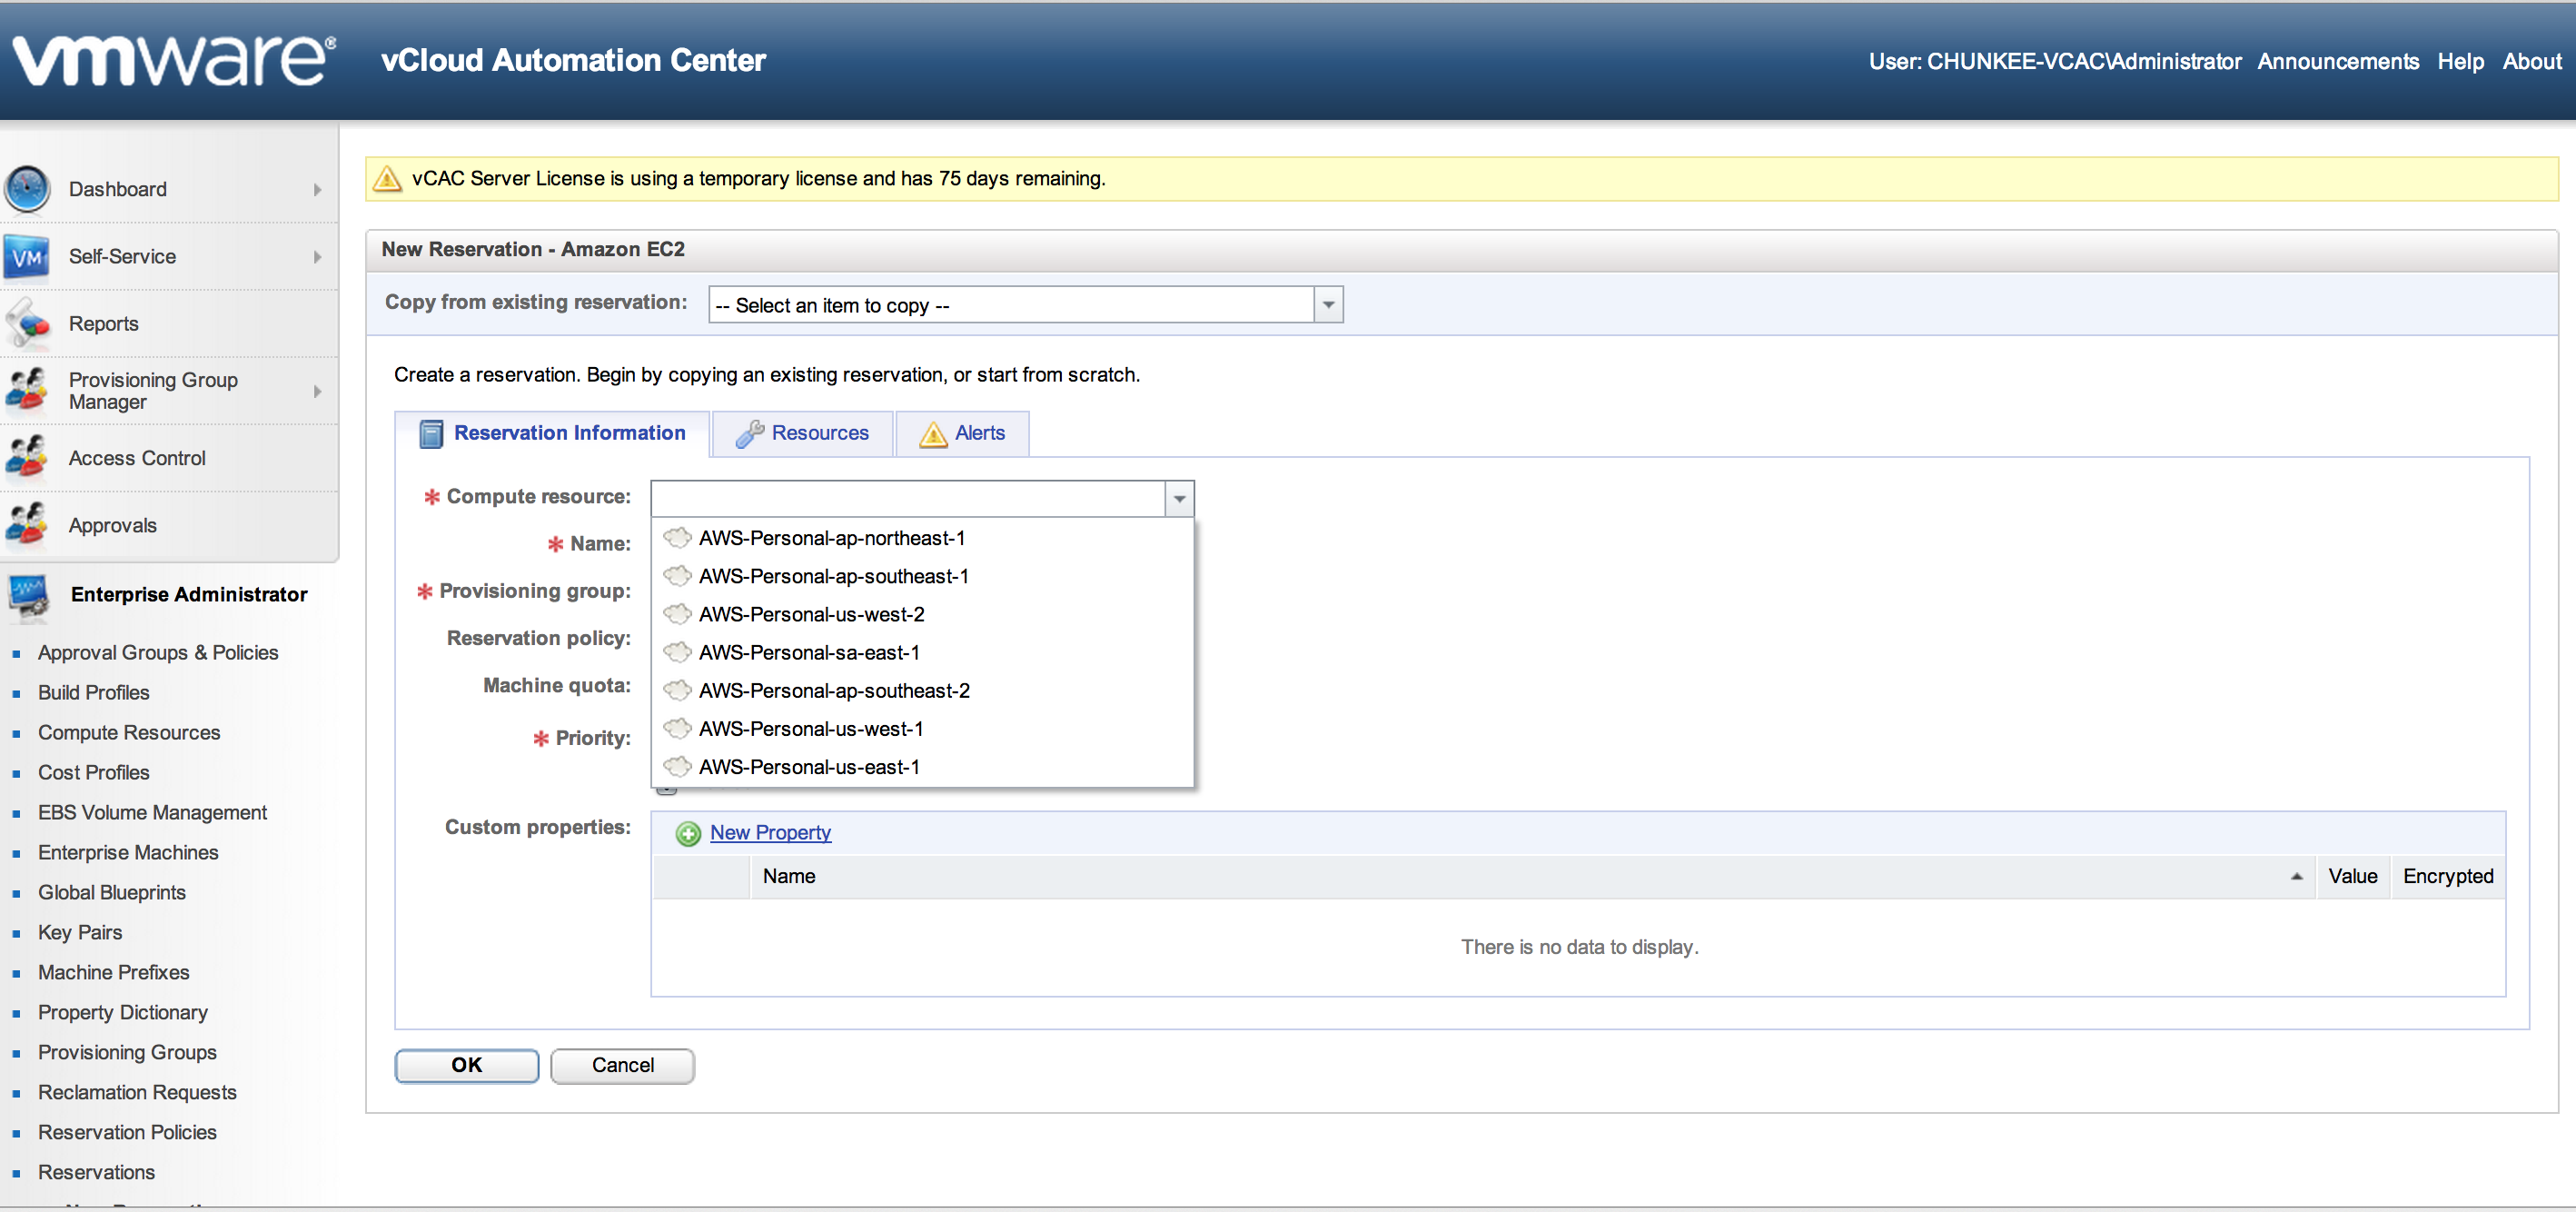
 To get started, click “New Reservation” and select the appropriate resource pool (either a cloud, physical or virtual end point) In our case we choose “Cloud” and “EC2”:
Some noteworthy items here worth deeper explanation:
Compute resources: If things are working correctly, this drop down should populate with the compute resources made available by the end point. If this is empty something went wrong with data collection.
Provisioning group: this is where the user entitlement created in the step above is entered
Resources: the resources tab provides additional configuration options based on the selected resource. In the case of EC2, we can select availability zone (location), security groups, the key pair (which can also be auto-generated during provisioning) and VPC assignment (if applicable)

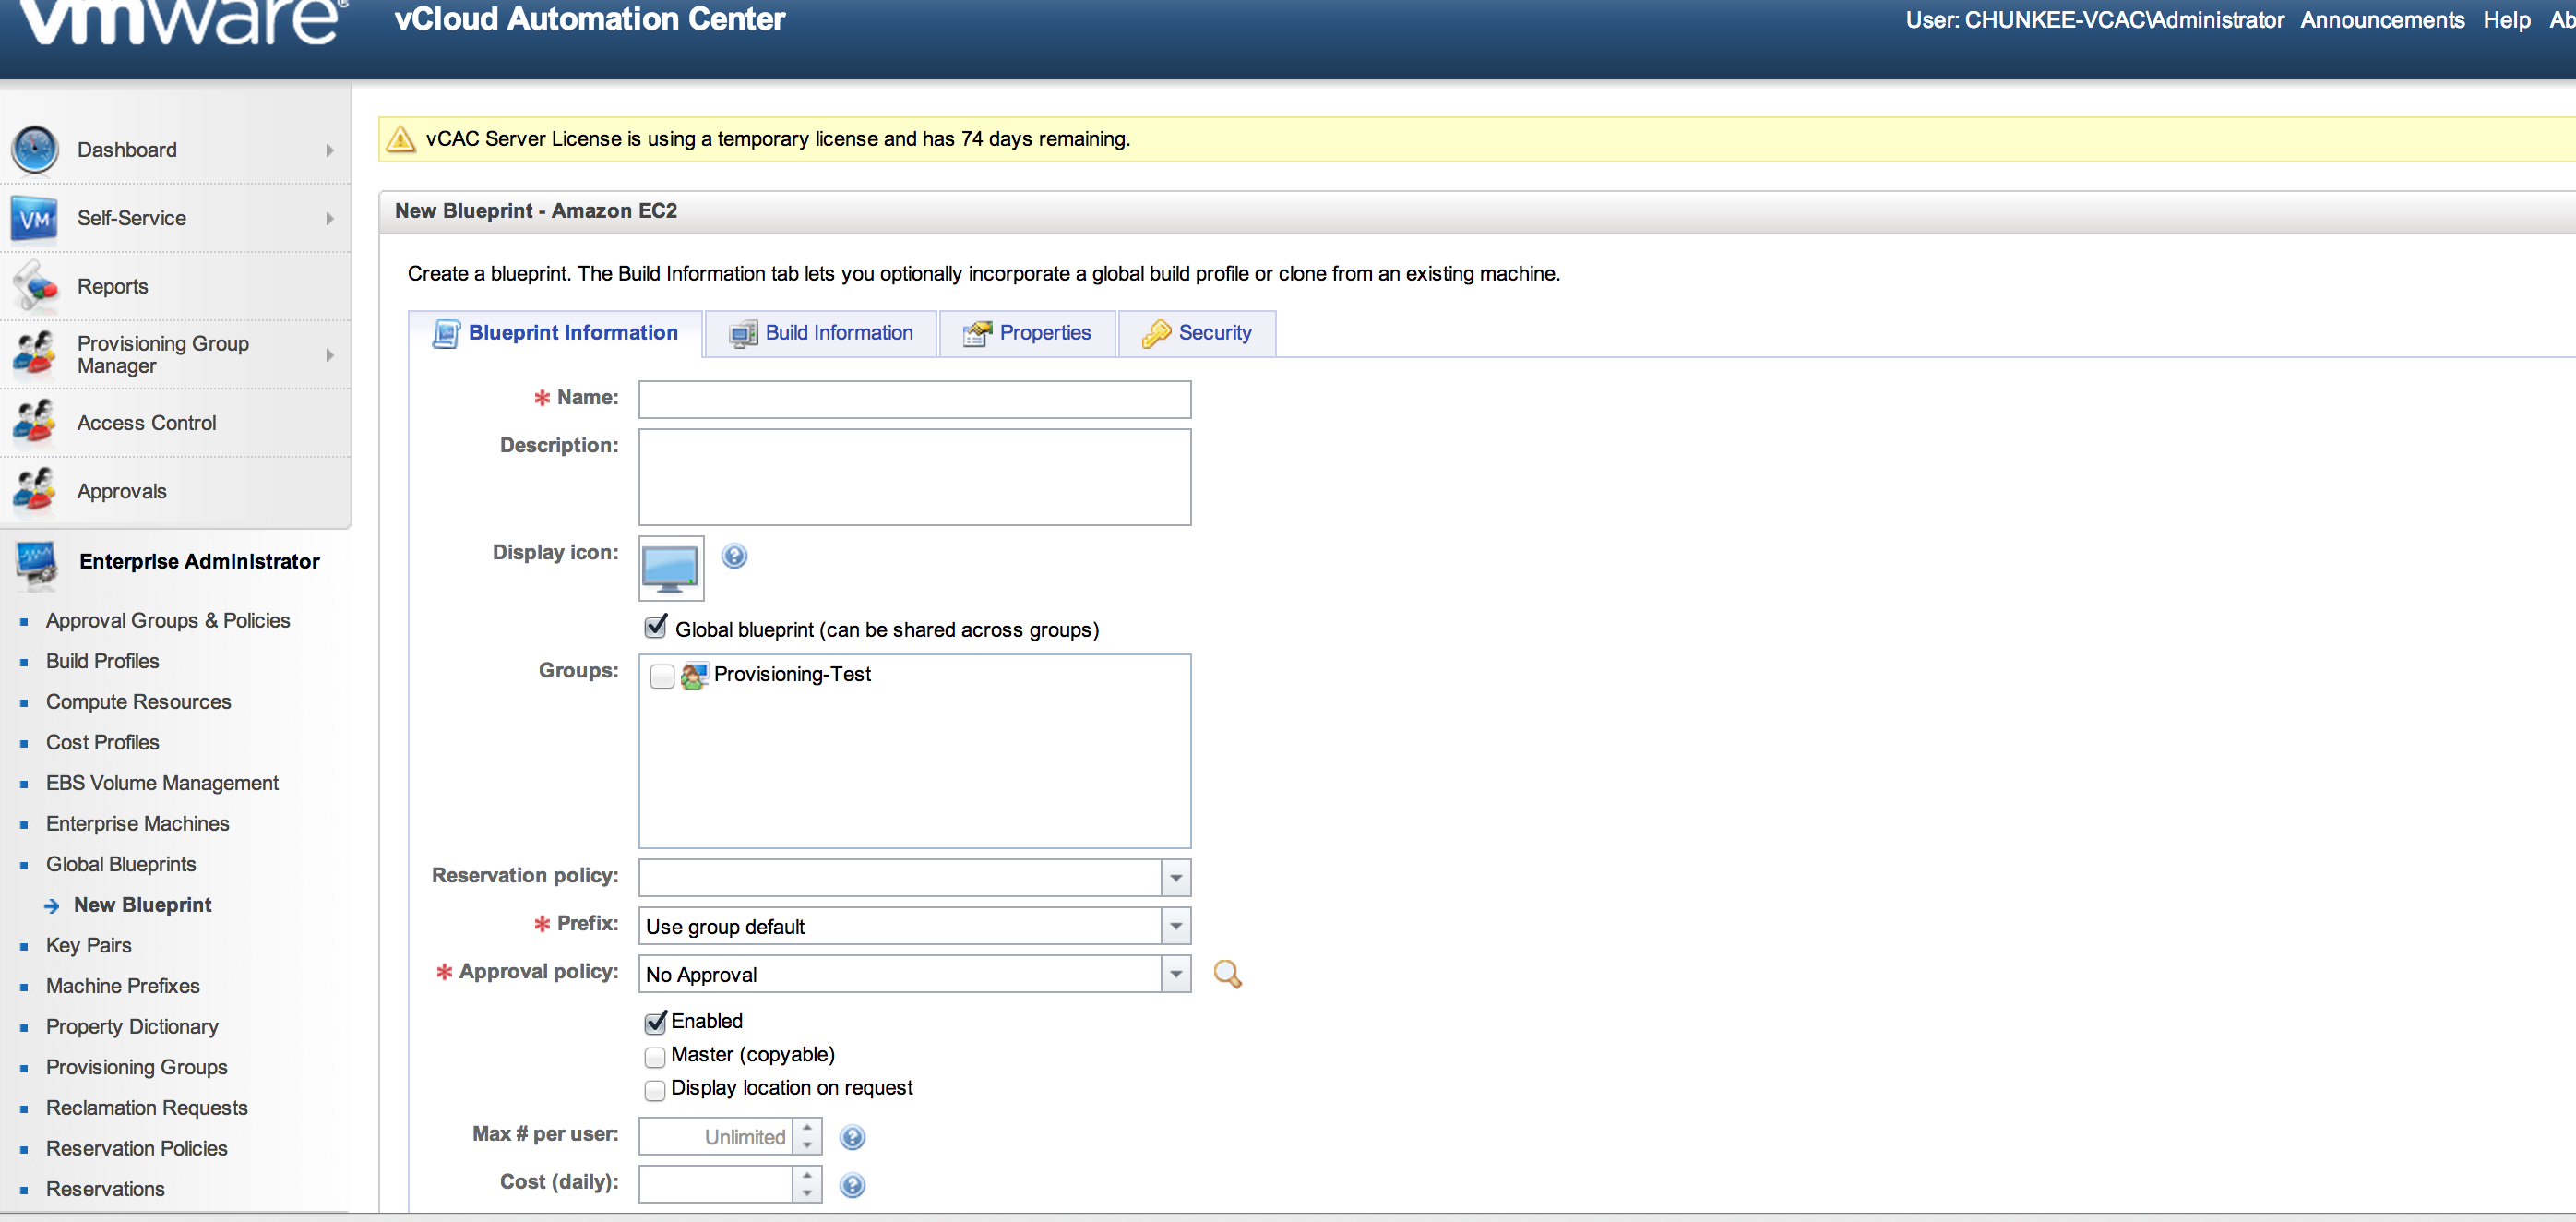
- Blueprints: with the resource sources created and allocated into reservation pools, and provisioning groups assigned with the rights to consume them, the next step is to create blueprints. A blueprint is the complete specification for a virtual, cloud or physical machine, determining the machine’s attributes, the manner in which it is provisioned, and its policy and management settings. When a user requests a machine, they must select the blueprint from which it will be created.

The Blueprint properties also include some interesting items:
Note that there is a place here as well to entitle a group to the blueprint. To be able to do this, the currently logged in user must have already been entitled as the Group Manager of at least one Provisioning Group. It is important to be mindful of these dependencies when setting up vCAC.
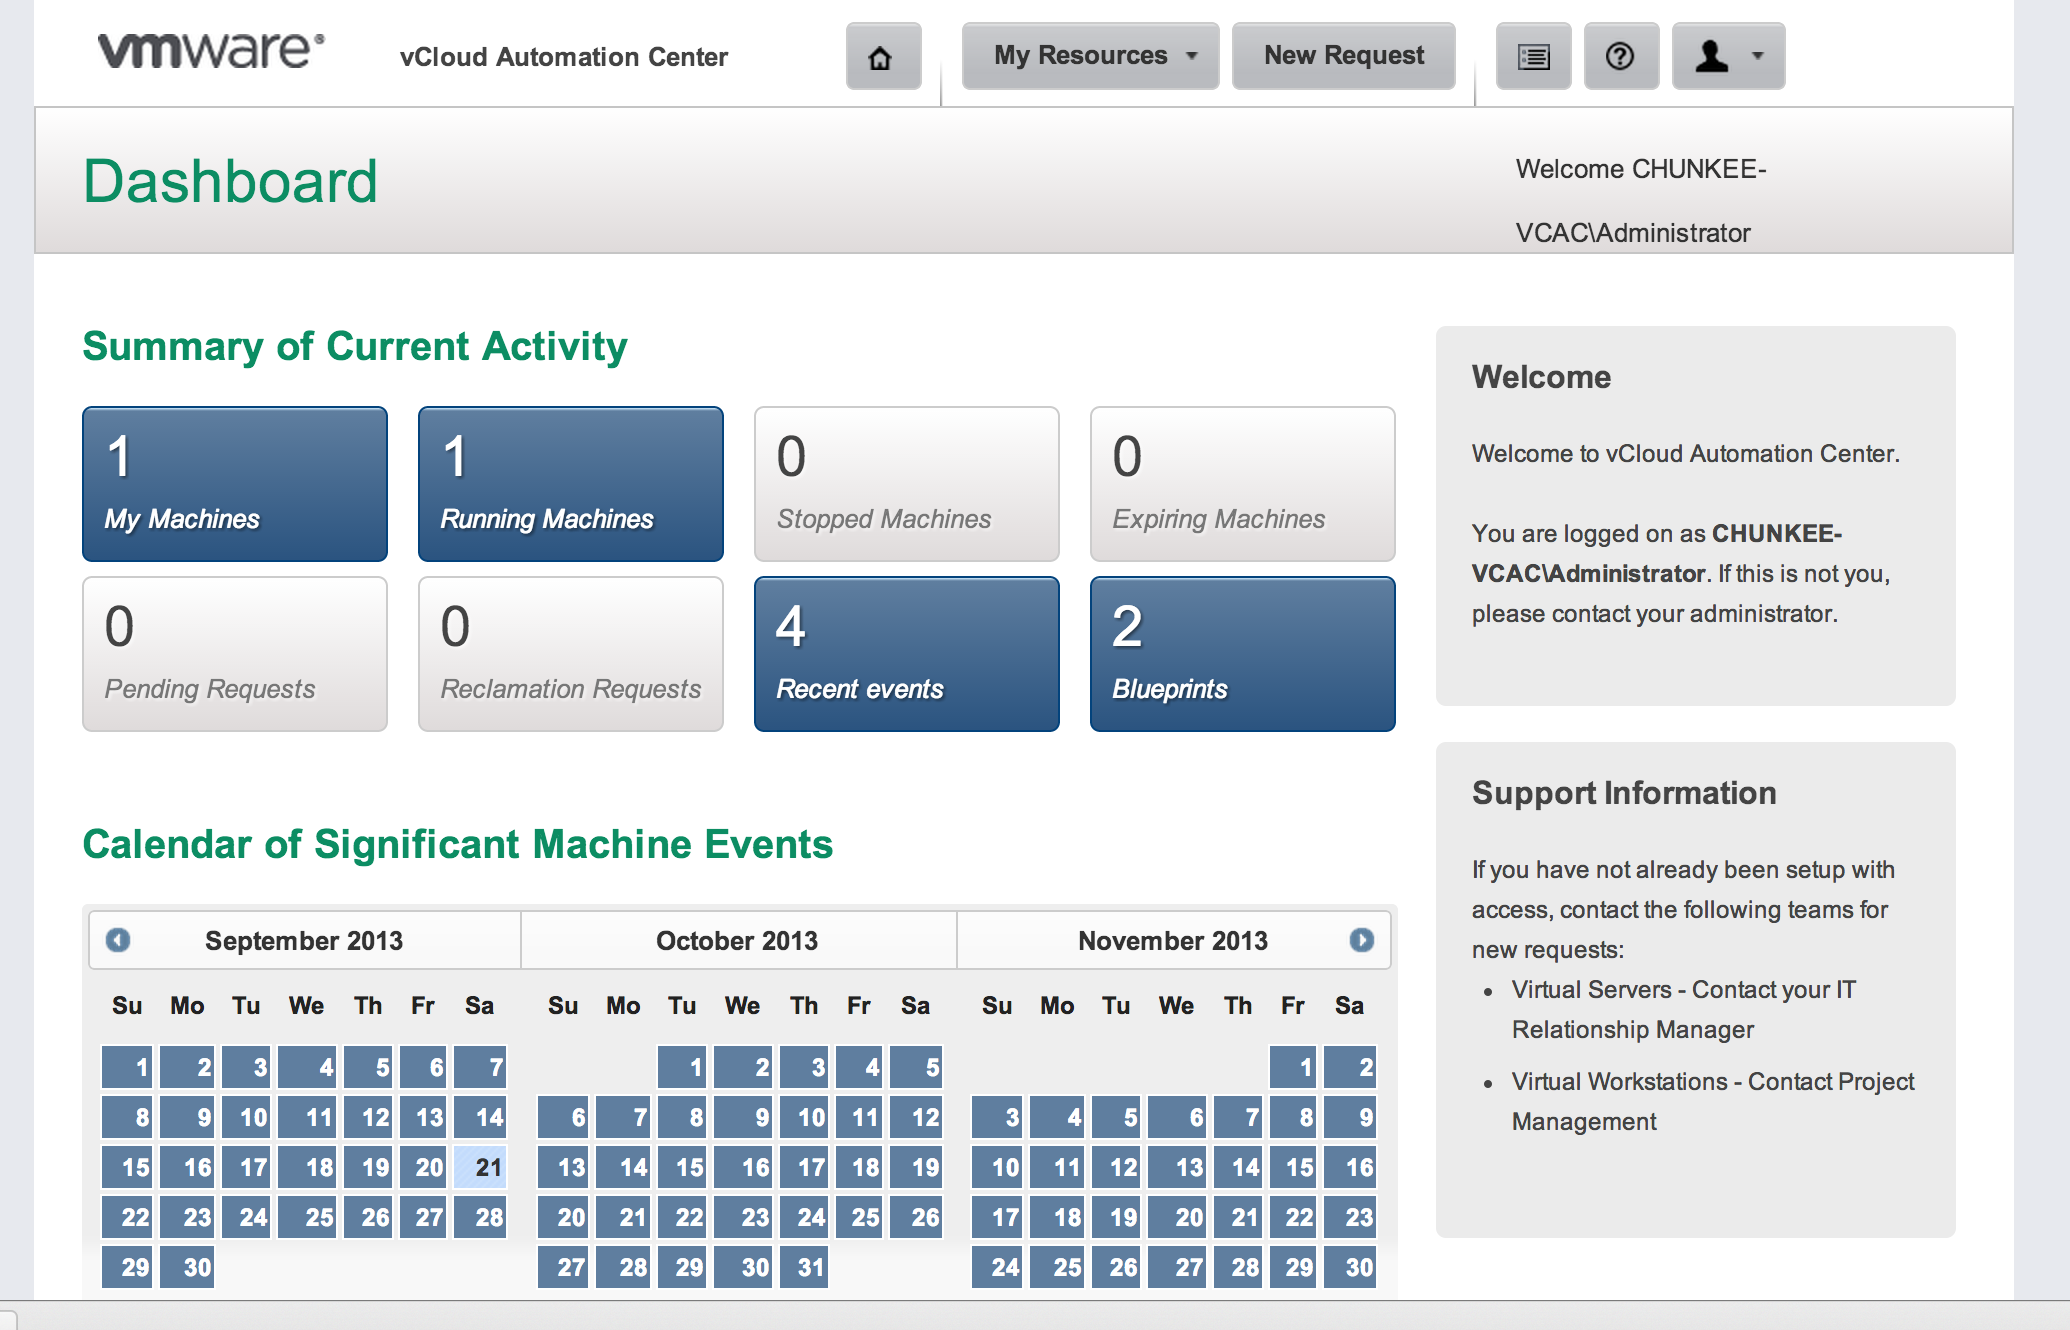
With all of the pre-requisite configuration in place it is time to head to the Self Service Portal and attempt a consumption test. We will provision an EC2 resource for this example. Logging into the Self Service Portal you will be greeted by the main Dashboard page if you have entitlement to a Provisioning Group:
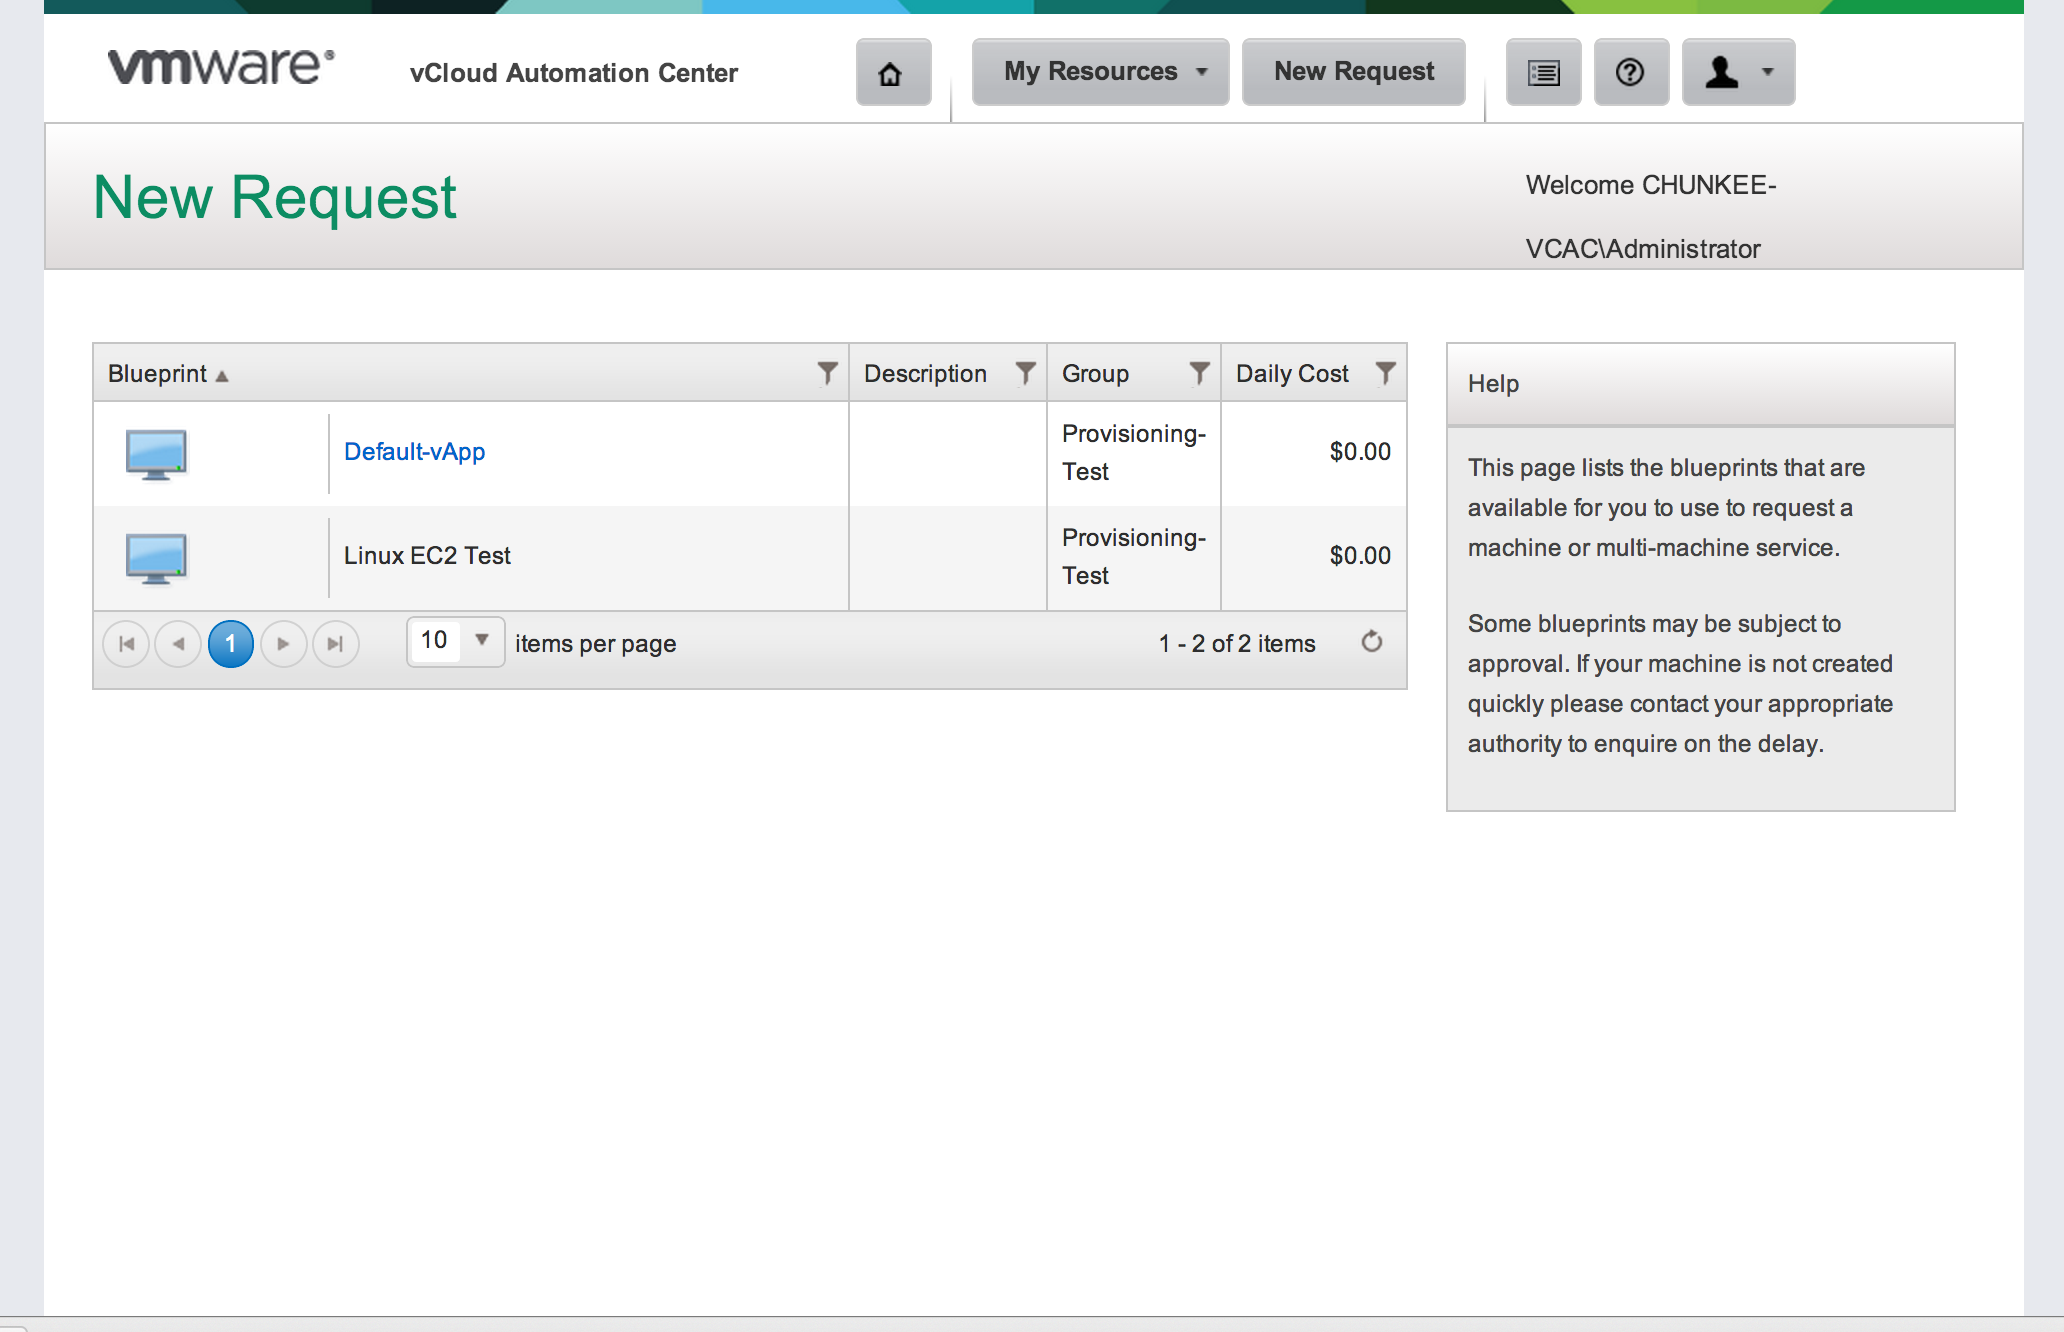
Selecting “Blueprints” will allow you to submit a resource request:
If everything has been correctly setup, and the reservation has resources available, submitting the request will trigger the provisioning workflow:
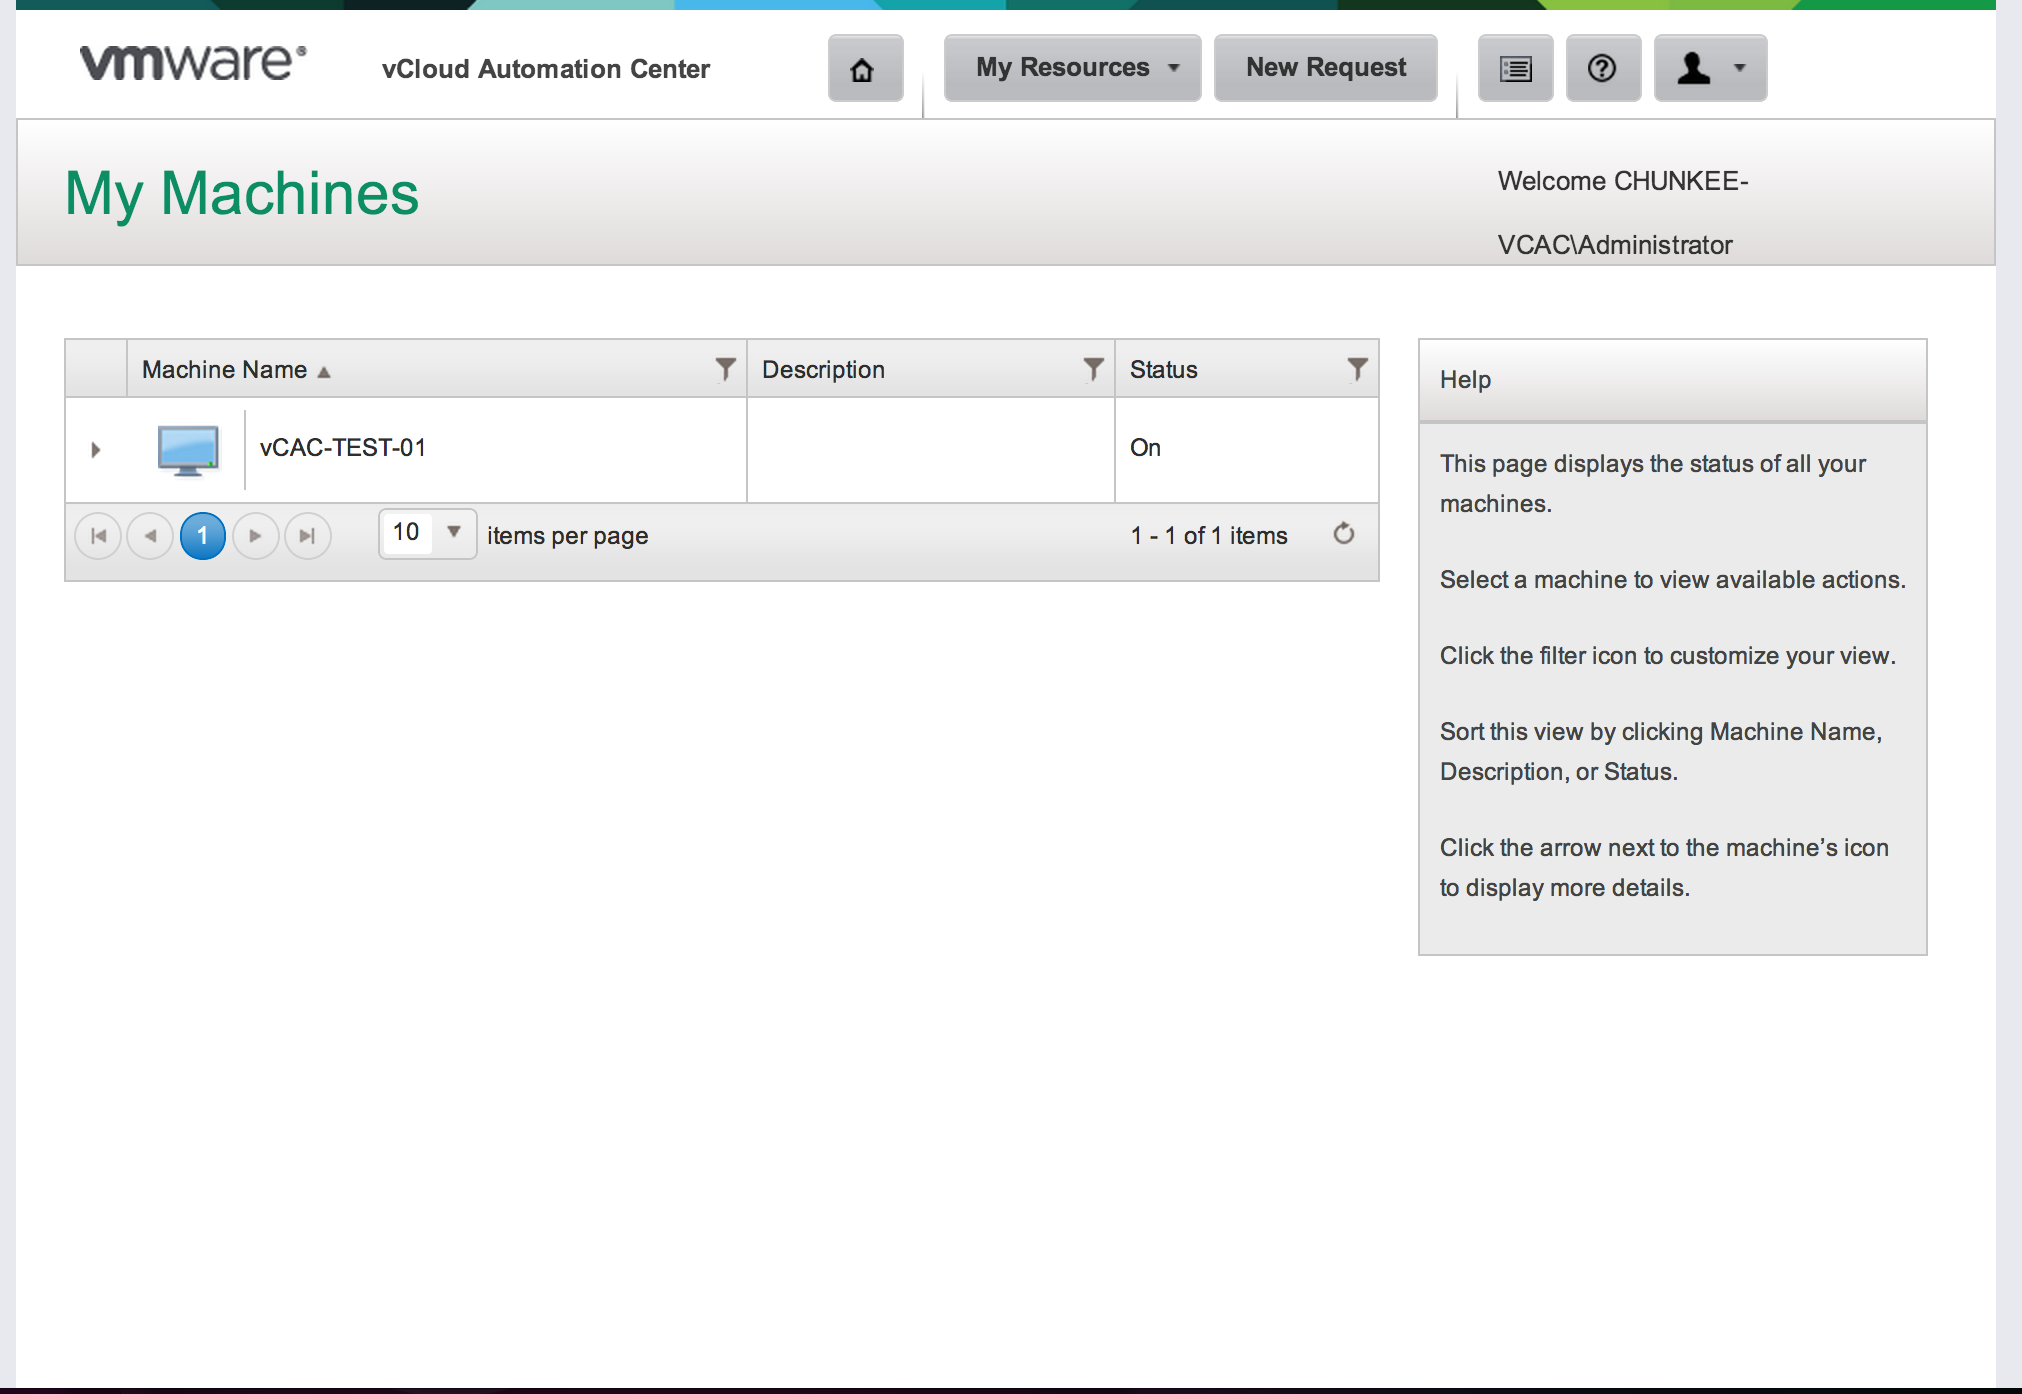
The status will cycle through the various stages in real time and, if all goes well, ultimately result in a status of “On”. Hopping over to the EC2 console we can check if any of this stuff is real:
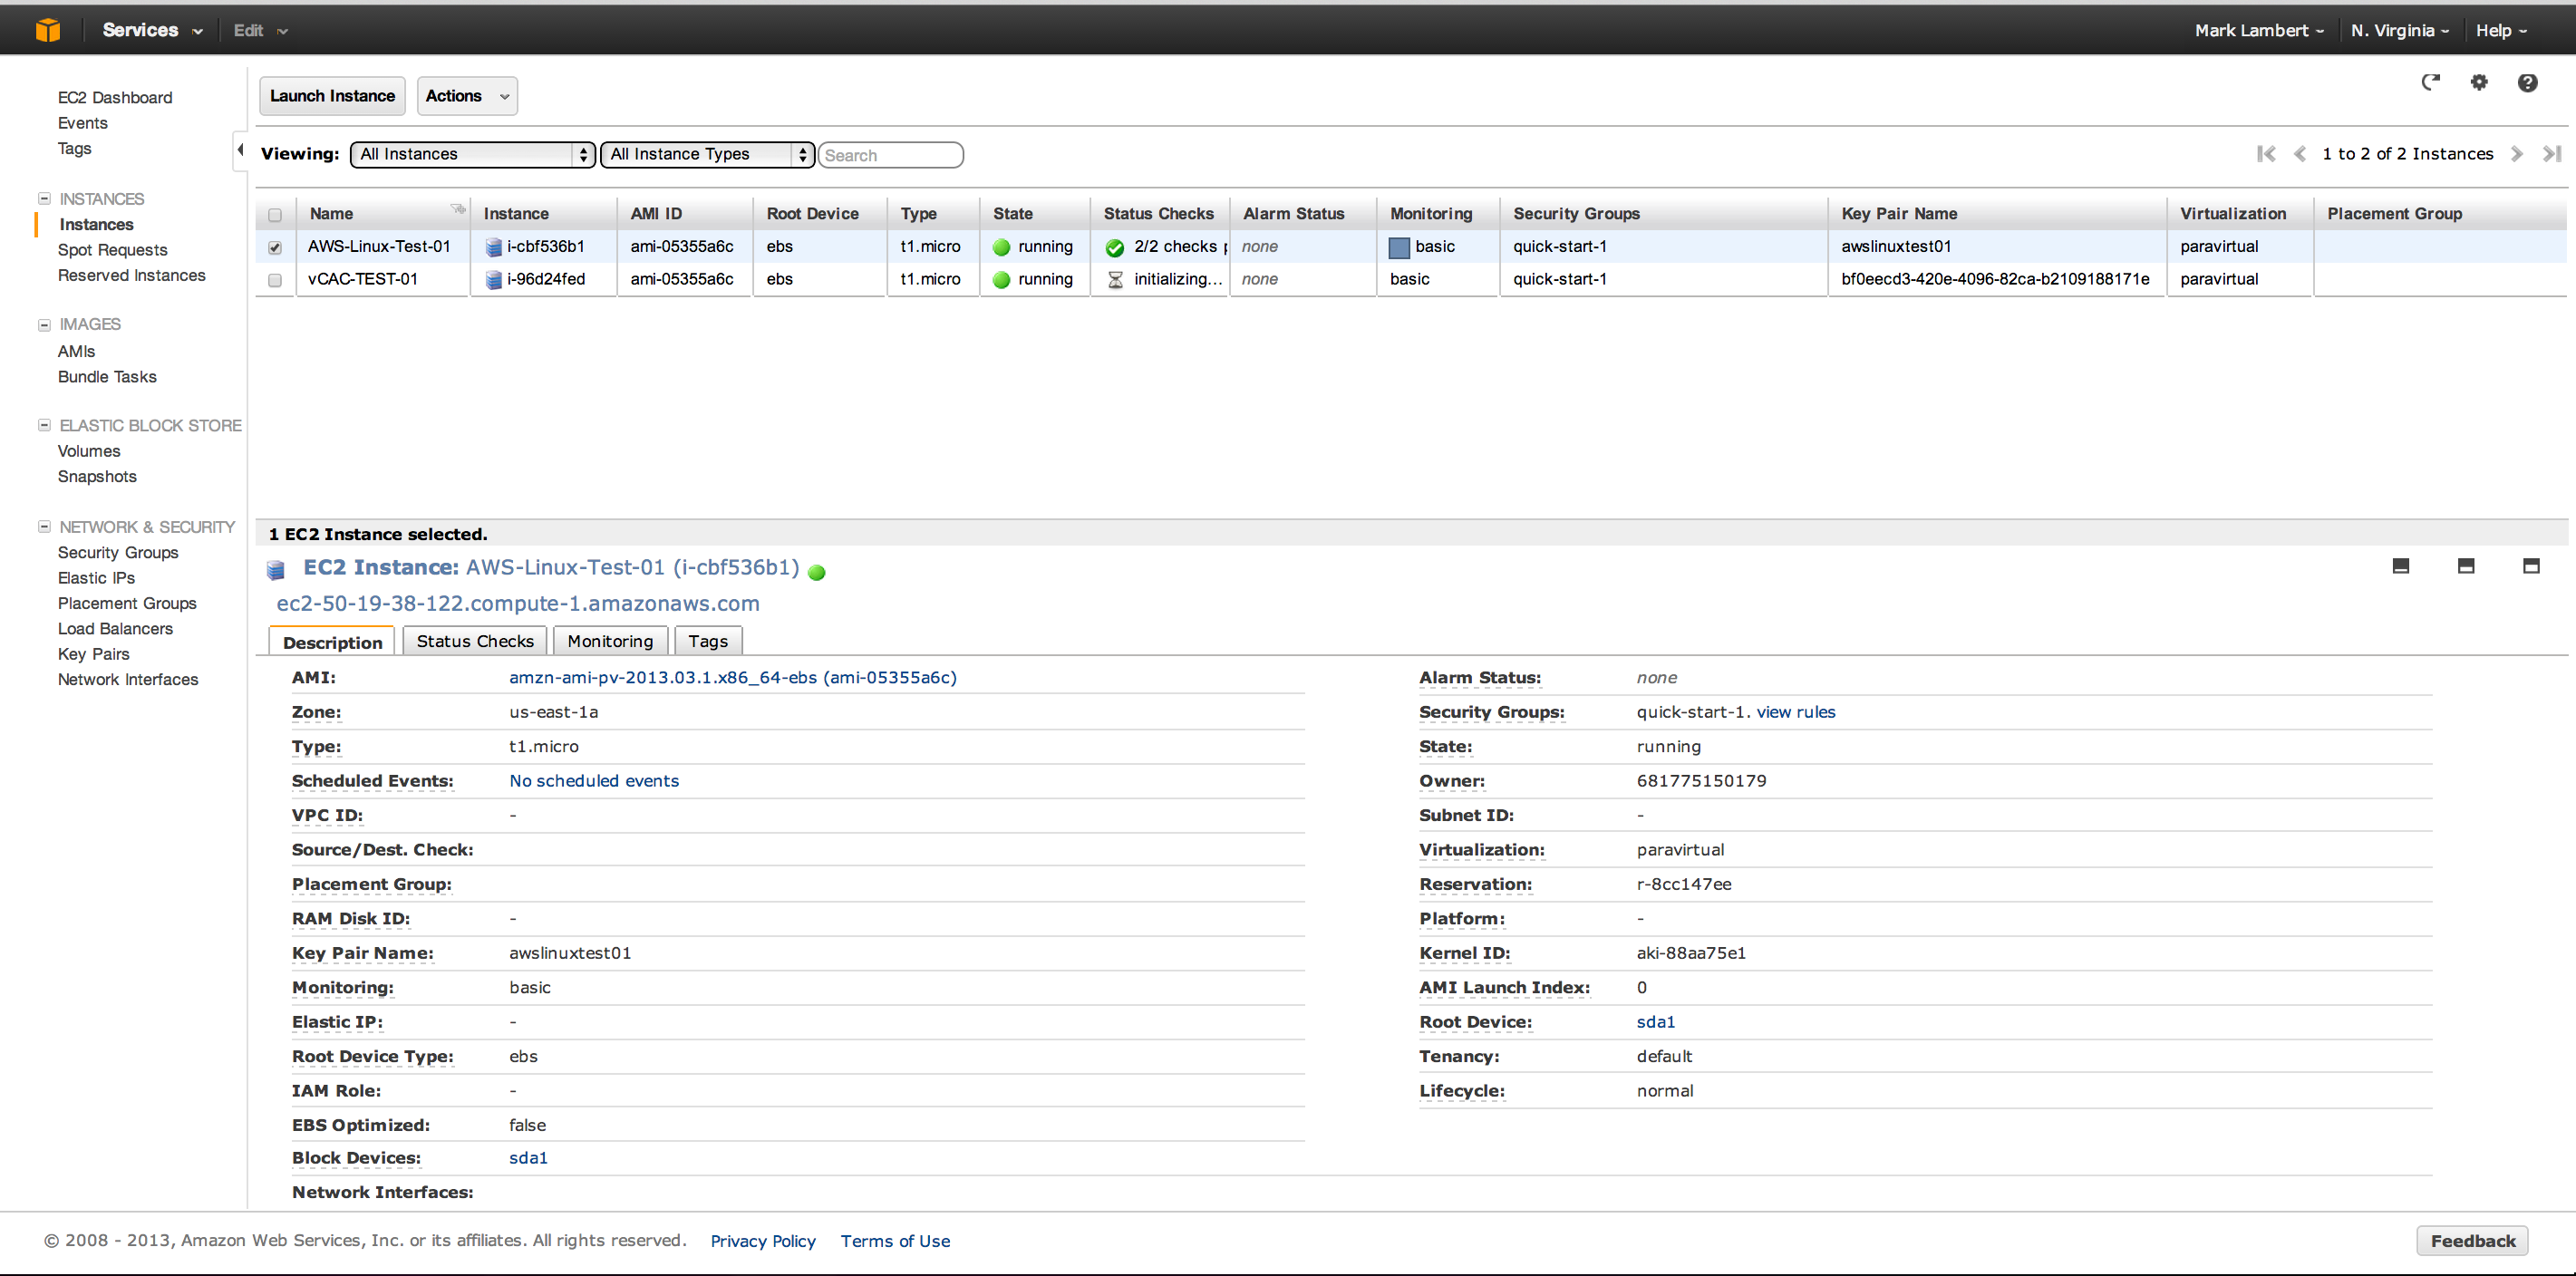
Low and behold it worked! We can see a new instance has been created with the prefix configured in our provisioning group. In trying this out yourself, don’t be disheartened if things go sideways along the road. The process of setting vCAC up, and ultimately getting it connected to an external service like EC2, is complex, but it does work. If something breaks along the way, pay attention to the dependencies and check that each discrete step that is required was performed and completed succesfully.
Good luck and happy automating!
