
A home NAS (Network Attached Storage) device is a great investment even for a casual hobbiest. It provides a central repository for files and backups that offers a much higher level of data durability than most desktops, laptops or mobile devices assuming you implement RAID protection. In addition, the NAS itself can be more easily backed up to an offsite mechanism (cloud share or external drive) since the data is centralized. For those of us who run home labs or small offices, the high end of the consumer NAS space can actually do a decent job of standing in for a proper enterprise device. At the Complaints HQ I have long relied on the ReadyNAS Ultra 6. It’s a workhorse and, while not necessarily the fastest kid on the block, it has a very robust app ecosystem (thanks nearly single handedly to the superhuman efforts of Super Poussin). In addition, even the 6 drive model has a compact form factor and doesn’t produce an obnoxious amount of heat and noise. I’ve documented my setup in these pages before, but just as a review:
- Brand: Netgear
- Model: ReadyNAS Ultra 6
- Firmware: RAIDiator 4.2.26
- Disk Config: 6 x 2TB Seagate Barracuda Green in X-RAID (~10TB usable)
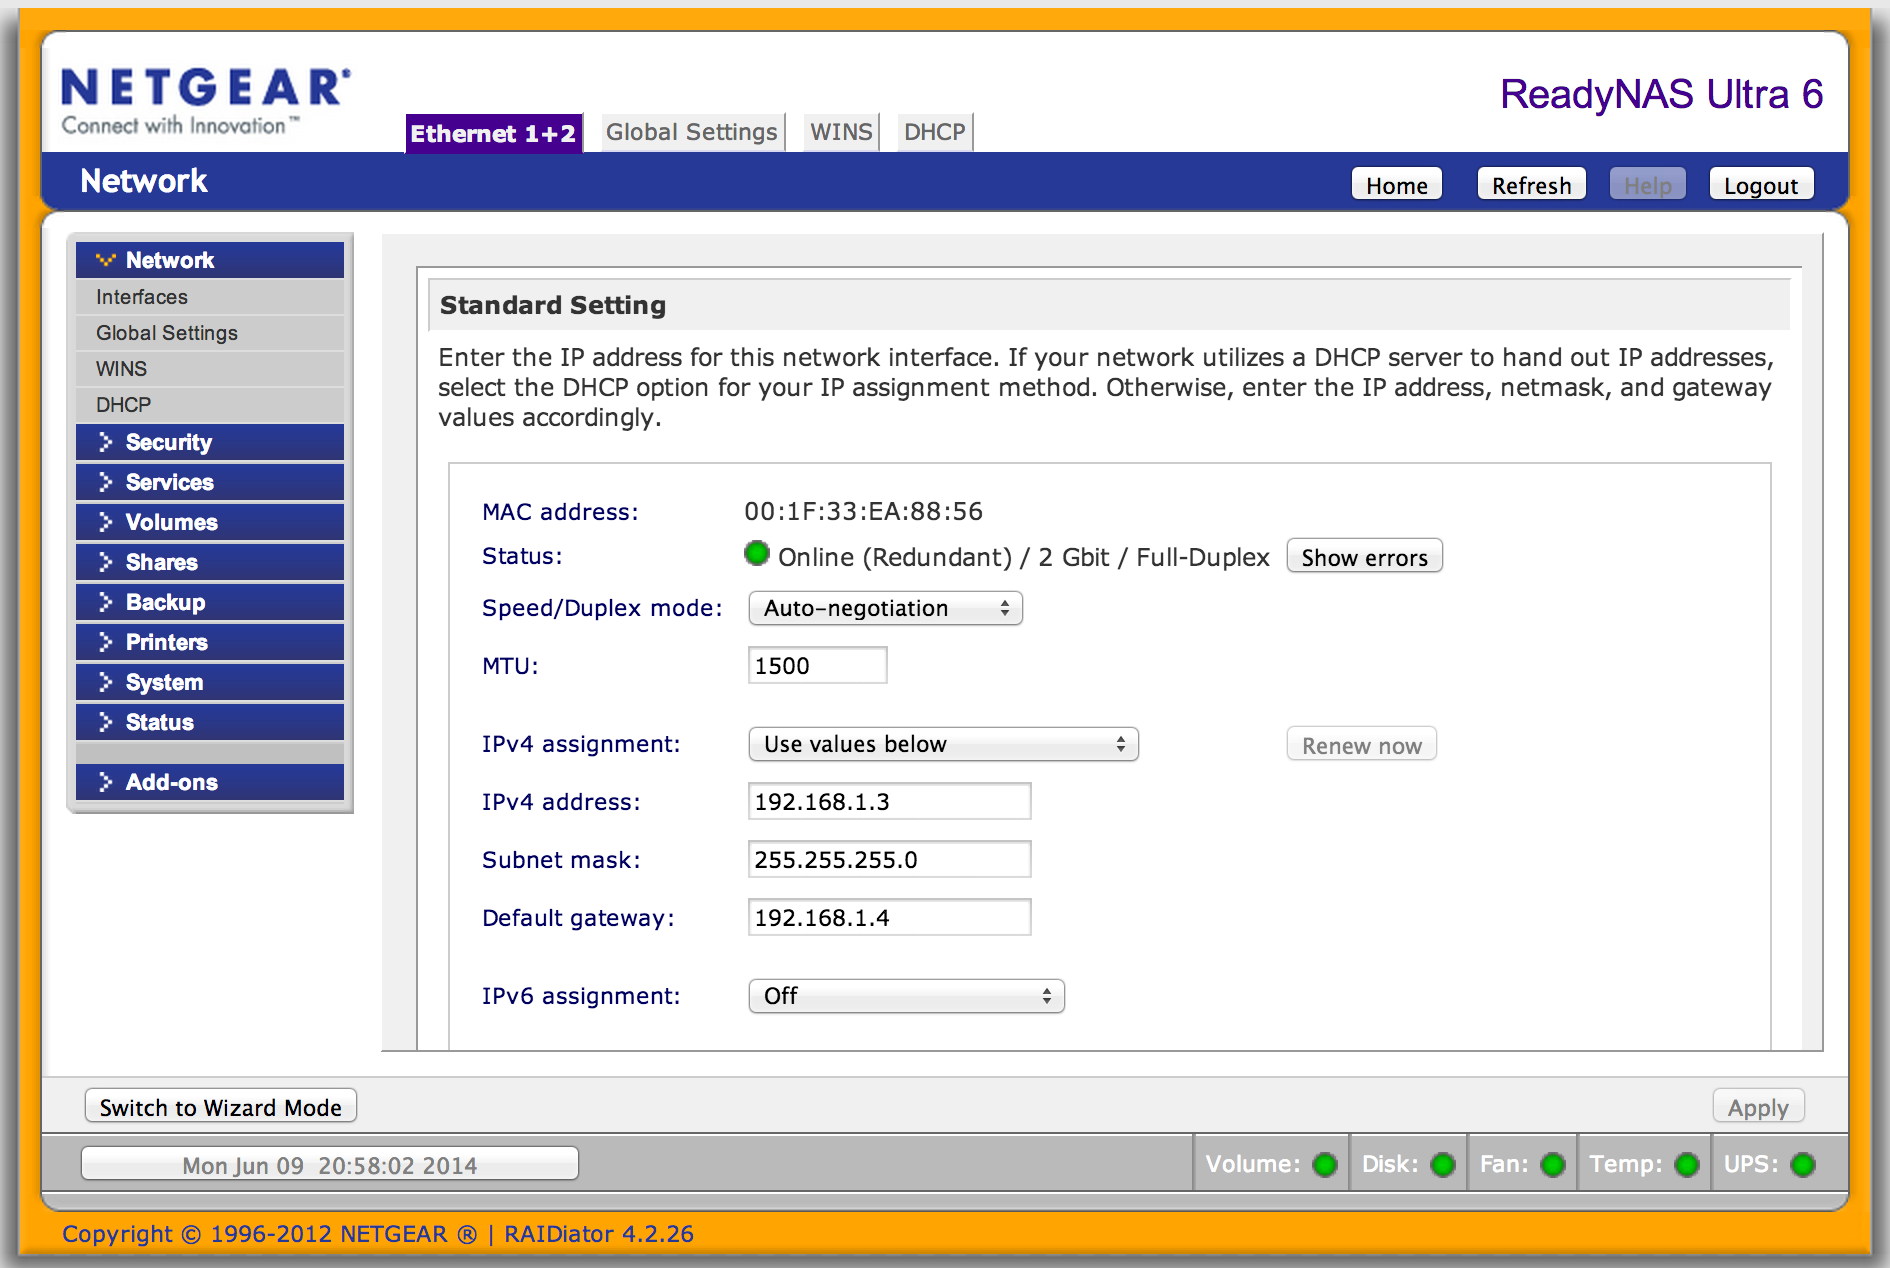
The Ultra 6 also has 2 1Gb/s NIC ports, but does not included native teaming capabilities. Luckily this is where the robust app ecosystem comes into play! An oldy but a greaty, “Team” for the old Pioneer NAS (which Netgear bought and repackaged under the ReadyNAS brand), purports to work on firmware revs up to version 4.2.11, but still works just fine on 4.2.26:

As with most ReadyNAS add-ons, if it is compatible, “it just works”. The installation is straightforward and the only real options are to set the Teaming Mode and decide whether you want Jumbo Frame support. Lots of teaming options are supported:
- Round Robin: requires static link aggregation at the switch, layer 3, alternate between links for outbound traffic only.
- Active Backup: no switch configuration requirement, basic active/stand-by failover protection
- XOR: no switch configuration requirement, select outbound NIC by performing a bitwise XOR on the source and destination MAC addresses (layer 2 based load balancing). Obviously a given destination will always utilize the same NIC
- Broadcast: no switch configuration requirement, channel mirroring, transmits every request over both links. Useful only in pretty specific scenarios where the two interfaces are connected to disconnected switches yet packets are needed on both segments.
- 802.3AD: requires dynamic link aggregation at the switch, used 802.3AD to negotiate a teaming config using LACP (Link Aggregation Control Protocol)
- Transmit Load Balancing: no switch configuration requirement, balances outbound traffic based on the load on the NIC. Inbound traffic is handled in an active backup fashion.
- Adaptive Load Balancing: no switch configuration requirement, builds on TLB by providing inbound load balancing by alternating ARP replies on the fly.
Once configured, the add-on actually modifies the Network Configuration tab. Really nice touch:
With the recent addition of the Dell T620 to the lab, I have more eggs in the basket of the main server (10TB worth of eggs actually – entry on vSphere Data Protection coming soon!), but the sizable chunk of data on the NAS is even more critical (5TB and 10 years worth of photos, documents, archives and backups). Traditionally I’ve relied on X-RAID to provide peace of mind and have copied off the most critical of critical files to a USB drive periodically for offsite protection. Recently though, in an unfortunately recurring theme, the threat environment has ratcheted up once again. The situation in Australia is a harsh reminder that “ransomware”, like CryptoLocker, is quickly become the most significant threat to our data. Once a system is compromised, any write accessible storage volume (including file system mounted cloud volumes) will end up irreversibly encrypted; it’s files permanently destroyed for all intents and purposes. It wasn’t long ago that some knowledge, common sense and good habits were enough to dodge the vast majority of attack vectors. Phishing attacks, and even spear phishing, can generally be avoided by being well informed and conscientious user. The proliferation of smarter and smarter web content (generally a good thing) and near ubiquitous (and increasingly sophisticated) ad serving technologies (a questionable thing) is combing to create a new kind of attack vector that, in the worst case, can be nearly impossible to dodge. A malicious ad server run by even a moderately sophisticated attacker can do a massive amount of damage if it can seize on a 0 day exploit in a browser. Even with reasonable day-to-day security settings on your account and browser, surfing to the wrong site, with the wrong version, on the wrong day can leave you exposed to a ransom attack. Of course security and convenience is a tricky balancing act and there are definitely measures one can take to greatly reduce risk exposure. Never running day-to-day as a local admin, not leaving network or cloud volumes permanently mounted with write access, and operating browsers in their strictest sandbox modes can go a long way. Realistically though, these measures taken in total can make day to day work more difficult and each step back introduces a bit more risk exposure. Ultimately, the last line of defense against these destructive encryption attacks is a really solid backup strategy.
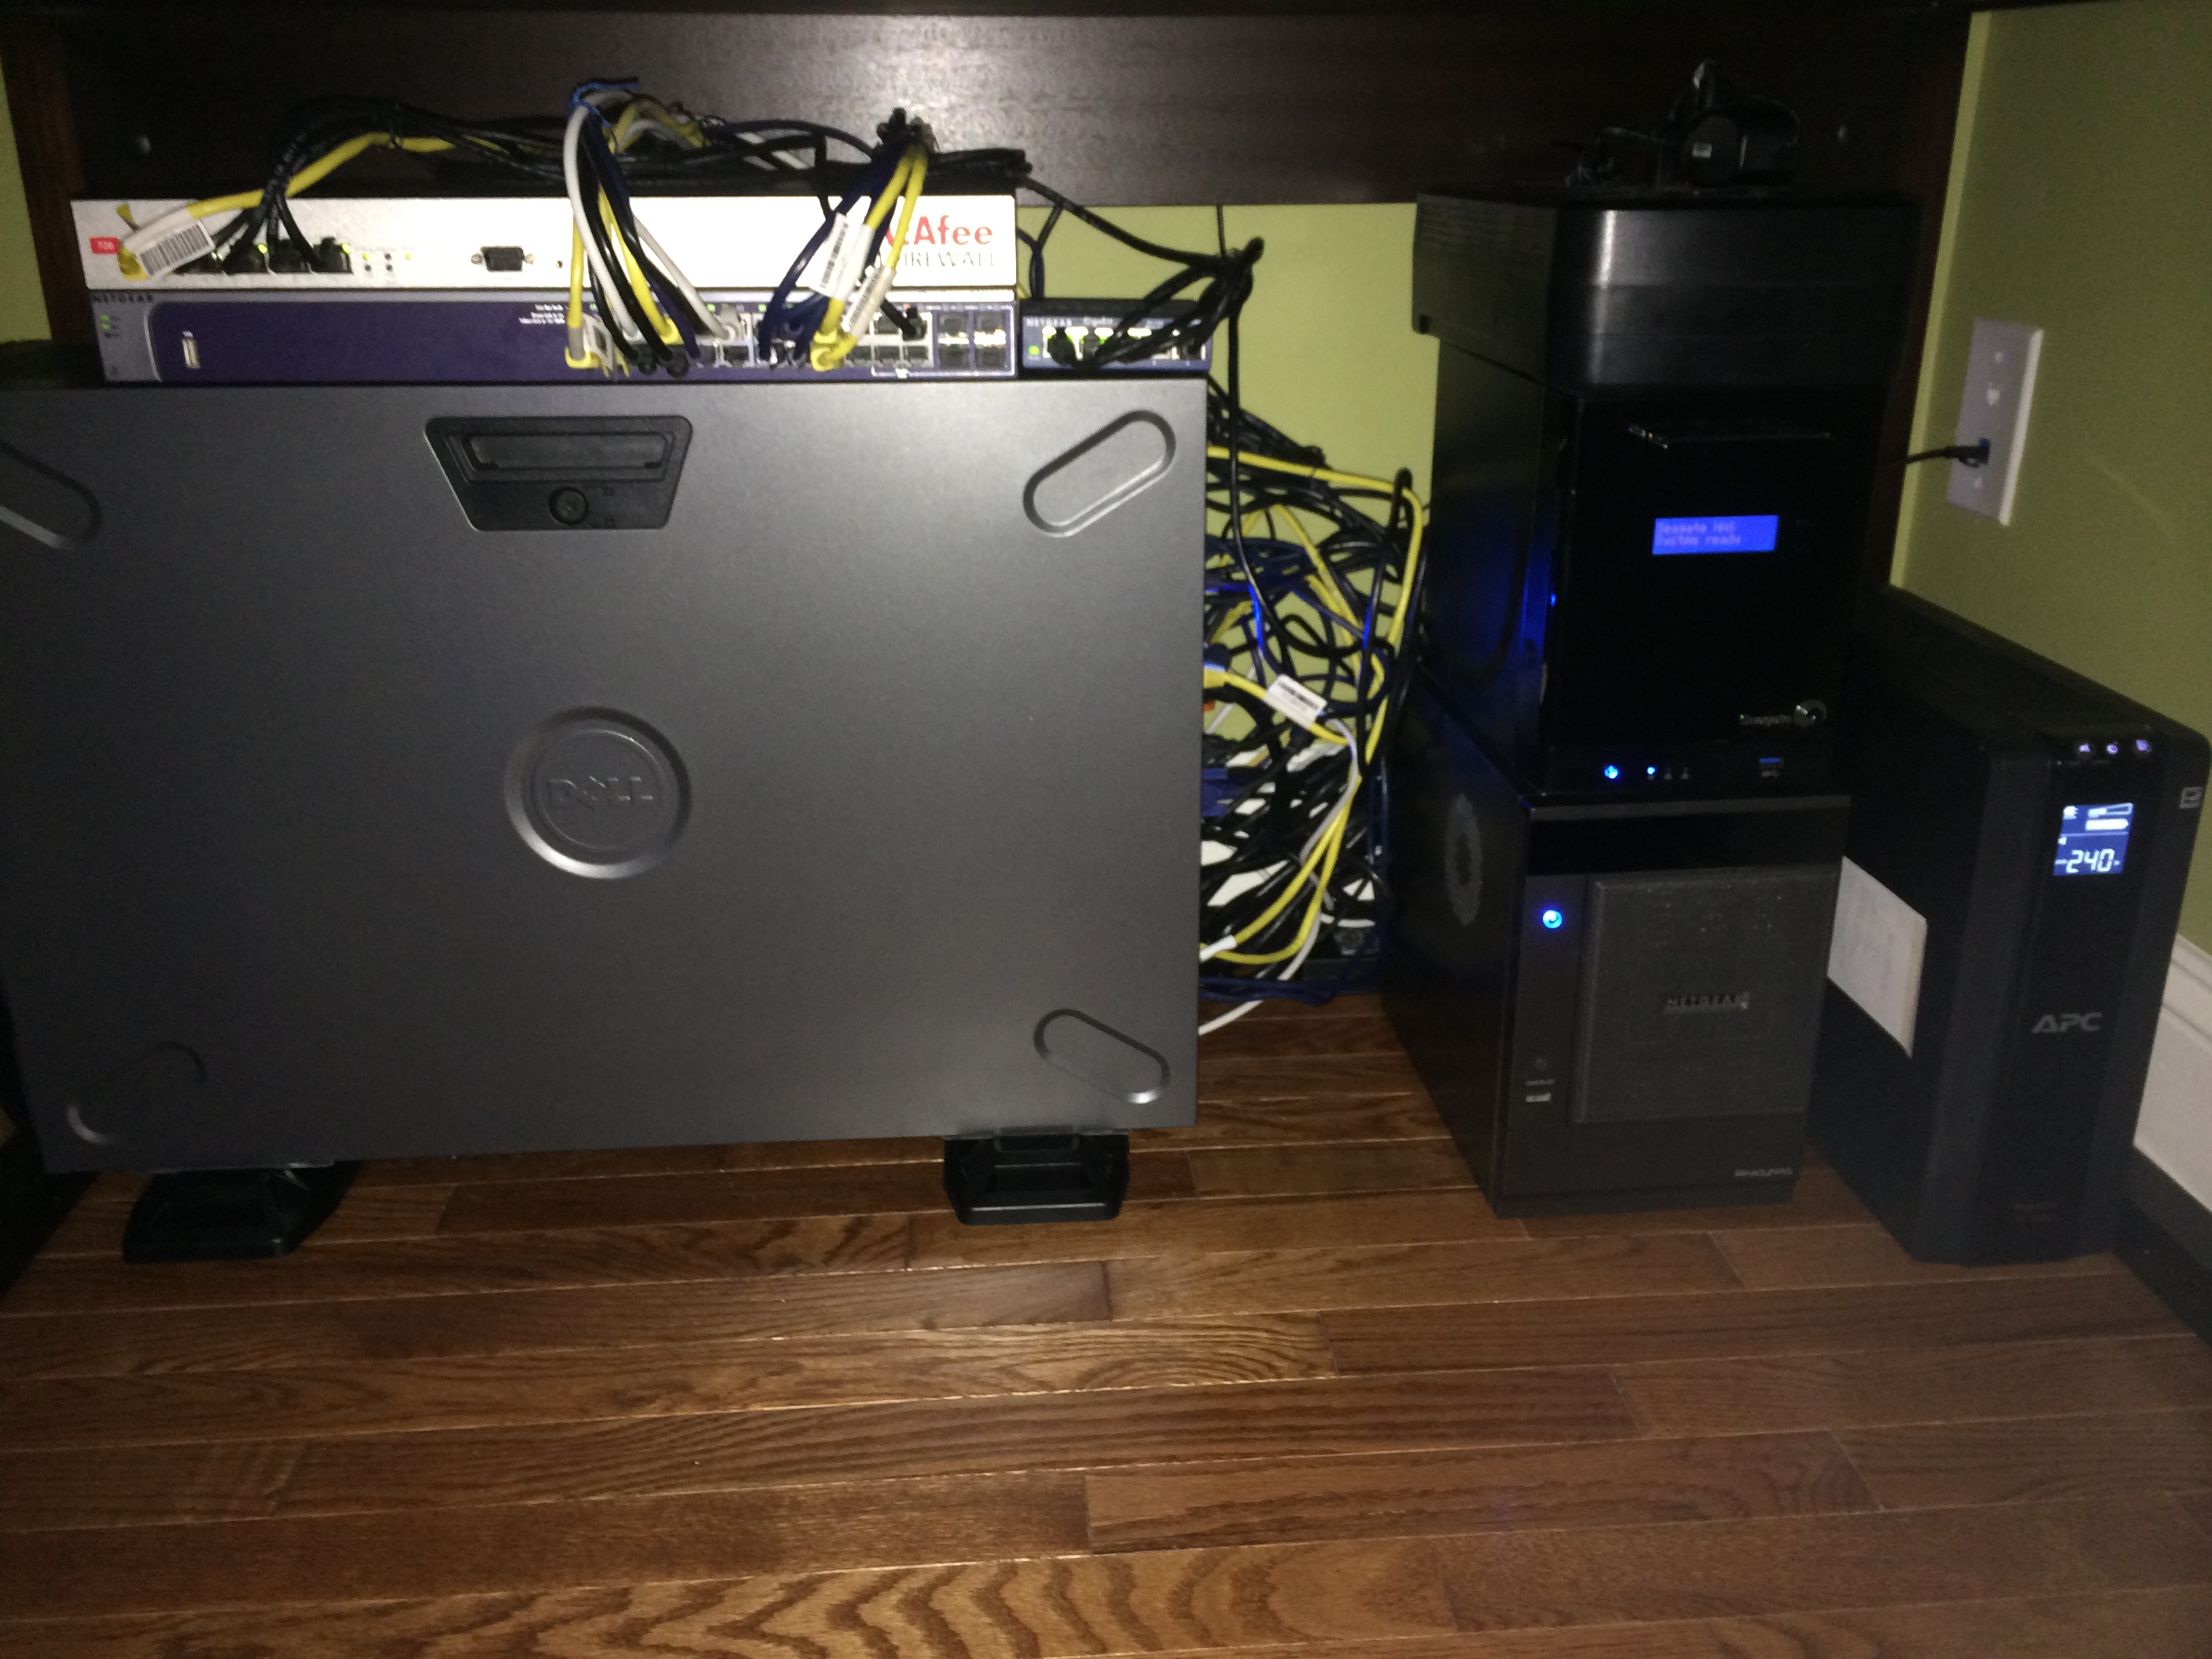
So with that in mind, I decided it was time to throw some money at the risk exposure. If nothing else it makes for a good blog entry! I decided that I didn’t need as extensible of a platform as the ReadyNAS for the backup NAS. Just a device that could be an Rsync target, provide decent bandwidth, offer Time Machine and some consumer backup story, support iSCSI and NFS and have bag loads of storage. A quick trip to Microcenter (surprise surprise) and I decided on the Seagate Business Storage 4 Bay 16TB edition. Microcenter had this on the shelf for $989 which seemed like a damn good deal for 16TB (11TB usable with RAID 5). Slightly smaller than the ReadyNAS 6, the two utilize a similar enough design aesthetic that they match well:
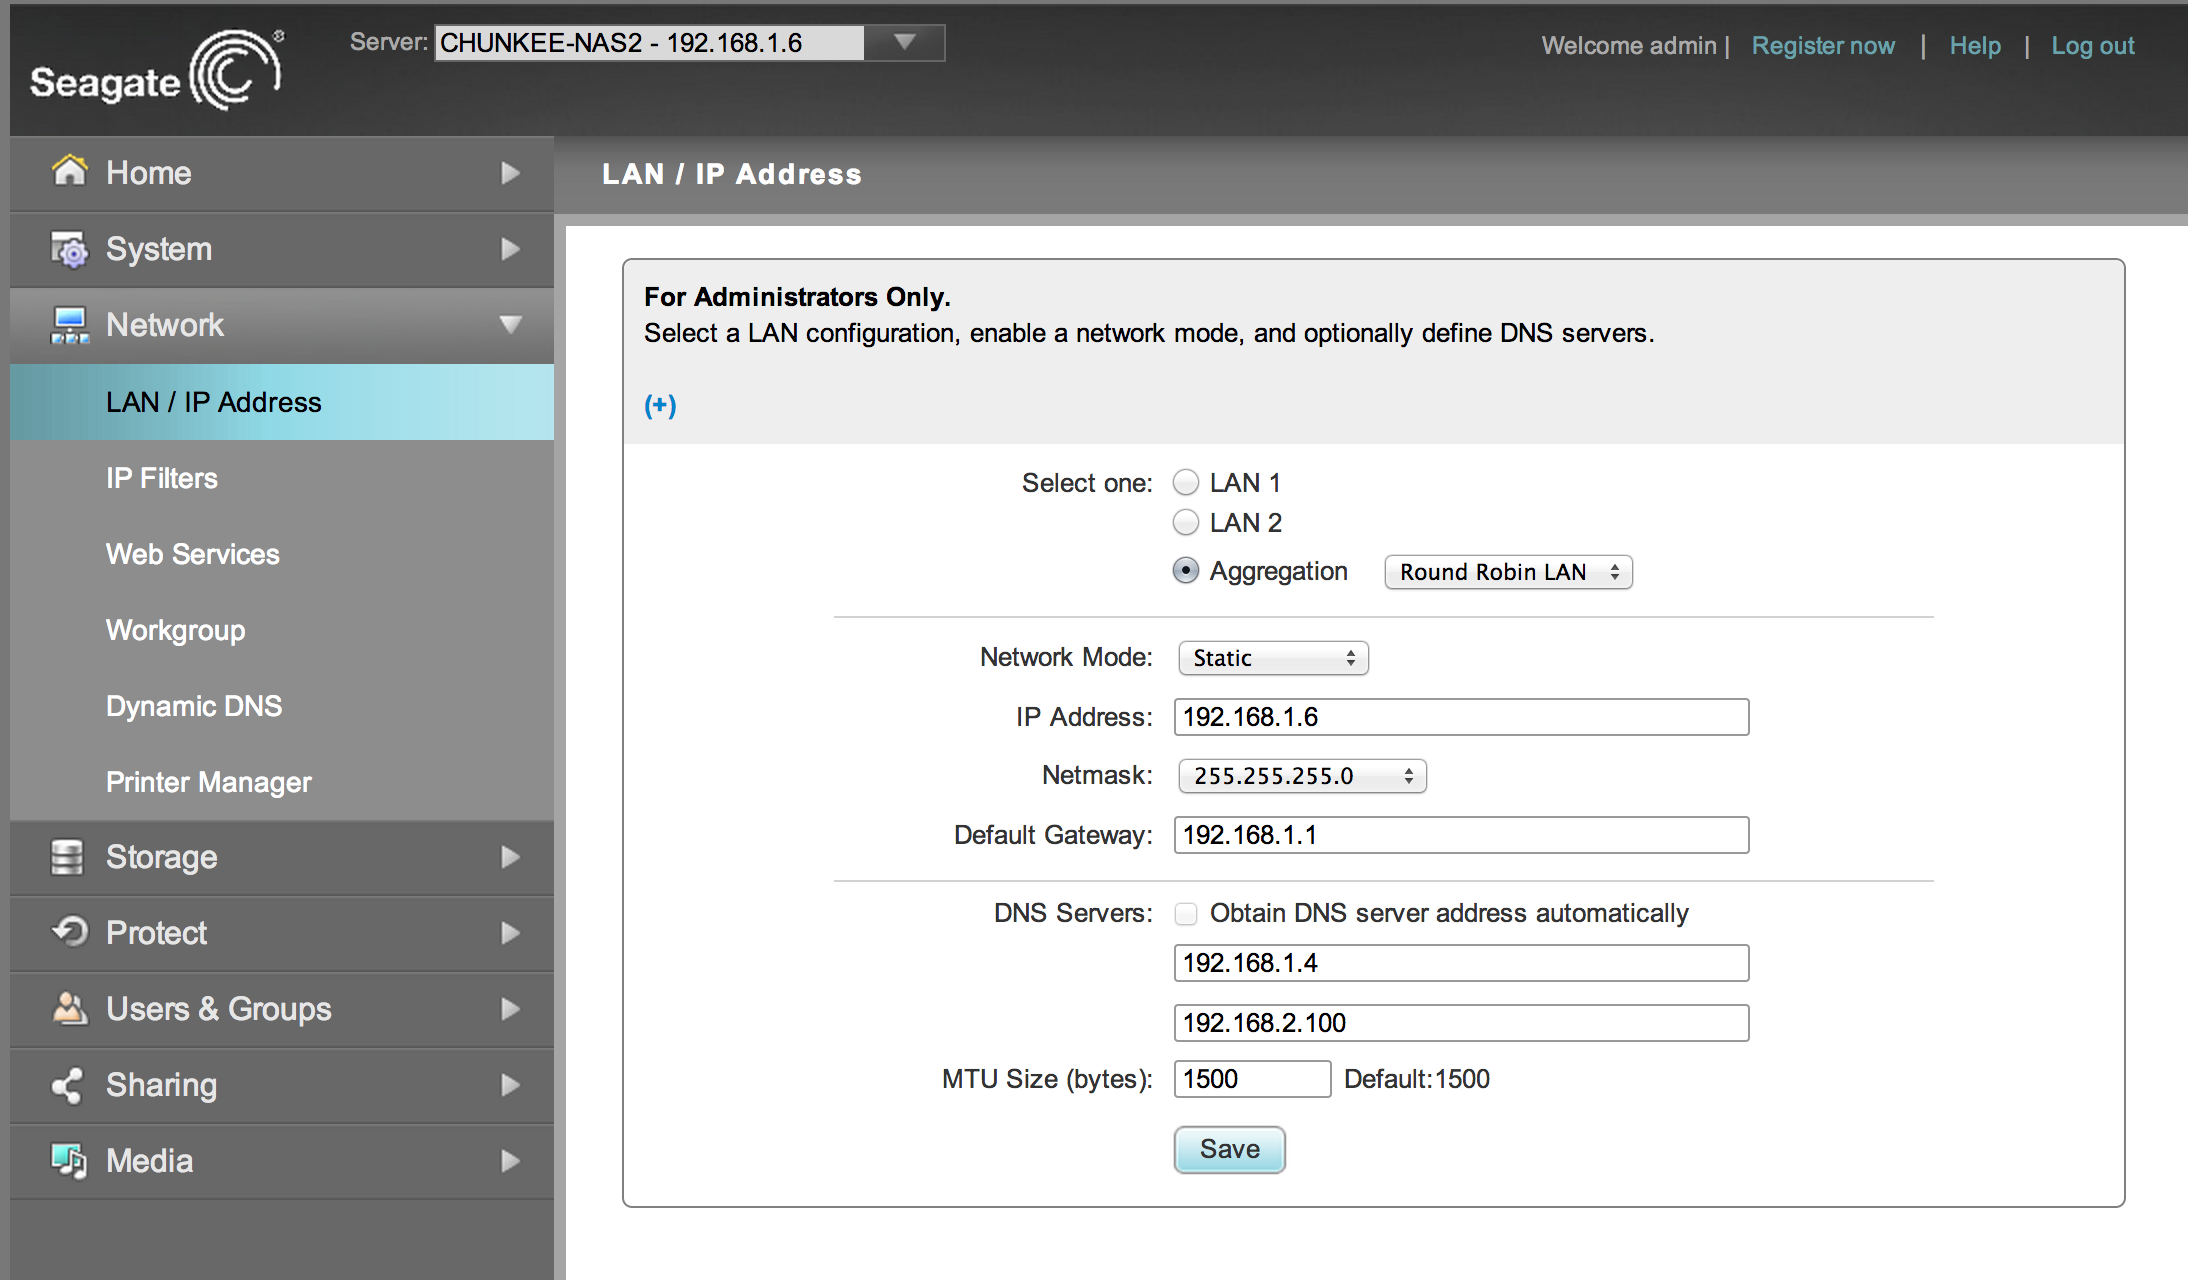
Presentation wise the Business Storage NAS UI is simultaneously slicker, yet more bare bones, than the ReadyNAS Ultra. For a “business line” product, it has a very consumer feel. Still, everything we need for this project is where you’d expect to find it and there is teaming support out of the box this time, but with a much simpler option set offering only Round Robin or Failover:
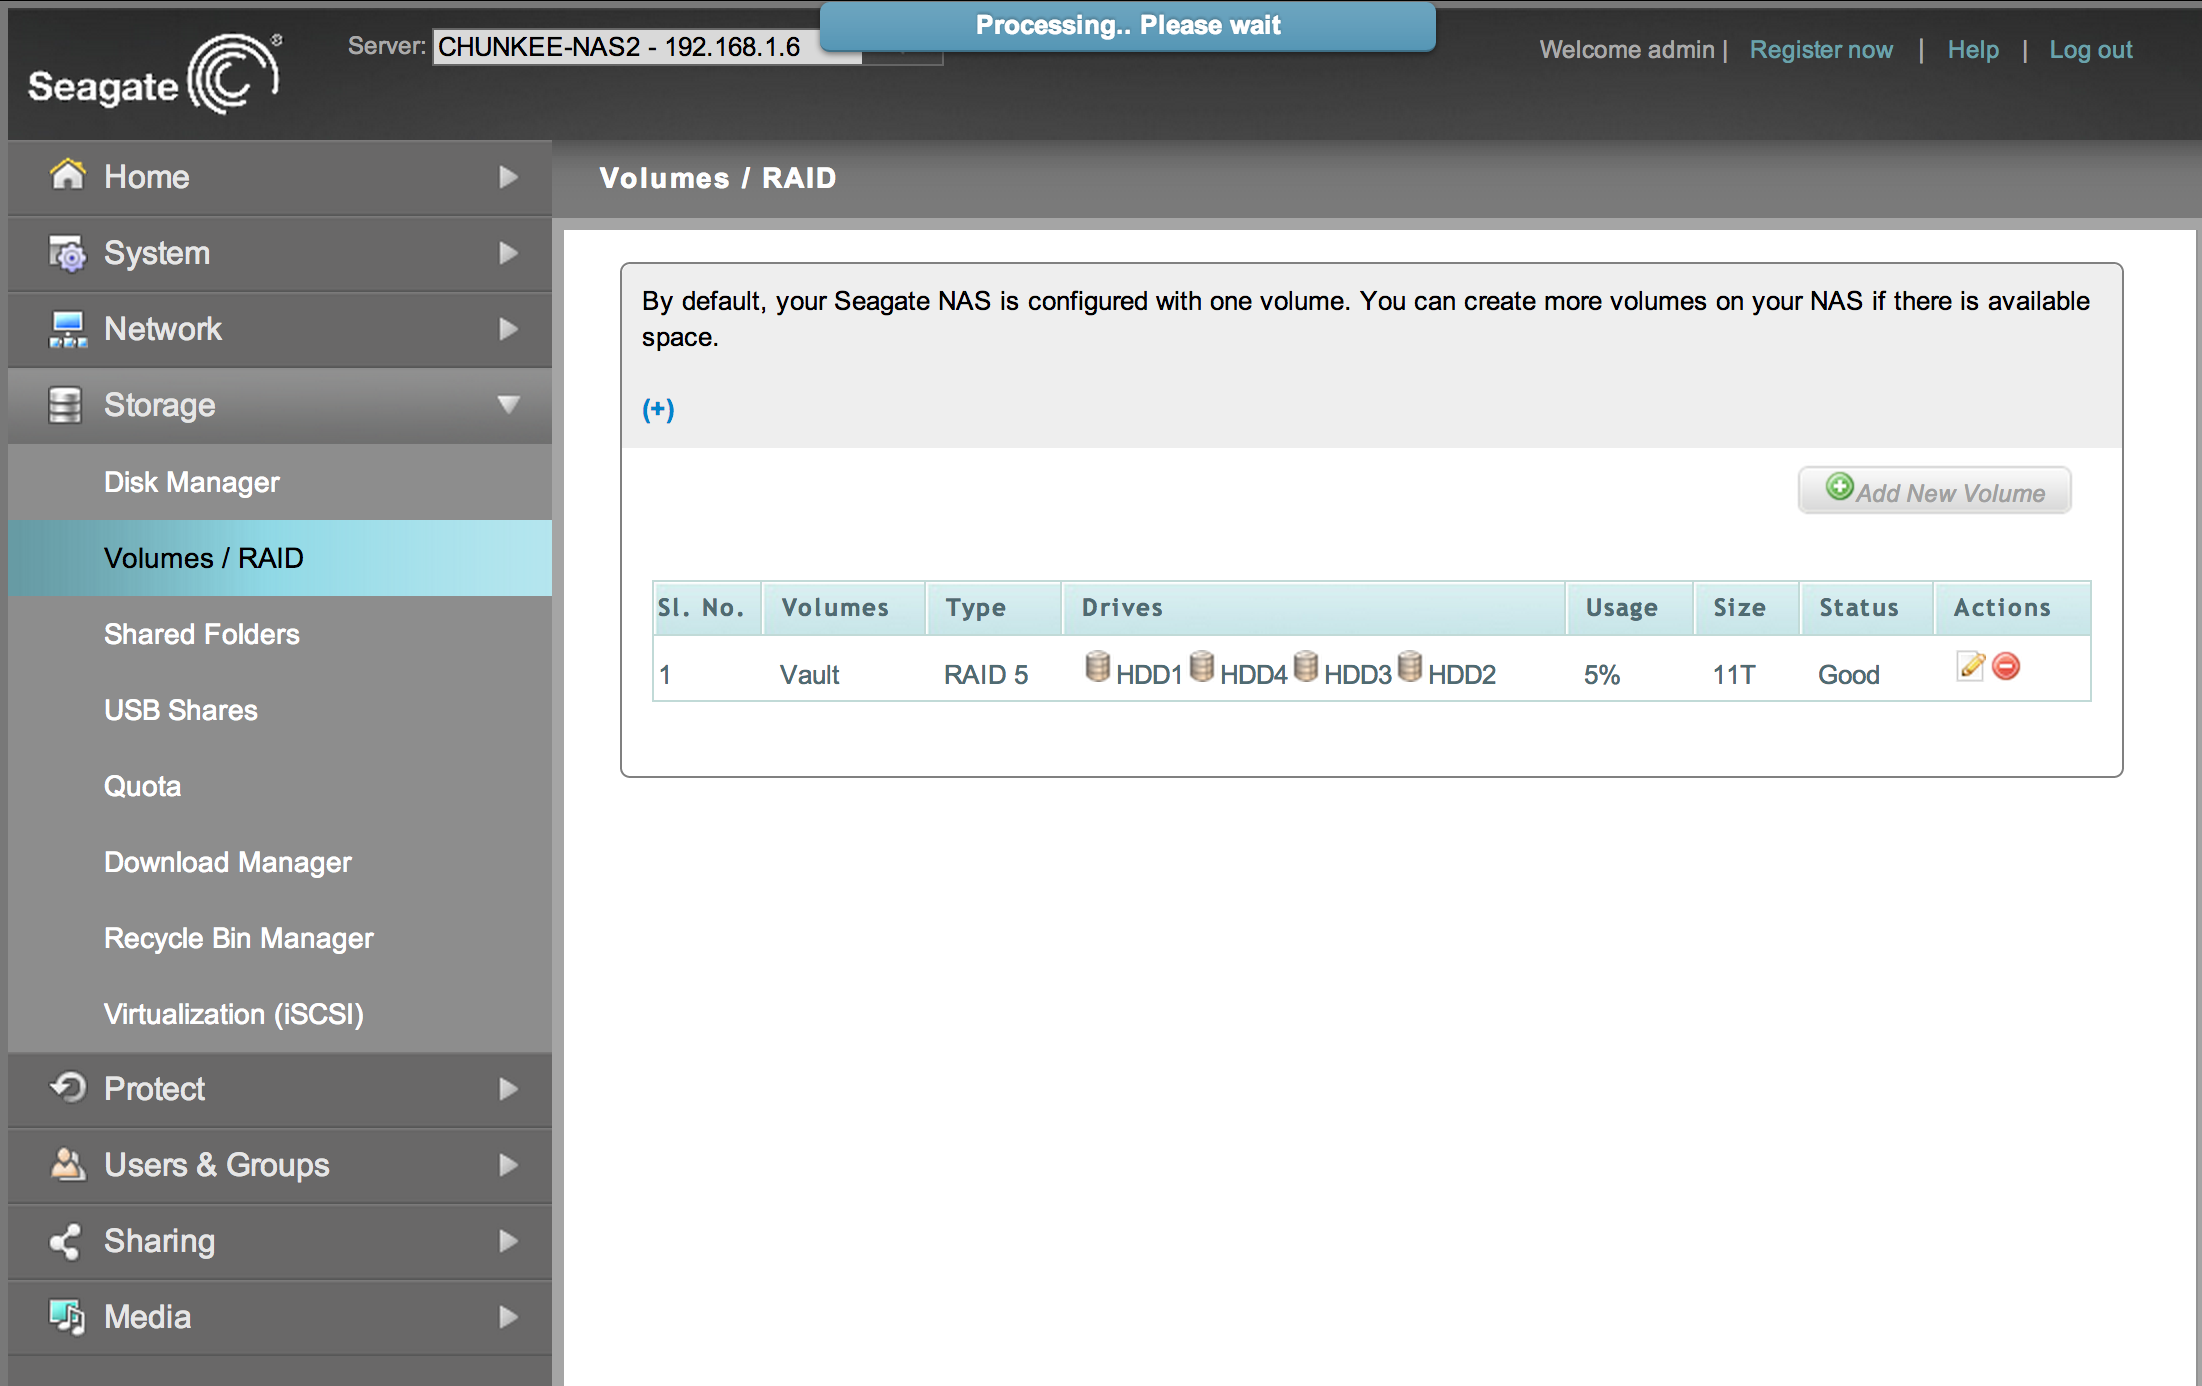
As mentioned, I stuck with the standard RAID 5 configuration yielding 11TB usable out of 16TB raw:
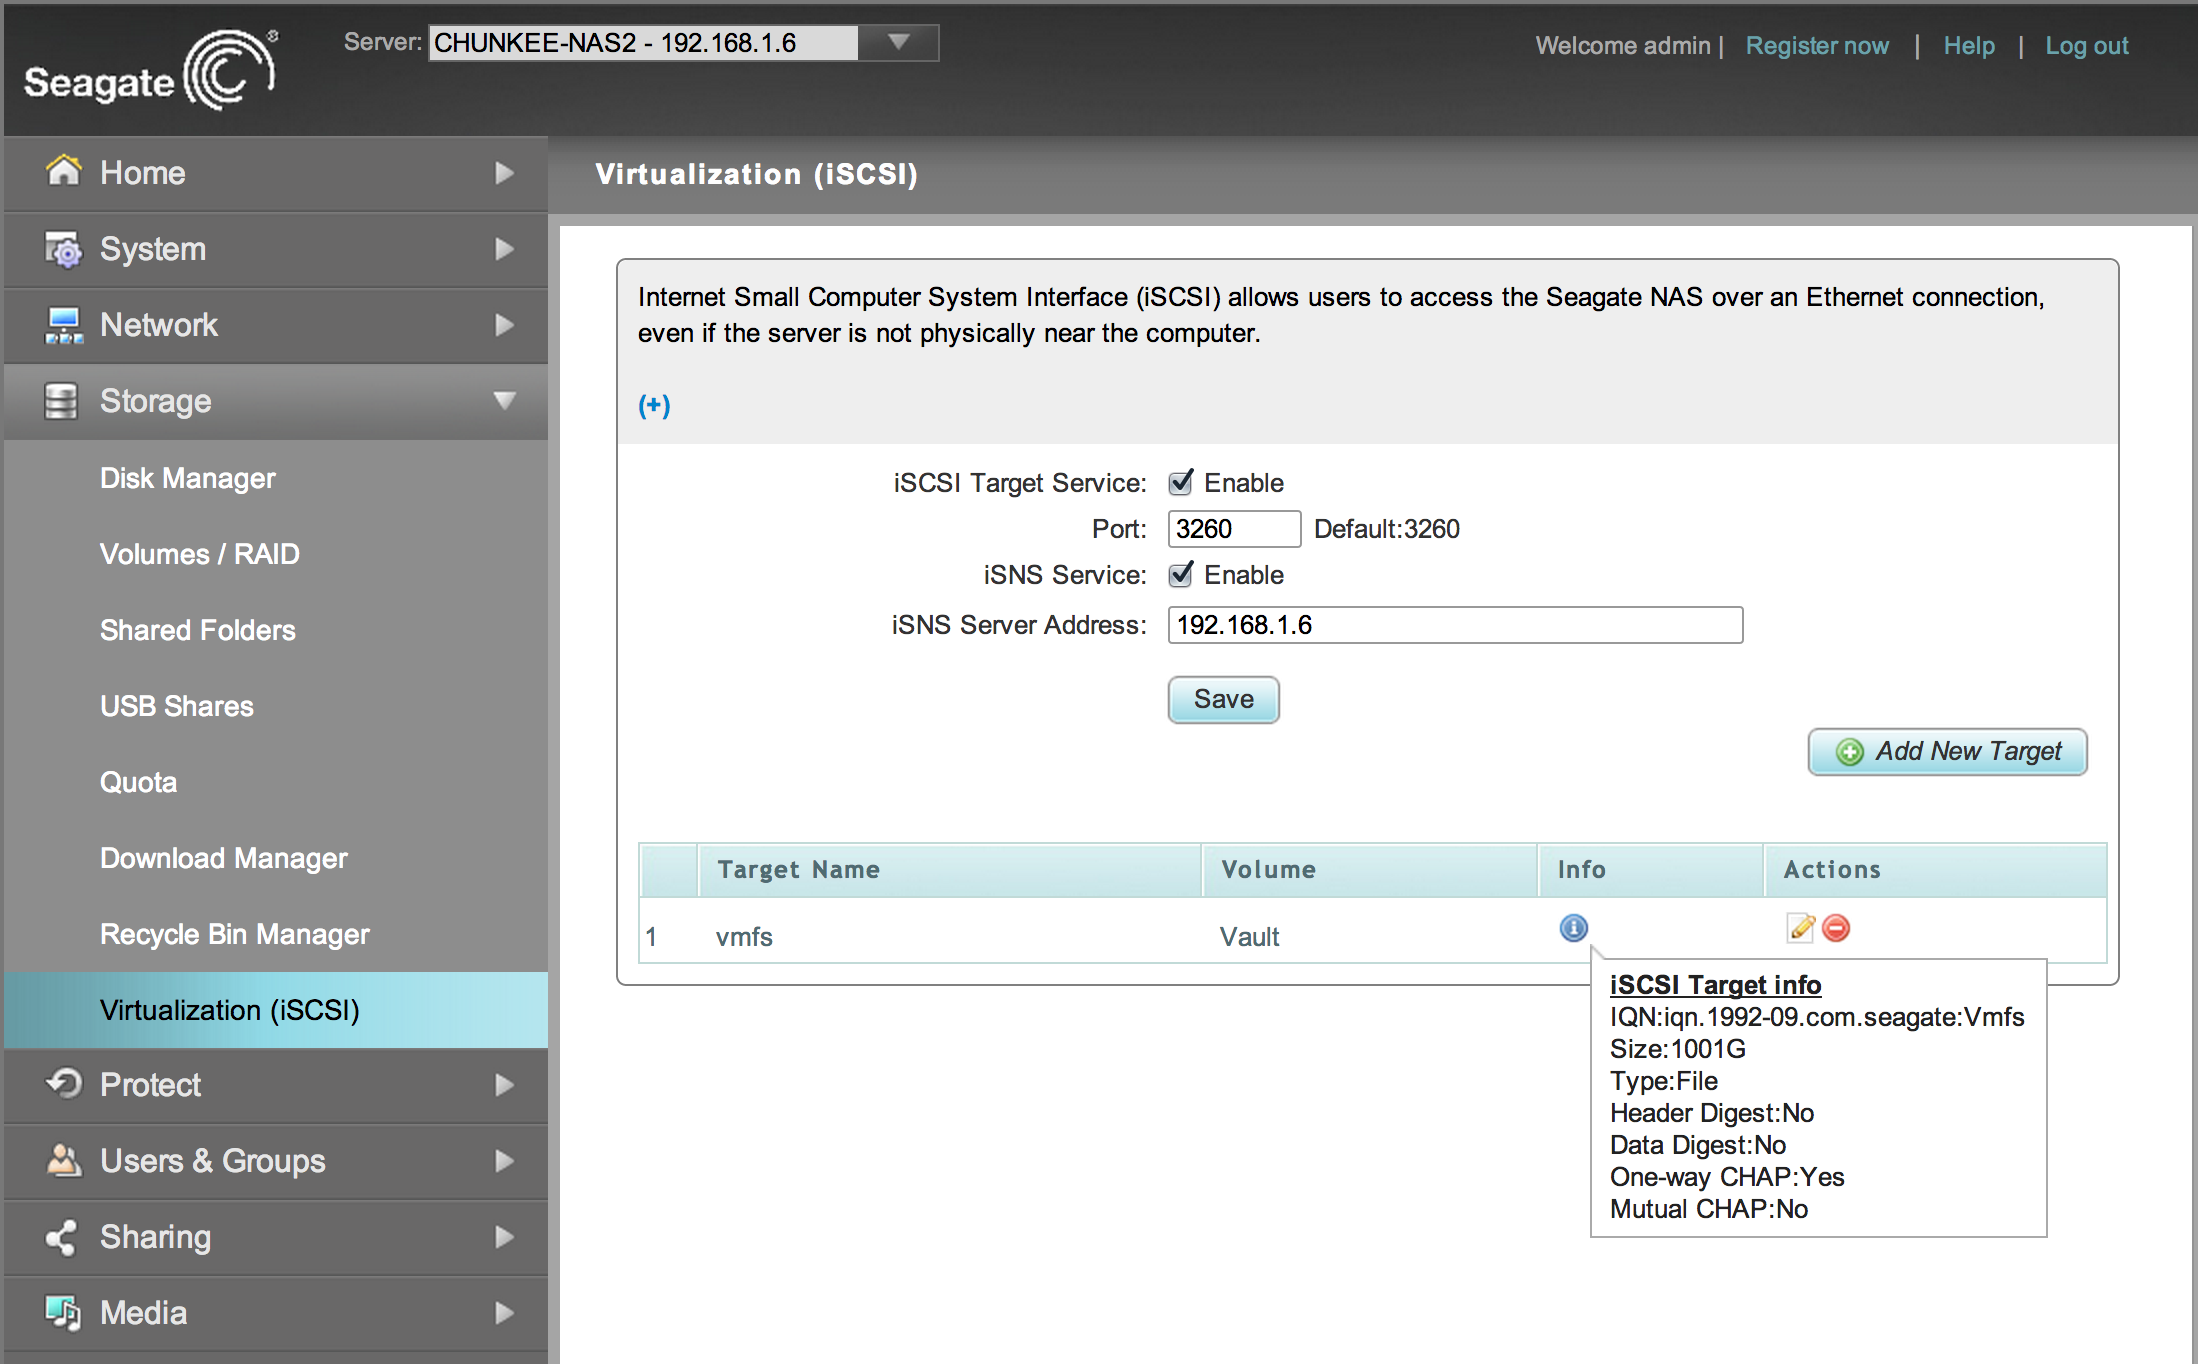
The iSCSI setup is also a bit more bare bones than the ReadyNAS (no place to specify initiators oddly enough), but it does provide one neat feature which is file based iSCSI. This is a nice option that provides the backend flexibility of a file based protocol (no need to fully dedicate a volume), while still presenting a block target to the initiators:
One thing I did do is delete the included volume and recreate it just to see how long that operation would take. The time to build the 11TB RAID 5 from scratch was 21 hours (yikes!). The other performance related testing I did before moving forward with the backup configuration was NAS throughput. Pretty interesting results. First the ReadyNAS:

Pretty bad performance actually. Not quite sure why given that there is no shortage of network bandwidth in theory. Team running on the ReadyNAS as shown above, and teamed NIC’s on the desktop as shown below:
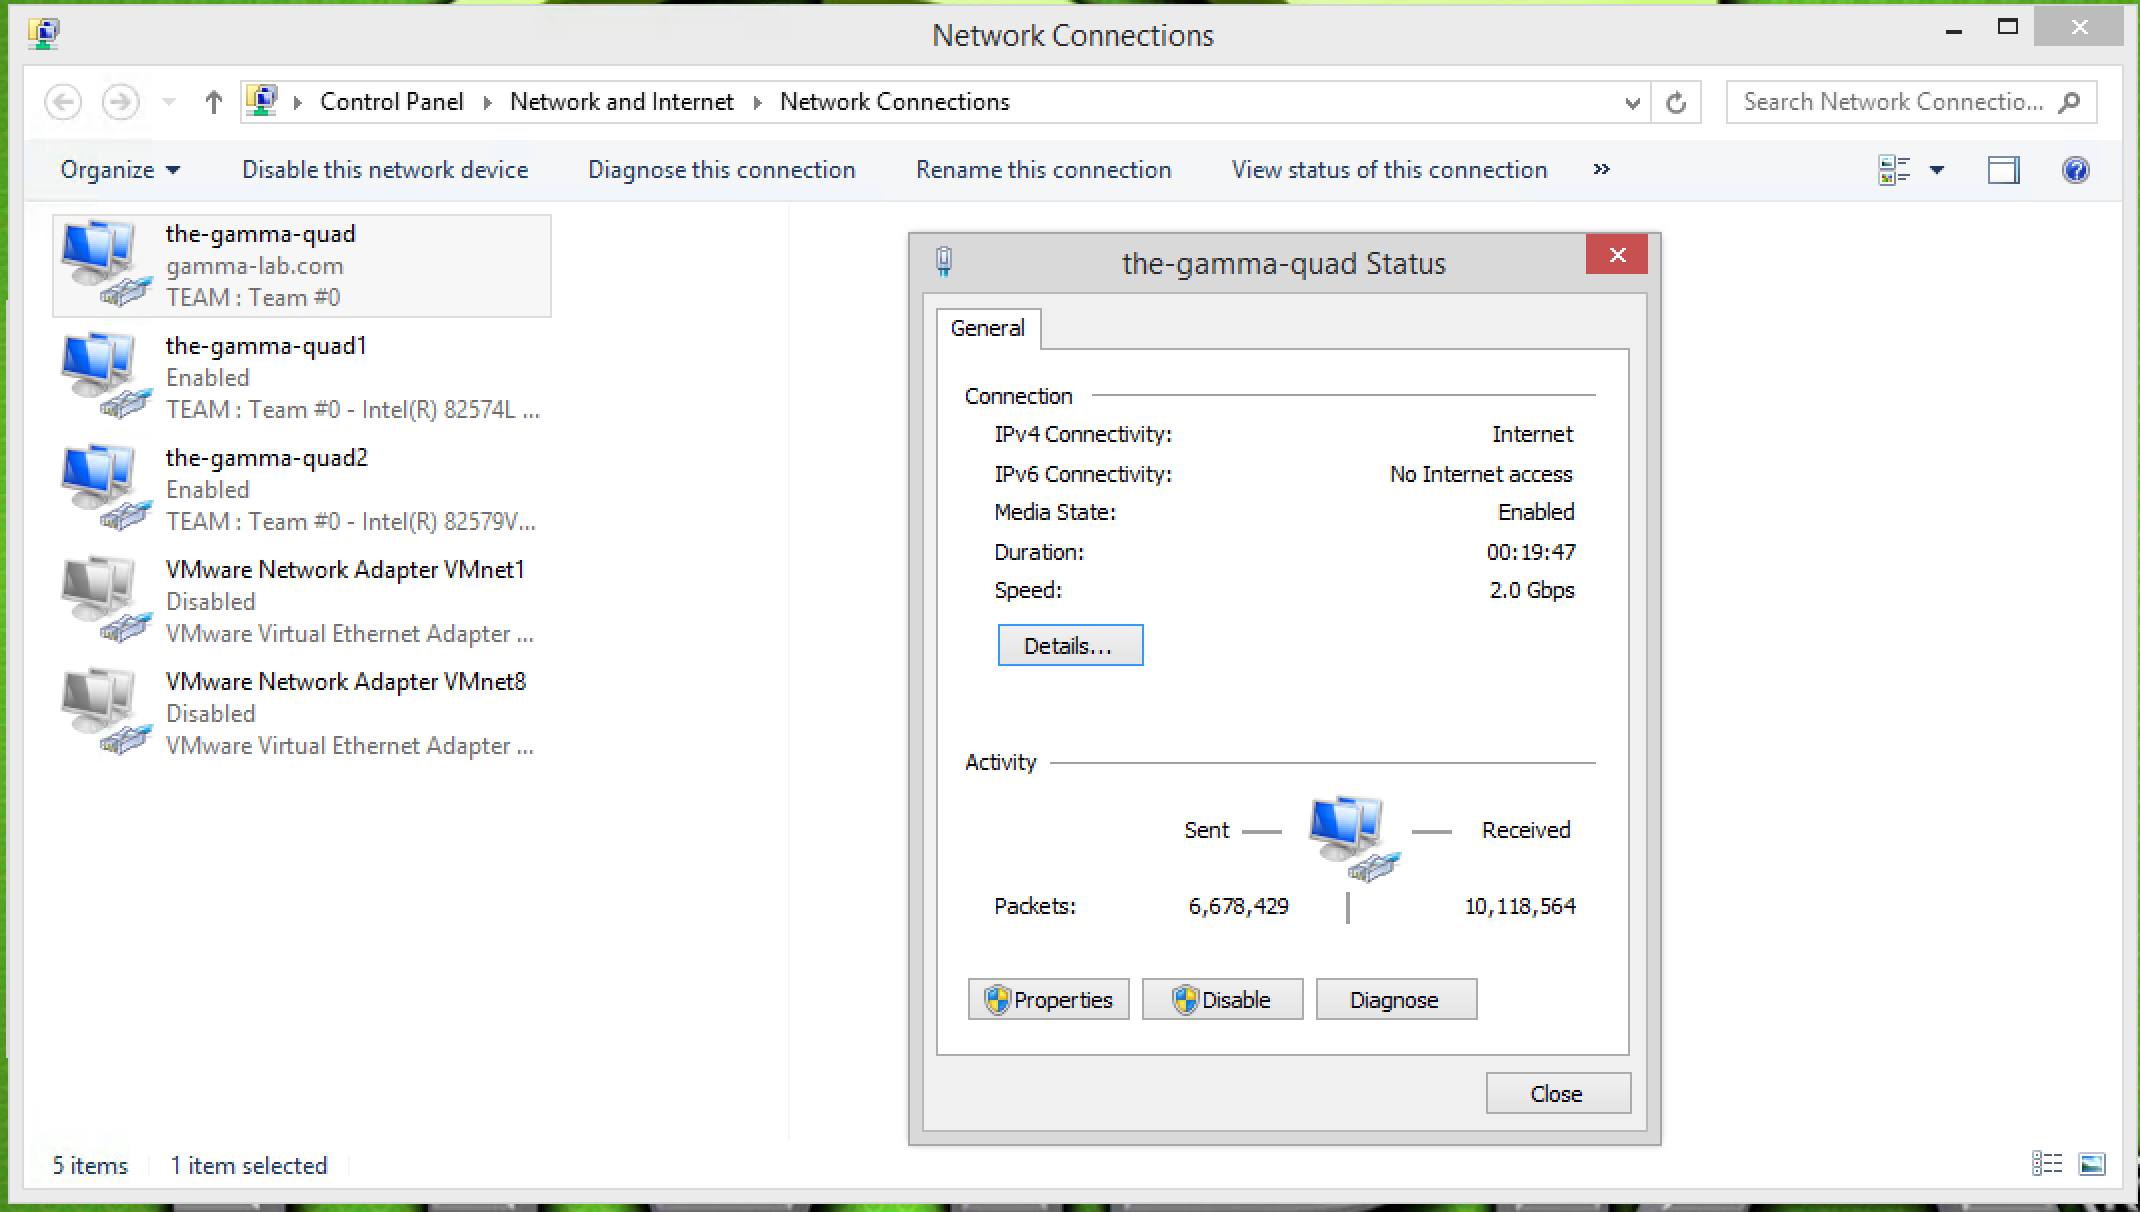
The backing switch is the Netgear GSM7224 v2, so the backbone bandwidth is good. The cabling is all CAT 6 so there is no cabling issue. Enabling jumbo frames actually kills the write speed and has no measurable impact on reads. This is definitely a mystery, but since the Seagate is sitting on the same core infrastructure, relative performance profiling should still apply. That said, the Seagate:
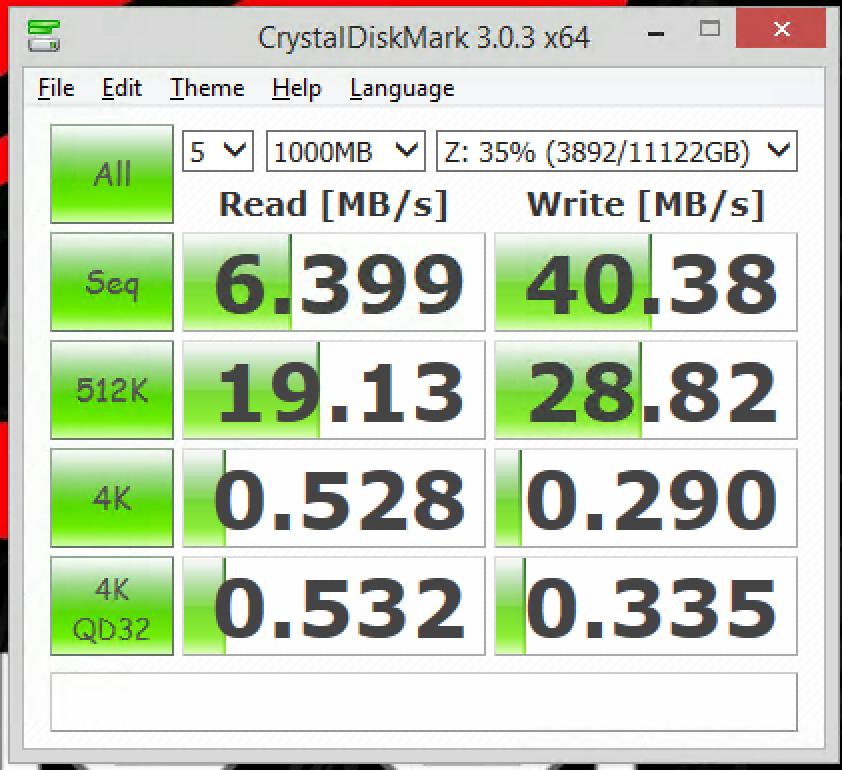
Wow! What the heck is going on here? Unknown at this point, but clearly the ReadyNAS is the better performer. Thats fine since we are using the Seagate purely as a backup device and iSCSI testing platform for VMware, but at some point I definitely need to track down the root cause of these performance issues! With initial setup and testing complete, it was time to setup the backup. This process was interesting and not entirely intuitive. As it turns out, the RSync capability of the Seagate is buried in the “Protect Server” feature.
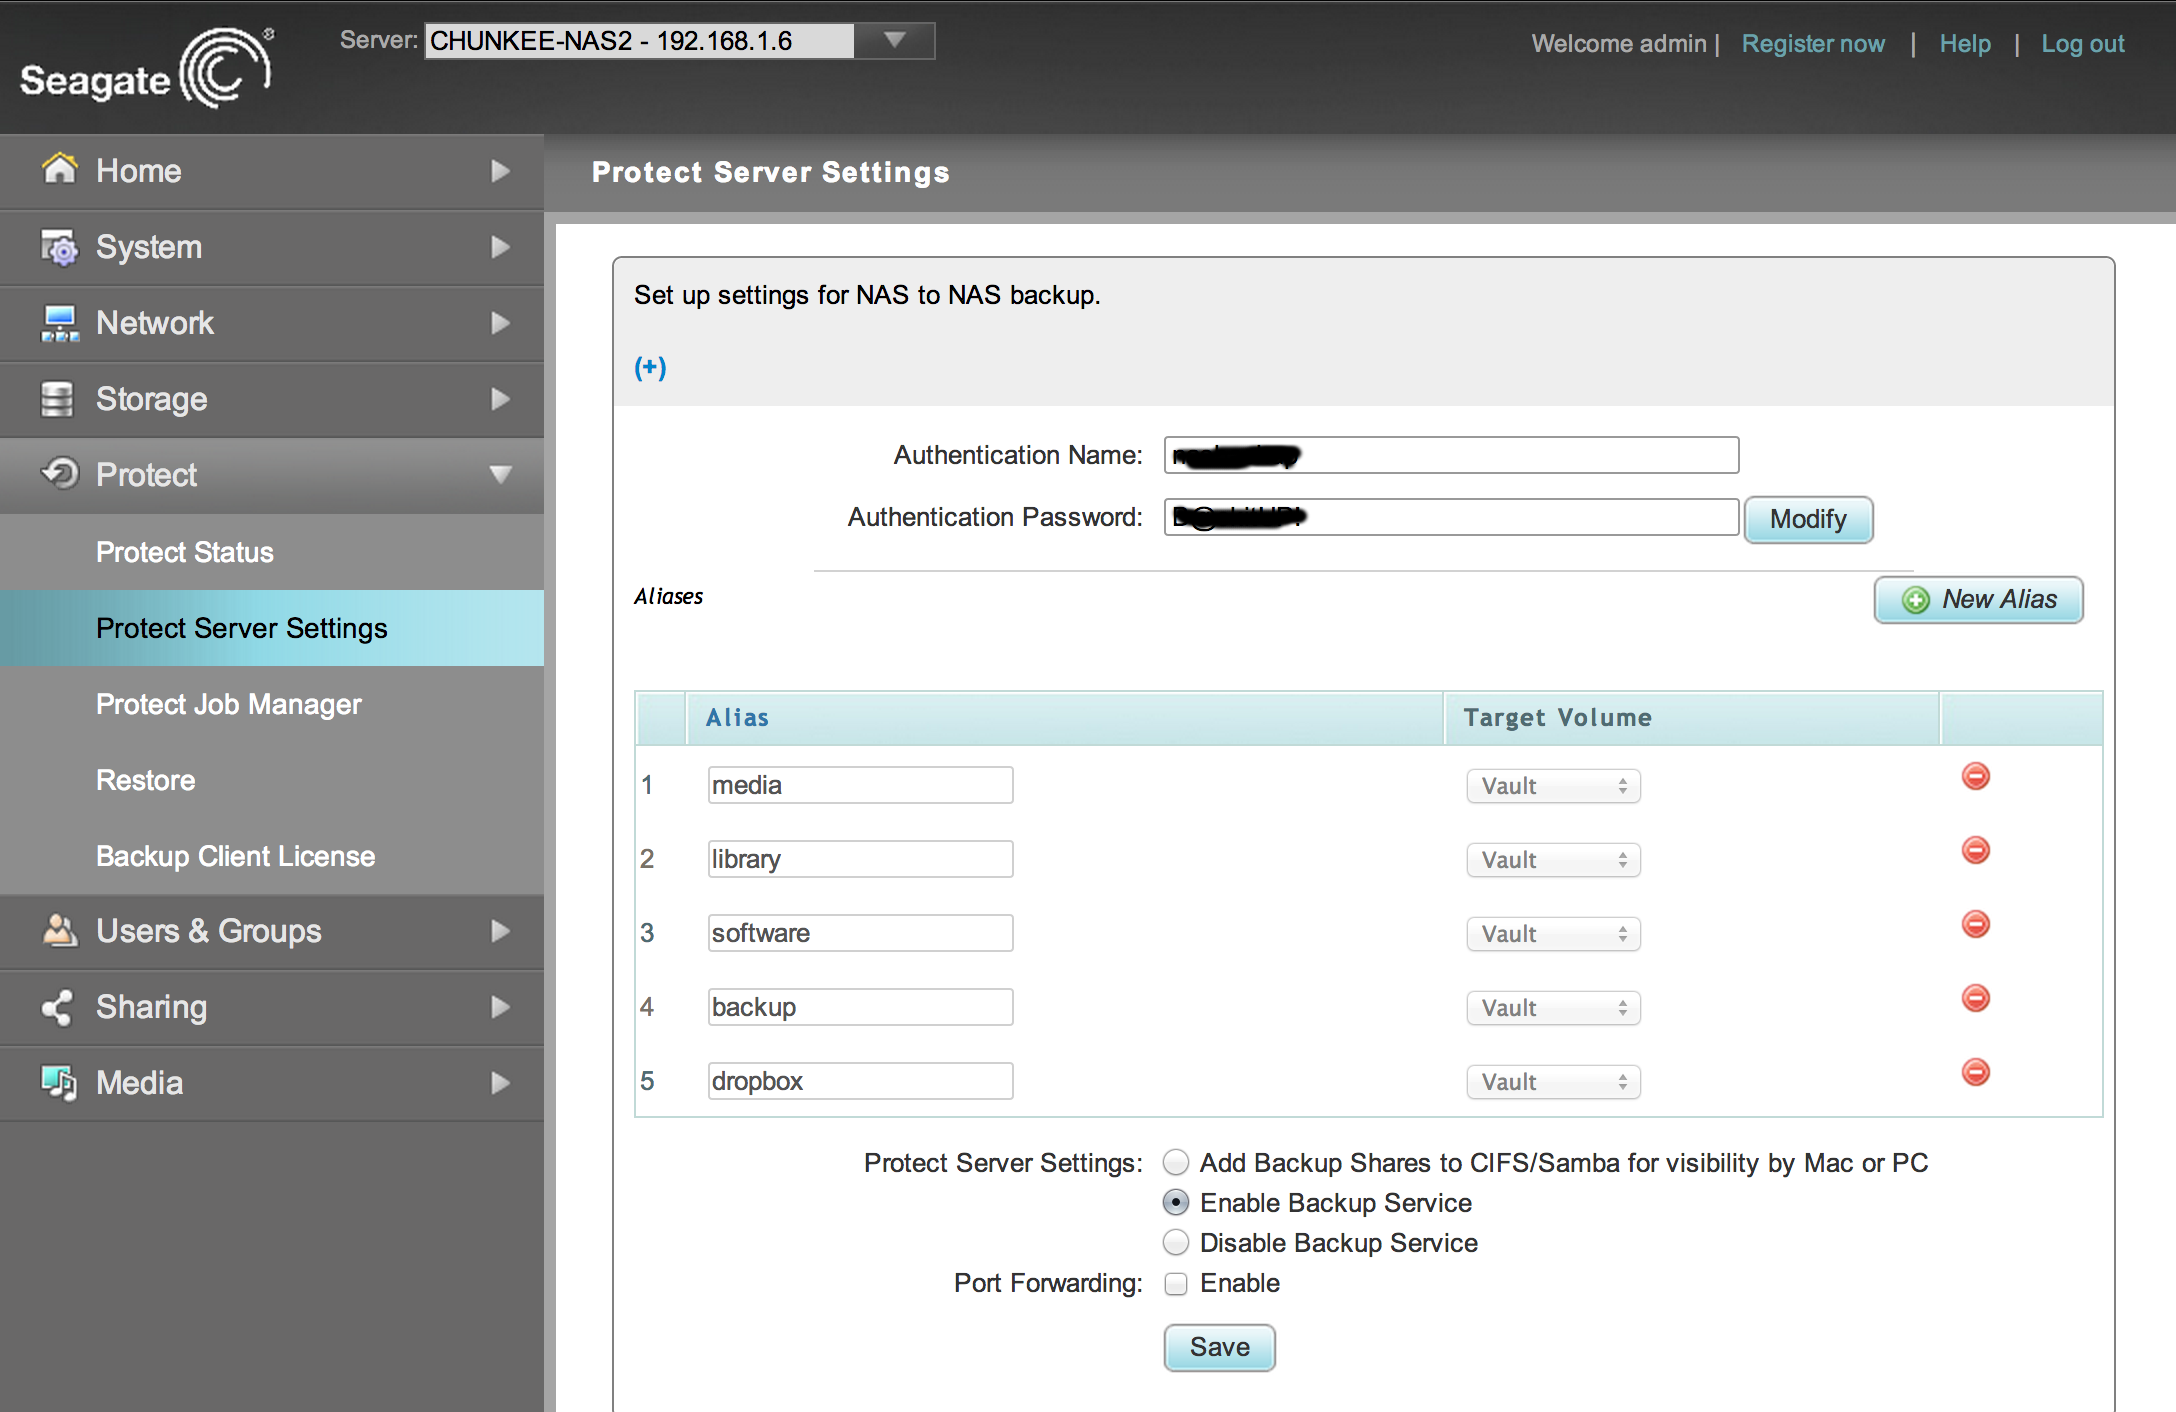
On the one hand, this is a super easy GUI driven way to setup RSync. On the other hand, it’s pretty limiting and a bit odd. It get’s the job done though! Here are the important options:
- Authentication Name: this is the account that your rsync source will need to authenticate as. A bit counter intuitive as this account will not show up under users nor can you ACL it. It seems there is a separate security model (including a dedicated path that you normally can’t see) associated with the “Protect” capability.
- Authentication Password: this is the password for the associated credentials. Note that the password is presented in the UI in clear text (and presumably stored that way) Yikes! Keep this guy safely tucked behind a firewall.
- Alias: what we are setting here are paths. For each “alias” created, a folder will be created under the “BackupStore-1” folder on the associated volume. This entire folder structure will not be surfaced as a share unless that is explicitly selected (more on that later)
- Enable/Disable Backup Service: as indicated. Also worth noting that disabling the backup service will also delete the folder structure (including files), so be careful here.
- Add Backup Shares to CIFS/SMB: this option will expose the BackupStore-1 folder under the default share for the volume. Note that when this option is enabled, the backup target will be disabled. This is interesting since, as far as I can tell, there is no way to get write access to the backup path via the share. Accessing it as admin won’t work (writes are denied) and you cannot access a share with the backup job credentials. Not sure why rsync availability vs CIFS presentation is an either/or proposition given this, but its workable.
- Port Forwarding: enabled UPNP support for RSync if you want to run through a firewall.
That’s about all you are able to setup. Hopefully it’s enough! Before heading over to the ReadyNAS to setup some backup jobs, let’s have a look at the client protection options. Of course TimeMachine is great for OSX integration. Seagate also provides a backup utility for both OSX and Windows on the setup disk. I tested the Windows app and it runs well. 10 licenses for clients are included and they are automatically applied by the software during install (you are able to discover and select the NAS). Client settings are found under Job Manager:

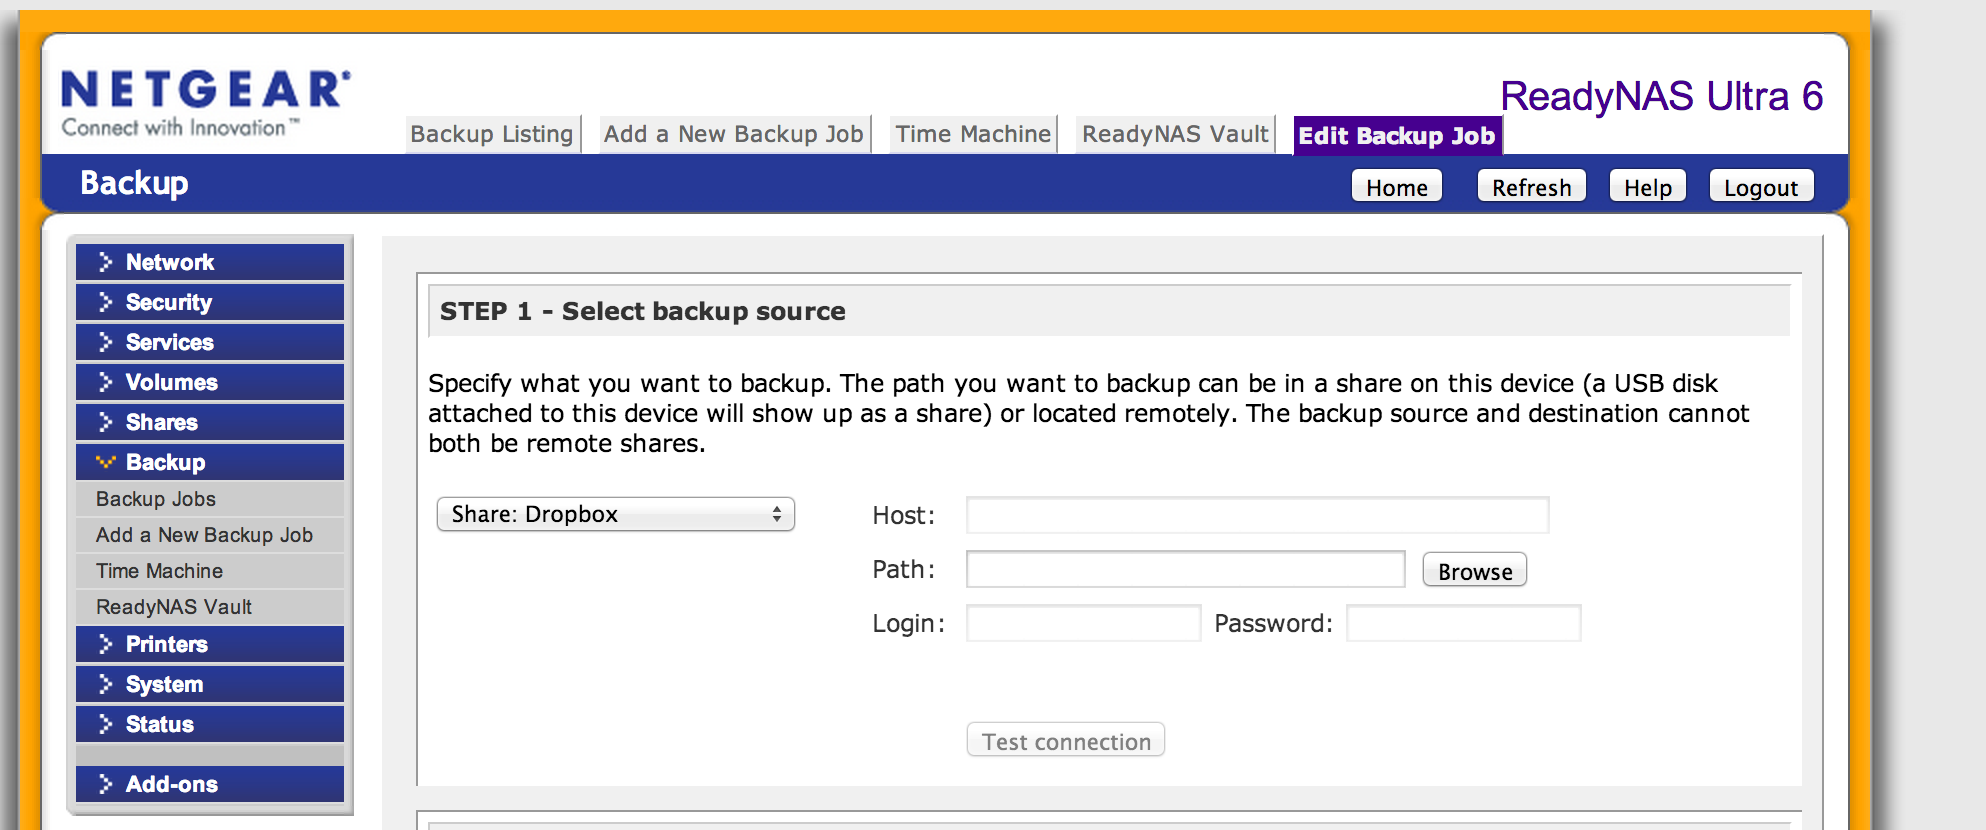
Incidentally, the NAS-NAS Backup tab here assumes the Seagate is the source so this isn’t going to work for our scenario. Instead, it is time to head over to the ReadyNAS! From the main menu, we can create new Backup Jobs under the Backup menu oddly enough. Selecting “Add a New Backup Job” presents us with a form that gives us everything we need. Under the source, a huge range of options are available:
- All of the local shares
- Remote configuration for RSync, NFS, WebDAV, Windows and FTP
- The local volume (C)
- Local USB devices
- If the source is remote (backing up to the ReadyNAS), host information, path and credentials should be entered here
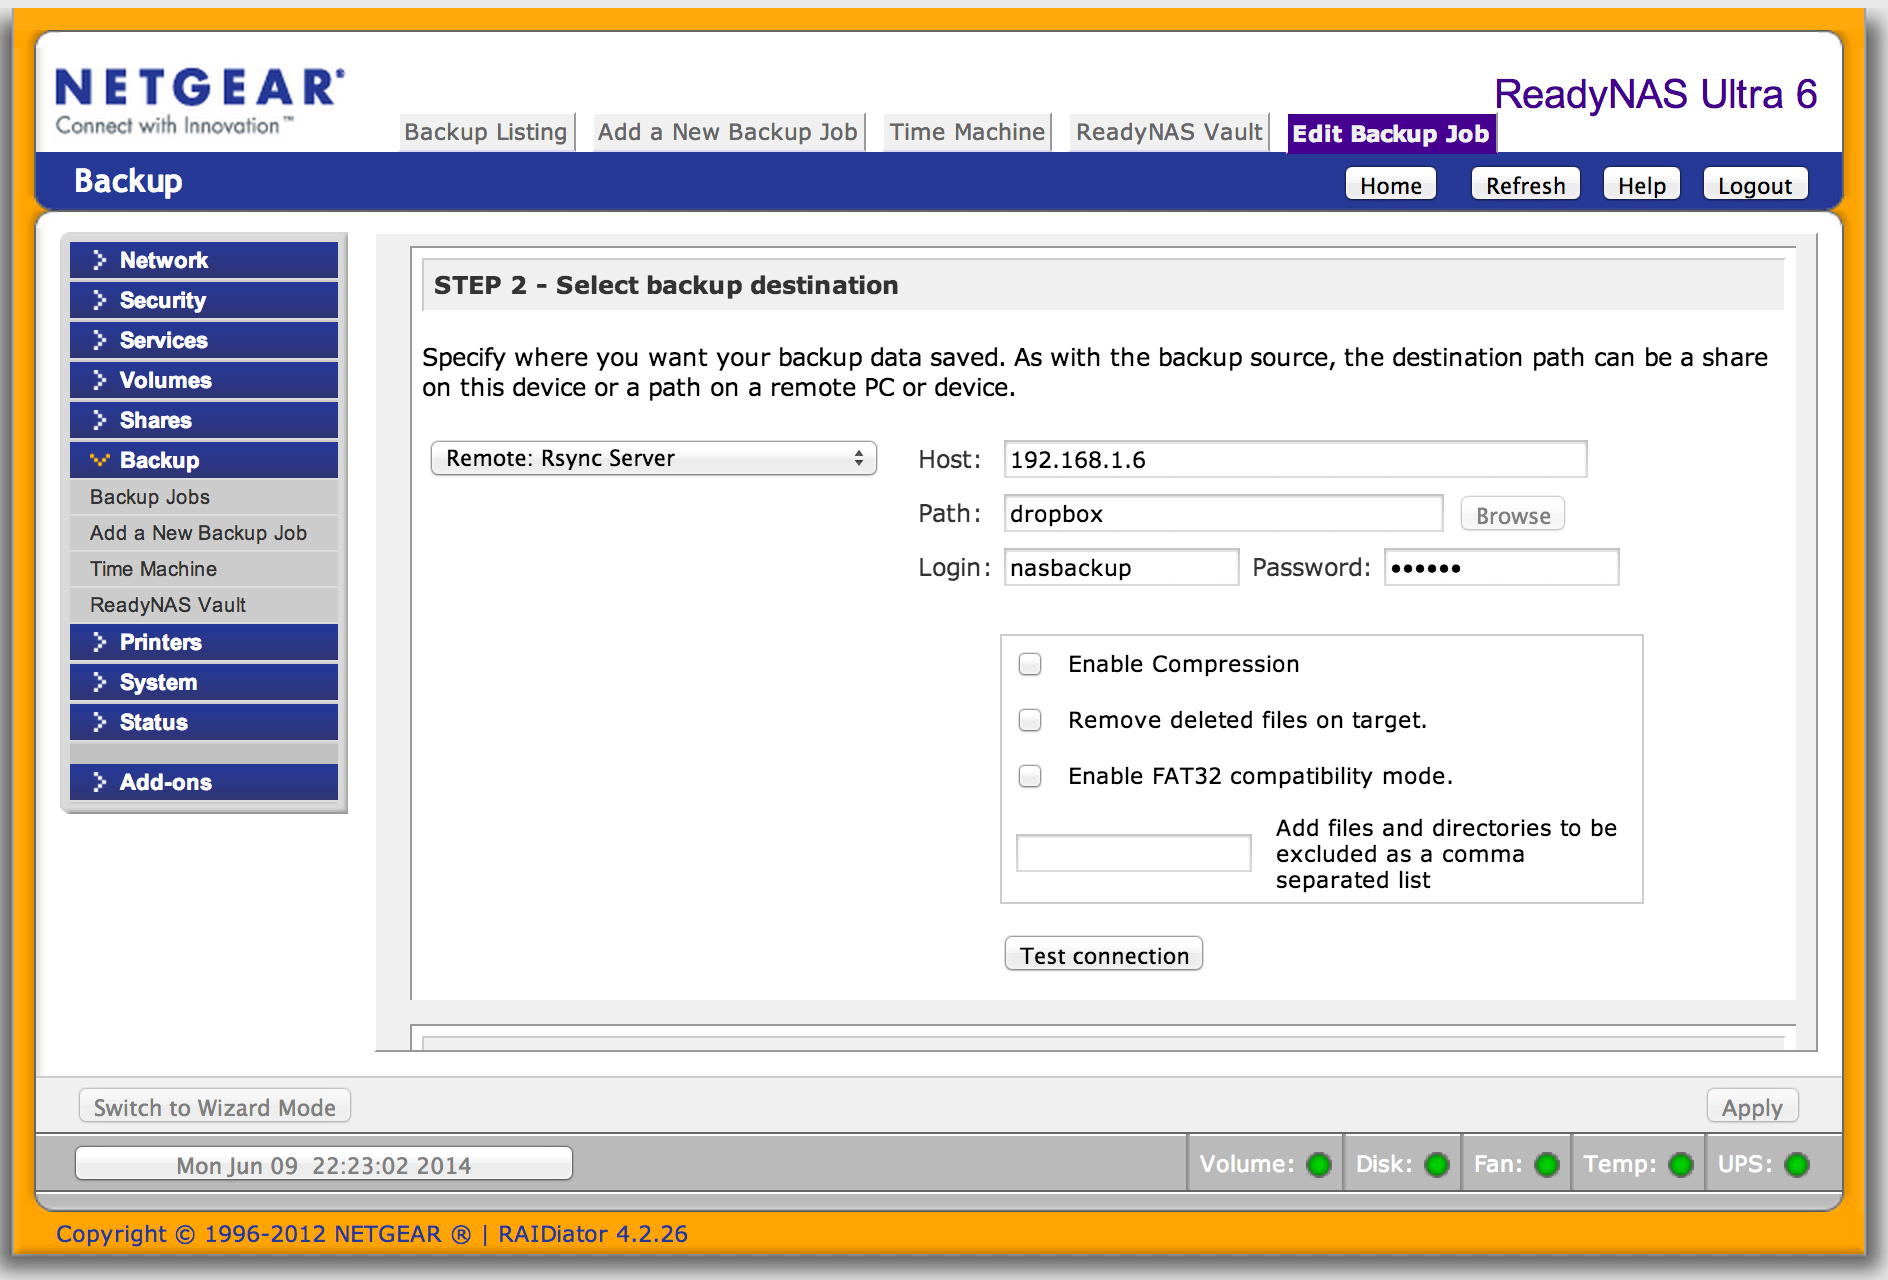
After setting the source, the same UI layout is used to set the destination. The range of options are the same as above, plus the addition of iSCSI paths. In the case of the Seagate Protect Server, what we are setting here is the Seagate NAS IP as host, the alias we setup as the path and using the backup credentials configured under the protect job. We also have the option to compress the backup volume, remove deleted files (sync folders), enable FAT32 compatibility mode for the backup file system and create an exclusion list for files and folders:
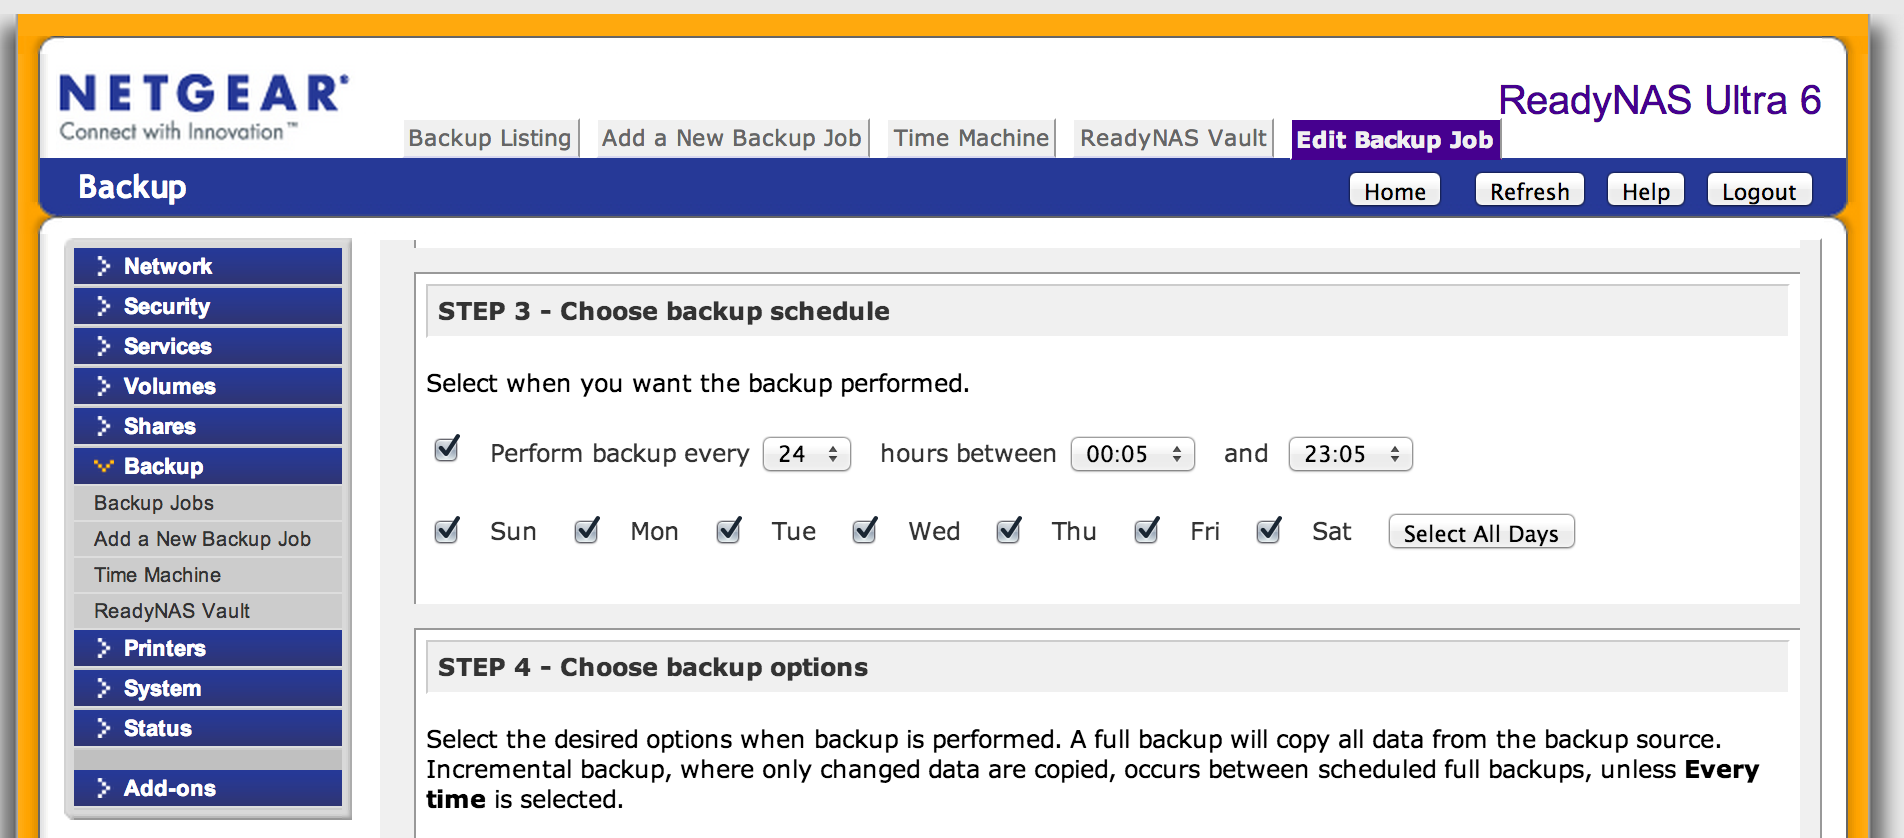
Step 3 is to set a backup schedule. Nothing fancy here. One interesting thing is that you can set both a period and a run window. A combination of both can allow for some decent flexibility in controlling scheduling:
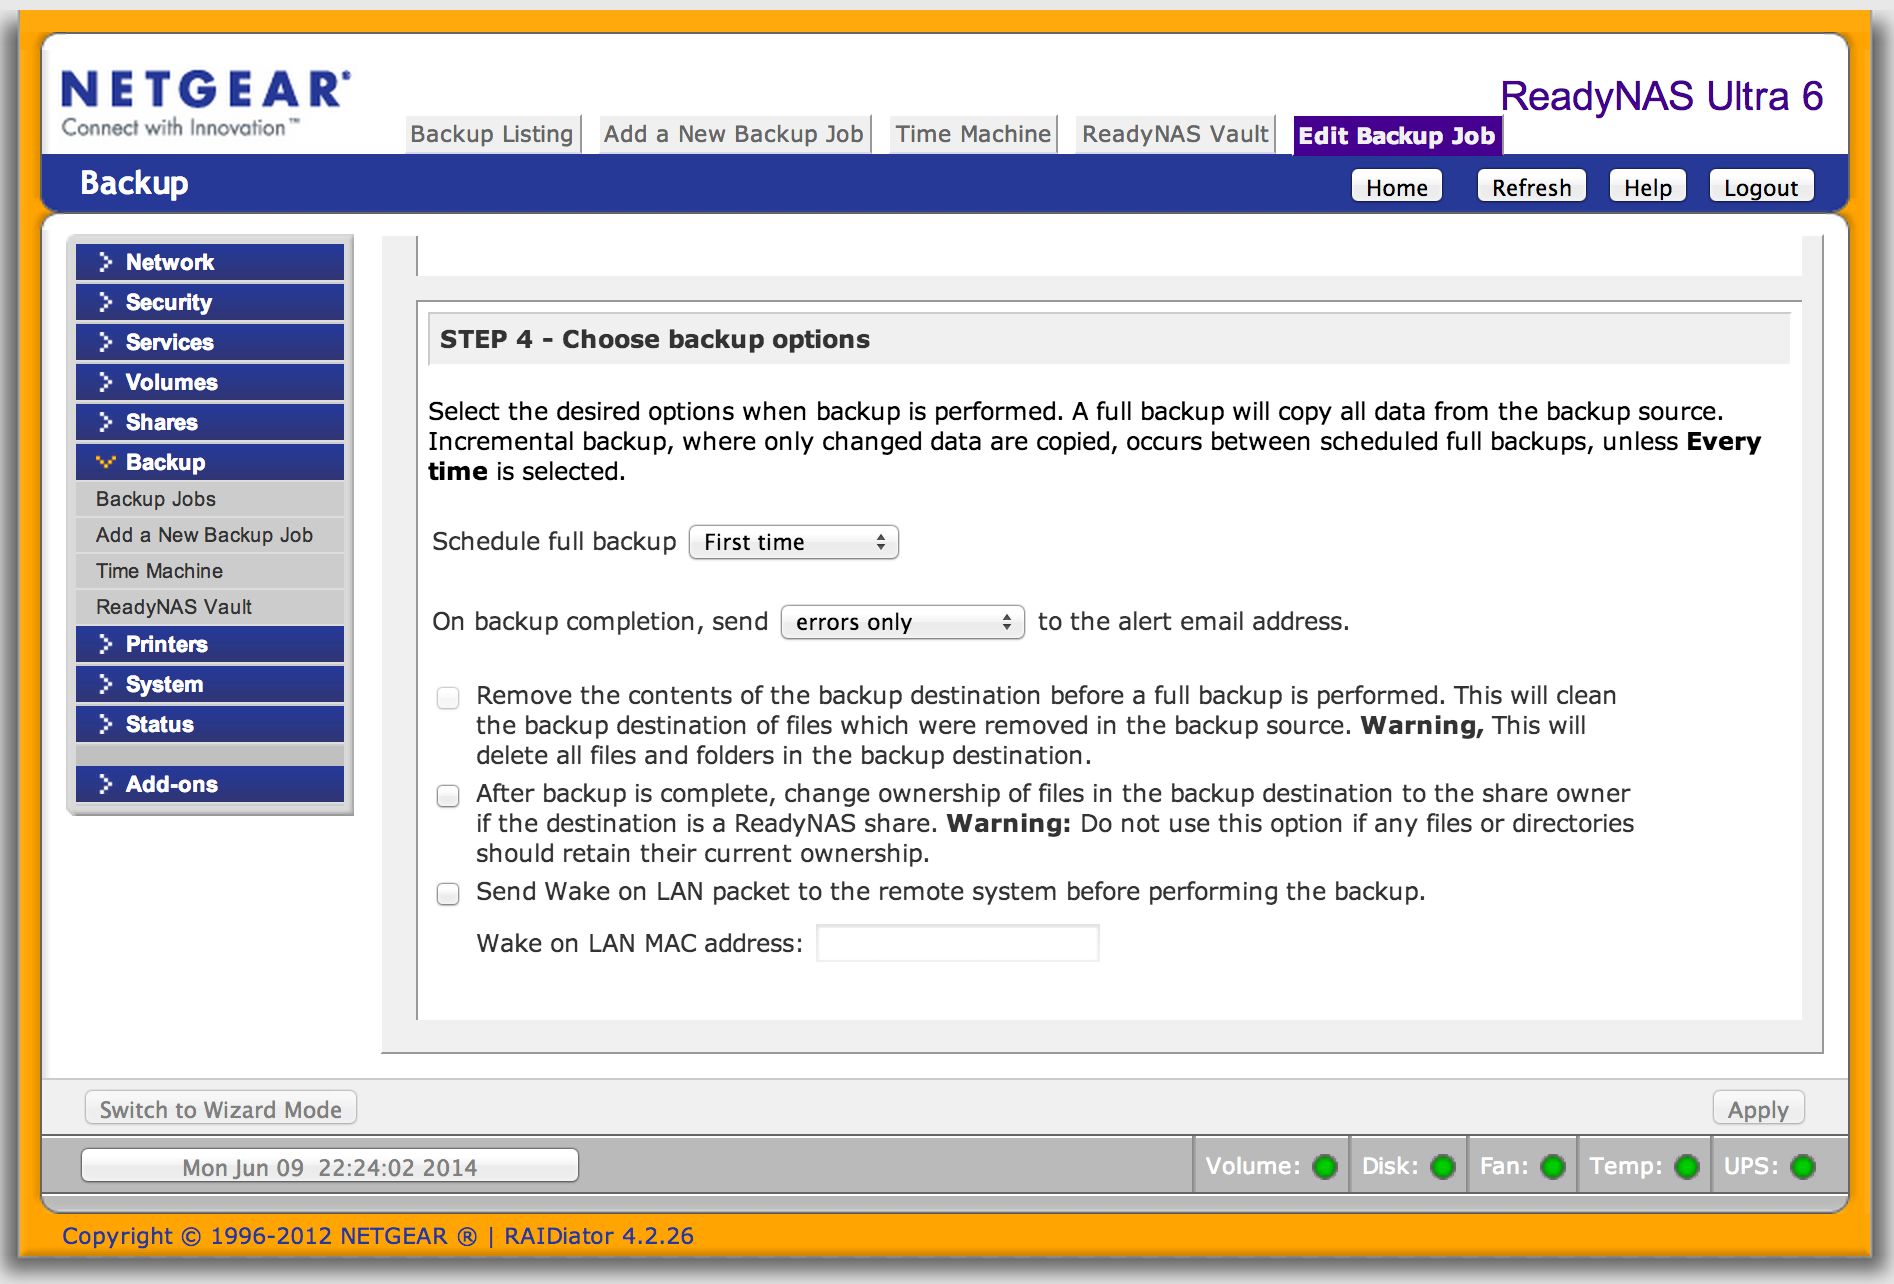
The options available require some explanation:
- Schedule full backup allows you to specify how often to run a full backup (vs differentials)
- The “on backup completion” option allows you to specify the end-of-backup scope for the email alert (none, errors only, all info, etc)
- Remove backup contents before full backup allows you to create a clean slate before the next full backup (a path wipe)
- After backup is complete change ownership to the share owner allows you to blanket set the file system ownership if the destination is also a ReadyNAS
- Send Wake on LAN to he remote system allows a WoL packet to be sent prior to backup (allowing for a “cold host” to be utilized for backup)
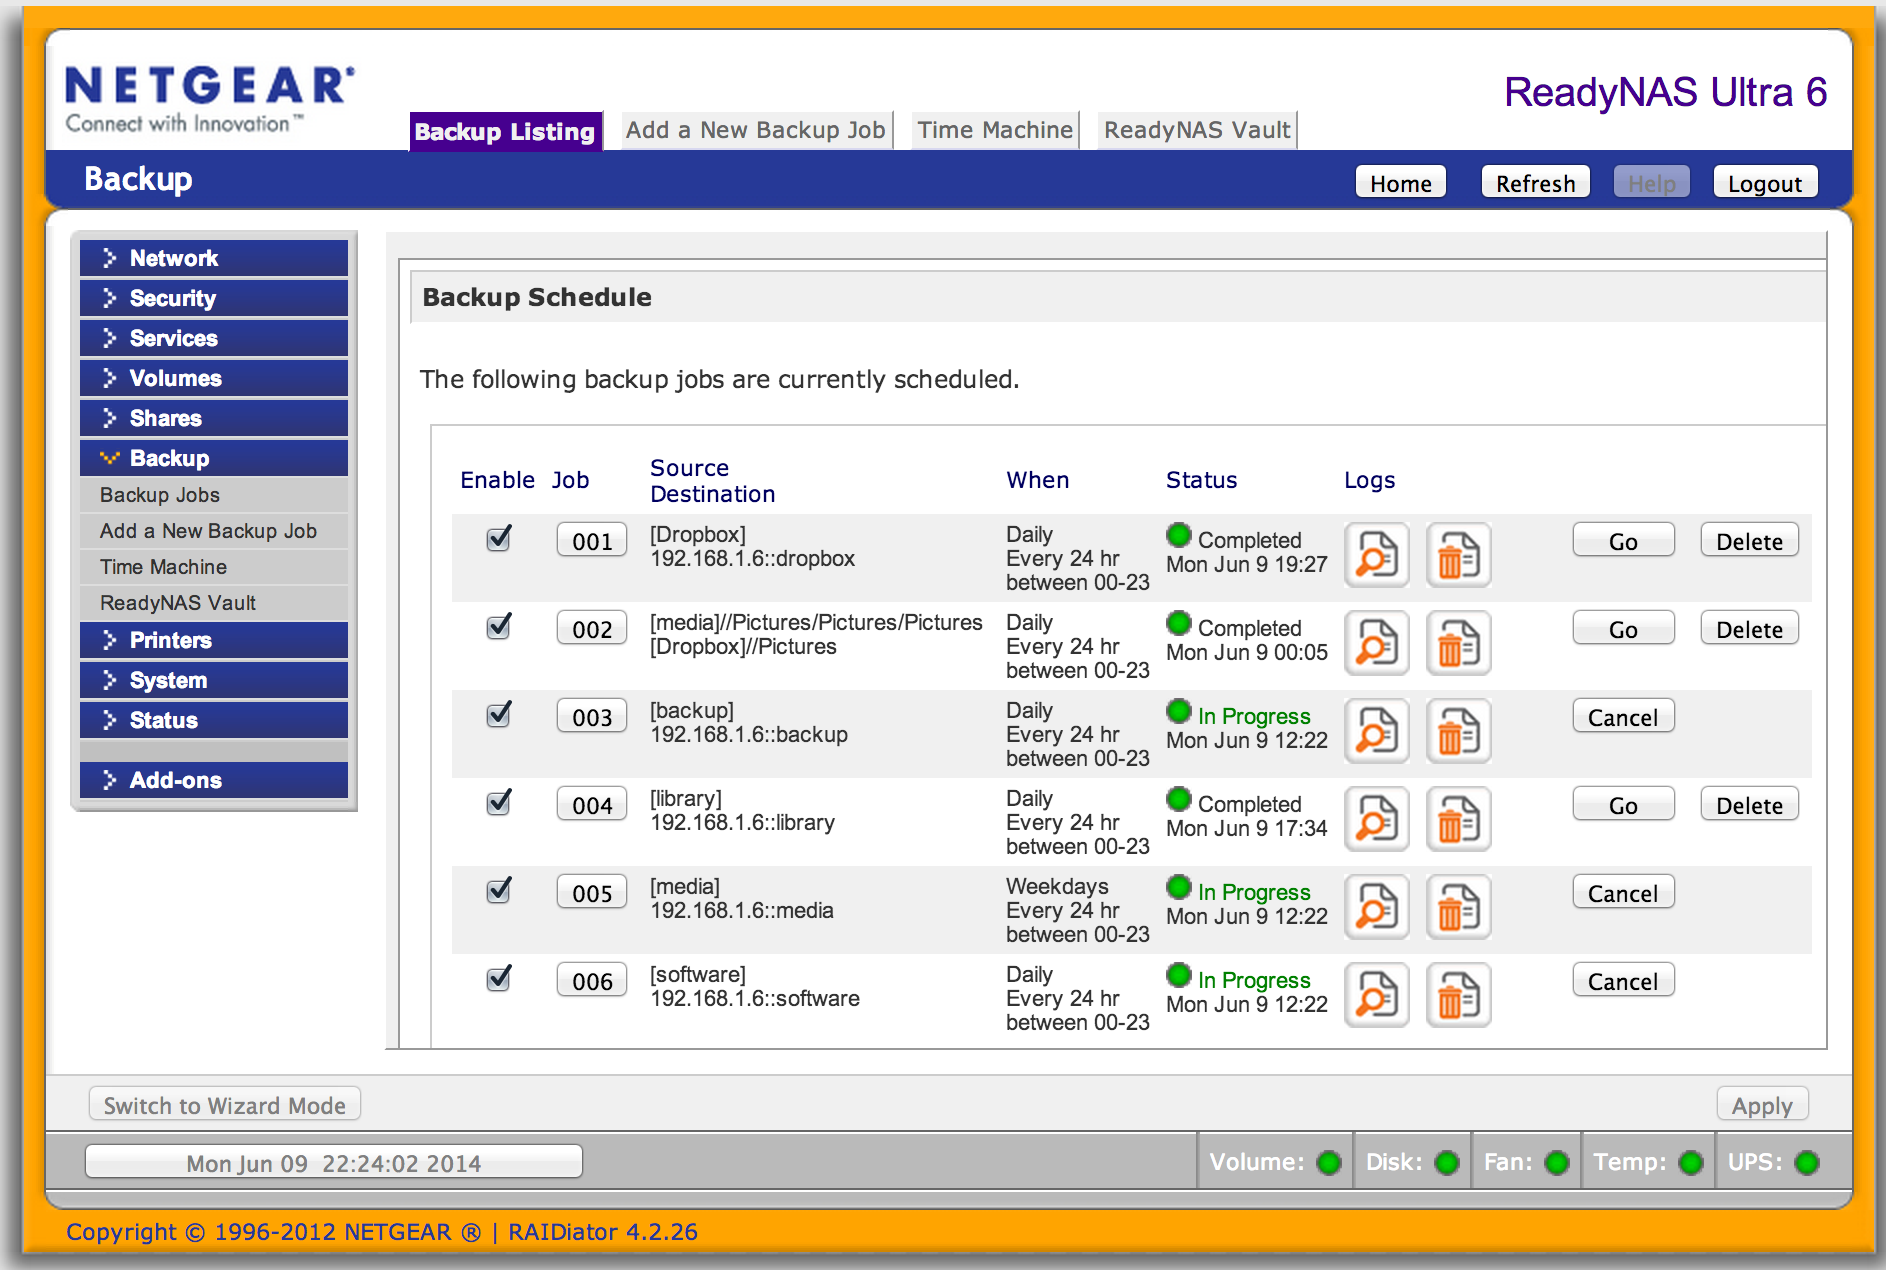
Any number of backup jobs can be created, tracked and managed from the Backup Listing tab:
So how long did it take to rsync 4TB at these horrible speeds? [drumroll] 96 hours! Yikes! Now thats terrible. Luckily though the full backup only occurs once and the rate of change of this data is tiny, so the differentials should (hopefully!) complete within their daily backup window. Off to troubleshoot the network performance!
