
Anyone who has built a serious home lab knows it is a really unique challenge. Bang for the buck is always a tough thing to solve for, but in the consumer space, be it gaming, home theater or what have you, it is certainly possible; particularly if you set some trade-off driven constraints (ie: limit to 1080p). Labs, by definition, resist this balance. In professional computing cost is an important dimension, but rarely primary and always relative. Take virtualization as an example. To be efficient, a host requires core density and memory density and high network bandwidth and high storage IO. Easy right? Very difficult to produce a cost effective solution that can be efficient at scale in a lab. And unlike the consumer cases, the trade-off driven constraint can really neutralize the value. 1080p is arguably a perfectly fine experience compared to 4k. Similarly 50fps can be certainly acceptable vs 80fps. In virtualization, the ability to run 20 VMs in a performant manner is a massive difference in terms of what the lab can be used to model than being only able to run 5. All of that said, the web is rife with “whitebox on the cheap!!!” entries and each brings really valuable lessons learned in part selection and creative configuration. One of my favorite examples is utilizing micro-PC devices (Intel NUC, Mac Mini, Gigabyte Brix, etc) as ESXi hosts.
For this build, I did consider a stack of NUC’s. They’re small, silent and as of the Haswell era i7 units, reasonably powerful. They also bring some limits. No expandability means a single gigabit NIC is all you get if you’re doing ESXi (VMware doesn’t support either WiFi or USB adapters except via DirectPath to a VM). A single mSATA slot means local DAS is limited so if you’re looking at modeling HA/DRS you’re going to need an iSCSI device. In my case I do have the faithful soldier ReadyNAS Ultra so this was a viable option, but if you don’t have a NAS this becomes added cost. Cost is, of course, also a critical dimension and the NUC approach is actually not that inexpensive. For a quad core i7 model you’re looking at $600 or so plus RAM. This approach is certainly a contender, but as the title hints, for this round I went a different path.
One thing I loved about the Dell T620 is that a single strong box allows you to simulate all sorts of interesting scenarios via nested virtualization. This excellent “oldie but a goodie” entry from Duncan Epping covers the topic perfectly. In a nutshell with nested builds you are installing a hypervisor OS onto your physical hardware, then installing a hypervisor OS into the guest VMs that you deploy. Any workload VMs (Linux, Windows, etc) then get installed onto that hypervisor (queue Inception theme). The beauty of this type of setup is it unlocks all sorts of potential for modeling complexity since everything above that first hypervisor becomes virtual. Paired with a VLAN aware physical switch and NIC you could easily simulate multiple datacenters by creating separate port groups for each VLAN in the base virtual switch and then attaching a nested ESXi guest VM per virtual switch (hint – this is what we’ll be doing in the next entry). The downside to this, of course, is that it requires a fairly muscular host. Tricky to do “on the cheap”; hence the air quotes!
So part selection was definitely tricky on this one. I also made it worse by choosing to pursue some exotic and unnecessary scenarios as well as trying to stay as “enterprisey” (is that word?) as possible. There is a method to the madness, but methods of madness are certainly not universal. For each component I will talk through why I selected it and present the cost to do with as you see fit in your own lab builds. So with no further ado I give you, “the build”:
COMPUTE
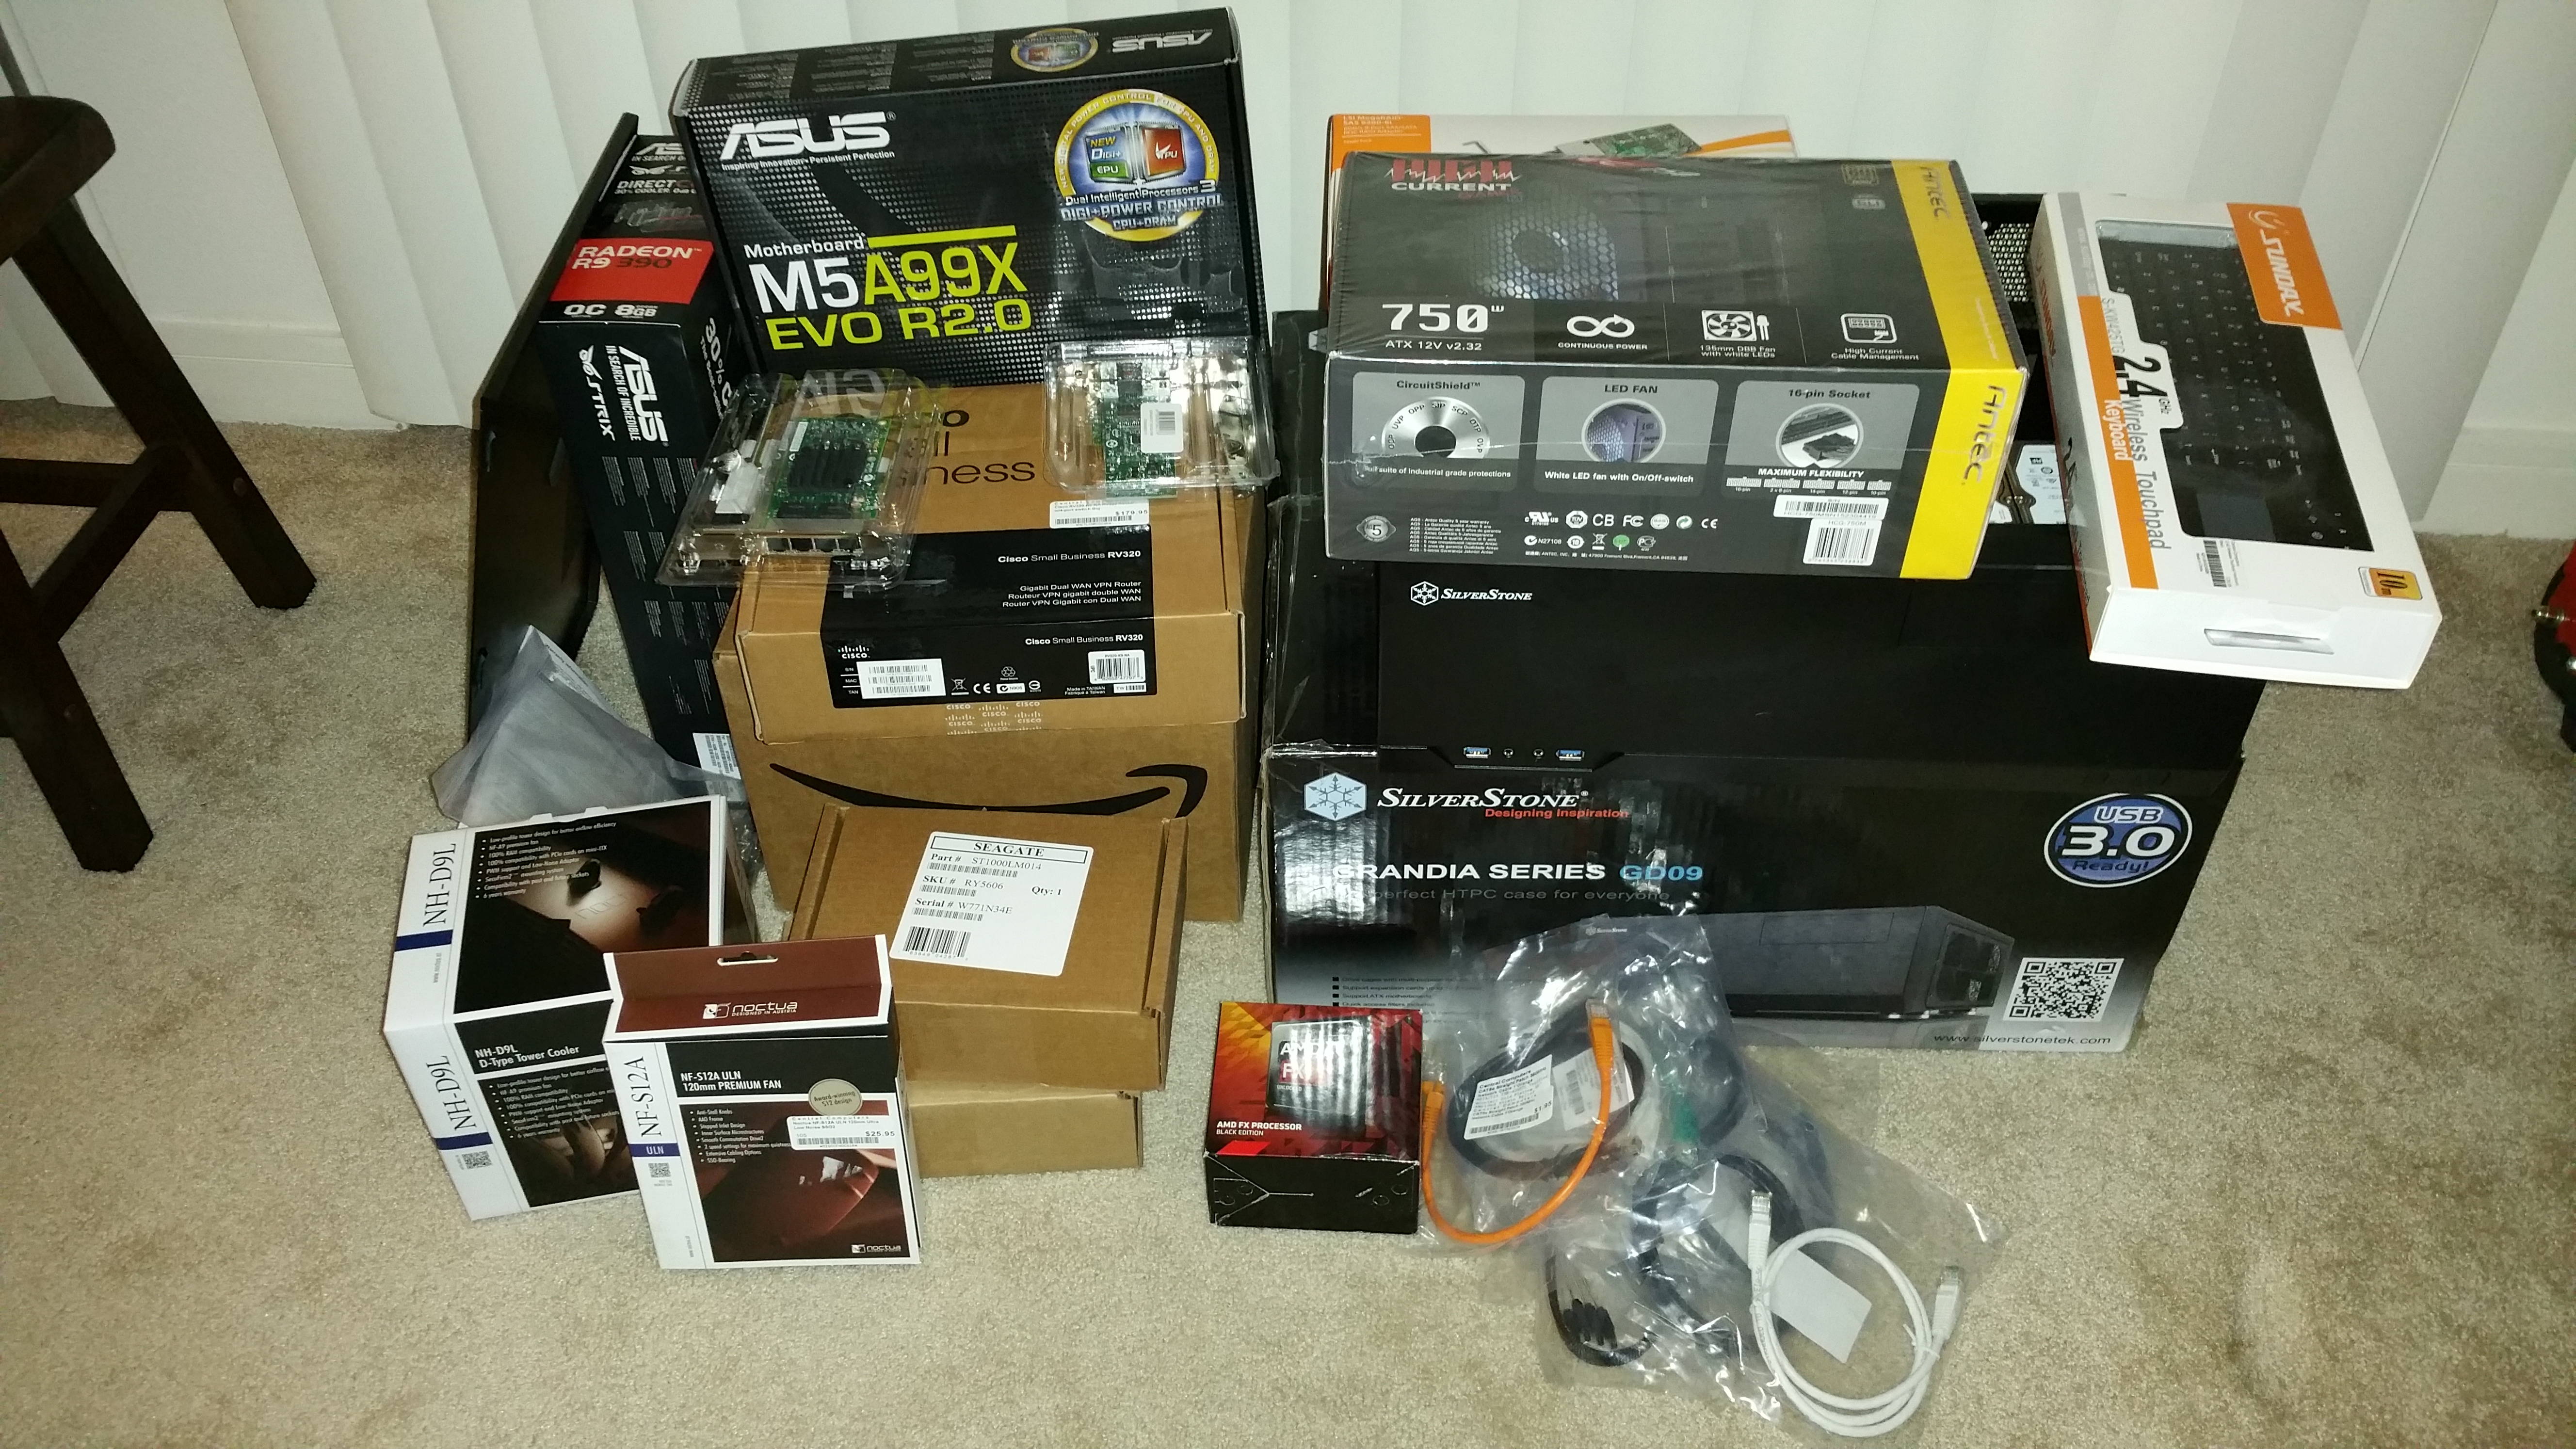
- CPU: AMD FX-8370 Black Edition – $199 @ Amazon – I’m going to admit right off the bat that this one was a tough call. On the one hand, AMD has been getting brutalized in the IPC department without a doubt and has also been stagnating. Current architecture is still 32nm and years old as well as power hungry with the 8370 weighing in at a horrible 125W (vs as low as 55W for 8 core Xeon parts). In addition, the AMD only concept of CMT (clustered multi-threading) is a bit controversial. While not as clearly a software trick as Intel SMT (simultaneous multi-threading) it is a marketing fudge given the amount of front and back-end component sharing between “modules” within each core and between cores. In a nutshell, each AMD core has two modules which share front-end resources. So an 8 core part is 4 cores / 8 modules. In addition, a FPU is paired per core. So two modules share 1 FPU as well. So why buy this thing? Well at the end of the day, virtualization is a workload that loves threading. And the AMD parts are 8 “core” parts from a hypervisor perspective is more “real” than what you get with hyperthreading a 4 core Intel part. Don’t forget that hyperthreading is just a method of keeping idle units busy when possible by allowing new instructions to be dispatched and issued. And of course the cost benefit is massive. $199 for an 8 core part running at 4.3Ghz is a great deal. For $200 you’re talking i5 territory. And last but not least (indeed probably first) is that AMD-V (unlike Intel VT) is present across all AMD CPUs and chipsets. Whereas with Intel you often find glaring gaps (especially VT-D) once you drop below the Xeon or enthusiast lines, with AMD you get the full suite of hardware virtualization support (including IOMMU). Plus having built and bought exclusively Intel for a decade (my last AMD was the FX-60) I just really wanted to throw them some business!
- Motherboard: Asus M5A99FX Pro R2 – $115 @ Central Computers – Yes I know I could have found this cheaper online, but I like supporting local stores and Central is just a great place to browse. We can’t lament the loss of “mom and pop” shops and then refuse to buy at anything above rock bottom. It took a while for me to understand what’s going on with the AMD chipsets, and even longer to wrap my head around how much they’ve lagged behind Intel (woah, is that a PCI slot?!), but once it was sorted the 990FX became the clear choice. I needed decent PCI-E 2.0 lane count and 4 DIMM slots, plus of course AM3+ high wattage socket support. I wanted to stick with mATX originally, but once I discovered I had sufficient room for an HTPC chassis, ATX became acceptable. The Asus is nice, if no frills.
- RAM: Crucial Ballistix Sport 32GB PC1866 (4 x 8GB) – $162 @ Amazon – With 8 cores to feed in a nested setup, but wanting to maintain decent performance, 20 VMs is probably a realistic upper limit. 8GB RAM per pCPU (for a total of 64GB) would have been ideal, but in the interest of the cost part of the cost/value equation, I decided to stick with a 32GB kit. The Asus 990FX boards technically cap at 32GB, so while going to 64GB via 16GB DIMMs would almost certainly work, it isn’t on the QVL which would have meant choosing one of the boards that do list 4 x 16 (currently Asrock who I don’t love).
- Case: Silverstone Grandia GD09B – $70 @ Frys – as mentioned in the first entry, after some deliberation and space analysis I settled on the HTPC form factor in general and the Grandia in particular. It provided a nice balance of size, cost and feature set. I was able to cram 7 drives into it as well as an ATX motherboard and the expansion cards. The fit and finish is decent and, while not sexy, it’s also not an eye sore.
- GPU: Asus STRIX R9 390 8GB Direct CU III Cooling – $345 @ Frys – for this build I plan to use DirectPath and attempt GPU work inside of a VM. I wanted something powerful enough that this is plausible, but still workable inside an HTPC build. So why in the heck did I go AMD? Honestly it was a tough call, but in the end OCD won out! In an AMD build I feel an AMD GPU is right. The gaming rig already has a GTX980Ti, and this system will be a server test bed, so there is no loss in going AMD. I selected the R9-390 for a balance of power and cost efficiency and the Asus STRIX for the (supposedly) superior cooling and reduced power. The car is enormous though!
- CPU Cooler: Noctua NH-D9L – $60 @ Central Computers – From what I’ve seen and heard online the 120mm closed loop water systems won’t fit in the Grandia. This is too bad because I’m not at all a fan of air coolers. It takes a massive one to do the job and there isn’t a lot of room in here. After looking at the available room (135mm height, roughly 150mm width) and thermal requirements the NH-D9L seemed like a safe bet. I’m not 100% sure it will fit, but we’ll see!
- Case Fan: Noctua NFS12-A ULN – $25 @ Central Computers – Noctua fans are great so this was a no brainer. Basic 120mm high quality case fan.
- KB/Mouse: Sunday 2.4Ghz wireless mini KB/mouse combo – $20 @ Central Computers – el cheapo wireless KB/mouse combo. Interesting note is it also works with the PS4.
NETWORK
- Router: Cisco Small Business RV320 – $180 @ Central Computers – for the nested build I want to produce to separate VLANs to simulate two data centers and have this flow down to the physical network. I didn’t have an L3 switch on hand, and don’t want to use a VM to route (I like to have actual physical segments for the option of testing physical devices also). The RV320 is a nice unit at a reasonable price that supports inter-VLAN routing as well as the full range of VPN concentrator functionality. More on this bit in the network entry.
- Switch: Cisco SLM2008 – $150 – the SLM2008 is a solid 802.1Q aware smart switch that I already had on hand. I’ll diagram out the network in the network entry, but basically I plan to split the 8 ports into two VLANs and uplink them to the RV320.
- NIC: Intel Gigabit CT PCI-E Network Adapter EXPI9301CTBLK – $26 @ Amazon – I wanted to make sure I had at least one “it just works” port for the ESXi install. It’s impossible to beat the single port Intel NICs for compatibility and at $26 this is a great insurance policy against the embedded Realtek NIC on the 990FX.
- NIC: Intel E1G44HTBLK Quad Port – $250 @ Central Computers – For nested testing having lots of physical ports is a nice luxury and simulates a real server environment. The Intel quad port is a bit pricey, but it brings a boatload of horsepower and great compatibility.
STORAGE
- HDD: ST1000LM014 x 6 – $462 @ Amazon – also as mentioned in the first entry, I decided to go with laptop hybrid drives for the main array. These little guys were $77 each at Amazon and, while not amazing drives by any stretch of the imagination, are quite interesting. Six of them gives you a solid 3TB RAID 10, they run very quiet . Of course an SSD is silent, but the ST1000LM014 runs at roughly 22db. Figuring out what 6 of them put into the room noise wise is an interesting exercise converting sound pressure to decibels and back. Let’s do it!
10 Pa * 10^(XdB/10dB) = Y Pa pressure
10 Pa * 10^(22dB/10dB) = 1585 Pa * 6 drives = 9509 Pa
log (9509 Pa / 10 Pa)*10 dB = 26.77 dB
So six of these guys is 26.77 dB. For comparison, the stock fan in the Silverstone Grandia GD09 case is 18dB. Power wise each drive idles at .5W and averages 2.7W in read/write operations. Roughly the same as an SSD.
- SSD: Sandisk Extreme Pro 240GB – $130 – I decided to repurpose an SSD I had on hand. Current going rate for this drive is about $130 though, so we’ll count it in this build since I think having a small boot SSD for ESXi is a good idea and would have bought one had I not had one on hand. This boot volume can also serve as the SSD cache for View (if doing VDI testing)
- HBA: LSI Logic MegaRAID SAS LSI9260-8i – $489 @ Central Computers – now we’re talking! This is where the “on the cheap” concept goes off the rails. The MegaRAID LSI9260-8i is a bit of a beast. 2 internal mini SAS ports gives you up to 8 SATA devices via a SAS to SATA 1 to 4 cable without using any SAS expanders (expanders are similar to a USB hub, but for SAS) with 512MB of DDR2 cache in a PCI-E 2.0 x8 package. So why bother? Well honestly the RAID support in the 990FX chipset is pretty mediocre. Also, in an actual server environment, like running 20 VMs concurrently, an actual server part starts to bring value. Production enterprise implementations will utilize either iSCSI over 10Gb/s or SAN attached via fiber channel typically. Home setups aren’t going to come near the performance of enterprise midrange NAS or even a low end FC SAN, and 10Gb/s is still a stretch cost wise for a home lab. This leaves DAS as a viable option. Particularly in a “one box” nested setup. At $500, a RAID controller like the LSI is a great deal. It gives an approximation of true enterprise RAID card capabilities at a semi reasonable cost. We’ll see how this card does in benchmarks in a future entry, but it’s a given that it will decimate the 950 Southbridges embedded software RAID. Especially with a 6 drive setup.
FINAL BUILD NOTES
TOTAL COST: $2,683 – What what WHAT?! Yeah, not so cheap at nearly 3 grand. That said, take a look at what we’re working with here… 8 4+Ghz cores, 32GB fast RAM, a powerful compute capable GPU, 6TB of cache backed hardware RAID and an SSD to boot (no pun) and server class networking. This is actually a powerful enough setup to run production for a small business (admittedly it is lacking hardware fault tolerance). And the cost includes a very capable network to attach it to complete with hardware routed VLANs.
This entry came in longer than I expected so we’ll wrap for now. Stay tuned next entry as we start to install the bits!
