
State of the NAS at ComplaintsHQ
Well I should have known, but the TS-451+ (which replaced the beloved ReadyNAS Ultra 6 in what was a very tricky decision) full of 8TB drives really did seem like “plenty of space”. Of course these famous last words are as old as computer science, but there you have it. Setup as a RAID5, no spares, the 451 provides 20TB of usable space (equivalent of 1 disk worth of space lost to parity, the rest lost to translation and file system overhead). 20TB really should be enough for any reasonable person, but let it never be said that ComplaintsHQ is reasonable! With space utilization inching towards 80%, it was time for action!
Expansion Ho!
First stop, the low hanging fruit if you will, was this beauty:

Behold the Western Digital MyBook Duo 16TB disk array! Really a handy little unit, you get 2 8TB WD Red drives in a USB C attached RAID chassis (offering 0 and 1). The TS-451+, while lacking USB C, does have a handy 5Gb/s USB 3 port, so it was a fairly easy step to evolve to this:

Here we see the TS-451+ nestled comfortable next to the WD MyBook 16. The QNAP UI makes managing external storage pretty easy. The WD ships in RAID 0 mode which is too high risk so the first step is to switch it over to RAID 1. This is pretty easy as well, but requires using either the OSX or Windows utility:

Luckily the WD presents it’s volume as a single drive over USB (or multiple if JBOD) and the QNAP sees it as such, so RAID protection provided by the WD is transparent. To take advantage of exFAT, the QNAP requires a premium license. More detail on that can be found here. The TL;DR is that it costs $3.99 to be able to read exFAT. NTFS of course works fine as well and, while less efficient, is free and the QNAP has full native support for it.
Expanding Plex
On the Plex side, taking advantage of the new space requires adding the volume as a new storage path in the library settings and then redirecting any workflow automation (Couchpotato/Sickbeard, NZBGet, etc) to the new volume in some way that makes sense. External volumes are found at /share/external/DEVxxxx. Moving files from the main RAID group to the external volume is much more efficient from the Linux command line, so best to SSH in to balance storage.
The MyBook 16 in RAID 1 offering up 7.2TB usable. This isn’t bad, but dealing with multiple volumes is a bit of an administrative pain. It’s also as far as you can go on the TS-451+ since there is only a single USB 3 port (on the back panel at least). OCD eventually kicked in, so as the external space started filling up, it was time to look for something bigger.
Enter the OctoNAS!

QNAP has a pretty hard break in their lineup between SOHO/prosumer and SMB if you want to keep the price below $1000 and need x86. Basically you’re looking at the 8 bay TS-853a. Unfortunately as upgrades go it’s something less than a slam dunk vs the 451+. You get more bays, USB, HDMI and Ethernet ports, which is all good, but these are still SATA 3, USB 3, HDMI 1.4 and 1000BaseT, which is less good. RAM upgradability stays at an unofficial 16GB, so a wash there. On the positive side the chassis is a nice metal finish and there is a tiny LCD screen. Again, not huge. It’s the CPU that presents the real conundrum though.
The 451+ is based on the older low power desktop/NUC CPU the quad core Bay Trail Celeron J1900@2Ghz with 2.42Ghz burst. The 853a uses the newer mobile Braswell Celeron N3160@1.6Ghz with 2.24Ghz burst. The J1900 is actually a bit quicker in synthetics since the IPC improvements on Braswell aren’t quite enough to make up for the clock deficit. This sucks. Both CPUs also support QuickSync, but here the Braswell scores a significant victory due to far superior performance of it’s IGP. Since Plex supports QuickSync for hardware transcoding this is a solid advantage for the Braswell. Overall synthetics are close enough for general work, and the transcoding advantage helps in one of the areas where these low power CPUs are seriously deficient, so the 853a gets the (admittedly very slim and highly qualified) nod.
So how did the actual migration go? Let’s have a look at the process and then at the good and the less good…
Migrating
So the physical process is pretty easy:
- Shutdown old NAS (after making sure array is clean and healthy)
- Open the old NAS, remove RAM
- Open the new NAS, install RAM
- Remove drives, 1 by 1 from the NAS and from their trays
- Install drives 1 by 1, in order, into the powered off 853a
The logical process is, in theory, easy as well:
- Power on new NAS
- Pray
- Update firmware
- Profit
Of course nothing is that easy right? Right…
What Is Good
TL;DR
- It did work – RAM moved over, drives moved over
- No data loss
- Firmware upgrade smooth
The array was definitely preserved in moving the drives over and since the trays are hotswap and nearly identical, the move was very easy. The two 8GM DDR3 1333 LDIMMs worked as well in the 853a as they did in the 451+. Of course the N3160 technically can handle DDR3 1600, memory bandwidth isn’t exactly a bottleneck here. On power-up, once the network issues were sorted (see below) a firmware update was prompted (and required to catch the new unit up with the old one – firmware ages out while gear sits on shelves) and went off without a hitch but unfortunately did not fully complete as normal (more below).
What Isn’t Good
TL;DR
- NIC teams broken
- IP config lost (prob due to above)
- Post firmware update reboot
- Needs a RAID sync (endless)
- Virtualization Station issues
- QPython needs reinstall
- QManager not working
Right off the bat, the NAS became unavailable after swapping in the disks and powering up. A quick check on the front panel LCD (forgot how handy that thing can be) showed 4 interfaces, each with a DHCP assigned address. The old config had a NIC team on eth0 and eth1 which was clearly not preserved. Not a huge hardship, but it also left the virtual switch in an odd state (more on that later).
Connecting to one of the interfaces via DHCP, the system immediately prompts for a firmware update. This is a required step and worked as expected. On completion, however, the system prompted reboot never fired off. The system got stuck in the “system is shutting down” state in the LCD, but the web UI would still respond and the system never rebooted. After 20 minutes of this a hard power cycle “solved” the issue (subsequent reboots did work).
This either caused a RAID resync to fire, or one would have been required anyhow due to migrating the disks to the new chassis. Either way, before doing anything further, the resync had to complete. This is pretty painful and took 9 hours for the 20TB array.
With the network configuration changed, the virtual switch lost it’s physical adapter mapping leaving any attached VMs without connectivity. Luckily trunking the NICs again and updating the virtual switch config did the trick here.
The Python issue was much trickier and resulted in SickBeard breaking. Python on the QNAP is pretty complicated. There are a few paths and symlinks to consider before even getting to versions and installs. First, the symlinks:
- /usr/bin/python2.7 ->symlink to /share/CACHEDEV1_DATA/.qpkg/Python
- /mnt/ext/opt/Python/bin/python -> symlink to /mnt/ext/opt/Python/bin/python2
- /mnt/ext/opt/Python/bin/python2 -> symlink to /mnt/ext/opt/Python/bin/python2.7
Now for the install paths:
- /mnt/ext/opt/Python/bin/python/python2.7 -> Python 2.7.5 possibly installed as part of the base OS? Not sure
- /share/CACHEDEV1_DATA/.qpkg/QPython2/bin/python2.7 -> install path for QPython (needed to get 2.7.14)
- /share/CACHEDEV1_DATA/.qpkg/Python/ -> install path for official Python package (currently 2.7.12)
Somehow the above mess was apparently working on the TS-451+ and was the result of installing Python from the App Store and QPython via sideloaded qpkg. The cleanest, safest, thing to do is to basically point all of the symlinks at the QPython install, then make sure to keep that fresh outside of the app store, but to keep the official Python package installed since many other packages do dependency checking against that one.
If the Python situation was weird, the SickBeard situation was straight up surreal. In investigating SickBeard failure to start, it seems like the Python import for xml.etree.ElementTree somehow has a typo and names the library as xml.etree.cElementTree across a number of SickBeard python modules (generic.py, helpers.py, plex.py). It was also determined that Git was no longer working, and was suffering a similar config issue as Python (detailed above). Fixing the symlinks to point to the correct version of Git corrected the problem. Once Git was working, the SickBeard startup script auto-update started working again as well. This meant that any manual edits to the afflicted .py files would be overwritten by the startup repo sync. A very brute force approach was taken to solving this, adding a section to the SickBeard init script to overwrite the .py files with corrected ones after the pull, but before service initialization. This did the trick and along with the Python fix, allowed everything to start up as expected. Why this happened though remains a mystery.
Expanding
With the NAS back up to roughly normal operating state, it was time to expand the array! Of course while it would be a nice luxury to leave the MyBook Duo 16 alone as a “just in case”, realistically 8TB Reds still ain’t cheap, so they needed to move over.
In the past surgery has been performed on MyBook single drive units to extract the beautiful WD Red contents nestled warmly inside. To say this surgery doesn’t go so well is an understatement. Most of the time, mangling and essentially annihilating the old casing is required to extract the goodness.
We are happy to report that the MyBook Duo is the exact opposite experience. It really could not be easier to deal with. Just get a thin flathead screw driver and gently insert it under the top lid (there is space) at the center of each side and pop up. The lid will pop off once the clips detach greeting you with this lovely sight:

From there, drive removal is tooless. This was a fantastic bonus because it allows you to completely preserve the fantastic RAID 1 Duo case for reuse with older drives as a backup unit. Awesome stuff!
At that point, moving the drives into the 853a is the same as any drive upgrade. Physically just install them in the trays and pop them in.
Logically, making sure the array is clean (it wont allow it otherwise), you just head into the Storage control panel, select Storage/Snapshots under Storage, highlight the Disk Group, click Manage and select Expand. At that point you will be giving the option of tagging available disks with which to extend the volume: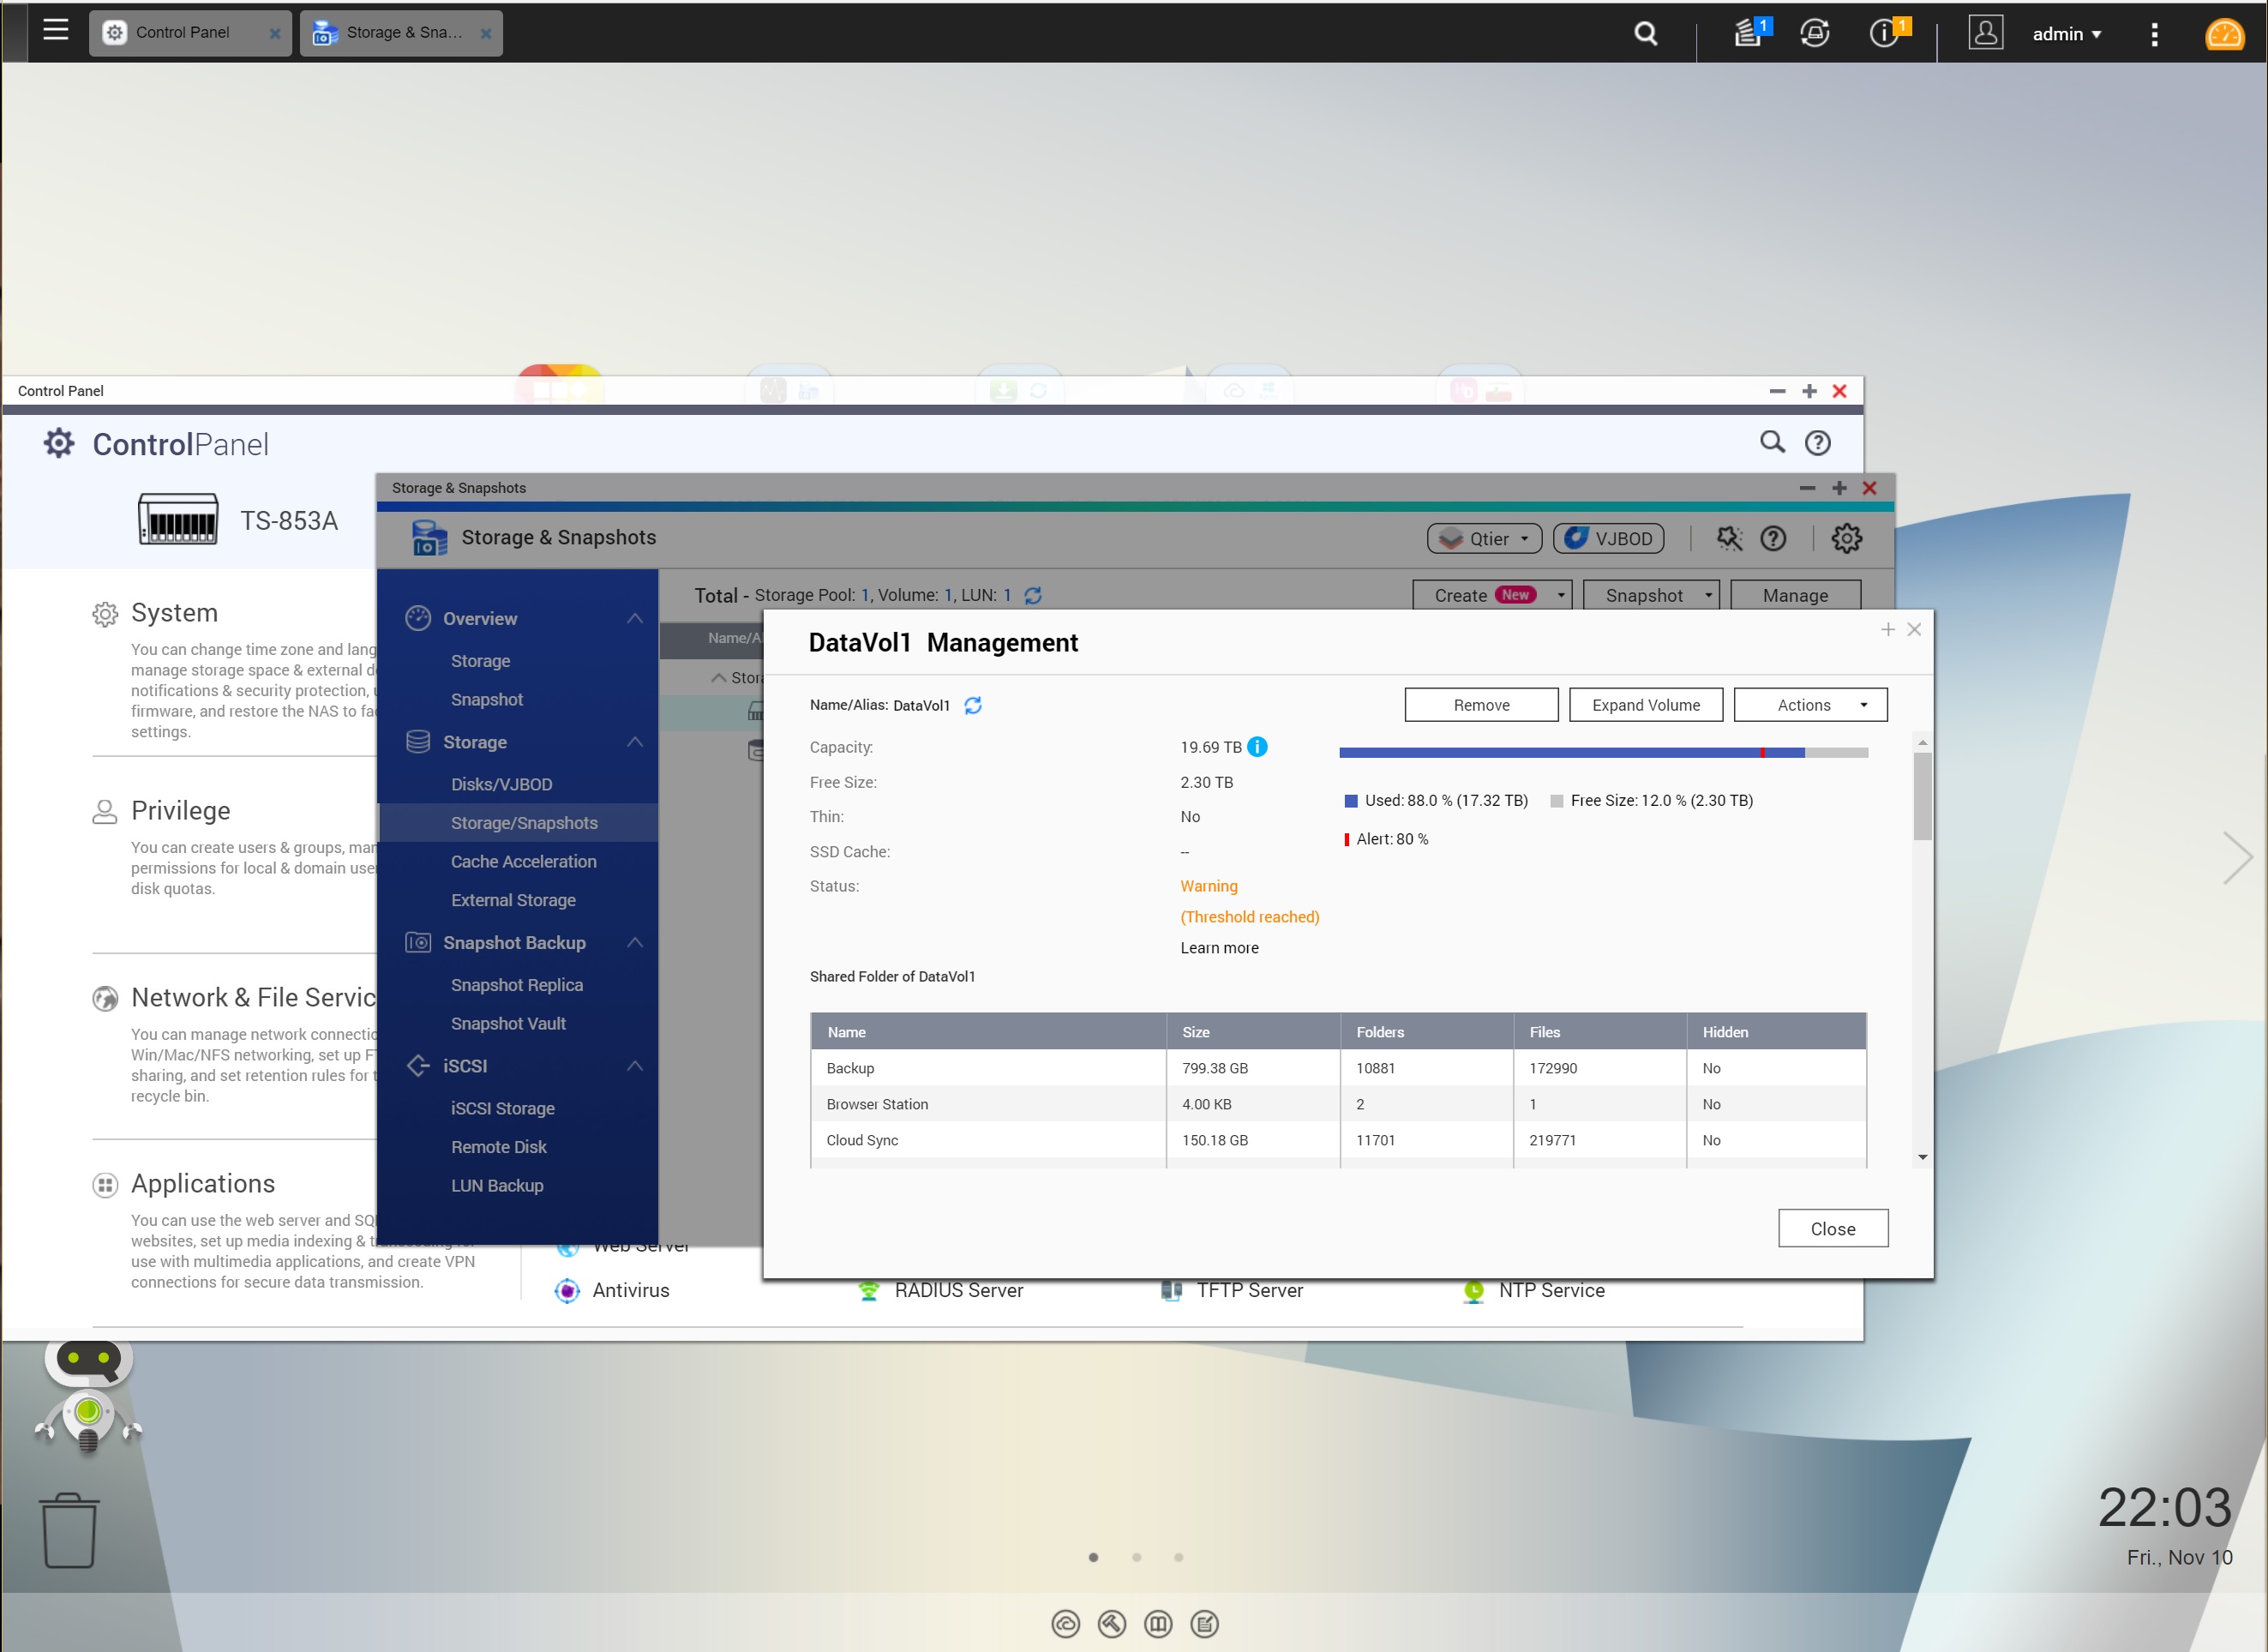
Expanding the volume requires a RAID migration event. In this case the array was doubling in size from 4x8TB to 8x8TB. Migration time was 44 hours with priority given to the migration task (QNAP allows a priority setting for RAID maintenance events vs other system services of low – system services take priority, medium – balance between the two, and high – migration tasks take priority). Large arrays are always difficult to administer from a time management perspective, but it did work without a hitch. Once the pool is expanded the volume can be resized:
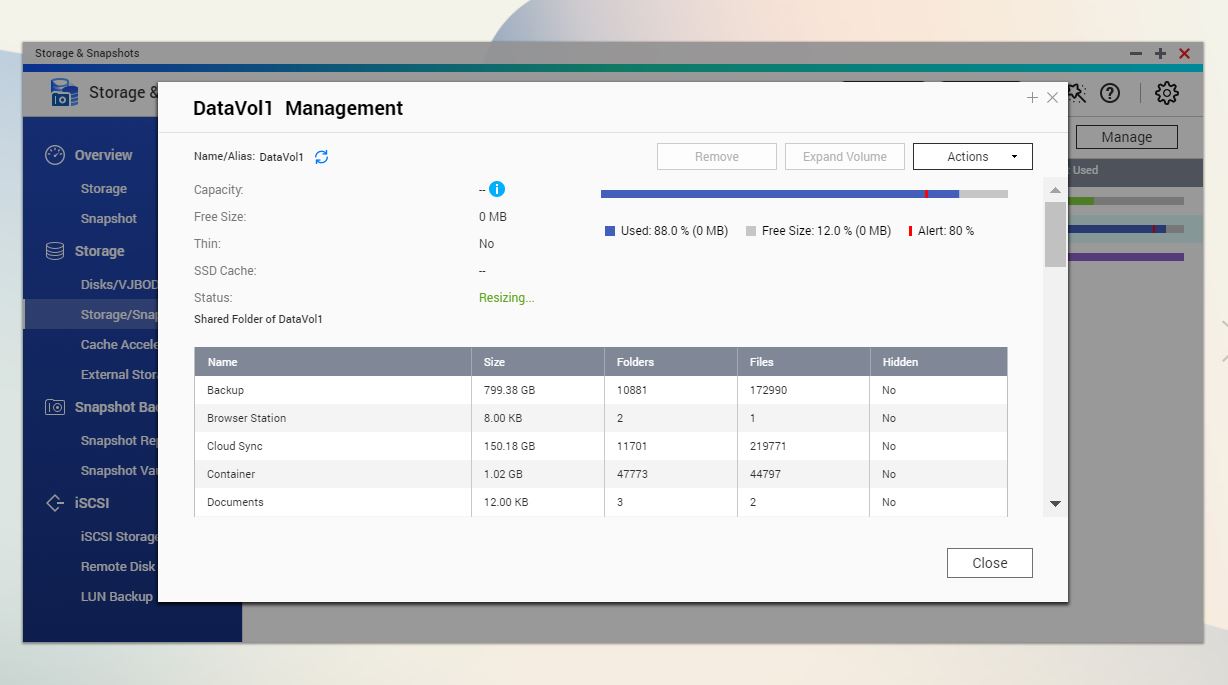
Resizing is intensive as well. Count on another big chunk of time before space is available (roughly 6-8 hours to double the volume). No option for task priority configuration on resize, unfortunately.
